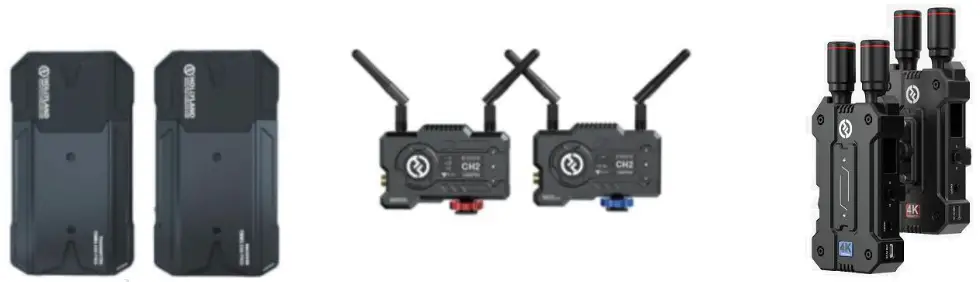
Mars M1 Monitor Transmitter
User Guide
Specifications
| Category | Item | Details |
| Size & Interface | Weight | 380g (without antenna) |
| Size | 152*96*40mm (without antenna) | |
| Interface | DC IN: 2.0mm Power Port DC OUT: 2.0mm Power Port SDI IN: 3G SDI HDMI IN: HDMI 1.4b HDMI OUT: HDMI 1.4b TYPE C: USB 2.0 OTG 3.5mm Headphone Monitor Interface Antenna: SMA Male Port | |
| Wireless Parameters | Frequency | 5.1-5.8 GHz |
| Transmission Power | <21dBm | |
| Frequency Bandwidth | 20MHz | |
| Modulation Mode | 802.11n | |
| Sensitivity | -80dBm | |
| MIMO | 2T2R | |
| Code and Rate | Maximum Data Rate | 12Mbps |
| Video Coding | H.264 | |
| Electrical Performance Parameters | Power Consumption | TX<14W, RX<10W (1 to 2) TX<10.5W, RX<9W (1 to 1) |
| Supply Voltage Range | 6~16V | |
| Output Voltage | 8.4V±5% | |
| Duration | About 4 Hours (NP-F970 Battery 7800mAh) | |
| Audio & Video Parameters | Input Video Format | HDMI: 720p 50/59.94/60Hz 1080i 50/59.94/60Hz 1080p 23.98/24/25/29.97/30/50/59.94/60Hz 3840*2160p 23.98/24/25/29.97/30Hz 4096*2160p 23.98/24/25/29.97/30Hz SDI: 720p 50/59.94/60Hz 1080i 50/59.94/60Hz 1080p 23.98/24/25/29.97/30/50/59.94/60Hz |
| Output Video Format | TX HDMI: 720p 50/59.94/60Hz 1080i 50/59.94/60Hz 1080p 23.98/24/25/29.97/30/50/59.94/60Hz 3840*2160p 23.98/24/25/29.97/30Hz 4096*2160p 23.98/24/25/29.97/30Hz RX HDMI: 720p 50/59.94/60Hz 1080i 50/59.94/60Hz 1080p 23.98/24/25/29.97/30/50/59.94/60Hz | |
| Color Depth Mode | 8bit, RGB limit/full, YUV444/422 | |
| Input Audio Format | SDI Embedded 2 channels, HDMI Embedded up to 8 channels | |
| Output Audio Format | HDMI Embedded up to 8 channels | |
| Transmission Parameters | Transmission Data Rate | TX to RX 12Mbps TX to APP 4Mbps |
| Delay | 1080p60: 84ms TX to RX (1 to 1 connection) | |
| Distance | 150m Between TX & RX (LOS) 100m Between TX & APP (LOS) | |
| Reliability Parameters | Working Temperature | -10℃ to 60℃ |
| Storage Temperature | -40℃ to 60℃ | |
| QVC drop test requirement | Reference Standard: GB/T 2423.8-1995 | |
| Vibration Standard | Reference Standard: GB T 2423.10-2008 | |
| ESD Electrostatic | Contact Discharge±6KV, Air Discharge±8KV |
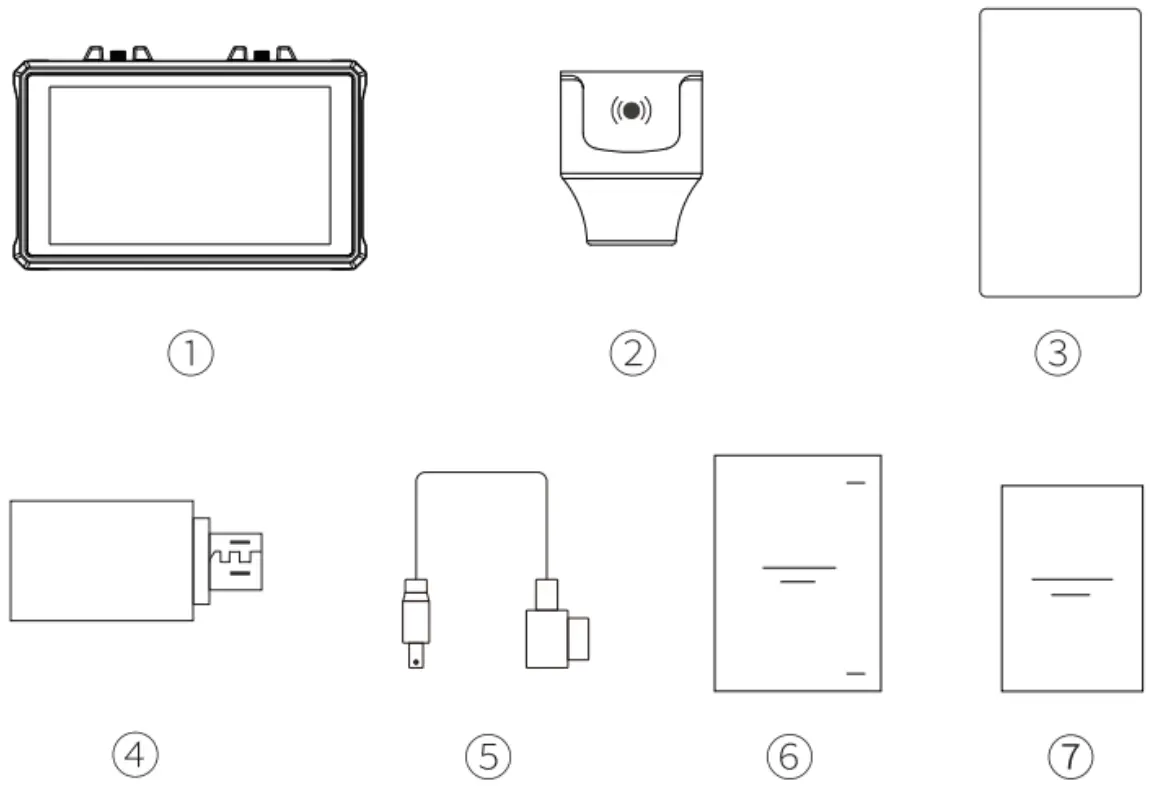
Packing List
| Name | Num |
| 1. Monitor | *1 |
| 2. Capsule Antenna | *2 |
| 3. Tempered Glass Screen Protector | *1 |
| 4. OTG Adapter | *1 |
| 5. D-Tap to DC Cable | *1 |
| 6. User Manual | *1 |
| 7. Warranty Card | *1 |
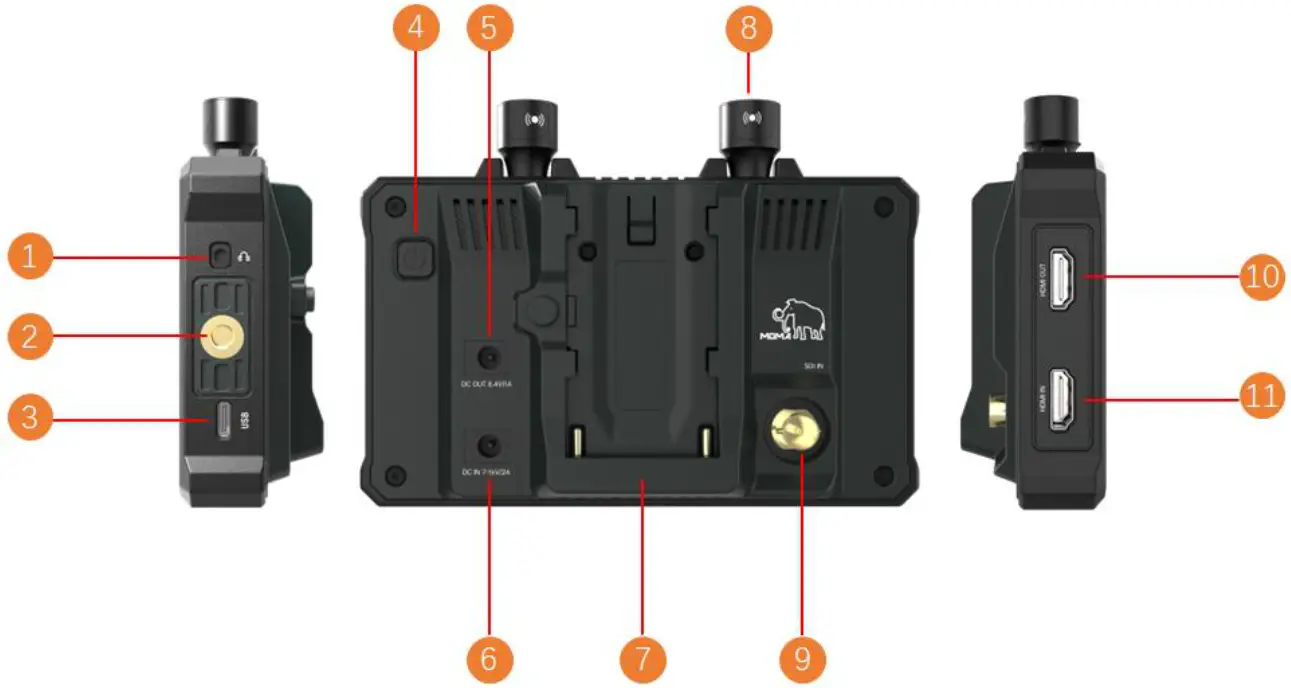
Interface & Keys
| Interface | Function |
| 1. 3.5mm Earphone Interface | Monitor the audio through 3.5mm TRRS earphone |
| 2. 1/4 Screw Hole | Mount horizontally on camera through magic arm |
| 3. USB Interface | USB upgrade, 3D-LUT import |
| 4. Power, Lock Screen Key | Long-press 3s to power ON/OFF; Click to lock/unlock the screen |
| 5. DC OUT | DC OUT 8.3~8.6V/1A |
| 6. DC IN | DC IN, support 6~16V |
| 7. NP-F battery plate | Supports NP-F 970/750/550 battery power supply |
| 8. Antenna | Video transmission antenna 5.1~5.9GHz |
| 9. SDI IN | SDI IN Video Input (Only work in TX mode) |
| 10. HDMI IN | HDMI IN Video Input (Only work in TX mode) |
| 11. HDMI OUT | HDMI OUT Video Output |
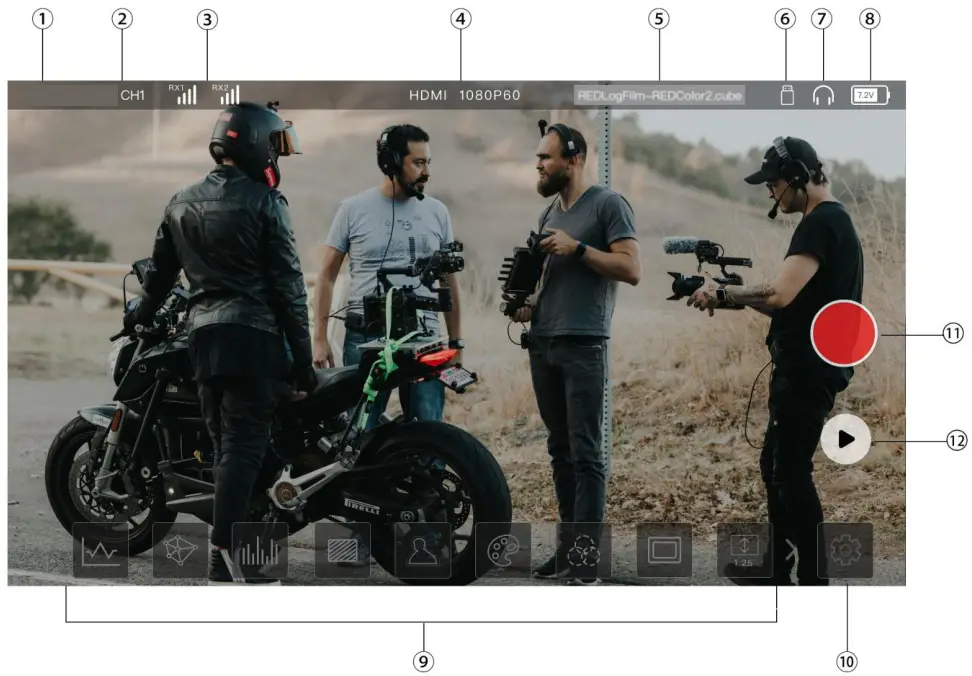
Status Display
| Status | Detail |
| 1. Device Mode | Current mode: 【Transmitter】/【Receiver】 |
| 2. Channel | Mars M1 current channel |
| 3. Connection | RX1/RX2 connection signal |
| 4. Video Input Format | Video Input: Display current video input format No Video Input: Display 【NO VIDEO】 |
| 5. LUT name display | Displays the loaded LUT file name |
| 6. USB Disk icon | Only display when USB disk plug in |
| 7. Earphone icon | Only display when earphone plug in |
| 8. Battery Voltage | 7.0V lower battery warning |
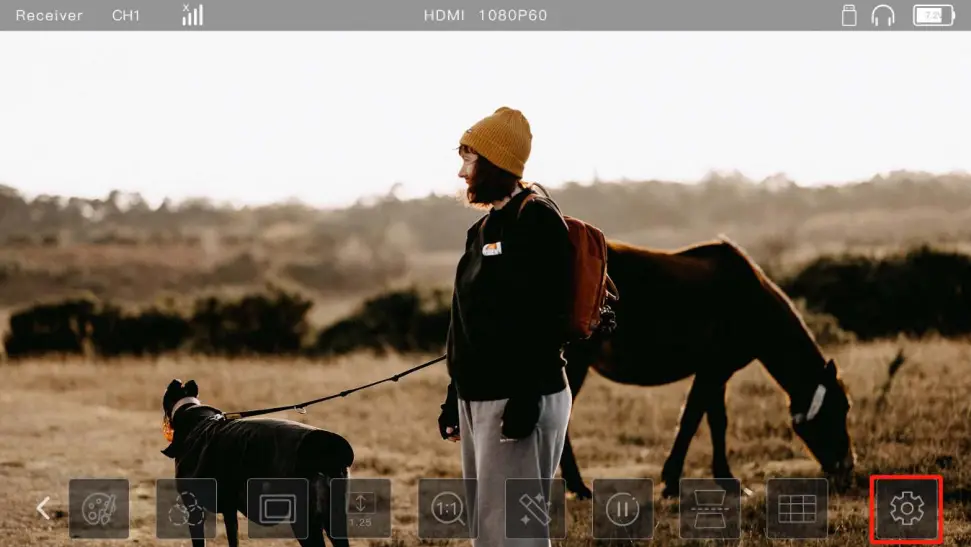
| 9. Image Analysis Options | Monitor corresponding image analysis function |
| 10. Setting | Monitor settings menu button |
| 11. record | Click the button to enter the recording state |
| 12. Playback | Click the button to enter the interface of the previous recording video |
Setting
Tip: Click 【Setting】 icon in the bottom right corner to enter the menu
Transmitter Status:
Receiver Status:
Display Settings:
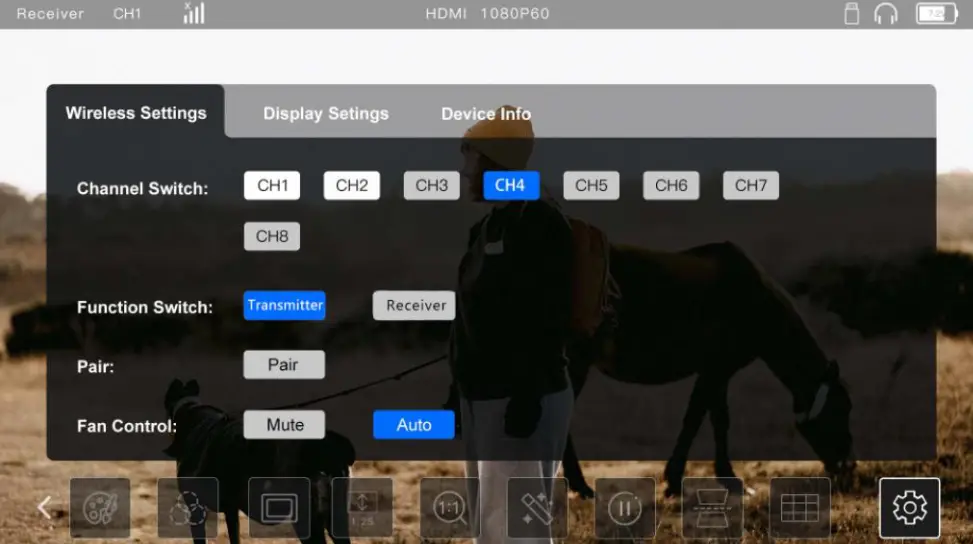
5.1. Channel Switch

Operation: Enter menu 【Wireless Settings】–> 【Channel Switch】 –> Click corresponding 【CH-】 to switch the channel.
Note: The frequency number and frequency band vary by country and region.
(There are 13 frequencies in China, 8 in the United States, 8 in Japan, and 8 in Europe.)
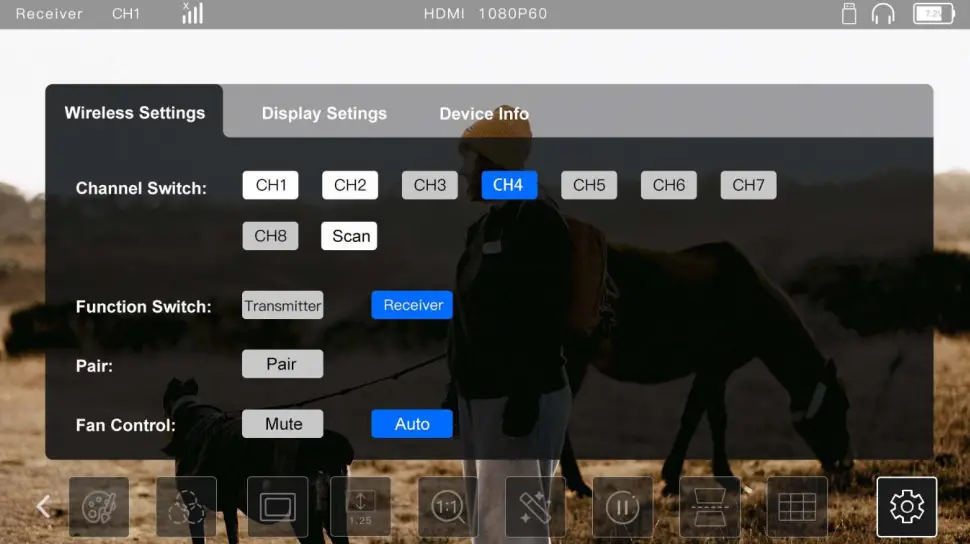
5.2. Function Switch

Operation: Enter menu 【Wireless Settings】–> 【Function Switch】 –> Click 【Transmitter】 or 【Receiver】 to switch TX or RX mode.
5.3. Pair
Operation:
- Mars M1 as a TX/RX to enter the menu【Wireless Settings】–> 【Pair】 –> Click Pair
- RX/TX to enter the pairing mode.
Note: TX and RX need to enter pairing mode at the same time.
5.4. Fan Control

Operation: Enter menu 【Wireless Settings】–> 【Fan Control】 –> Click 【Mute】 or 【Auto】 to change fan working mode.
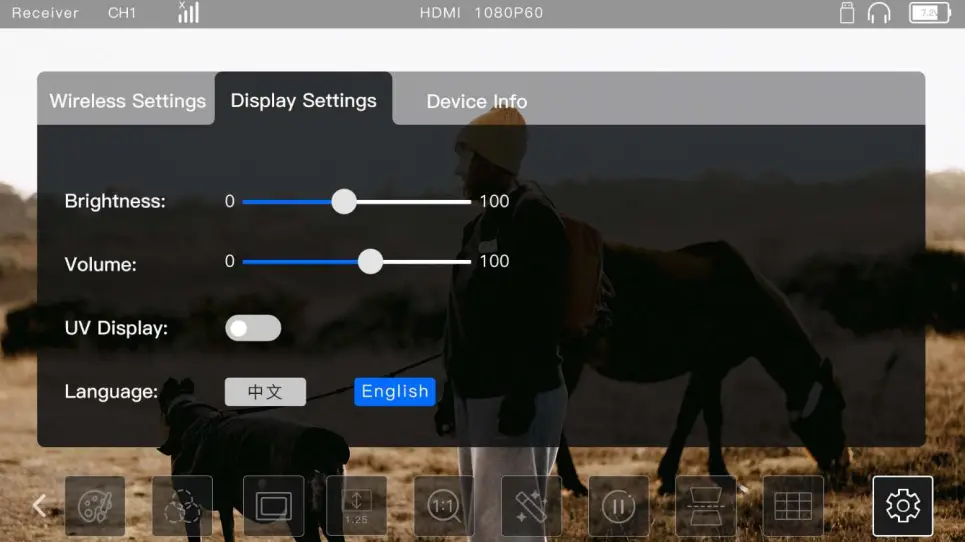
5.5. Brightness

Operation: Enter menu 【Display Settings】–> 【Brightness】 –> Drag the slider to adjust brightness
5.6. Volume

Operation: Enter menu 【Display Settings】–> 【Volume】 –> Drag the slider to adjust the monitoring volume
5.7. UV Display Settings
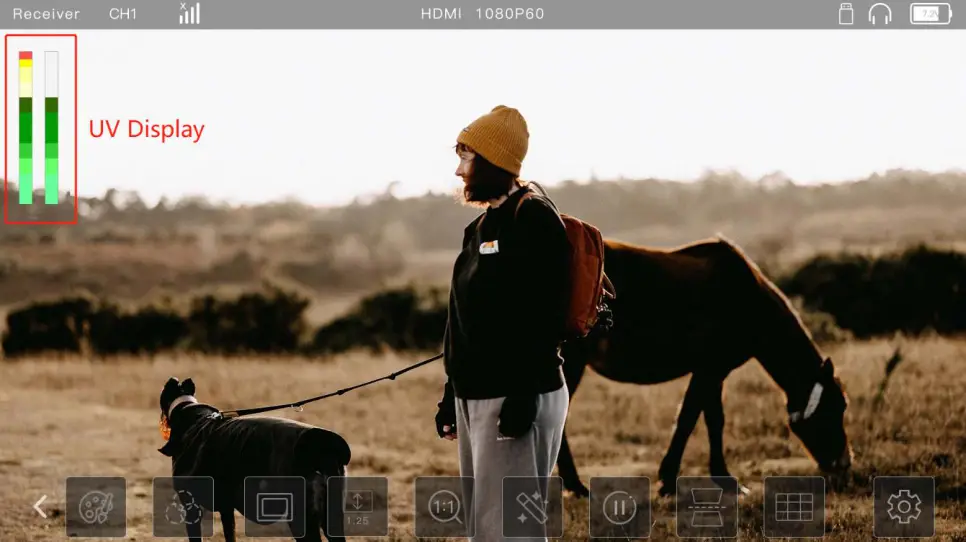
UV Display: Display/Turn off【Audio Level Display】
Operation: Enter menu 【Display Settings】–> 【UV Display】 –> Click to turn ON/OFF
5.8. Language Setting

Operation: Enter menu 【Display Settings】–> 【Language】 –> Click 【中文】 or 【English】to change Language.
Function description
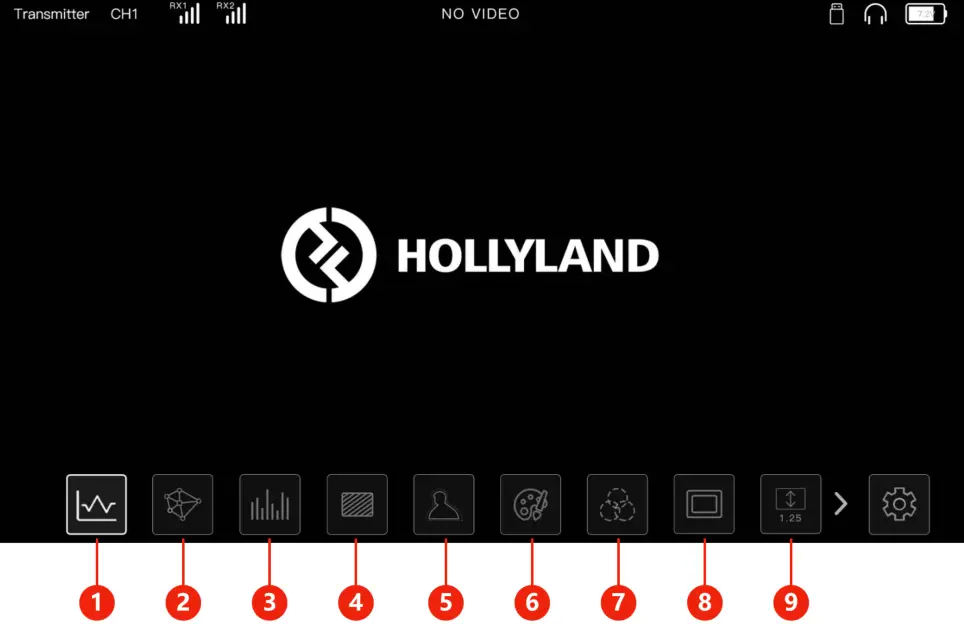
| Features | Details |
| 1. Waveform (WFM) | Display the distribution of brightness or black and white information in the image in the horizontal direction, press and drag the waveform to change the display position of the waveform |
| 2. Vector scope | Displays the degree of saturation of each color in the image, press and drag the vector map to change the display position of the vector map |
| 3. Histogram | Displays the ratio of brightness or black and white information in the image, press and drag the histogram to change the display position of the histogram |
| 4. Zebra | The area in the image that exceeds the set exposure level displays a diagonal line, and the zebra pattern threshold can be adjusted in the range of 0~100, where the exposure corresponding to 0 is IRE=50, and the exposure corresponding to 100 is IRE=100 |
| 5. Auxiliary focus | Colo red lines are displayed around the sharp outline of the image. The focus color can be selected from red, yellow, blue, green, and white. The focus sensitivity can be adjusted in the range of 0~100. |
| 6. Pseudo-color | Change to the corresponding color according to the brightness value of the element of the image |
| 7. RGB & Gray | In “Gray” mode, all colors are disabled and the image only displays a gray image. In “Red”, “Green”, “Blue” mode, only the corresponding color in the image is displayed |
| 8. Cropping | Block the upper and lower sides of the image according to the set aspect ratio to change the aspect ratio of the image. The masking transparency can be adjusted in the range of 0~100. The masking mark function supports the following ratio adjustments: Off, 16:9, 4:3 , 5:4, 1:1.9, 2.41:1, 2.39:1, 2.35:1, 1.9:1, 1.85:185 |
| 9. LUT | Color-calibrate the image, preset 5 different 3D-LUT filters, and replace 5 other LUT filters by importing changes from a USB flash drive |
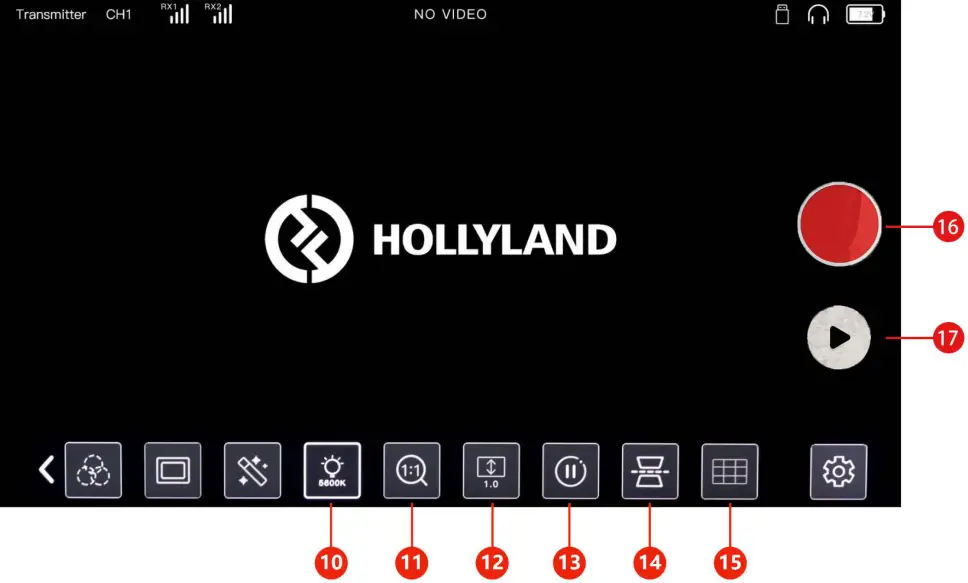
| Features | Details |
| 10. Color Temperature | Realize that the picture can be viewed at different color temperatures, and four modes of 5600 K/6500 K/7500 K/9300 K can be selected |
| 11. Zoom Tool | The part of the screen is enlarged by ×2, ×4, and the zoomed area can be moved and switched by manually sliding the screen. |
| 12. Image Compression | Capable of achieving ×1.25, ×1.33, ×1.5, ×2.0 compression in the vertical direction, and ×2.0 compression in the horizontal direction |
| 13. Screen Freezes | The picture remains the current frame, and the audio continues to play normally |
| 14. Horizontal/vertical Flip | Mirror the screen horizontally or vertically |
| 15. Assistive Grid | You can turn on/off the Jiugongge auxiliary composition |
| 16. record | Turn on the recording mode in the settings, click the record button to record a video of up to 3 minutes |
| 17. playback | Enter the playback interface, you can playback the last recorded video |
3D-LUT
7.1、LUT import
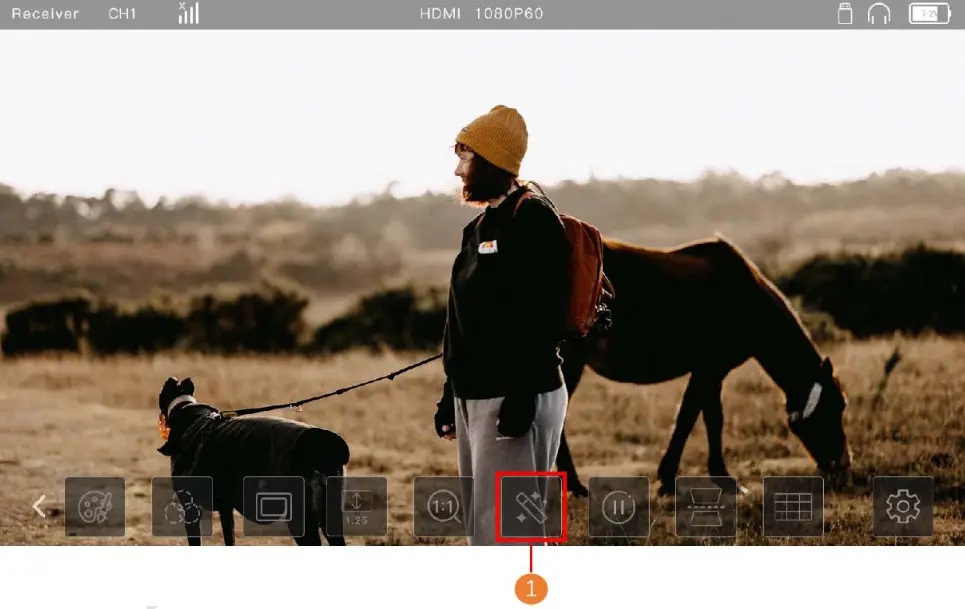

①【3D-LUT】Function switching, import
Operate:
- Put the LUT file into the U disk formatted as FAT32, and use the OTG adapter to connect the U disk to the [USB-C] interface of Xiaojian
- Click the [LUT icon] of Xiaojian, select [LUT import], and wait for the system to retrieve the LUT file to be loaded in the U disk
Note: The suffix of the LUT file must be [.cube], and the file name cannot exceed 128 letters - Select the LUT file to be loaded, and select any location (F1~F5) in the pop-up window as the target import location of the file
- Click [LUT Import] to import the corresponding LUT file to the selected import location
7.2. LUT application
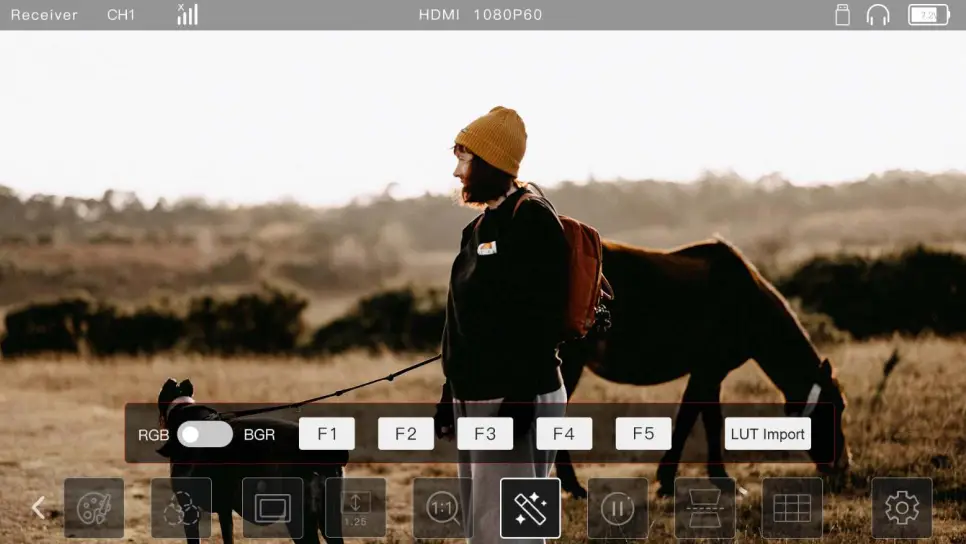
Operate:
- Click the LUT icon to apply the LUT file on the F1 button by default
- Click other buttons to apply the LUT on the corresponding button
- Click the selected button again to close the corresponding LUT application
- Click on the LUT icon or elsewhere on the screen to close the LUT secondary application menu
Note: The 5 default camera LUT files are:
F1: Canon_C-Log.cube
F2: Canon_C-Log2.cube
F3: Sony_S-Log.cube
F4: Sony_S-Log2.cube
F5: Slog3to709TypeA.cube
Recording mode(After V2.1.0.3 version)
8.1、Enable recording mode
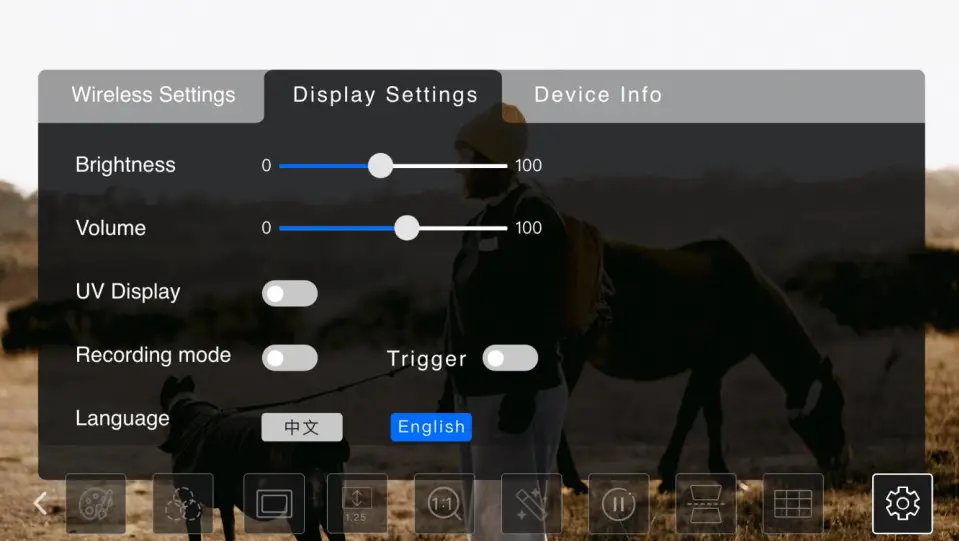
Operate:
- Click the Settings button
- Select Display Settings at the top to enter the Display Settings interface
- Click the record mode switch on the display interface to turn on/off the record mode
- Trigger mode: After enabling Trigger, the camera will start recording and end recording, etc.
Note: Trigger mode currently supports the following camera models:Manufacturer Model Version SONY ZV-E10 Body: ZV-E10
Ver. 1.00
Lens: Ver. 01PXW-Z150 Body: PXW-Z150
Ver. 1.00PXW-Z1280V V4.00 ILCE-7M3 Body: ILCE-7M3
Ver. 4.01
Lens: Ver. 02Fs7 Lens: Ver.02 Fx3 ILME-FX3
Ver. 2.00
Lens: Ver.02ILCE-7M3 Ver.4.11
Lens: Ver.02ILCE-7M4 Ver.1.00 Lens: Ver.02 ILCE-7SM2 Ver.3.01
Lens: Ver.02Canon C500 Mark II 1.0.5.1
LensEOSR5 Ver.1.4.0
Lens 1.0.2Canon 5D MarkIV Ver.1.2.1
Lens: Ver.1.0.2BMD BMPCC 6K Ver 7.3 FUJIFILM XS-10
8.2、Record
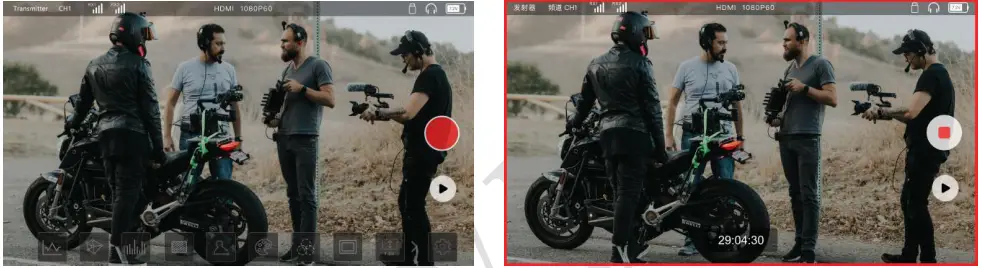
Operate:
- Click the red record button on the right side of the screen to start recording, the screen will have a red border during the recording process
- Click the end button to end the current recording
- Clicking the record button again will delete the last recorded video and store the latest video in the current recording state
Note: The video recording is only 3 minutes at most, and the latest recorded video is saved, and the video is automatically deleted after the shutdown.
8.3、Playback

Operate:
- Click the playback button to enter the playback interface
- Click the middle start button to start playback, there will be a green frame during playback
- Click the pause button in the lower left corner to pause playback
- Drag the progress bar to control the playback process
- Click the back button in the lower right corner to exit the playback interface
Note: Only the last recorded video can be played back, it cannot be selected, and the playback video cannot be exported
Installation
9.1. Interface Connection & Installation
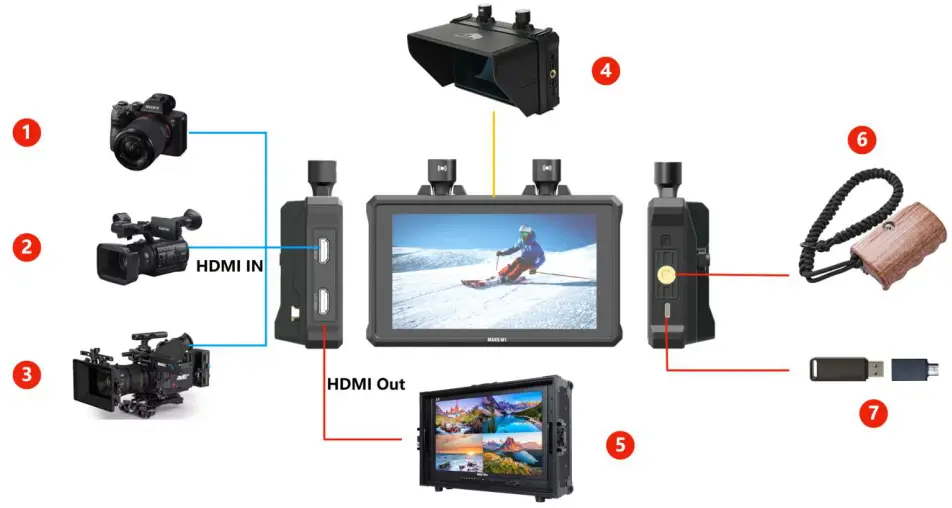
| Feature | Details |
| 1. Micro-single Camera | SONY, Canon, Fuji, Nikon and other cameras |
| 2. Video Camera | Panasonic, SONY and other cameras |
| 3. Cinematography | ARRI, RED, SONY Telecine Camera and other cameras |
| 4. Sun Shield | Shield from direct sunlight when used outdoors |
| 5. Monitor | Connect to big monitor to review |
| 6. Hand Shank | Mount it to handle the Mars M1 easily |
| 7. USB Disk | Connect USB flash disk to upgrade. |
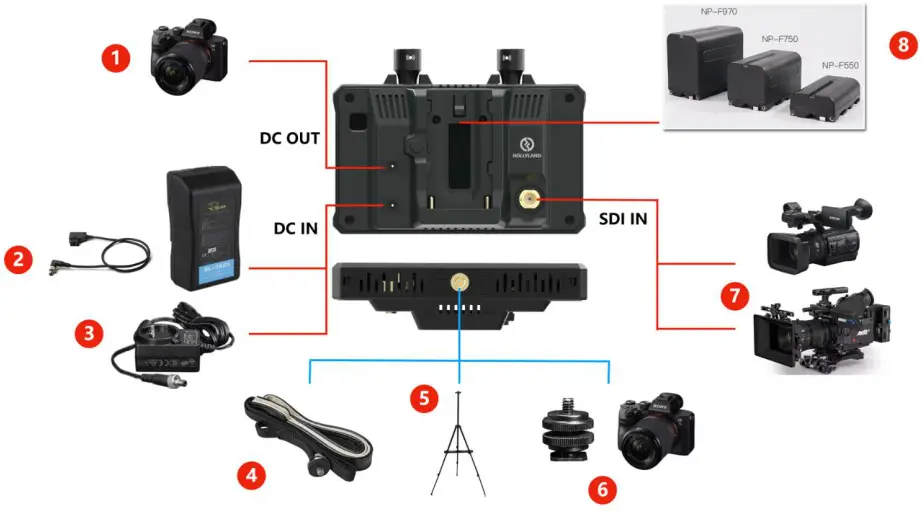
| Feature | Details |
| 1. DC OUT to Camera | DC OUT to power the camera (Also work when power by battery) |
| 2. D-Tap to DC | Power by V-mount / G-mount battery |
| 3. DC Adapter | Power by DC Adapter (6~16V) |
| 4. Shoulder Girdle | Mount it to hang Mars M1 over your shoulder |
| 5. Tripod | Mount it to the tripod when using as RX |
| 6. Cold shoe to Camera | Mount it on the camera cold shoe when using as TX |
| 7. Camera SDI IN | Camera SDI input only work when using as TX |
| 8. NP-F Battery | NPF970, NPF750, NPF550 battery |
9.2. Installation
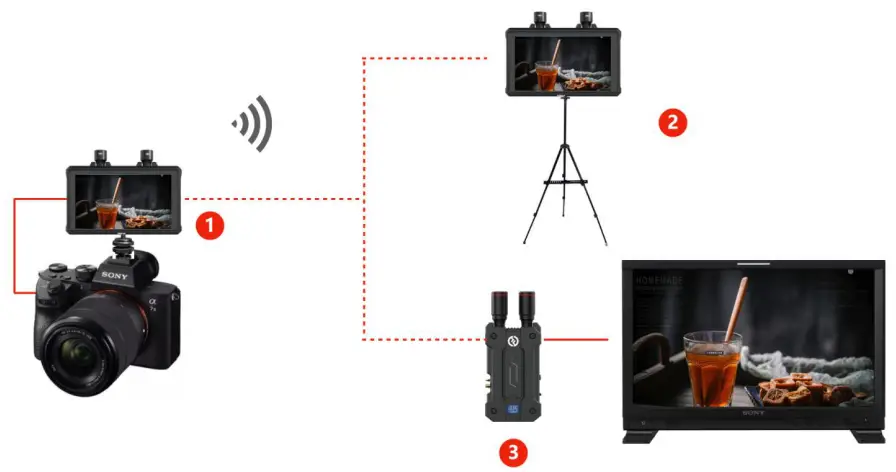
| Connection | Details |
| 1. Connect to Camera as TX | Connect to camera output as monitor (also a TX) |
| 2. Mars M1 as RX | Mars M1 as RX to monitor (Can also output to big monitor) |
| 3. Connect to Mars 4K RX | Connect to Mars 4K RX to monitor |
9.3. Holly view APP Connection
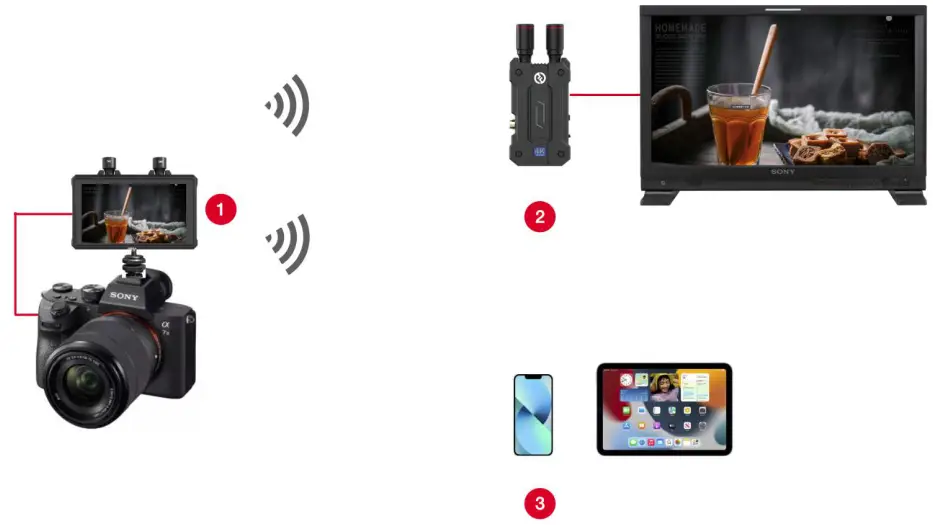
| Mode | Detail |
| Mars M1 Only | Support 4 APP connection |
| Connect to 1RX | Support 2 APP connection |
| Connect to 2RX | Don’t support APP connection |
| Note: The WIFI name is 【”HLD_”+”SN”】. You can check the wifi info on 【Device Info】 WiFi default password: 12345678 |
Operation:
- Set Mars M1 to【Transmitter】 mode
- Open WIFI setting on smartphone, and search WIFI name 【HLD_XXXXXXX】
- Connect WIFI enter default password: 12345678
- Open 【HollyView】 app on smartphone, click connect to watch the video
Scan Channels (Only work in Receiver mode)
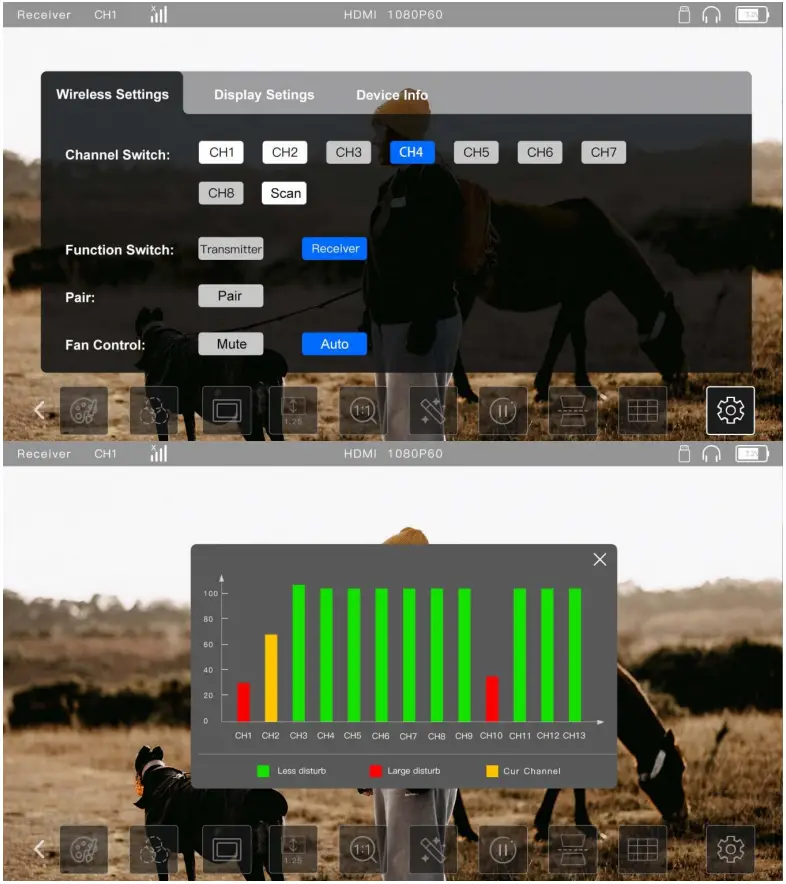
Operation: Enter menu 【Wireless Settings】–> 【Channel Switch】 –> Click 【Scan】 to check the clean channel.
FAQ
– A: The SDI port on Mars M1 is SDI IN, so it only work as Transmitter Mode, in Receiver mode it won’t work.
– A: Mars M1 support 2 RX when working in TX mode, so if you only connect 1 RX, the other signal icon wilshow “x”.
– A: Mars M1 can pair to Mars Pro series (Mars 300 Pro, Mars 400s pro) and Mars 4K, also Mars M1 (in Receiver Mode)
(1) Mars M1 as receiver pair to the transmitter of Mars Pro or Mars 4K:
● Mars M1 switch to 【Receiver】 mode: Click【Setting】 => 【Receiver】 on 【Function Switch】
● Mars Pro or Mars 4K Transmitter enter 【menu】 => 【Setting】 => 【Pair】
● Mars M1 click 【Pair】 to enter pairing mode at the same time.
(2) Mars M1 as transmitter pair to the receiver of Mars Pro or Mars 4K:
①Mars M1 switch to 【Transmitter】 mode: Click【Setting】 => 【Transmitter】 on 【Function Switch】
②Mars Pro or Mars 4K Receiver enter 【menu】 => 【Setting】 => 【Pair】
③Mars M1 click 【Pair】 to enter pairing mode at the same time.
Note: STEP ② and ③ enter pairing mode at the same time to pair it.
– A: Mars M1 supports up to 4K30 input but it only shows 1080p on the screen, and it just transmit 1080p when as transmitter.
– A: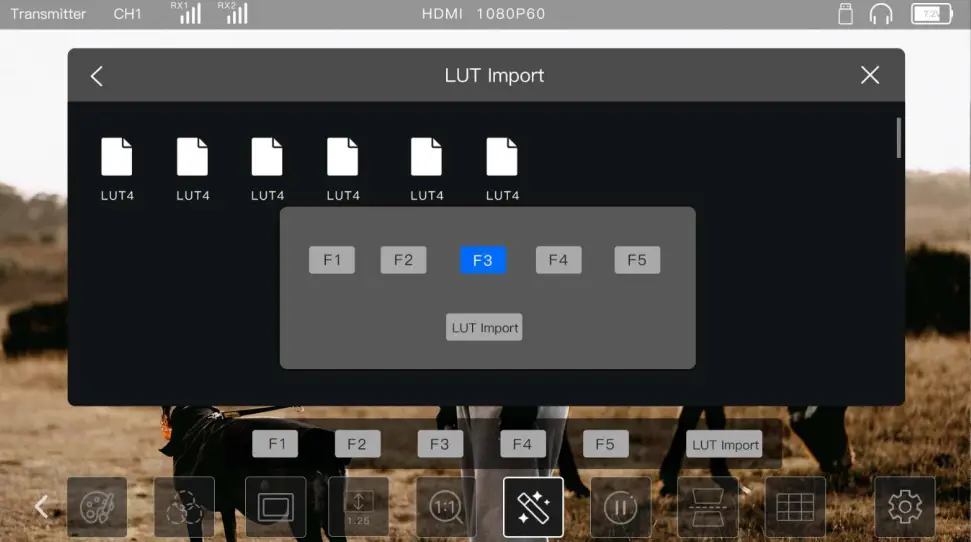
● Format USB disk to 【FAT32】
● Copy 3D-LUT file (.cube) to USB disk
● USB disk plug to 【USB-C】 interface of Mars M1
● Click 【LUT icon】 –>【 LUT Import】
● Select corresponding LUT file import to F1~F5, it will cover the current LUT in F1~F5
– A: Click 【Setting】 icon, on 【Function Switch】 select 【Transmitter】 or 【Receiver】 to switch to TX or RX mode.
– A: Click 【Setting】 icon, on 【Wireless Settings】 => 【Channel Switch】 to switch the channel.
– A:
Note: Mars M1 should be in 【Transmitter】 mode when connect the APP.
● Download 【Holly view】application in APP Store.
● Set Mars M1 to【Transmitter】 mode.
● Open WIFI setting on smartphone, and search WIFI name 【HLD_XXXXXXX】, you can check it on 【Setting】 => 【Device Info】
● Connect WIFI enter default password: 12345678
(Some smartphone have 【WIFI Assist】 function need to be turn off)
● Open 【Holly View】 app on smartphone, click connect to watch the video
– A: The specifications and performance of each battery are different; the approximate usage time can be calculated by the following formula:
E.g: NP-F970 battery specification: 7.4V 6600mAh 48.8Wh
Mars M1 maximum working power: 14.5W
Working time = 7.4V * (6600mAh / 1000)A / 14.5W = 48.8Wh/14.5W≈3.36h≈201min
– A:
● Check the video input SDI, HDMI cable connection is reliable, or replace the cable.
● The concrete walls and human body will great attenuate the signal, so reduce wall occlusion and when there is crowd blocking between the TX and RX, the RX should be elevated 1.7m to avoid signal attenuation.
● Scan channels on RX to check whether there is interference.
– A: DC OUT can power the camera when power via NP-F battery or DC IN. You just need a 2.0mm DC Port to Dummy Battery.
– A: Mars M1 supports HDMI / SDI input decimal video format such as 23.98/29.97/59.94, and output decimal video format from HDMI out.
V1.0


