
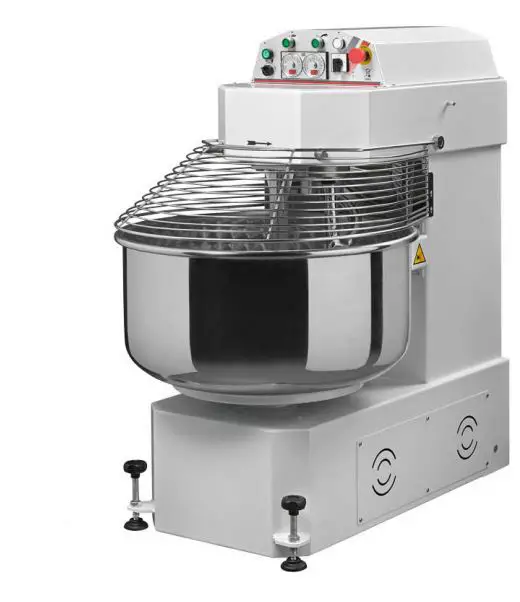
OMCAN MX-IT-0080 Spiral Dough Mixers
 General Information
 General Information
Omcan Manufacturing and Distributing Company Inc., Food Machinery of America, Inc. dba Omcan and Omcan Inc. are not responsible for any harm or injury caused due to any person’s improper or negligent use of this equipment. The product shall only be operated by someone over the age of 18, of sound mind, and not under the influence of any drugs or alcohol, who has been trained in the correct operation of this machine, and is wearing authorized, proper safety clothing. Any modification to the machine voids any warranty, and may cause harm to individuals using the machine or in the vicinity of the machine while in operation.
CHECK PACKAGE UPON ARRIVAL
Upon receipt of an Omcan shipment please inspect for external damage. If no damage is evident on the external packaging, open carton to ensure all ordered items are within the box, and there is no concealed damage to the machine. If the package has suffered rough handling, bumps or damage (visible or concealed), please note it on the bill of lading before accepting the delivery and contact Omcan within 24 hours, so we may initiate a claim with the carrier. A detailed report on the extent of the damage caused to the machine must be filled out within three days, from the delivery date shown in the shipping documents. Omcan has no recourse for damaged products that were shipped collect or third party.
Before operating any equipment, always read and familiarize yourself with all operation and safety instructions.
Omcan would like to thank you for purchasing this machine. It’s of the utmost importance to save these instructions for future reference. Also, save the original box and packaging for shipping the equipment if servicing or returning of the machine is required.
Safety and Warranty
IMPORTANT
To prevent accidents and ensure best performance the machine must not be modified or altered unless authorised by Omcan. Nor must it be used in conditions or for purposes other than those for which it has been expressly designed. Any arbitrary modification implemented in this machine will automatically exempt Omcan from any liabilities for ensuing damage or injury and warranty claims.
For your own personal safety, before connecting the machine to the electrical main:
- Check that power mains leading to distribution socket is fitted with an appropriate multipolar switch protected against overloads and short circuits.
- Carry out all phase connections, as well as any neutral and ground connections (compulsory) with a standard plug compatible with the above mentioned socket.
- The protection lead (ground) is the one with the yellow/green insulating sheath; make sure that the power supply cable is appropriate to its use, according to length, mains voltage and machine consumption.
- Unless adequate protections against electrical shock are fitted, do not operate the machine in damp or wet environments.
Do not start up the machine without the protective paneling. This may jeopardize personnel safety and machine serviceability.
RESIDENTIAL USERS: The vendor assumes no liability for parts or labor coverage for component failure or other damages resulting from installation in non-commercial or residential applications. The right is reserved to deny shipment for residential usage; if this occurs, you will be notified as soon as possible.
1 YEAR PARTS AND LABOUR WARRANTY
Within the warranty period, contact Omcan Inc. at 1-800-465-0234 to schedule an Omcan authorized service technician to repair the equipment locally.
Unauthorized maintenance will void the warranty. The warranty covers electrical and part failures, not improper use.
Please see https://omcan.com/disclaimer for complete info.
WARNING
The packaging components (cardboard, polyethylene, and others) are classified as normal solid urban waste and can therefore be disposed of without difficulty.
In any case, for suitable recycling, we suggest disposing of the products separately (differentiated waste) according to the current norms.
DO NOT DISCARD ANY PACKAGING MATERIALS IN THE ENVIRONMENT!
Technical Specifications
| Model | MX-IT-0080 | MX-IT-0091 |
| Horsepower | Spiral – 1.4 / 5.5 HP | Spiral – 2.8 / 6.4 HP |
| Bowl – 0.50 HP | Bowl – 0.75 HP | |
| Bowl RPM | 14 RPM | |
| Spiral RPM | 117 RPM – 1st speed | |
| 234 RPM – 2nd speed | ||
| Bowl Capacity | 135.3 L / 143 QT | 155.2 L / 164 QT |
| 176 lbs. / 80 kgs. | 220 lbs. / 100 kgs. | |
| Bowl Dimensions | 27.6” x 13.8” / 701 x 351mm | 27.6” x 15.7” / 701 x 399mm |
| Current | Spiral – 8.3A / 15.26A | Spiral – 10.4A / 18A |
| Bowl – 19.4A | ||
| Power | Spiral – 2400 / 4400 W | Spiral – 3000 / 5200 W |
| Bowl – 5600 W | ||
| Electrical | 208V / 60Hz / 3 | |
| Weight | 924 lbs. / 419 kgs. | 1034 lbs. / 469 kgs. |
| Dimensions | 46” x 28.5” x 50” / 1168 x 724 x 1270mm | |
| Item Number | 13175 | 13161 |
Installation
Install and use the machine in a room that can be efficiently ventilated, and where the floor is level, compact and easy to clean.If floor is uneven, to prevent instability and machine movements, shim feet with strips of hard rubber. Position the machine as preferred, leaving a free space of approx. 50 cm/20” around all sides. This will enable unhindered access for actual operation, as well as for cleaning and maintenance. For machines equipped with wheels, ensure to apply brakes by pressing the lever down. Also ensure that machine voltage is the same as that distributed by power mains (see rating plate on machine rear cover).For connection to electrical system, fit a suitable plug to the machine power supply cable.
Warning: have the plug fitted to the power supply by qualified electrician. Take the necessary precautions to prevent the cable from being crimped or damaged.
After mating the plug to the mains socket, the machine is ready for use. First, however, check proper operation of all moving parts and components of the machine. Thus, check:
- Rotation direction of bowl (compare with arrow on bowl) and spiral.
- Safety device serviceability: device is serviceable when machine stops the moment the guard is lifted by 10-15 mm/0.4”-0.6”.
- Operation of push buttons and pilot lamp.
Important: If the machine or some of its parts fail, call your Omcan for repairs.
Note: for machines with three-phase power supply: in case of counter rotation, invert two phases of the power supply plug. Check bowl rotation each time you replace the power supply plug or change power mains socket.
TRANSPORT AND HANDLING
The machine, pallet-mounted at origin, is shipped enclosed in an appropriate packing and strapped to the wooden pallet itself. When unloading the machine from the transport vehicle, lift from the points marked on the packing using suitable equipment. Unless you need to check its contents, you are recommended not to open the packing until the moment of installation. To transport the machine to the installation site, use a trolley of adequate carrying capacity. Remove straps, packing and polystyrene strips. Dispose of this material according to the regulations in force. Lift the machine and place on the installation site. Remove the supporting pallet using straps of suitable carrying capacity (approx. 6 times the weight of the machine). These will have to be slipped under the spiral holder head. The whole operation is to be controlled by adequate manual or power-driven lifting equipment.
PREPARING THE MACHINE
Prepare the machine before every process cycle. BE SURE that the machine, especially parts which come in contact with food products (spiral, bowl and column) are clean and sanitized; where necessary clean with hot water and spirit. Clean with machine off.
OPERATING THE MACHINE
After having ensured perfect cleanliness of the machine, proceed with dough-making operations as required.
LOADING AND STARTING
Press the stop push button to make sure the machine is off. Raise the bowl guard until it stops against the rubber rest. Load the machine with ingredients of the type and quantity required. Lower the bowl guard on its rest. Press the start push button.
CAUTION: the machine will run only if the safety microswitch is serviceable and in position.
Operation
MACHINES EQUIPPED WITH TIMER
For machines equipped with control timer, before pressing the start push button, set the required time. When set time runs out the machine stops automatically. In the event that you need to use manual controls, eliminate timer operation by setting to “SER.CONT” or “POS.MAN.”
TWO-SPEED MACHINES
To start the machine set the commutator to the required speed. Depress the start push button. If you want to change speed with the machine in operation, first set the selector to “0” then set the new speed. Subsequently press the start push button.
Caution: if the selector remains in position “0” it is impossible to start the machine.
UNLOADING THE MACHINE
At the end of the time period set for the process, press the stop push button.
Note: machines equipped with timer will stop automatically.
Raise the bowl guard, remove the dough, and thoroughly clean all parts affected by the process immediately. At the end of the cleaning, close the guard.
VARYING INITIAL MIXTURE DOSES
If you need to vary the initial mixture by adding or changing the amount of the ingredients, use the food slots in the guard without stopping the machine or raising the guard.
Maintenance
ALWAYS UNPLUG THE MACHINE FROM THE ELECTRICAL SOCKET BEFORE PERFORMING ANY MAINTENANCE OR CLEANING!
CLEANING
Warning: For healthy and hygienic processing of nutritional products, be sure to keep your machine and the surrounding environment clean. Always disconnect the power supply before cleaning.
After use, especially since processed material is still soft, always thoroughly clean guard, bowl, spiral and column. Inspect and if necessary, clean the process tools again before a fresh kneading operation. Use hot water to remove and rinse off any residual dough. Dry with nutritional absorbent paper and disinfect with a soft cloth dabbed in alcohol, or food grade disinfectant.
Warning: never use non-food grade, abrasive or corrosive chemicals to clean. Also never use coarse or abrasive objects such as steel wool, abrasive sponges and so on.
To clean machine internal and external parts:
- Remove power supply plug from power mains socket.
- Clean coated surfaces with soft cloth and disinfect with alcohol.
- To clean internal parts of machine, first dismantle the rear panel; remove any grease and powder from the food products processed; then reassemble the panels.
MAINTENANCE AND ADJUSTMENT
Warning: Remember that all maintenance operations are hazardous if you do not first disconnect the plug from power mains.To maintain machine safety, serviceability and stated performance, service the following parts:
Belt tension: once yearly, or in case of irregular machine operation (r.p.m. loss), check belt drive tension. To do this, disassemble machine rear panel; be sure that the belt is tight enough and, if necessary, turn screw marked by the appropriate symbol, without exaggerating when tightening the belt. Reassemble the rear panel.
Never use the machine with any missing, disassembled or open guards and shields. If servicing operations require repairs to electrical system and/or replacement of bearings or mechanical components, call Omcan.Together with the top control panel, remove all the fixing screws of the panel except one, which should be loosened to allow the panel to rotate while still remaining attached to the machine (this allows you not to detach the electrical cable from the panel). Use MR3 type grease in sufficient quantities that allow lubrication of all chain links. Do not apply too much grease because during chain motion it will tend to spatter against the machine walls and gum up with dust and food products (e.g. flour) making it harder for you to clean. Finally, reassemble all panelling taking care not to damage the control electrical cable in machines with the top control panel.
Troubleshooting
| INCONVENIENCES | CAUSES | REMEDIES |
| Machine operation failure. | Disconnected plug. | Connect plug. |
| Plug leads not correctly connected. | Check lead connections. | |
| Trip switch adjusted for insufficient values. | Adjust trip switch accordingly. | |
| Unsuitable trip switch. | Replace trip switch. | |
| Board fuses blown out. | Replace blown fuse. | |
| Timer not set. | Set timer to required time. |
| Whirring noise. | The whirring noise emitted by the machine has been measured on an identical sample machine in compliance with standard DIN 45635. A constant value not exceeding 70 dB(A) was measured as stated in the manufacturers test report. |
Parts Breakdown
Model MX-IT-0080 13175
Model MX-IT-0091 13161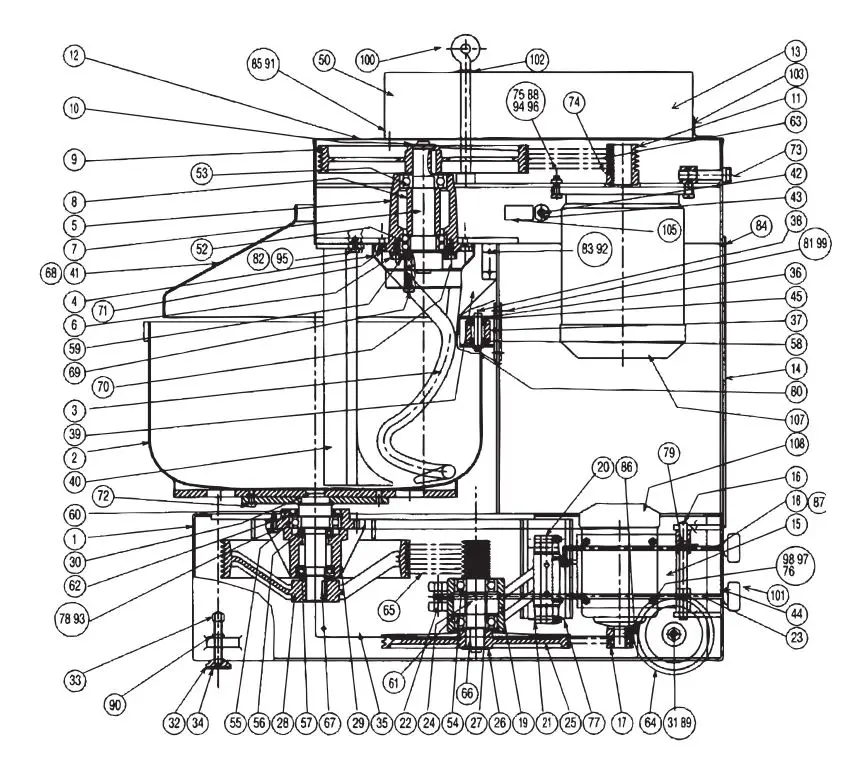
Model MX-IT-0080 13175
| Item No. | Description | Position | Item No. | Description | Position | Item No. | Description | Position |
| 63007 | Base for 13175 | 1 | 63038 | Vertical Lateral Removal for 13175 | 35 | 63124 | Screw M8x12 for 13175 | 74 |
| 63008 | Tube for 13175 | 2 | 63039 | Roof Support Support Vask for 13175 | 36 | 63125 | Screw M12x40 for 13175 | 75 |
| 63009 | Spiral for 13175 | 3 | 63040 | Roll Leather Support for 13175 | 37 | 63126 | Screw M8x25 for 13175 | 76 |
| 63010 | Spiral Flange Cap Cover for 13175 | 4 | 63041 | Rubber Stainless Steel Pipe for 13175 | 38 | 63127 | Screw M10x20 for 13175 | 77 |
| 63011 | Spiral Shaft Support for 13175 | 5 | 63042 | Stainless Steel and Stainless Steel for 13175 | 39 | 63080 | Screw M10x35 Zinc for 13175 | 78 |
| 63012 | Spiral Shaft Flange for 13175 | 6 | 63043 | Vertical Bar for 13175 | 40 | 63128 | Screw M8x12 for 13175 | 79 |
| 63013 | Spiral Shaft for 13175 | 7 | 63044 | Protection for 13175 | 41 | 63129 | Screw M10x20 for 13175 | 80 |
| 63014 | Spacer for Spiral Shaft for 13175 | 8 | 63045 | Tree for Protection for 13175 | 42 | 63086 | Screw M10x25 Zinc for 13175 | 81 |
| 63015 | Spiral Control Pulley for 13175 | 9 | 63046 | Micro Control Lever for 13175 | 43 | 63130 | Screw M6x10 for 13175 | 82 |
| 63016 | Washer for 13175 | 10 | 63117 | Plastic Washer for 13175 | 44 | 63131 | Screw M6x10 for 13175 | 83 |
| 63017 | Spiral Motor Pulley for 13175 | 11 | 63118 | Washer for Roller Support for 13175 | 45 | 63132 | Screw M5x15 for 13175 | 84 |
| 63018 | Shelter Headed for 13175 | 12 | 63051 | Electrical System for 13175 | 50 | 63133 | Screw M5x10 for 13175 | 85 |
| 63019 | Electrical System for 13175 | 13 | 63119 | Bearing 3211 for 13175 | 52 | 63134 | Screw M6x8 for 13175 | 86 |
| 63020 | Rear Vertical Rear for 13175 | 14 | 63053 | Bearing 63092RS for 13175 | 53 | 63090 | Nut M10 for 13175 | 87 |
| 63021 | Support for Motor Control Panel for 13175 | 15 | 63054 | Bearing 63082RS for 13175 | 54 | 63135 | Nut M12 for 13175 | 88 |
| 63022 | Cylinder for Mounting Engine Support for 13175 | 16 | 63055 | Bearing 6212 for 13175 | 55 | 63091 | Nut M16 Zinc for 13175 | 89 |
| 63023 | Pulley Tank Engine for 13175 | 17 | 63056 | Bearing 51209 for 13175 | 56 | 63136 | Nut M16 Nickel for 13175 | 90 |
| 63024 | Tirante for Vasca Engine for 13175 | 18 | 63057 | Bearing 62082RS for 13175 | 57 | 63137 | Rosetta 5.3×10 for 13175 | 91 |
| 63025 | Tendicinghia Takes for 13175 | 19 | 63058 | Bearing 62022RS for 13175 | 58 | 63138 | Rosetta 6.4×12.5 for 13175 | 92 |
| 63026 | Tendicinghia Lever for 13175 | 20 | 63060 | Sealing Ring for 13175 | 59 | 63139 | Rosetta 10.5×21 for 13175 | 93 |
| 63027 | Tennis Length for Tendicinghia Lever for 13175 | 21 | 63120 | Sealing Ring for 13175 | 60 | 63140 | Rosetta 13×24 for 13175 | 94 |
| 63028 | Tennis for Tendering Handle for 13175 | 22 | 63062 | Seeger for 13175 | 61 | 63141 | Rosetta 10.5x5x21 for 13175 | 95 |
| 63029 | Tendering Life Tirante for 13175 | 23 | 63063 | Seeger for 13175 | 62 | 63142 | Rosetta 15×28 for 13175 | 96 |
| 63030 | Tree with Puleggia for 13175 | 24 | 63064 | Trapezoid Belts for 13175 | 63 | AI199 | Nut M8 for 13175 | 97 |
| 63031 | Pulley 1” Reducing Vask Control for 13175 | 25 | 63065 | Wheels for 13175 | 64 | 63143 | Rosetta 8.4×17 for 13175 | 98 |
| 63113 | Washer for 13175 | 26 | 63066 | Trapezoid Belts for 13175 | 65 | 63144 | Rosetta 8.4×17 for 13175 | 99 |
| 63032 | Length Distance for Lamar Pulley for 13175 | 27 | 63067 | Tab for 13175 | 66 | 63098 | Lifting Hook for 13175 | 100 |
| 63033 | Pulley 2” Reducing Vask Control for 13175 | 28 | 63068 | Tab for 13175 | 67 | 63099 | Horizontal Hole M10 for 13175 | 101 |
| 63034 | Support for Tank Vacuum Door for 13175 | 29 | 63069 | Elastic Spine for 13175 | 68 | 63100 | Closing Hole for Golf for 13175 | 102 |
| 63035 | Spindle Tub for 13175 | 30 | 63121 | Screw M12x50 for 13175 | 69 | 63145 | Hinges with Screws for 13175 | 103 |
| 63036 | Wheelchair for Wheels for 13175 | 31 | 63122 | Screw M8x25 for 13175 | 70 | 63102 | Micro for 13175 | 105 |
| 63114 | Support Disk for 13175 | 32 | 63086 | Screw M10x25 Zinc for 13175 | 71 | 63146 | Motor for 13175 | 107 |
| 63115 | Complete Support Disc for 13175 | 33 | 63086 | Screw M10x25 Zinc for 13175 | 72 | 63147 | Motor for 13175 | 108 |
| 63116 | Shock for 13175 | 34 | 63123 | Screw M12x70 for 13175 | 73 |
Model MX-IT-0091 13161
| Item No. | Description | Position | Item No. | Description | Position | Item No. | Description | Position |
| 63007 | Base for 13161 | 1 | 63038 | Vertical Lateral Removal for 13161 | 35 | 63075 | Screw M6x12 Inox for 13161 | 74 |
| 63008 | Tube for 13161 | 2 | 63039 | Roof Support Support Vask for 13161 | 36 | 63076 | Screw M3x8 Inox for 13161 | 75 |
| 63009 | Spiral for 13161 | 3 | 63040 | Roll Leather Support for 13161 | 37 | 63077 | Screw M12x90 Zinc for 13161 | 76 |
| 63010 | Spiral Flange Cap Cover for 13161 | 4 | 63041 | Rubber Stainless Steel Pipe for 13161 | 38 | 63078 | Screw M6x12 Zinc for 13161 | 77 |
| 63011 | Spiral Shaft Support for 13161 | 5 | 63042 | Stainless Steel and Stainless Steel for 13161 | 39 | 63079 | Screw M10x30 Zinc for 13161 | 78 |
| 63012 | Spiral Shaft Flange for 13161 | 6 | 63043 | Vertical Bar for 13161 | 40 | 63080 | Screw M10x35 Zinc for 13161 | 79 |
| 63013 | Spiral Shaft for 13161 | 7 | 63044 | Protection for 13161 | 41 | 63081 | Screw M8x16 Inox for 13161 | 80 |
| 63014 | Spacer for Spiral Shaft for 13161 | 8 | 63045 | Tree for Protection for 13161 | 42 | 63082 | Screw M8x20 Inox for 13161 | 81 |
| 63015 | Spiral Control Pulley for 13161 | 9 | 63046 | Micro Control Lever for 13161 | 43 | 63083 | Screw M8x16 Zinc for 13161 | 82 |
| 63016 | Washer for 13161 | 10 | AI204 | Plastic Washer for 13161 | 44 | 63084 | Screw M8x20 Zinc for 13161 | 83 |
| 63017 | Spiral Motor Pulley for 13161 | 11 | AI205 | Washer for Roller Support for 13161 | 45 | 63085 | Screw M8x30 Zinc for 13161 | 84 |
| 63018 | Shelter Headed for 13161 | 12 | 63051 | Electrical System for 13161 | 50 | 63086 | Screw M10x25 Zinc for 13161 | 85 |
| 63019 | Electrical System for 13161 | 13 | 63052 | Bearing 3211 for 13161 | 52 | 63087 | Screw M5x20 Zinc for 13161 | 86 |
| 63020 | Rear Vertical Rear for 13161 | 14 | 63053 | Bearing 63092RS for 13161 | 53 | 63090 | Nut M10 for 13161 | 87 |
| 63021 | Support for Motor Control Panel for 13161 | 15 | 63054 | Bearing 63082RS for 13161 | 54 | AI206 | Nut M12 for 13161 | 88 |
| 63022 | Cylinder for Mounting Engine Support for 13161 | 16 | 63055 | Bearing 6212 for 13161 | 55 | 63091 | Nut M16 Zinc for 13161 | 89 |
| 63023 | Pulley Tank Engine for 13161 | 17 | 63056 | Bearing 51209 for 13161 | 56 | 63136 | Nut M16 Nickel for 13161 | 90 |
| 63024 | Tirante for Vasca Engine for 13161 | 18 | 63057 | Bearing 62082RS for 13161 | 57 | 63092 | Rosetta 16Dia for 13161 | 91 |
| 63025 | Tendicinghia Takes for 13161 | 19 | 63058 | Bearing 62022RS for 13161 | 58 | 63093 | Rosetta 8Dia Zinc for 13161 | 92 |
| 63026 | Tendicinghia Lever for 13161 | 20 | 63059 | Sealing Ring for 13161 | 59 | 63094 | Rosetta 12Dia Zinc for 13161 | 93 |
| 63027 | Tennis Length for Tendicinghia Lever for 13161 | 21 | 63060 | Sealing Ring for 13161 | 60 | 63095 | Rosetta 10Dia Zinc for 13161 | 94 |
| 63028 | Tennis for Tendering Handle for 13161 | 22 | 63062 | Seeger for 13161 | 61 | 63096 | Rosetta 17Dia for 13161 | 95 |
| 63029 | Tendering Life Tirante for 13161 | 23 | 63063 | Seeger for 13161 | 62 | 63097 | Rosetta 10Dia Zinc for 13161 | 96 |
| 63030 | Tree with Puleggia for 13161 | 24 | 63064 | Trapezoid Belts for 13161 | 63 | 63089 | Nut M8 for 13161 | 97 |
| 63031 | Pulley 1” Reducing Vask Control for 13161 | 25 | 63065 | Wheels for 13161 | 64 | 63101 | Rosetta 9Dia SP2 for 13161 | 98 |
| AI200 | Washer for 13161 | 26 | 63066 | Trapezoid Belts for 13161 | 65 | 63101 | Rosetta 9Dia SP2 for 13161 | 99 |
| 63032 | Length Distance for Lamar Pulley for 13161 | 27 | 63067 | Tab for 13161 | 66 | 63098 | Lifting Hook for 13161 | 100 |
| 63033 | Pulley 2” Reducing Vask Control for 13161 | 28 | 63068 | Tab for 13161 | 67 | 63099 | Horizontal Hole M10 for 13161 | 101 |
| 63034 | Support for Tank Vacuum Door for 13161 | 29 | 63069 | Elastic Spine for 13161 | 68 | 63100 | Closing Hole for Golf for 13161 | 102 |
| 63035 | Spindle Tub for 13161 | 30 | 63070 | Screw M10x20 Zinc for 13161 | 69 | 63145 | Hinges with Screws for 13161 | 103 |
| 63036 | Wheelchair for Wheels for 13161 | 31 | 63071 | Screw M8x20 Zinc for 13161 | 70 | 63102 | Micro for 13161 | 105 |
| AI201 | Support Disk for 13161 | 32 | 63072 | Screw M12x45 Inox for 13161 | 71 | 63103 | Spiral Drive Motor for 13161 | 107 |
| AI202 | Complete Support Disc for 13161 | 33 | 63073 | Screw M16x50 Zinc for 13161 | 72 | 63104 | Vacuum Engine for 13161 | 108 |
| AI203 | Shock for 13161 | 34 | 63074 | Screw M10x40 Inox for 13161 | 73 |
Electrical Schematics
Model MX-IT-0080 13175
Model MX-IT-0091 13161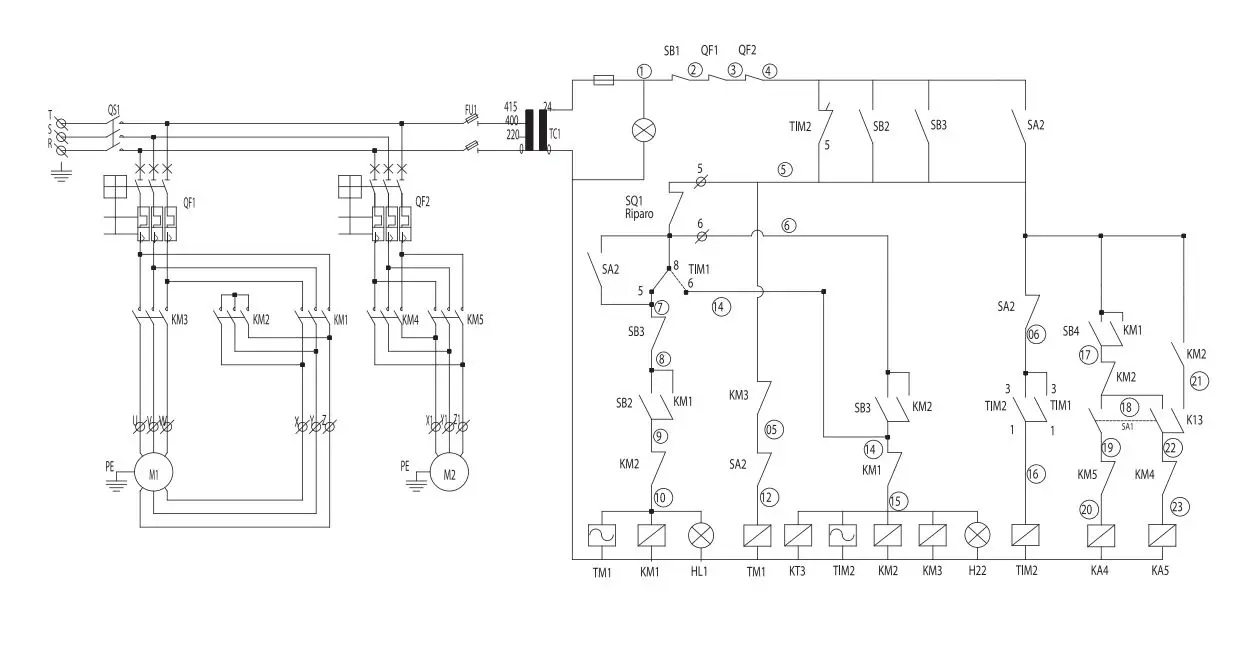
Warranty Registration
Thank you for purchasing an Omcan product. To register your warranty for this product, complete the information below, tear off the card at the perforation and then send to the address specified below. You can also register online by visiting: https://omcan.com/warranty-registration/
Since 1951 Omcan has grown to become a leading distributor of equipment and supplies to the North American food service industry. Our success over these many years can be attributed to our commitment to strengthen and develop new and existing relationships with our valued customers and manufacturers. Today with partners in North America, Europe, Asia and South America, we continually work to improve and grow the company. We strive to offer customers exceptional value through our qualified local sales and service representatives who provide convenient access to over 5,000 globally sourced products.
For mailing in Canada
Pour postale au Canada
OMCAN
PRODUCT WARRANTY REGISTRATION 3115 Pepper Mill Court,
Mississauga, Ontario
Canada, L5L 4X5
or email to: [email protected]


