![]() Reference Guide to Automatic Processing of INDUSTREX Films
Reference Guide to Automatic Processing of INDUSTREX Films
Manual Mixing:
- Measure water for correct dilution.
- Add replenisher concentrate and mix using a separate paddle for Developer and Fixer to avoid contamination.
- Mix only enough replenisher to last a week to assure fresh chemicals.
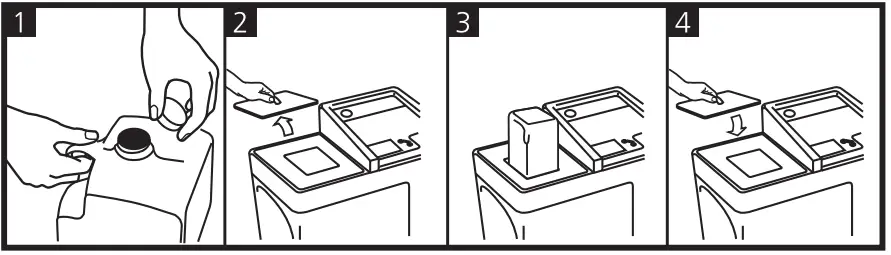
IMPORTANT: use the floating lid for the developer replenisher tank to prevent oxidation and maximize solution life.
| Dilution Concentrate + I-120 | Replenishment Rate | pH re St Working gth | Specific Gravity Working Strength | To Make Working Strength Solution | |
| Developer | |||||
| Use INDUSTREX Single Part Developer and Replenisher. Material No. 5315288 | 1 + 3 | 665mUm2 (e.g., 100 mL per 14 x 17 inch sheet) | 10.40 +/- 0.10 (25 °C,77 °F) | 1.072 +/- 0.005 (20 °C,68 °F) | 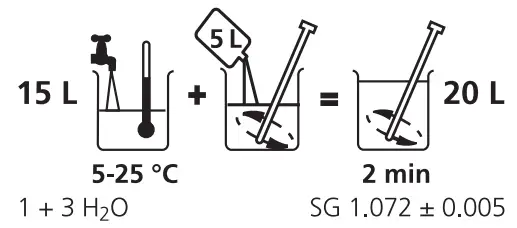 |
| Fixer | |||||
| Use INDUSTRIES LO Fixer and Replenisher. Material No. 5159082 | 1 + 3 | 1200mUm2 (e.g., 180mL per 14 x 17 inch sheet) | 4.90 +/- 0.10 (25 °C,77 °F) | 1.084 +/- 0.005 (20 °C.68 °F) | 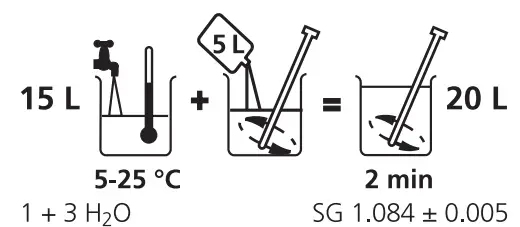 |
Chemical Mixers
- Proper templates that match the bottles should be used.
- Thorough mixing is necessary after each addition.
- Ideally, the mixer should have a floating lid to protect the solutions from oxidation.
- The concentrates should be examined to be certain there is no premature oxidation due to excessive handling.
- The manufacturer’s recommended water-mixing temperature should be observed.
- A new mix of developer and/or fixer should only be made when indicated by the solution level in the mixer.
- To aid in verifying that the chemistry is acceptable, the pH and the specific gravity can be measured. It is important to make these measurements at the recommended temperatures for the instrument used. (see above)
- The processor should be turned off when mixing.
Developer Tank Sizes/Starter Volume
| INDUSTRIES Processor Model | Developer Tank Volume (L) | Starter Amount (31 ml/L) Material No. 835 1413 |
| M43 | 14. | 419. |
| M37 | 7. | 202. |
| M37 Plus | 8. | 233. |
Developer Immersion Time and Temperature
| INDUSTRIES Processor Model | Recommended Cycle Speed (cm/min) | Developer Immersion Time (Sec) | Cycle Time (Dry-to-Dry) (Min) | Developer Temperature |
| M43 | 39 | 100 | 8 | 26 °C (78.8 °F) |
| M37/M37 Plus | 22 | 110 | 7 | 28 °C (82.4 °F) |
Calibrating Replenishment Pumps and Checking Replenishment Rates
NOTE: Use qualified service personnel and refer to the manual for each specific model, to perform the following procedures.
| INDUSTRIES Processor Model | Replenishment Pump Calibration Method | Setting Replenishment Rates |
| M43/M37/M37 Plus | A | B |
Calibration Method
A: Use the control panel/display and the programming menu to select Manual Replenishment Cycle. Request 400 ml. of developer replenisher and verify it is delivered by the pump. (Fill a graduated cylinder with 500 ml of replenisher and insert the replenishment intake hose into the graduated cylinder or collect the overflow.) The pump can be mechanically adjusted to deliver the amount requested as necessary. It may take several measurements and adjustments to match the pump to the amount requested. Repeat for a fixer.
B: Use the control panel/display panel and the programming menu to select Setup Mode, Program, Modify and adjust developer replenishment rate per to 665 ml and fixer replenishment rate to 1200 ml.
Site Specification and Installation of Automated Processors
NOTE: Refer to the manual for the specific equipment and use.
Access:
- Service access of 50 cm around the processor.
Water:
- The filtered water supply of proper water temperature, pressure, and flow. A mixing valve may be necessary.
- A sink large enough to accommodate cleaning processing racks a minimum of 50 cm wide.
- The hose that can reach the processor for cleaning.
Drain:
- Minimum 7.6 cm diameter drain hose or line, free of bends and have a constant decline to the drain.
- Height from floor: The top of the drain or drain containers must be lower than the bottom of the processor.
- A floor or wall drain may be used, which should include an anti-siphon system.
- The drain must be ventilated and do not use brass or copper in the drain lines.
Room Ventilation:
- The processing area should have 10 air changes per hour, 24 hours per day, 7 days per week.
For example, a 3 x 3 x 3 m room has a volume of 27 cubic meters, so the ventilation system should supply the room with 270 cubic meters of fresh air per hour. - For through-the-wall installations, the air pressure in the darkroom area where the processor is located must be of slightly higher pressure than the surrounding rooms to assure that the airflow through the processor is in the correct direction.
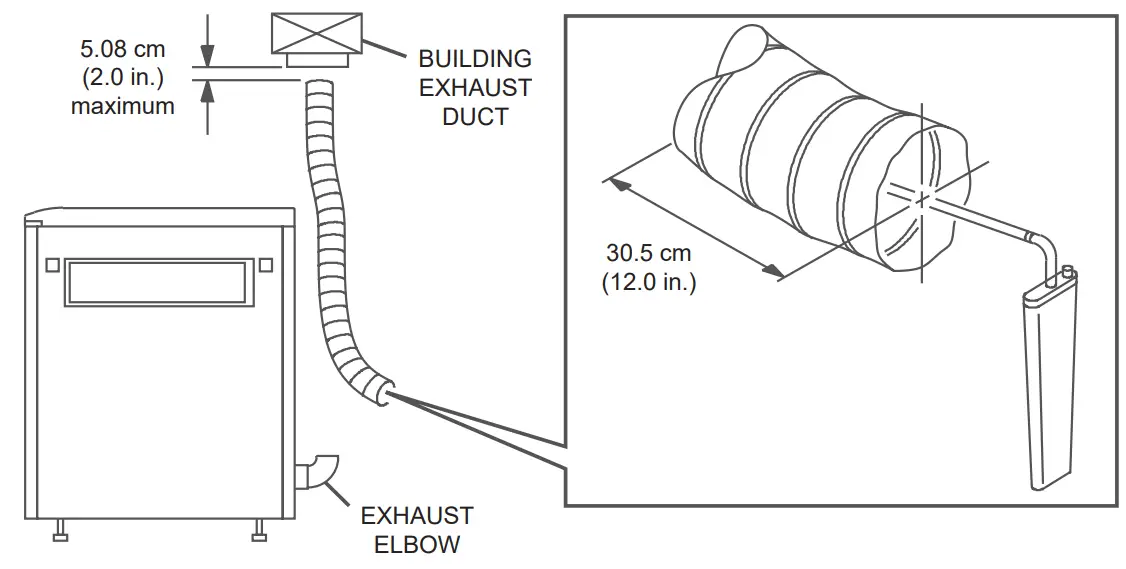
Processor Exhaust:
- Dedicated exhaust that provides proper Negative Static Pressure (see table below), 24 hours per day, 7 days a week, connected to the processor using the proper size dryer duct hose with an adjustable air gap. A supplemental Exhaust Fan can be purchased if an adequate exhaust system is not available at the site. The processor cannot be vented into the room where the processor resides.
- Use of a Dwyer Air Meter TL-2431 or equivalent to measure exhaust.
| Dryer Exhaust Duct Diameter (cm) | Negative Static Pressure (mm of water) |
| 7.6 cm | 0.76 – 2.54 mm |
| 10.2 cm | 0.25 – 1.02 mm |
Start-Up, Shutdown, Cleaning, and Maintenance
Start-Up:
- Check that the wash tank drains are closed.
- Turn on the water supply.
- Close the cover of the processor.
- Switch on the processor and check for any errors.
- Check replenishment tank and waste tank levels.
- Top off processing tanks with chemistry.
- Before starting production, place 2 full-size cleaning sheets into the processor, preferably INDUSTREX Roller Transport Cleanup Film.
Shut-Down:
- Power off the processor and turn off the water supply.
- Remove the top cover and drain the water.
- Spray down rollers and gears above solution level with warm water using a water spray bottle.
- Place the top cover back on the processor at an angle for venting purposes.
- Check the levels in the waste chemical collection containers.
Weekly Check:
- Check and clean the wash rack rollers/water tank ensuring roller and tank surfaces are free from deposits and algae.
- Check and clean all crossover rollers.
- Check water supply, filters/water drain.
- Check the replenishment (see “Calibrating Replenishment Pumps and Checking Replenishment Rates”).
- Recommend the customer to keep a “service book” and to write down everything related to the processor.
(Dates when chemicals/filters changed, cleaning/service issues, and problems).
Periodic Maintenance Advice for Service Technicians:
Technical checks every 3 to 4 months to be made by a qualified service technician.
- Switch off the machine and unplug from power. Then drain all tanks.
- Remove the racks for cleaning. Handle carefully, so as not to damage rollers and rack components.
- When cleaning the developer and fixer tank and racks, carefully remove chemical deposits and inspect rollers. Do not use abrasive materials to clean rollers, racks or guide shoes.
- Drain and fill all tanks with fresh clean water and switch on the unit.
- Connect the replenishment system with water and start the replenishment pumps and verify proper calibration and replenishment rates. (See “Calibrating Replenishment Pumps and Checking Replenishment Rates”.)
- Drain all 3 tanks and refill with clean water. Allow recirculation for 10 minutes and then drain completely.
- Replace developer filter.
- When a Chiller System is in use check the level of the cooling agent and top up when necessary.
- Measure and adjust processor ventilation (see above).
Note: Refer to the manual for the specific equipment for the complete and detailed periodic maintenance schedule and instructions.
Process Quality Control Tools:
Roller Transport Cleanup Film Cat No. 122 4310
- Removes precipitates, dirt, and other materials. Use each morning or after an extended period of idle time (more than 4 hours.) Useful to control delay streaks.
INDUSTRIES Process Control Strips Cat No. 526 1326
- Process Control Strips are pre-exposed with a 10-step wedge to X-ray radiation. See CHSP-8983 for more information.
INDUSTRIES Test Film Cat No. 508 5436
- Helps to identify and correct artifacts prior to processing important radiographs. Shelf-life is 12 months from the pre-exposure date.
Uniformly pre-exposed to an average optical density of 1.9.
Exposure Film Factor (R) – Film Types and Desired Densities
Selenium
| M100 | 3.6 | 4.6 | 5.5 | 6.5 | |||
| MX125 | 2.2 | 2.9 | 3.6 | 4.4 | |||
| T200 | 1.4 | 1.8 | 2.2 | 2.6 | |||
| AA400 | 0.8 | 1.2 | 1.6 | 2 | |||
| HS800 | 0.3 | 0.6 | 0.8 | 1 |
Iridium
| M100 | 3.2 | 4.3 | 5.5 | 6.6 | |||
| MX125 | 2.3 | 3.1 | 3.9 | 4.7 | |||
| T200 | 1.1 | 1.5 | 2 | 2.4 | |||
| AA400 | 0.8 | 1.1 | 1.5 | 1.9 | |||
| HS800 | 0.2 | 0.5 | 0.7 | 0.9 |
Cobalt
| M100 | 7.3 | 9.3 | 11.4 | 13.4 | |||
| MX125 | 3.9 | 5.3 | 6.7 | 7.9 | |||
| T200 | 2.3 | 3.1 | 3.9 | 4.7 | |||
| AA400 | 1.2 | 1.8 | 2.4 | 2.9 | |||
| HS800 | 0.1 | 0.6 | 1 | 1.4 |
Created in the U.S.A.
Carestream Health, Inc.
CHSP-9011, rev1
2021-03-31
150 Verona Street
Rochester, NY USA 14608
CARESTREAM, INDUSTRIES, and X-OMAT are trademarks of Carestream Health.


