Contents hide
FISC3600BK Film Scanner
User Manual
Preface
Thank you for purchasing the Nedis FISC3600BK.
This document is the user manual and contains all the information for correct, efficient and safe use of the product.
This user manual is addressed to the end user. Read this information carefully before installing or using the product.
Always store this information with the product for use in the future.
Product description
The Nedis FISC3600BK scans images from developed negative or slide film and converts them to digital video.
Film or slides are put through the scanner using the provided film holders.
The product runs on DIGITNOW! Software and connects to your computer using a provided USB cable.
Intended use
The product is exclusively intended for scanning negative film or slide film and converting it to digital video.
The product functions exclusively in combination with the provided DIGITNOW! software.
Any modification of the product may have consequences for safety, warranty and proper functioning.
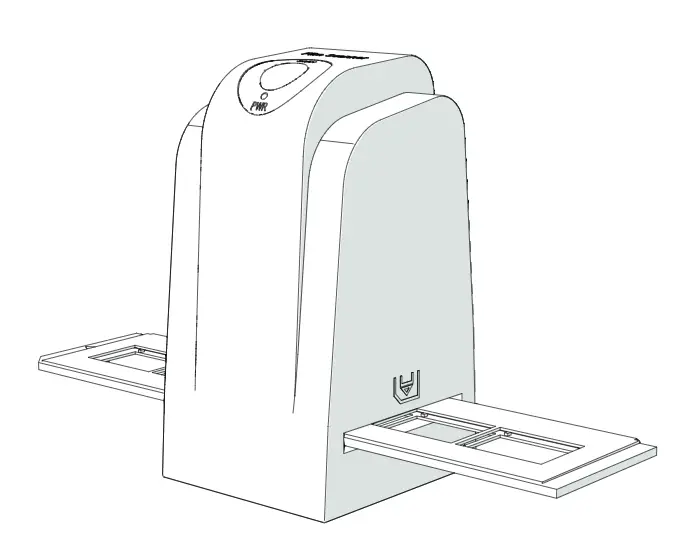
Main parts (image A)
 |
A |
1. SCAN button |
2. Status indicator LED |
3. Casing |
4. Brush |
5. Negative film holder |
6. Positive slide holder |
7. CD-ROM with driver software |
8. Mini USB port |
9. Film holder slot |
10. USB cable |
Safety instructions
Specifications
Product | Film Scanner |
Article number | FISC3600BK |
Dimensions (l x w x h) | 82 x 86 x 152 mm |
Weight | 350 g |
Interface | USB 2.0 |
Power supply | 5 V DC / 1 A |
Image sensor | 5 MP colour CMOS |
Lens | Fixed focus precision glass element |
Exposure control | Automatic with manual fine tuning |
Colour balance | Automatic with manual fine tuning |
Quality | Standard & interpolated (1800 & 3600 dpi) |
Colour depth | 10 bits per colour channel |
Scan method | Single pass |
Light source | Backlight with 3 white LEDs |
Software compatibility | Mac: OS X Snow Leopard 10.6 and above Windows: 7 / 8 / 9 (32 / 64 bit) |
WARNING
- Only use the product as described in this manual.
- Do not use the product if a part is damaged or defective. Replace a damaged or defective device immediately.
- Disconnect the product from the electrical outlet and other equipment if problems occur.
- Do not expose the product to water or moisture.
- Do not expose the product to heat, cold or direct sunlight.
- Do not use the provided brush to clean the film.
Installation
- Check the contents of the package
- Check that all parts are present and that no damage is visible on the parts. If parts are missing or damaged, contact the Nedis B.V. service desk via the website: www.nedis.com.
Connecting the Film scanner
1. Connect A10 to a USB 2.0 port of your computer.
2. Connect the other end of A10 to A8.
- The film scanner is recognised automatically by the computer and is ready for use after a few moments.
3. Insert A7 into your computer.
4. Install the driver software.
5. Run the software. When prompted, enter the software serial number.
- The serial number is printed on the CD-ROM sleeve.
Use
Feed film or slides into the scanner (Image B + C)
 |  |
B | C |
1. Open the film or slide holder by gently pulling the latch in the middle while firmly holding the back of the holder.
2. Place film in the film holder or place framed slides in the slides holder.
3. Close the holder.
4. Insert the holder arrow-first into A9.
5. Push until the first picture is centered.
Scanning (Image D)
 |
D Windows |
 |
D Mac |
1. In the DIGITNOW! software menu bar, click “Get Photo” and choose “From Film Scanner”.
2. Choose the film type D2, resolution D3 and the film size D4.
3. Click “Scan” (Windows) or “Take image” (Mac) D7 or press A1 to scan the picture. It takes several seconds to save your picture and show it on screen.
4. Adjustments D5 can be made to the saturation, brightness, contrast and the level of each individual RGB channel.
5. Click D6 to reset the adjustment levels to their defaults.
6. Push the holder further into A9 until you reach the next frame or slide.
7. Click D7.
8. Repeat for all remaining frames or slides.
Maintenance
Cleaning
To check for dust and dirt in the film scanner:
1. Take a picture without the film holder in the scanner.
2. Use the provided brush A4 to wipe the inside.
- Do not use the brush to clean film or slides. Use specialist products to clean film or slides.
- Clean the product regularly with a soft, clean, dry cloth. Avoid abrasives that can damage the surface.
- Do not use aggressive chemical cleaning agents such as ammonia, acid or acetone when cleaning the product.
Troubleshooting
Problem | Possible cause | Solution |
No power | No USB connection | Make sure the USB cable is connected. A2 should light up. |
Spots show up on the picture | Dirt inside the film scanner | Use A4 to clean the inside of the film scanner. |
Dirt on the film | Clean the film with a specialised product. Do not use the provided brush to clean the film. |
Warranty
Any changes and/or modifications to the product will void the warranty. We accept no liability for damage caused by improper use of the product.
Disclaimer
Designs and specifications are subject to change without notice. All logos, brands and product names are trademarks or registered trademarks of their respective owners and are hereby recognized as such.
Disposal
 | This symbol indicates that this product should not be thrown away with other household waste throughout the EU. To prevent possible harm to the environment or human health by uncontrolled waste disposal, you are responsible for recycling it so that it can promote the sustainable reuse of raw materials. To return your used product, you can use the regular return and collection systems or contact the store where the product was purchased. They can recycle this product for the environment. |


