![]() User Manual
User Manual
Commercial Ranges
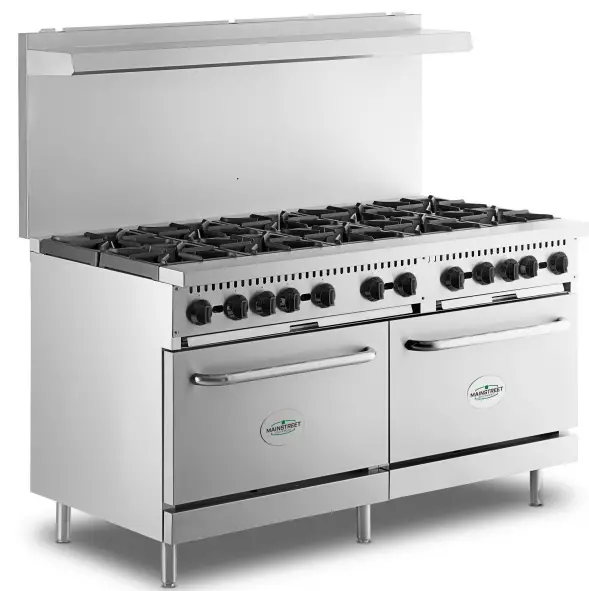
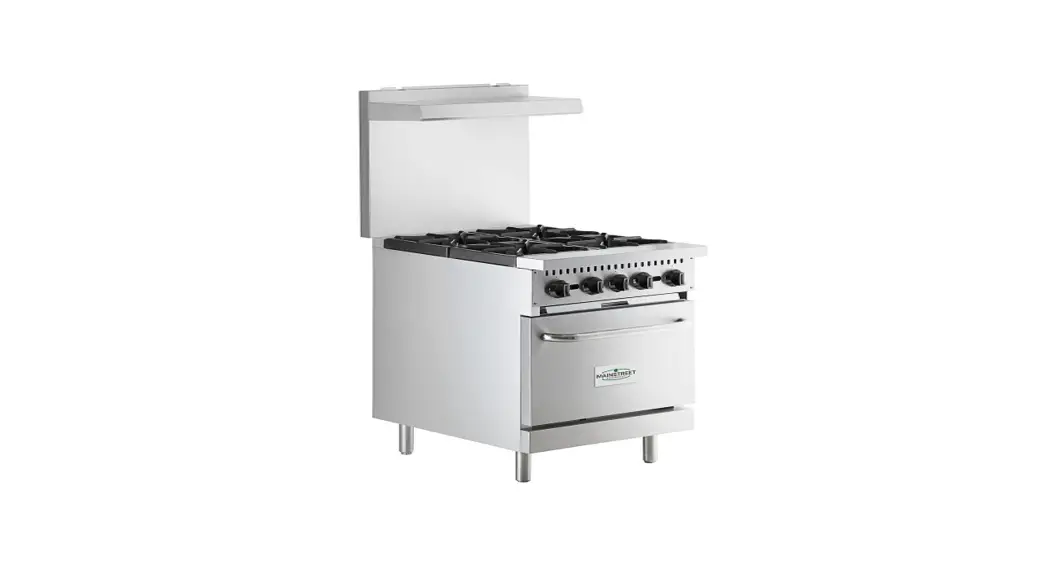
![]() Models: 541E24L, 541E24N, 541E36L, 541E36N, 541E60L, 541E60N
Models: 541E24L, 541E24N, 541E36L, 541E36N, 541E60L, 541E60N
Please read and keep these instructions. Indoor use only.
Congratulations on your purchase of Main Street Equipment commercial cooking equipment! At Main Street Equipment, we take pride in the design, innovation, and quality of our products. When used as intended and with proper care and maintenance, you will experience years of reliable operation from your Main Street Equipment. To ensure optimal performance, we have outlined the following instructions and guidelines in this manual carefully for your review. Main Street Equipment declines any responsibility in the event users does not follow the instructions or guidelines stated here.
PRODUCT OVERVIEW
Main Street ranges feature independently controlled burners to improve kitchen efficiency and performance. The removable cast iron grates and pull-out crumb tray help to further expedite cleanup. Adjustable legs offer stability, while the handy kick plate ensures internal component protection and easy-access servicing. A convenient back shelf holds seasonings and supplies to maximize efficiency. Featuring 24”, 36”, and 60” configurations, Main Street ranges are a versatile asset to busy commercial kitchens!
SAFETY PRECAUTIONS
CAUTION:
Failure to comply with the following operating instructions could lead to potential hazards and/or unsafe practice and could result in injury and damage to product and property
NOTICE:
Local codes regarding installation vary greatly from one area to another. The National Fire Protection Association, Inc., states in its NFPA96 latest edition that Local codes are “Authority Having Jurisdiction” when it comes to the requirement for installation of equipment.
Therefore, installation should comply with all local codes.
This product is intended for commercial use only. Not for residential use. Use in residential applications will void the warranty.
![]() WARNING:
WARNING:
Do not store or use gasoline or other flammable vapors and liquids in the vicinity of this or any other equipment. Improper installation, adjustment, alteration, service, or maintenance could lead to property damage, injury, or death. Read the installation, operating, and maintenance instructions thoroughly before installing or servicing Main Street equipment. This manual must be retained for future reference.
A factory-authorized agent must handle all maintenance and repair
GAS PRESSURE:
The appliance and its individual shutoff valve (to be supplied by the user) must be disconnected from the gas supply piping system during any pressure testing of that system at test pressures in excess of 1/2 PSI (3.45 kPa). The appliance must be isolated from the gas supply piping system by closing its individual manual shut-off valve during any pressure testing of the gas supply piping system at the test pressures equal to or less than 1/2 PSI (3.45 kPa).
START-UP
INSTALLATION
This installation is to be carried out by a certified technician. Issues related to installation, such as adjustments and calibrations, are the responsibility of the installer and are not matters of warranty. Proof of installation may be required to make a warranty claim.
CAST IRON TOP GRATES:
Seasoning grates before their first use and after each cleaning will help prevent rusting.
Note: Your new Main Street range comes equipped with a plastic coating to help protect the finish from scratching during shipping.
This protective plastic film should be peeled off prior to starting the range.
- Remove grates and wash thoroughly with mild soap and warm water, then dry with a clean cloth. (For further cleaning instructions see Cleaning & Maintenance on pg. 5).
- After drying, immediately season grates with vegetable oil. We recommend Pan Sprease (999SRPANAP16). Do not season grates while on the range top.
- After seasoning, reinstall grates and turn all burners to “low” for approximately 20 minutes before using pots or pans.
OVEN:
- Wash and dry interior as well as oven racks with soap and water before first use. (For further cleaning instructions see Cleaning & Maintenance on pg .5)
- It is normal for an unpleasant smell to be noticeable the first time the oven is used. This is caused by the burn-off of grease or solvent left over from the manufacturing process. Before cooking in the oven, turn the oven on and set it to maximum temperature until the smell dissipates
GAS CONNECTION
Note: This commercial range is configured for areas with an altitude below 2,000 ft. Please contact your local authorized service agent or certified gas professional if you are installing at an elevation above 2,000 feet. The supplied regulator is required for use.
- Ensure gas supply and gas type, as shown on the unit serial plate agree. Unit installation must conform with the National Fuel Gas Code, ANSI Z223.1/NFPA 54, the National Gas Installation Code, CSA-B149.1, or the Propane Installation Code, CSA-B149.2 as applicable anin accordance with local codes.
- The gas inlet is located on the back of the unit for gas connection. The external regulator provided with the unit must be installed. A manual gas shut-off valve must be installed in the gas supply line ahead of the appliance and gas pressure regulator for safety and ease in servicing.
- The gas pressure regulator supplied must be installed on the appliance prior to connecting the equipment to the gas line. Failure to install a regulator could be potentially hazardous and will void the limited equipment warranty.
- It is recommended to use a pipe threading compound or thread tap to seal gas connections. Thread tape or compound must be rated for use with gas equipment.
- All pipe joints and connections must be tested thoroughly for gas leaks. Use only soapy water for testing all gases. Never use an open flame to check for gas leaks.
EXHAUST SYSTEM
Proper ventilation is crucial to safe and optimum performance. Ensure that the oven is installed underneath a ventilation hood according to all applicable local and national codes. Keep adequate clearance for air openings into the combustion chamber.
OPERATING INSTRUCTIONS
LIGHTING INSTRUCTIONS: OPEN TOP BURNERS
- Light pilot adjacent to each burner
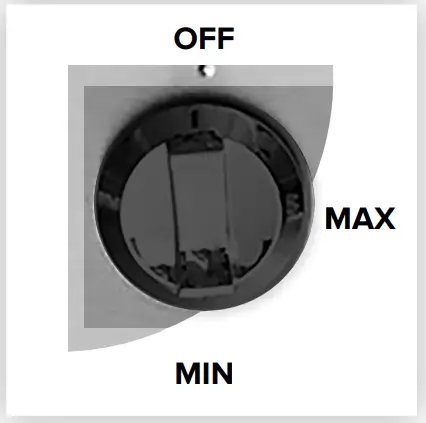
- Push and turn the burner valve 90 degrees counterclockwise, and the burner will ignite.
- Open burners have standing pilots which once lit can be adjusted by turning the flat head screw on the pilot valve. Turn the screw clockwise to decrease the pilot flame size and counterclockwise to increase it.
Note: Please note that the pilot flame should only be large enough to light the pilot. Yellow tipping of the flame should be avoided as it is a sign of a dirty flame and can cause odor and soot build-up on the burner. Maintain as blue of a flame as possible.
CAUTION:
Should burner ignition fail within 4 seconds, turn burner valve off and repeat steps 1 and 2.
STANDARD OVEN:
- Open the kick plate under the oven door.
- Press down the temperature control knob and rotate counterclockwise to align the mark with the notch on the bezel. Hold the knob down.
Note: on new installations, all air must be purged from the gas lines. Initial gas line purging of the oven pilot on new installs can take up to 3 minutes. - Ignite the pilot flame with a lighter via an ignition hole.
- After the pilot flame is ignited, continue holding the knob for at least 20 seconds to heat the thermocouple. If the pilot light goes out, repeat steps 2-4 until remains lit
- Keep rotating the temperature control knob counterclockwise to ignite the main burner of the oven. Select appropriate temperature according to food requirement
- Once the pilot is lit it will stay lit indefinitely. If you turn the knob all the way to the OFF position it will turn off all gas to the pilot and it will go out. To avoid this the knob should be turned to the pilot symbol when turning the oven OFF.
TURNING PILOT OFF:
Rotate knob clockwise to align pointer on knob with notch on bezel.
![]() WARNING:
WARNING:
- Always ensure proper supervision while the equipment is in use.
- Simple adjustments to knobs, leg height, etc. do not require assistance from specialized personnel.
- Use only parts and accessories recommended by Main Street Equipment
- It is normal for an unpleasant smell to be noticeable the first time the oven is used. This is caused by the burn-off of grease or solvent left over from the manufacturing
process. Before cooking in the oven, turn the oven on and set it to maximum temperature until the smell dissipates - The equipment will remain hot for a short time after use (residual heat). Avoid all physical contact with the unit during this time to prevent injury.
- This equipment is strictly for professional use and must be used by qualified personnel.
- The installation, startup, and maintenance of this equipment must be carried out by a qualified technician.
- All installation must be carried out according to the law. Main Street Equipment is not responsible for damages due to an incorrect installation, improper maintenance, or incorrect use.
These are very important regulations; if they are neglected, the equipment may not perform properly or the user may be placed at risk and void the manufacturer warranty.
CLEANING & MAINTENANCE
Regular cleaning and maintenance will maintain the appearance and performance of your range for years to come. Follow these tips to keep your range operating at its best.
BURNERS & GRATES
CAUTION:
Before cleaning, turn off the unit and let it cool down.
- DAILY: Wipe spills as they occur
- DAILY: Remove grids and trays to wash, rinse, and dry.
- DAILY: Use a wire brush to clean clogged burner ports or remove baked-on food material.
- POST EACH CLEAN: Lightly coat grates with vegetable oil to help prevent rust.
OVEN:
- WEEKLY: Oven racks and guides may be removed and cleaned with soap and water.
- WEEKLY: Oven interior may be cleaned with a suitable oven cleaning product.
RECOMMENDED CLEANING AGENTS
 | |||
| #999SUNBRIGHT Sunbright Lemon Dish Soap | # 999KNOCKOUT Knockout Heavy-duty Oven/Grill Degreaser & Carbon Remover | #999BLASTOT Blast Liquid Oven & Grill Cleaner | #147GRIDDL KIN Griddle Kleen Liquid Grill/Griddle Cleaner |
TROUBLESHOOTING
| SYMPTOM | CAUSES | SOLUTIONS |
| Pilot flame cannot be ignited | Gas Pressure is too low | Adjust release valve to proper pressure |
| Nozzle is blocked | Unblock nozzle | |
| Connection of the thermocouple is loose | Tighten thermocouple | |
| Thermocouple is defective | Replace thermocouple | |
| Gas control valve is malfunctioning | Replace gas control valve | |
| Pilot flame is on, but the main burner cannot be ignited | Gas pressure is too low | Adjust release valve to proper pressure |
| Main burner nozzle is blocked | Unblock nozzle | |
| Gas control valve is defective | Replace gas control valve | |
| Oven backfires | Nozzle diameter does not match with gass supply | Adjust nozzle diameter |
| Damper is too large | Adjust damper | |
| Gas pressure is too low | Adjust release valve to proper pressure | |
| Flow of the connected pipe is insufficient | Increase permitted flow | |
| Flame is red and accompanied by black smoke | Nozzle diameter does not match with gas supply | Adjust nozzle diameter |
| Damper is too small | Adjust damper | |
| Gas supply has run out | Replace gas | |
| Gas regulator reduces gas flow in peak demand | Decrease gas flow & increase after peak demand of gas |
If any failure occurs, stop using, and consult a qualified service technician. All maintenance should be performed after the power supply and gas supply are shut down.
ELEVATION CHARTS
| ITEM # | GAS TYPE | WATER COLUMN | UNDER 2,000 ft | UNDER 5,000 ft | UNDER 8,000 ft | UNDER 10,000 ft | ||||
| STOVE | OVEN | STOVE | OVEN | STOVE | OVEN | STOVE | OVEN | |||||||
| 541E24L | LP | 10” WC | #51 | #50 | #52 | #52 | #53 | #53 | #54 | #54 |
| 541E24N | NG | 4” WC | #36 | #36 | #38 | #38 | #38 | #40 | #42 | #42 |
| 541E36L | LP | 10” WC | #51 | #50 | #52 | #52 | #53 | #53 | #54 | #54 |
| 541E36N | NG | 4” WC | #36 | #36 | #38 | #38 | #38 | #40 | #42 | #42 |
| 541E60L | LP | 10” WC | #51 | #50 | #52 | #52 | #53 | #53 | #54 | #54 |
| 541E60N | NG | 4” WC | #36 | #36 | #38 | #38 | #38 | #40 | #42 | #42 |
Note: Nozzle elevations under 5,000, 8,000, and 10,000 ft. do not have ETL certificate approval
24“ Range LP
![]()
Item: 541 E24L
Gas Type: Propane
Orifice Size: 51 Oven: 50
BTU: 150,000
Manifold Pressure: 10″WC
Max Pressure: 13″WC Serial #:
Intended for other than household use.![]() Conforms to ANSI Z83.11-2016
Conforms to ANSI Z83.11-2016
Certified to CSA1.8-2016
Conforms to NSF std.4
Gas Food Service Equipment
MADE IN CHINA
12/2021


