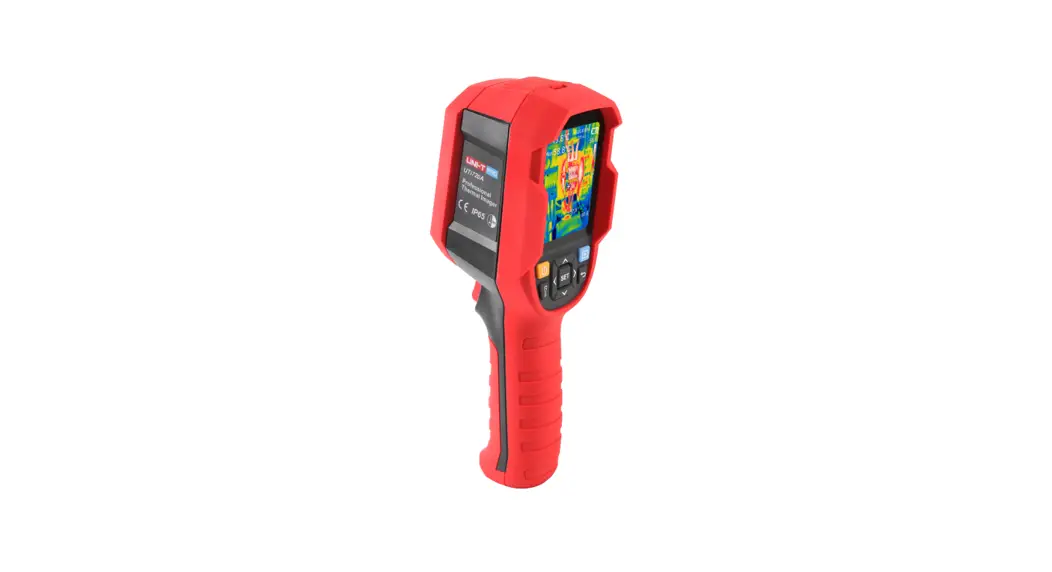
![]() UTi720A Professional Thermal Imager
UTi720A Professional Thermal Imager
User Manual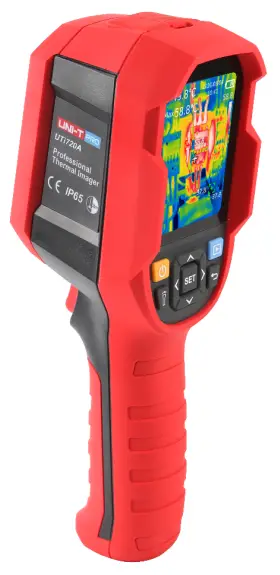
![]()
PREFACE
Thank you for purchasing the new UTi720A thermal imager. In order to use this product safely and correctly, please read this manual thoroughly, especially the Safety Instructions part.
After reading this manual, it is recommended to keep the manual at an easily accessible place, preferably close to the device, for future reference.
LIMITED WARRANTY AND LIABILITY
Uni-Trend guarantees that the product is free from any defect in material and workmanship within one year from the purchase date. This warranty does not apply to damages caused by accident, negligence, misuse, modification, contamination and improper handling. The dealer shall not be entitled to give any other warranty on behalf of Uni-Trend. If you need warranty service within the warranty period, please contact your seller directly.
This warranty is the only compensation you can obtain. Uni-Trend will not be responsible for any special, indirect, incidental or subsequent damage or loss caused by any reason or speculation. As some areas or countries do not allow limitations on implied warranties and incidental or subsequent damage, the above limitation of liability and stipulation may not apply to you.
Specifications
| Sensor | Uncooled vanadium oxide |
| Range | -20°C-400°C (-4T-752C) |
| Emissivity | 0.95 (default) 0.01-1.00 |
| Accuracy | Range: -10°C-400°C. ±2°C/±2% (whicherver is greater) |
| Response time | 5500ms |
| IR resolution | 256’192 (49152) |
| Pixel size | 12pm |
| Palettes | Iron, Rainbow, White Hot, Red Hot, Black Hot, Lava, Rainbow HC |
| Infrared spectral bandwidth | 8-14pm |
| Field of view (FOV) | 56-42.2° |
| Instantaneous field of view (IFOV) | 3.8mrad |
| Thermal sensitivity | <50mK @25°C |
| Frame rate | <25Hz |
| Temperature display | Center point temperature, high/low temperature tracking (default), ROI |
| Image format | BMP |
| Temperature measuring point | Besides the center point, 3 points can be added |
| PC analysis software | |
| Real-time image transmission | |
| Data communication | Type-C USB |
| Product size | 236mm°75.5mm°86mm |
| Display | 2.8″ TFT LCD |
| Display resolution | 320’240 |
| Battery | 5000mAh(18Wh) |
| Auto power off | 5 minutes/10 minutes/30 minutes (defaulty0ff |
| Operating time | 7-9hrs |
| Charging time | <5hrs |
| Charging voltage/current | 5V/2A |
| Image storage | Micro SD card |
| Storage temperature | -20°C-60°C (-4C-140T) |
| Operating temperature | -10C–50°C (14’F-122C) |
| Operating humidity | 10%-95VORH(non-condensing) |
| IP rating | IP65 |
| Drop proof | 2m |
| Certificates | CE FCC |
| Accessories | User manual, Type-C USB cable, TF card |
Product Structure
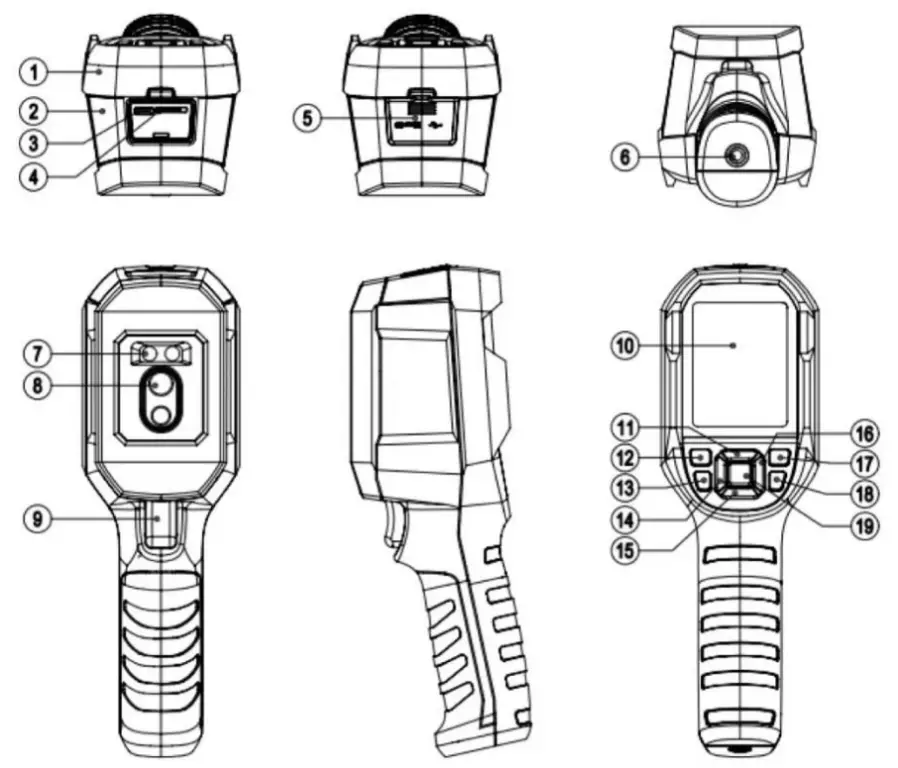
| NO. | Description | NO. | Description |
| 1 | Upper casing | 11 | Up |
| 2 | Lower casing | 12 | Power |
| 3 | USB Type-C interface | 13 | Flashlight button |
| 4 | SD card slot | 14 | Left |
| 5 | Interface cover | 15 | Down |
| 6 | Tripod mounting hole | 16 | Right |
| 7 | Flashlight | 17 | Image viewing |
| 8 | Infrared camera lens | 18 | Return |
| 9 | Trigger | 19 | SET |
| 10 | LCD |
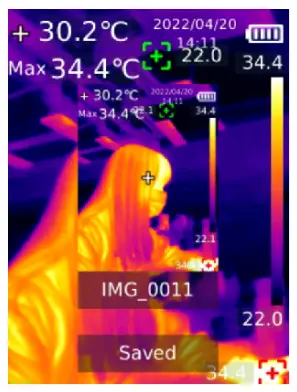
LCD Indicators/Icons
Display size: 2.8″
Display resolution: 320 (vertical) x 240 (horizontal)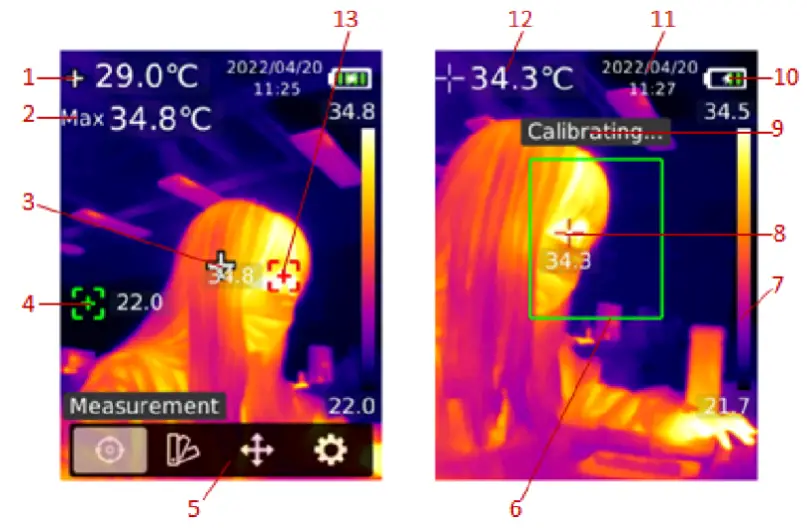
| NO. | Description | NO. | Description |
| 1 | Center point temperature | 8 | Highest temperature spot in ROI |
| 2 | Highest temperature | 9 | Calibrating |
| 3 | Center point | 10 | Battery status |
| 4 | Lowest temperature spot | 11 | Date and time |
| 5 | Menu | 12 | Highest temperature in ROI |
| 6 | ROI | 13 | Highest temperature spot |
| 7 | Range bar |
Power on/off
Long press the Power button for 3s to turn on/off the product. If the product has not been used for a long time or the measurement environment has changed, please turn on the product and leave it for 20 minutes before measuring.
Note: It will take 5 to 6s for the product to power off. Please do not turn it on and off repeatedly.
Measurement
 In the main interface, press the SET button to open the main menu. Press the Left/ Right button to select “Measurement”, and press the SET button to open its submenu. Press the Up/Down button to select Center spot/Hi/Lo spot/ROL. Press the Return button to return to the previous interface.
Palette
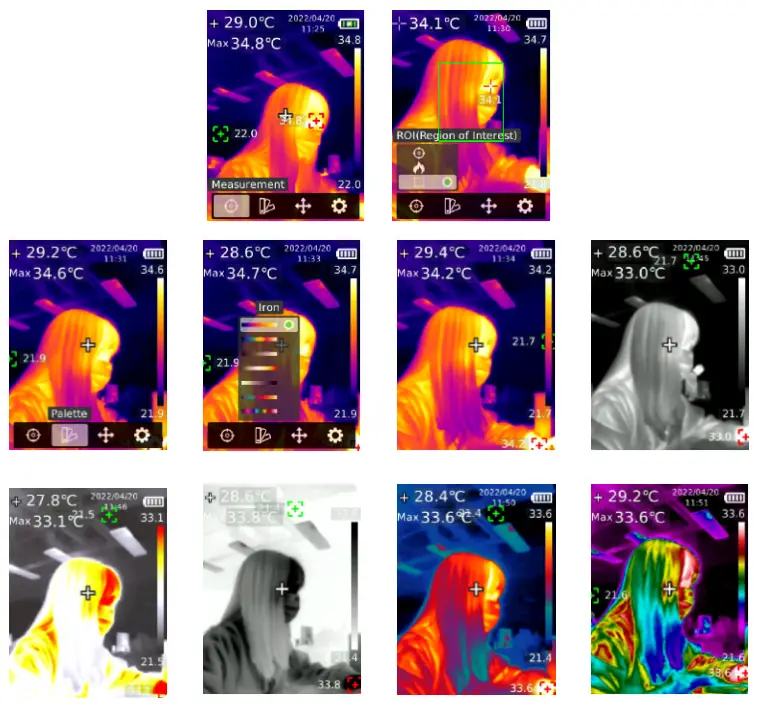 In the main interface, press the SET button to open the main menu. Press the Left/ Right button to select “Palette”, and press the SET button to open its submenu. Press the Up/ Down button to select a palette. Press the SET button to use the selected palette. Press the Return button to return to the previous interface.
Point Temperature
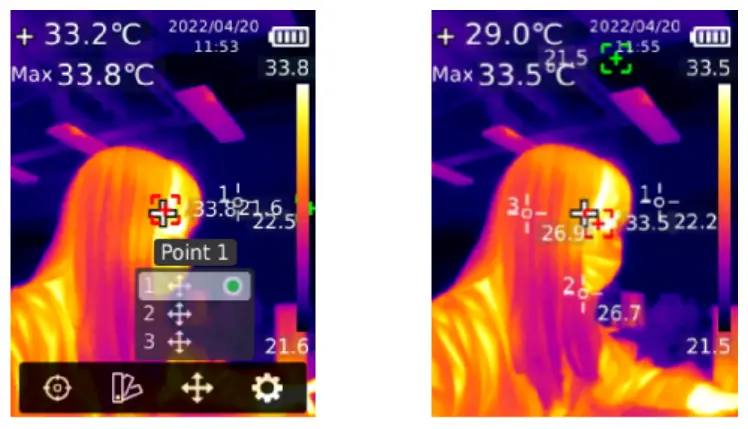 In the main interface, press the SET button to open the main menu. Press the Left/ Right button to select “Point temperature”, and press the SET button to open its submenu. Press the Up/Down button to select a point, and press the SET button to add the point to the main interface. Press the Left/ Right/Up/Down button to move the point, and press the SET button to confirm. The point temperature will show on the screen. Press the SET button again to close the point. Press the Return button to return to the previous interface.
Settings
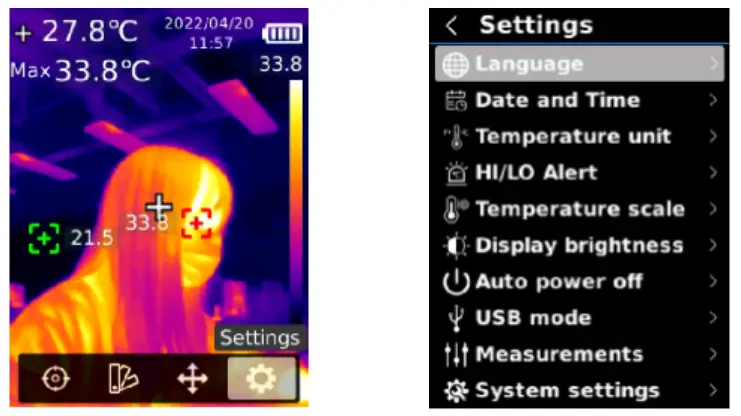 In the main interface, press the SET button to open the main menu. Press the Left/ Right button to select “Settings”, and press the SET button to open its submenu. Press the Up/ Down button to select an option in the submenu, and press the SET button to enter its setting interface. Press the Return button to return to the previous interface.
8.1 Language In the Settings interface, press the Up/Down button to select “Language”, and press the SET button to enter the language interface. Press the Up/Down button to select English/ German/French/Spanish/Swedish/Italian, and press the SET button to confirm. Press the Return button to return to the previous interface.
8.2 Date and Time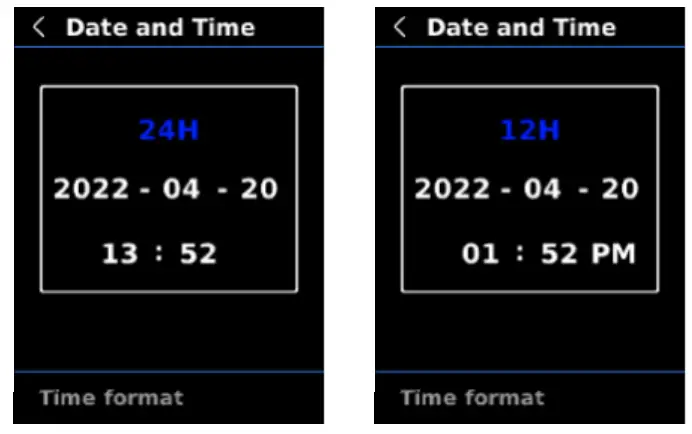 In the Settings interface, press the Up/Down button to select “Date and time”, and press the SET button to enter its setting interface. Press the Left/Right button to select time format/ year/month/day/hour/minute, and press the SET button to set the selected value. Press the Up/Down button to add/subtract, and press the SET button to save the modified value. Press the Return button to return to the previous interface.
8.3 Temperature Unit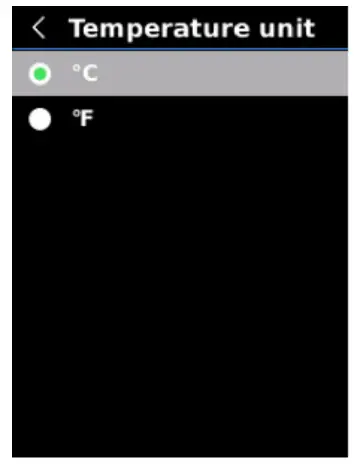 In the Settings interface, press the Up/Down button to select “Temperature unit’, and press the SET button to enter the unit setting interface. Press the Up/Down button to select °C/°F, and press the SET button to confirm. Press the Return button to return to the previous interface.
8.4 HI/LO Alert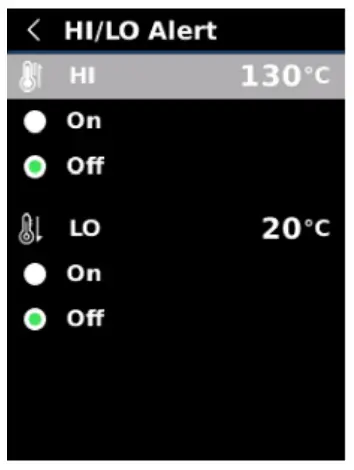 In the Settings interface, press the Up/Down button to select “HI/LO alert’, and press the SET button to enter the alert setting interface. Press the Up/Down button to select On/Off. Press the SET button to set the alert value. Press the Up/Down button to add/subtract. Press the Return button to return to the previous interface. When the HI/LO alert function is turned on, the alert will be issued when the temperature exceeds the set range.
8.5 Temperature Scale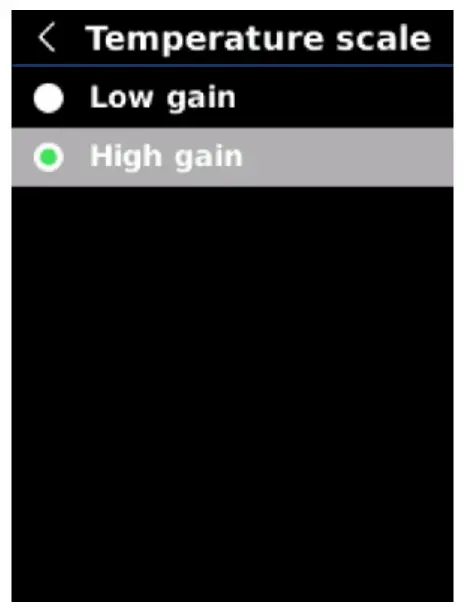 In the Settings interface, press the Up/Down button to select “Temperature scale”, and press the SET button to enter the scale setting interface. Press the Up/Down button to select Low gain/High gain, and press the SET button to confirm. Press the Return button to return to the previous interface.
Note: It will take 30s to 40s to switch between low gain and high gain.
8.6 Display Brightness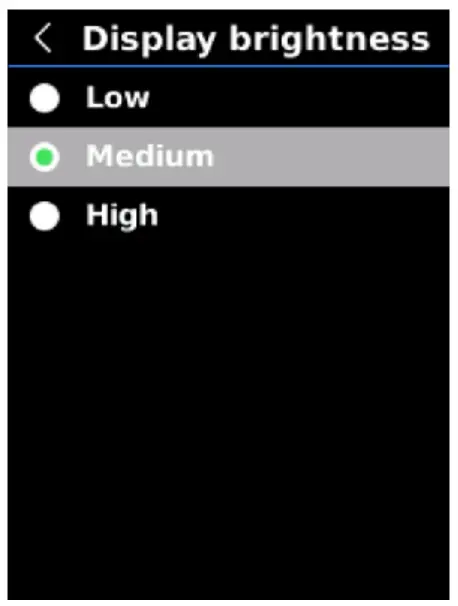 In the Settings interface, press the Up/Down button to select “Display brightness”, and press the SET button to enter the brightness setting interface. Press the Up/Down button to select Low/Medium/High, and press the SET button to confirm. Press the Return button to return to the previous interface.
8.7 Auto Power Off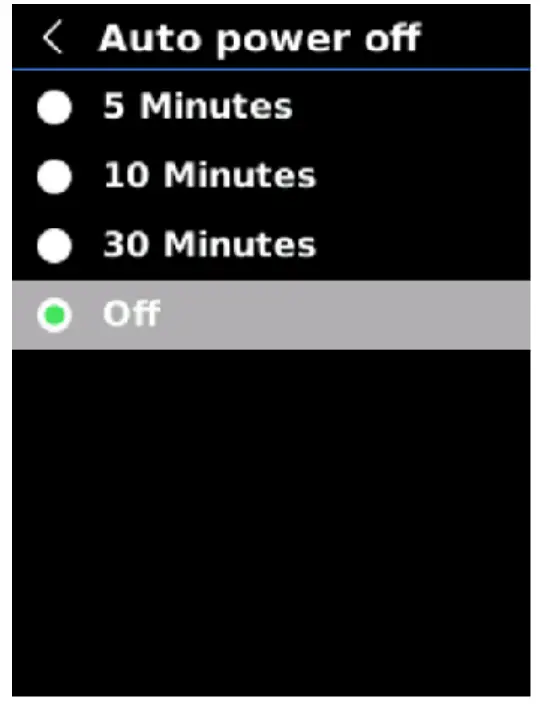 In the Settings interface, press the Up/Down button to select “Auto power off”, and press the SET button to enter its setting interface. Press the Up/Down button to select 5 minutes /10 minutes/30 minutes/Off, and press the SET button to confirm. Press the Return button to return to the previous interface.
8.8 USB Mode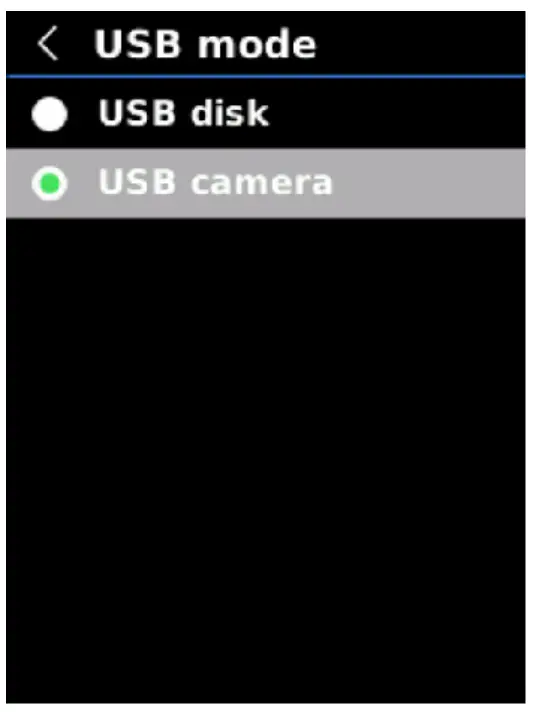 In the Settings interface, press the Up/Down button to select “USB mode”, and press the SET button to enter its setting interface. Press the Up/Down button to select USB disk/USB camera, and press the SET button to confirm. Press the Return button to return to the previous interface.
USB disk: Connect the product to the PC to view images and analyze data;
USB camera: Connect the product to the PC for real-time image projection.
8.9 Measurements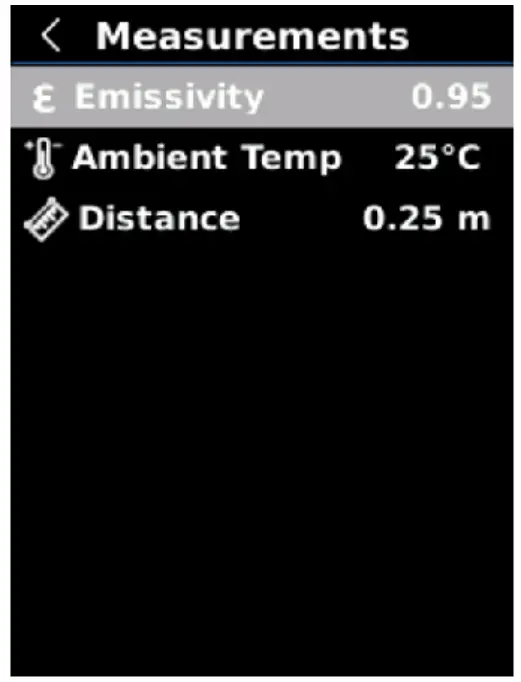 In the Settings interface, press the Up/Down button to select “Measurements”, and press the SET button to enter its setting interface. Press the Up/Down button to select Emissivity /Ambient temp/Distance, and press the SET button to set the selected parameter. Press the Up/Down button to add/subtract the value, and press the SET button to confirm. Press the Return button to return to the previous interface.
Note: For the emissivity of common objects, please refer to the table in appendix.
8.10 System Settings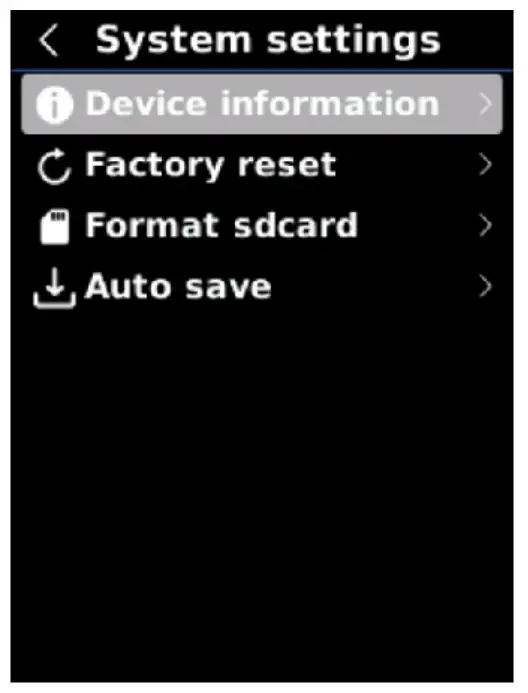 In the Settings interface, press the Up/Down button to select “System settings”, and press the SET button to enter its setting interface. Press the Up/Down button to select Device informatioNFactory reset/Format SD card/Auto save, and press the SET button to enter the submenu. Press the Return button to return to the previous interface.
8.10.1 Device Information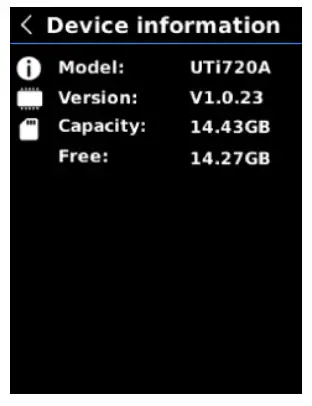 In the system settings interface, press the Up/Down button to select “Device information”, and press the SET button to enter its submenu. The Model version/ Capacity/Free can be viewed. Press the Return button to return to the previous interface.
8.10.2 Factory Reset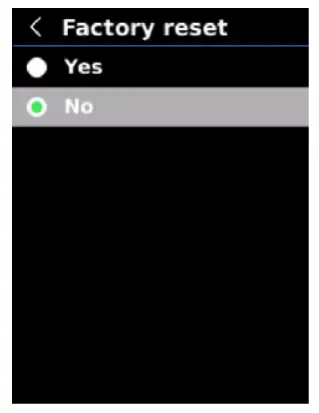 In the system settings interface, press the Up/Down button to select “Factory reset”, and press the SET button to enter its submenu. Press the Up/Down button to select Yes/No, and press the SET button to confirm. Press the Return button to return to the previous interface. Note: Do not perform other operations when restoring factory settings.
8.10.3 Format SD Card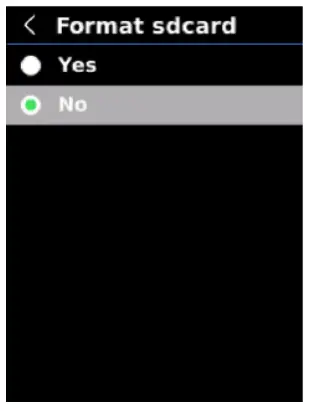 In the system settings interface, press the Up/Down button to select “Format SD card”, and press the SET button to enter its submenu. Press the Up/Down button to select Yes/No, and press the SET button to confirm. Press the Return button to return to the previous interface.
Note: When formatting an SD card, do not remove it or perform other operations.
8.10.4 Auto Save In the system settings interface, press the Up/Down button to select “Auto save”, and press the SET button to enter its submenu. Press the Up/Down button to select Yes/No, and press the SET button to confirm. Press the Retum button to return to the previous interface.
Note: Do not remove or insert the SD card when saving or viewing images. The number of saved images should not exceed 1000. Clean up the SD card if there are more than 1000 images.
Temperature Compensation and Calibration
To adapt to different environments and places, temperature compensation is available. For the specific setting method, please refer to Chapter 8.9 Measurements. To improve the measurement stability, manual calibration can be performed. Press the Return button in the main interface to calibrate.
Image Viewing
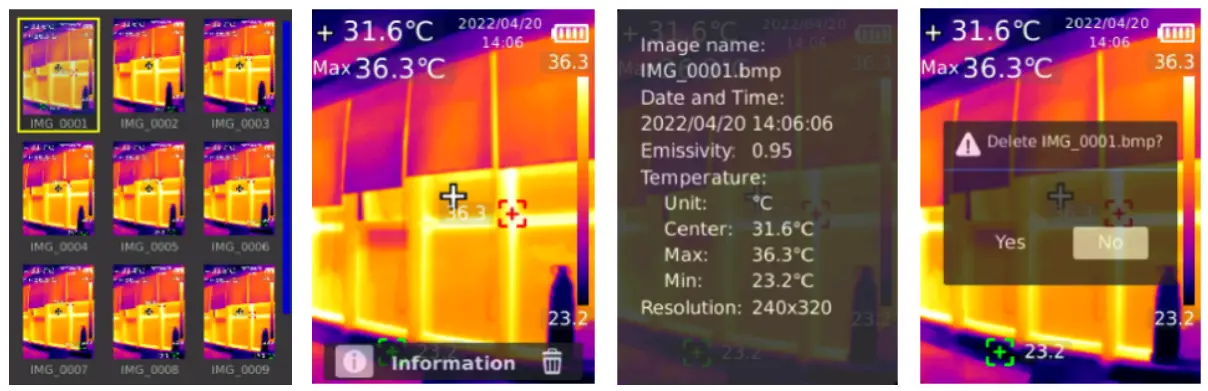 Press the Image Viewing button to view the images. Press the Up/Down/Left/Right to select an image, and press the SET button to view the image. Press the SET button again to view the image information and delete images.
Note: Do not remove or insert the SD card when viewing images.
Image Capture
 Press the trigger to capture an image Press the Left/Right button to save it or not, and press the SET button to confirm or the Return button to cancel. In the auto save mode, the images will be automatically saved to the SD card.
Note: Images can only be saved if an SD card is inserted.
Flashlight
Long press the Flashlight button for 3s to turn on/off the flashlight. When the temperature alert is on and the measured temperature exceeds the set range, the LED light will flash.
Note: When the LED light is on, please do not point it at eyes of people or animals.
USB Communication and Image Projection
- Download and install the UTi-Live Screen software and real-time image projection upper computer software.
- Refer to Chapter 8.8 USB Mode to select USB disk. Connect the product to the PC. In the PC software, users can view images and analyze data.
- Refer to Chapter 8.8 USB Mode to select USB camera. Connect the product to the PC. In the real-time image projection software, the real-time image projection function can be enabled.
- Regarding the operation of the PC software, retrieve the Software User Manual from the Help option in the main interface.
Note: Please do not unplug the USB cable during image projection. After use, please close the PC software before unplugging the USB cable.
SD Card
This product supports Micro SD card (TF card) to store images. To avoid affecting the operating speed, please copy the backup data regularly and clean up the SD card in time. To avoid causing abnormal data on the SD card, do not insert or remove the SD card repeatedly.
Charging
Please use a safety-certified 5V/1A or 5V/2A power adapter for charging.
Note: Do not turn off the product during charging. If shutdown or restart is needed, please unplug the Type-C power cord and disconnect the power supply first.
Maintenance
Use a wet cloth or weak soap solution to clean the outer shell of the device. Do not use abrasives, isopropyl alcohol or solvents to clean the outer shell, lens or windows.
Warnings
To ensure the accuracy, please read the instructions carefully before using. Please do not use the product in flammable, explosive, steamy, wet or corrosive environments. Stop using the product if it was damaged, drop or modified to avoid inaccurate measurement results.
- Please try to keep the device stable and avoid violent shaking during its use;
- Please do not use or store the instrument at a temperature higher than the permitted operating temperature or storage temperature of the device;
- Please do not direct the thermal camera at very high intensity radiation sources such as the sun, carbon dioxide lasers or arc welders etc;
- Please do not block the holes on the device;
- Do not knock, throw or shake the instrument and accessories to avoid damage;
- Please do not disassemble the device by yourself, which may cause its damage and loss of warranty rights;
- Please do not use soluble or similar liquids for the device and cables, which may cause damage to the device;
- Please do not use the device at a temperature higher than its operating temperature, which may cause its damage;
- Please observe the following measures when wiping the device:
• For the non-optical surface, use a clean soft cloth to wipe the non-optical surface of the thermal camera when necessary;
• For the optical surface, please avoid staining the optical surface of the lens when using the thermal camera and especially avoid touching the lens with your hands because sweat stains on your hands will leave a mark on the lens glass and may corrode the optical coating on the glass surface When the surface of the optical lens is contaminated, wipe it carefully with specialized lens paper; - Please do not place the battery in a high temperature environment or near high-temperature objects;
- Please do not make the positive and negative poles of the battery short-circuited;
- Please do not place the battery in a humid environment or water.
- Do not expose the equipment to dust or damp environment. When using in the environment with water, avoid splashing water on the instrument. Cover the lens cover when not using the instrument.
- When this equipment is not used, please put the instrument and all accessories in a special packing box.
- Avoid using the random SD card for other purposes.
- The graphic information of the goods used in the product introduction. The actual products have differences in materials and details due to different batches. Please understand, and please subject to the receipt of specific physical objects.
- The experimental data provided in the page are theoretical values, which are all from the intemal laboratory of our company, and it’s only for reference Customers cannot use it as a reference for ordering and shopping. It is hereby explained! If you have any questions, please contact customer service for detailed consultation.
Notice for Use
Please use the correct emissivity to obtain accurate temperature readouts. To ensure accuracy of the product, please warm it up for 20 minutes before measuring if it has not been used for a long time. When being charged, the internal temperature of the product rises, which will lead to inaccurate temperature measurement. So, it is not recommended to take measurements during or right after charging the product. The product has a self-calibration function. If the reading jumps quickly, please read the temperature after it gets steady.
FCC Compliance statement
This device complies with Part 15 of the FCC Rules. Operation is subject to the following two conditions: (1) this device may not cause harmful interference, and (2) this device must accept any interference received, including interference that may cause undesired operation.
Common Emissivity
| Material | Emissivity | Material | Emissivity |
| Wood | 0.85 | Black paper | 0.86 |
| Water | 0.96 | Polycarbonate | 0.8 |
| Brick | 0.75 | Concrete | 0.97 |
| Stainless steel | 0.14 | Copper oxide | 0.78 |
| Tape | 0.96 | Cast iron | 0.81 |
| Aluminum plate | 0.09 | Rust | 0.8 |
| Copper plate | 0.06 | Gypsum | 0.75 |
| Black aluminum | 0.95 | Paint | 0.9 |
| Human skin | 0.98 | Rubber | 0.95 |
| Asphalt | 0.96 | Soil | 0.93 |
| PVC | 0.93 |
Note: This user manual can be downloaded from the official website of Uni-Trend.
This manual is subject to change without prior notice.
![]() UNI-TREND TECHNOLOGY (CHINA) CO., LTD.
UNI-TREND TECHNOLOGY (CHINA) CO., LTD.
No.6, Gong Ye Bei 1st Road,
Songshan Lake National High-Tech Industrial
Development Zone, Dongguan City,
Guangdong Province, China


