
ES8100: V-LOCK
INSTALLATION GUIDE AND USER MANUAL
ES8100-121 (1)
 https://rebrand.ly/ES8100
SCAN FOR DETAILED
PRODUCT INFORMATION
ASSA ABLOY Australia Pty Limited, 235 Huntingdale Rd, Oakleigh, VIC 3166 ABN 90 086 451 907 ©2022
Experience a safer and more open world
IMPORTANT SAFETY INSTRUCTIONS AND WARNINGS
- Read and follow all instructions prior to installing and using this product.
- These instructions or a full copy of these instructions should be provided to the user.
- These instructions should be kept by the end user for future reference.
- Obey and heed all warnings on the product and in the manual.
- Ensure the functionality, specification and configuration of the ES8100: V-Lock is befitting for the intended application and environment. This may include in the event of a power failure and the ability to exit any building access point in an emergency.
- Do not use this unit near excess water or moisture not typical to natural rainfall and installation practices i-e., installed in a door frame/enclosure.
- Do not use this unit in environments with excessive air dust that could accumulate and prevent correct operation.
- Avoid prolonged exposure to direct sunlight or heat.
- This product is not suitable for environments with explosive or flammable atmospheres.
- Only use attachments, accessories, and fixings as specified by the manufacturer.
- Clean with a dry cloth only, do not use chemicals.
- Refer all servicing to qualified service personnel. Servicing or replacement is required when the unit has been damaged. This may include either mechanical or electrical issues. This may also include the ingress of liquid spilled or objects which have fallen into the unit or if the unit has been exposed to excessive rain or moisture and no longer operates normally. Do not attempt to service this product yourself.
- Opening or removing covers may expose you to dangerous voltages or other hazards.
- To prevent the risk of fire or electric shock ensure the power supply or system is suitable for this product in addition to any other units already sharing the same power supply or system.
- Do not let objects or liquids enter the product as they may prevent correct the operation, possibly preventing door access or short-out parts that could result in a fire or electric shock.
- Modification of this product in any way may affect both its functionality and compliance status and will void any warranty and claim to compliance, ratings or performance.
- Ensure the correct power supply is connected.
DO NOT connect AC mains power to this product.
TROUBLESHOOTING GUIDE
- The lock will only lock when the magnet in the strike plate is detected within range. Always ensure that the strike plate and lock are correctly aligned and door gap is within the 3 – 8mm range.
- The lock continuously monitors its status and the status of the environment. The lock will warn users using the indication LED (regardless of the LED activation status). The following errors may be seen:
| Indicator LED | Fault | Required action |
| Fast flashing red and blue | Critical system fault | The lock will move to its non-powered state – replace the lock |
| Slow flashing red and blue | System fault warning | The lock is approaching the end of its life – replace the lock |
| Blue | Lock jam or timeout | Check for obstructions and strike plate alignment |
| Purple | Main motor over current | Check for obstructions and strike plate alignment |
| Flashing purple | Blocking motor over current | Check for obstructions and strike plate alignment |
| Orange | Overvoltage | Check power supply and grounding |
| Yellow | Under voltage | Check power supply and grounding |
| Flashing yellow | Power supply fault | Check power supply and grounding |
| Flashing blue | Under temperature | Check environmental conditions |
| Flashing red | Over Temperature | Check environmental conditions |
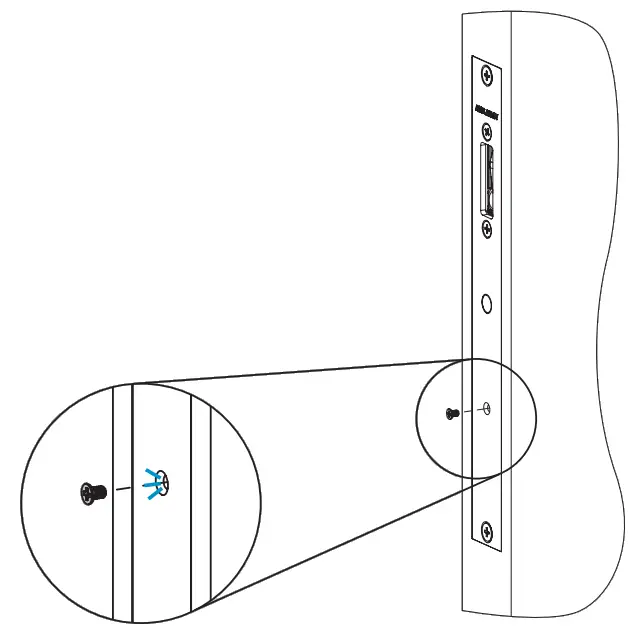
- A heartbeat LED is provided under the small screw In the cover plate. A slow flashing blue light confirms the lock is powered and operating correctly.
MAINTENANCE, STORAGE, AND DISPOSAL
MAINTENANCE
Clean the external surfaces with a dry cloth only, do not use chemicals.
FAULTS, REPAIRS & RETURNS
This product contains no user-serviceable parts. Please contact your local supplier.
STORAGE AND TRANSPORT
The product should be transported and stored in its original packaging.
DISMANTLE & ENVIRONMENT
Dispose of packaging and product in a responsible manner, this may include recycling at your nearest recycling center. Including the reuse and recycling of the materials & packaging of this product. Contact your local authority to find the nearest electrical and electronic equipment waste disposal point. This product must not be disposed of with regular household waste.
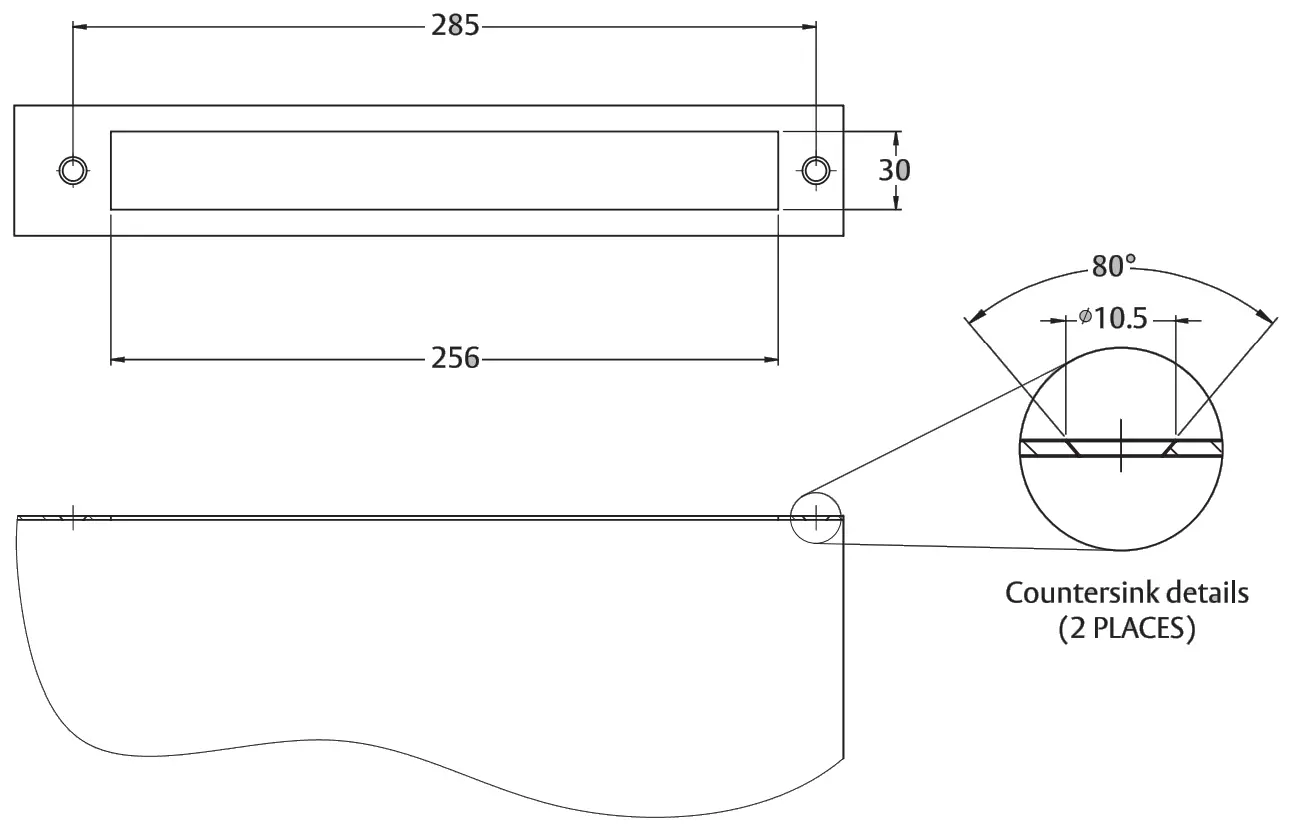
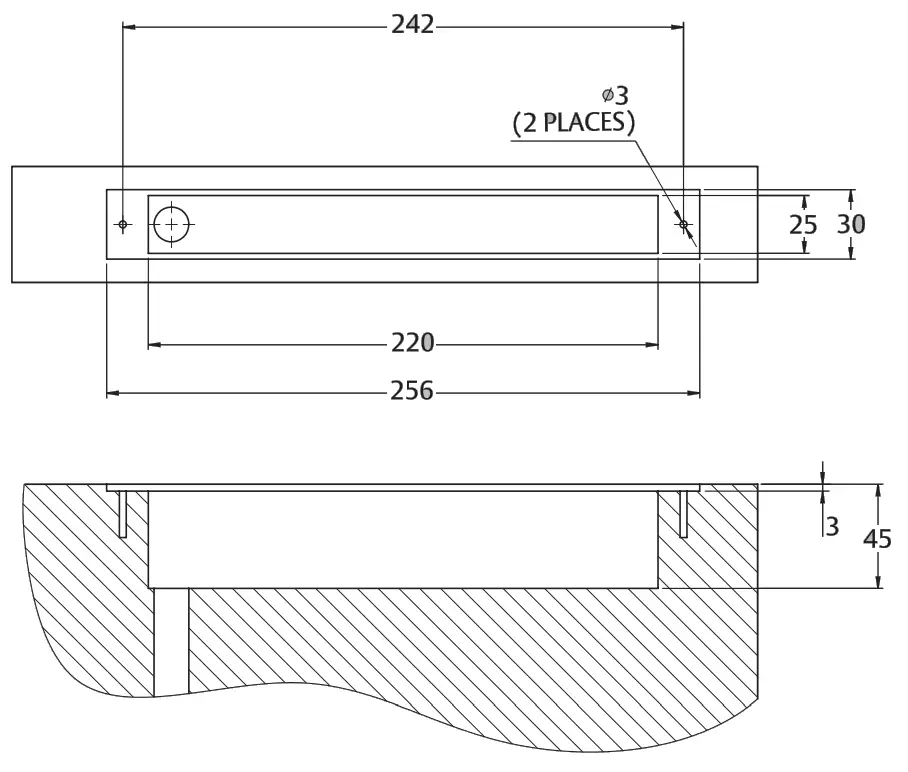
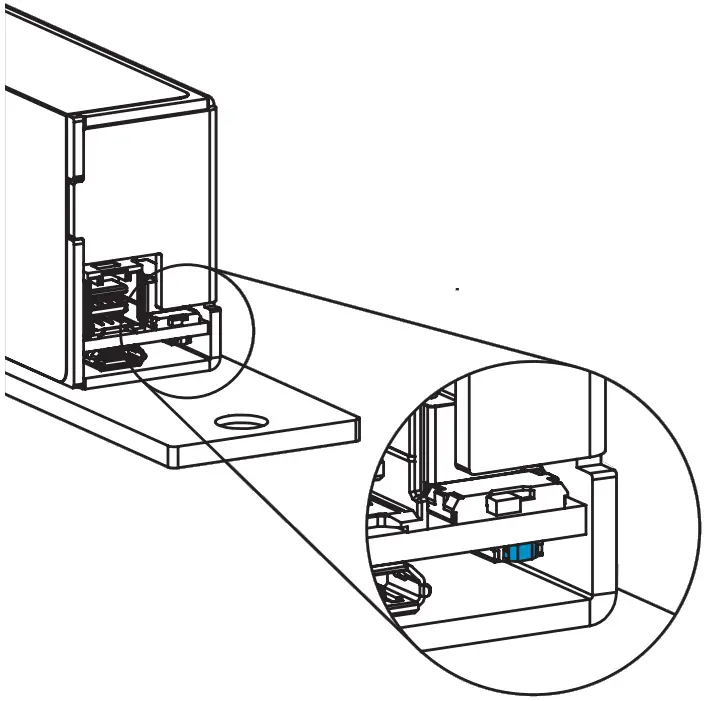
HOLLOW FRAME PREPARATION FOR LOCK
LOCK INSTALLATION I N A HOLLOW FRAME
Connect the power cable and complete the lock setting and indication LED activation before securing the lock.
Loosely fit mounting plates using screws and nuts.
Fit the lock then tighten all Screws.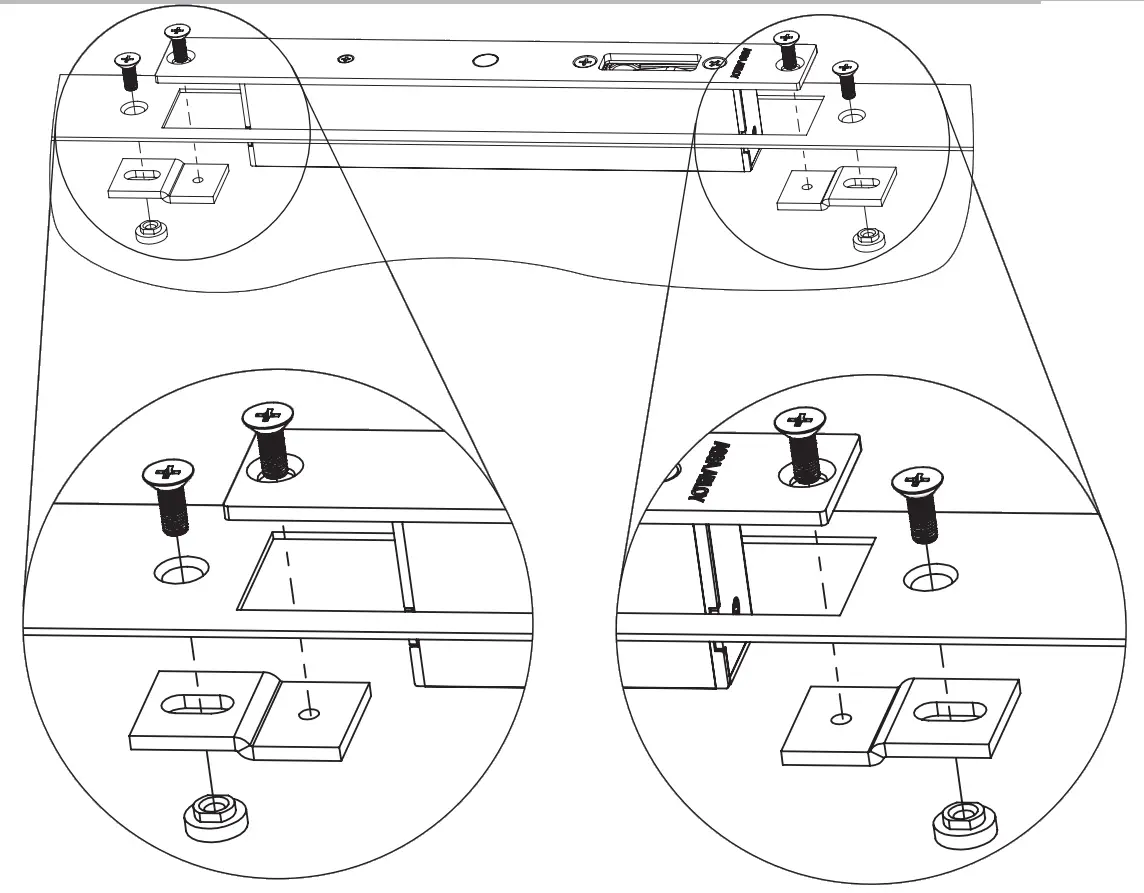
IMPORTANT INSTALLATION AND FIXING INSTRUCTIONS
- Ensure the electric lock meets your physical (dimensions), grade/rating and electrical specification before going any further. It is recommended to verify that the door & door frame construction allows the use of the device.
- Before fitting the electric lock to a fire/smoke-resisting door, the fire certification should be examined to ensure the suitability of the electric lock for that door assembly.
- Before fitting this product, the door should be checked to ensure correct hanging and freedom from binding.
- The electric lock shall be installed using the specified fasteners and instructions for the door type and installation the electric lock is designed for.
- This product is designed for metal, timber, or glass doors.
- This electric lock can be used on double-action (double swing) doors.
- Care shall be taken to ensure that any seal or weather stripping fitted to the complete assembly, does not inhibit the correct operations of the electric lock.
- Fixing instructions must be carefully followed during installation. The instructions and any maintenance instructions must be passed on by the installer to the user.
- All components specified for the intended installation shall be fitted to ensure that any compliance or stated performance is satisfied.
- All components specified for the intended installation shall be fitted to ensure compliance.
- It is important to follow the instructions precisely to ensure the lock and strike plate are correctly positioned.
MOUNTING ORIENTATION
The ES8100: V-lock can be installed horizontally or vertically.
When mounting the V-lock vertically, the orientation must be as per the direction shown on the product label.
Never mount the V-lock on the floor.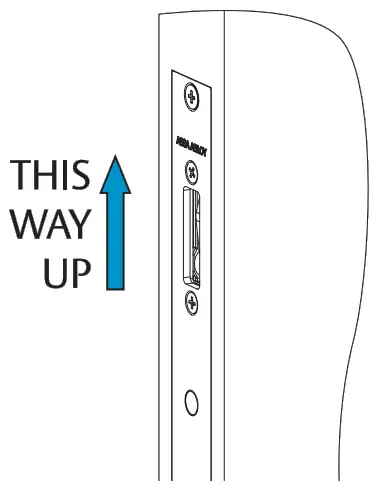
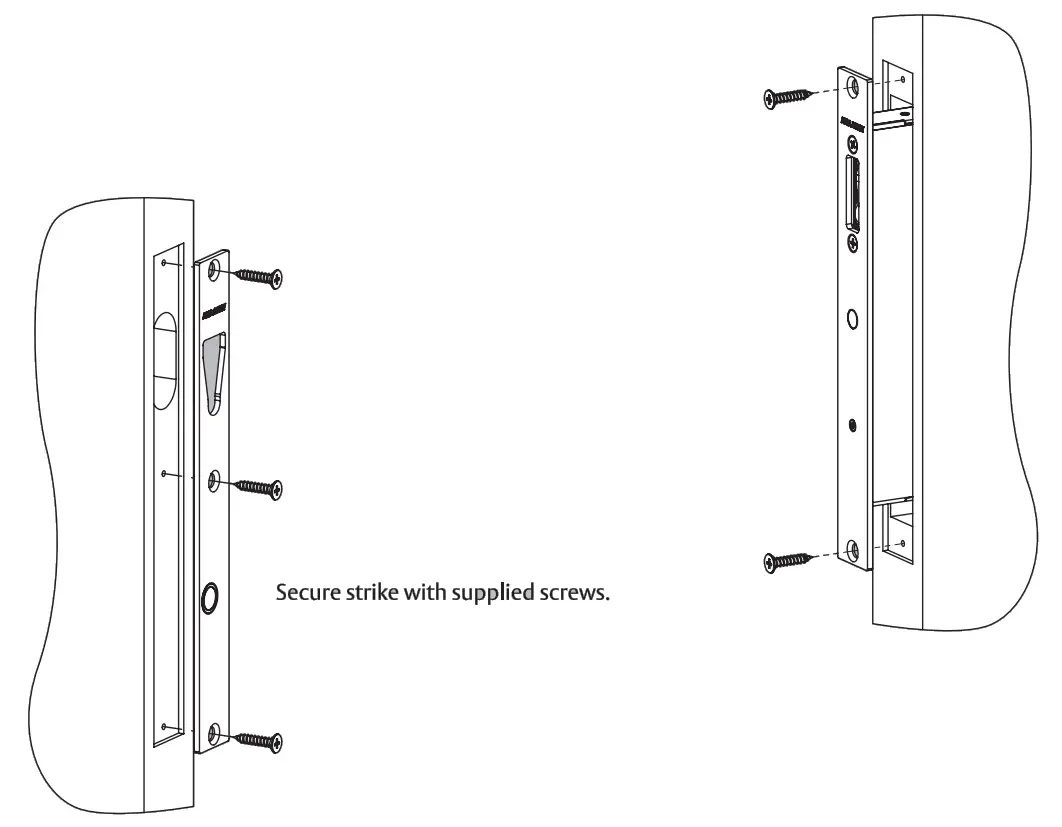
TIMBER LOCK AND STRIKE INSTALLATION
Connect the power cable and complete the lock setting and indication LED activation before securing Glock with supplier dscrews.
LOCK SPECIFICATIONS
| Power supply | 11 – 26VDC |
| Operating current | Peak : 1000mA @ 12VDC Standby : 35mA @12VDC with LED activated |
| Lock Status Monitor | NO / NC contacts (50mA @ 30VDC) |
| Door Position Monitor | NC (50mA @ 30VDC) |
| Maximum door-side load | Unlocking: 100kg (3 wire mode), 15kg (2 wire mode) Locking : 20kg (12W), 35kg (24W) |
| Operating temp. | -10 to 55°C |
| Mass | 750g |
| Dimensions | 256 x 30 x 42mm |
| IP rating | IP53 |
CONTENTS
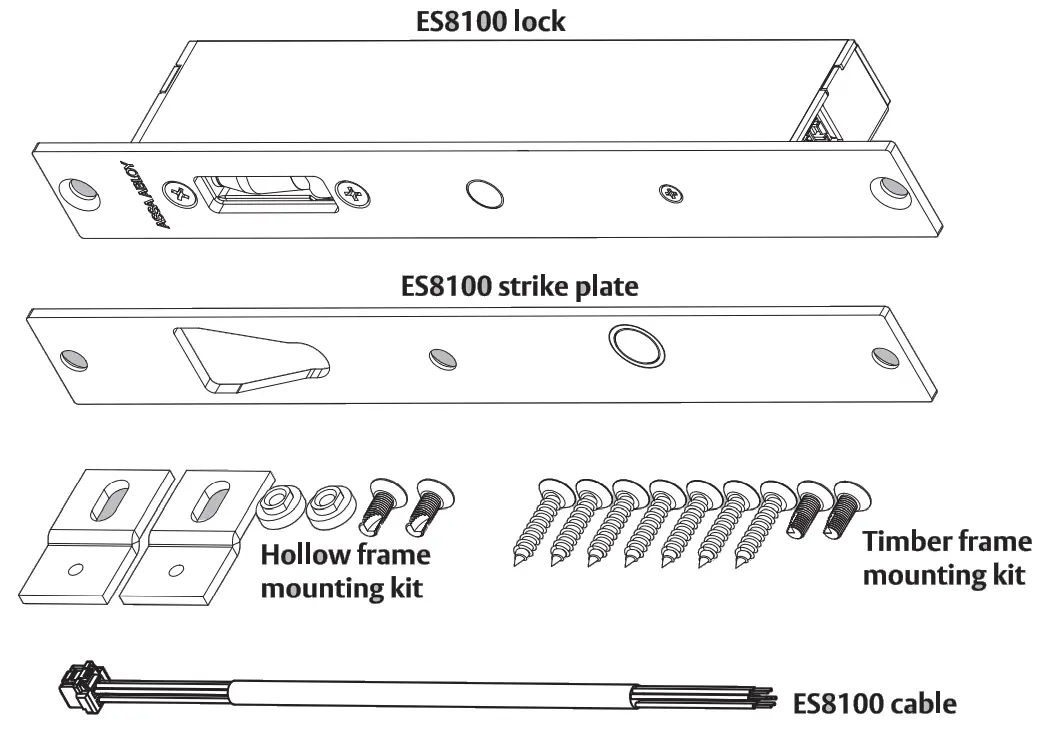
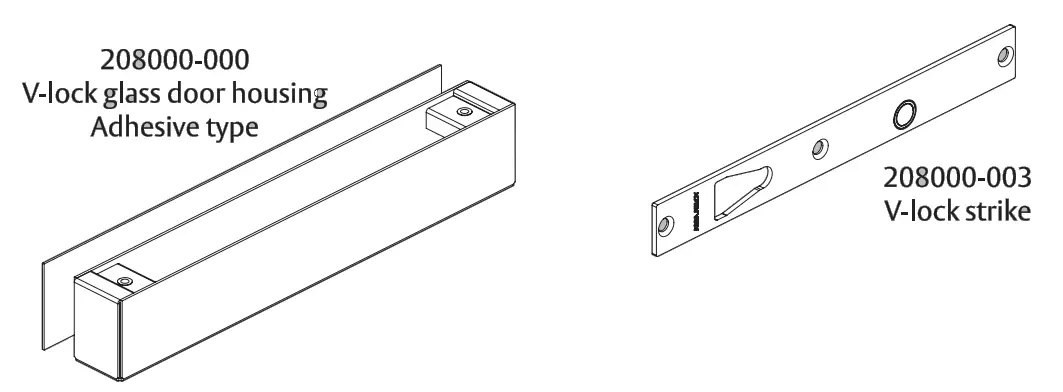
AVAILABLE MOUNTING KITS AND SPARE PARTS
Additional accessories are available for optional mounting & spare parts (not supplied):
TIMBER FRAME PREPARATION FOR LOCK
TIMBER DOOR PREPARATION FOR STRIKE

Ensure strike and lock are aligned.
WIRING SCHEMATIC
Schematic shows lock locked state with a strike in position.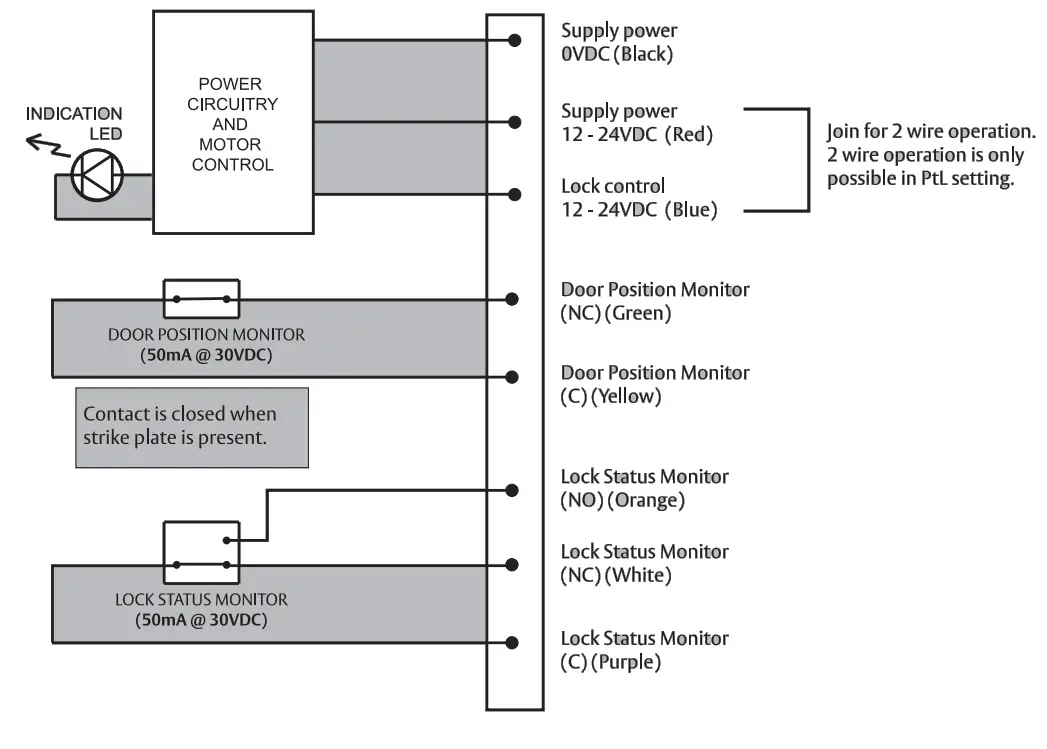
Contact is closed when the bolt is fully extended and locked.
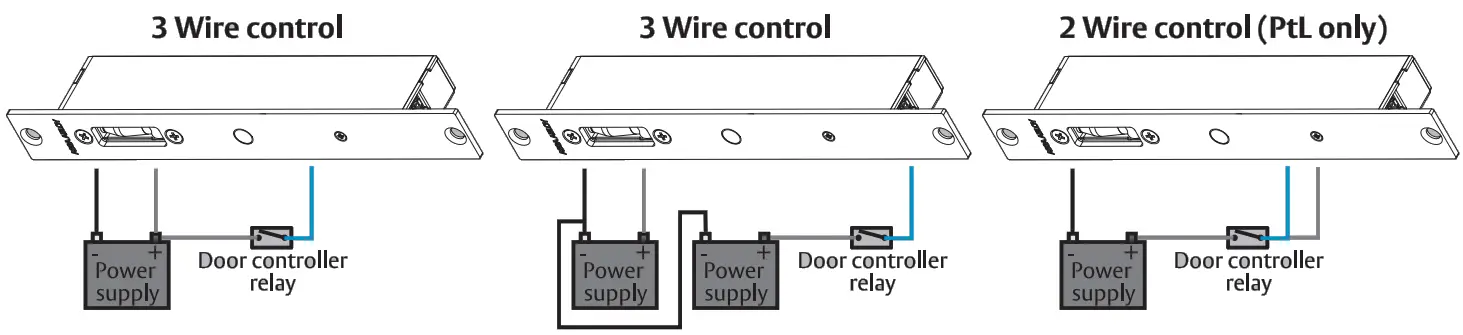
WIRING NOTES
- 3 wire operation is recommended when using the ES8100: V-lock.
- 2-wire operation possible in PtL setting only. The lock will operate slower when operated in 2-wire mode.
- Ensure ground reference is common for both power (red) and control (blue) cables.
 Ensure ground references are common
| Cable gauge requirements | |||||
| Distance | Cable cross-section | American wire gauge | Distance | Cable cross-section | American wire gauge |
| 5m | 0.33mm2 | AWG22 | 20m | 1.31111[112 | AWG16 |
| 10m | 0.65mm2 | AWG19 | 30m | 1.63 m m2 | AWG14 |
| 15m | 1.04mm2 | AWG17 | 50m | 2.05mm2 | AWG12 |
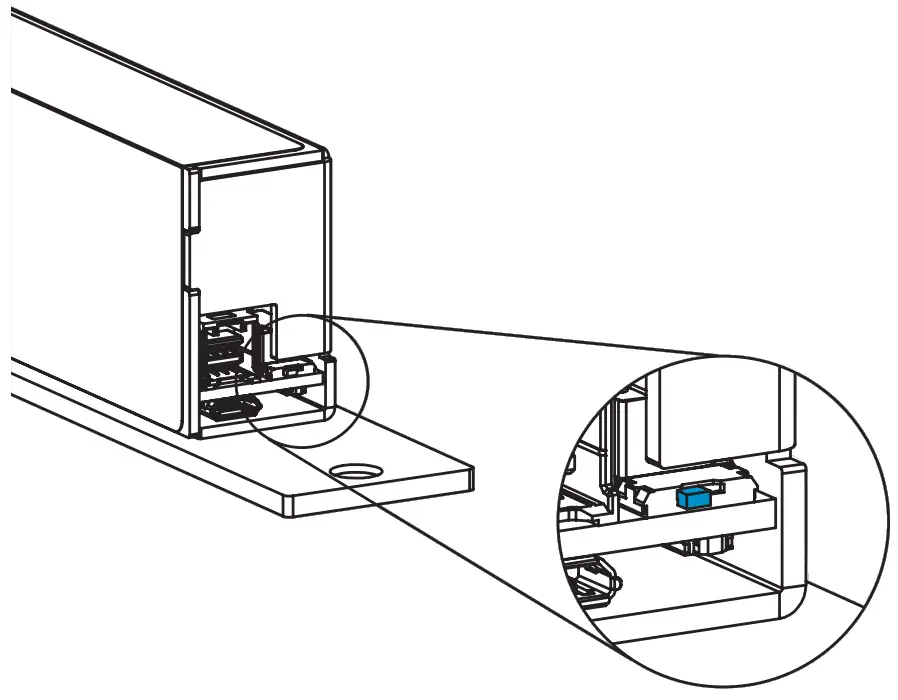
SETTING LOCK FUNCTION
Adjust the slide switch at the rear of the lock to select the locking function.![]() PtO~ Power to Open or Fail Secure
PtO~ Power to Open or Fail Secure![]() Pte ~ Power to Lock or Fail Safe
Pte ~ Power to Lock or Fail Safe
For lock function setting changes to take effect, the lock has to be completely powered down (approx. 2 minutes without power).
The new setting will be active when the lock is next powered.
The lock is shown in the PtL setting
A lock is supplied in the Pte setting
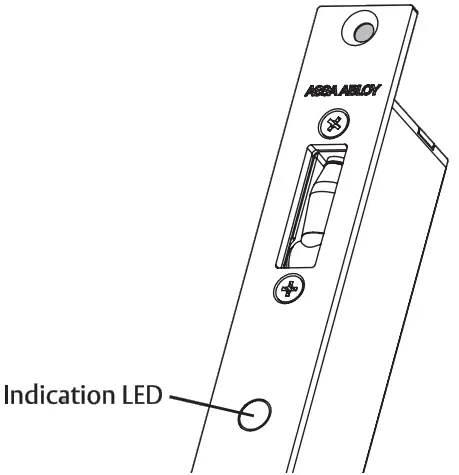
SETTING INDICATION LED
- The lock is supplied with the indication LED activated and illuminated red when secure.
- To activate or de-activate the indication LED:
- Supply the lock with power through a USB or main connector.
- Carefully press and hold the push button for 3 seconds.
The lock will enter setup mode and the LED will illuminate white. - Short press the button to select illumination color or deselect LED activation.
- The lock will cycle through the LED indication table with each short press and display the secure illumination color for 1s to indicate a setting change.
- Press the button for 3 seconds to exit setup mode. The LEDs will no longer illuminate white and will begin to illuminate according to the power supplied and lock status.
- The setup mode will time out after the 60s and the setting will not be saved.
The push button is located under the slide switch.
| LED indication table | ||
| Lock secure | Lock open | ls display |
| RED | GREEN | RED (default) |
| GREEN | RED | GREEN |
| OFF | OFF | PURPLE |
CERTIFICATION AND CONTACT DETAILS
 EU CE DECLARATION OF CONFORMITY (DoC)
Hereby, ASSA ABLOY Australia Pty Ltd declares that the ES8100: V-Lock is in compliance with the CE Directives including the Electromagnetic Compatibility (EMC) directive, Restriction of Hazardous Substances (RoHS) directive & Registration, Evaluation, Authorisation, and Restriction of Chemicals (REACH) Regulation.
The full text of the EU declaration of conformity is available at www.assaabloy.com/es8100
 UKCA DECLARATION OF CONFORMITY (DoC)
Hereby, ASSA ABLOY Australia Pty Ltd declares that the ES8100: V-Lock is in compliance with the United Kingdom (UK) legislations including the Electromagnetic Compatibility Regulations 2016 and the Restriction of the Use of Certain Hazardous Substances in Electrical and Electronic Equipment Regulations 2012.
The full text of the UKCA declaration of conformity is available at www.assaabloy.com/es8100
![]() RCM Australia & New Zealand
RCM Australia & New Zealand
Hereby, ASSA ABLOY Australia Pty Ltd declares that the ES8100: V-Lock is in compliance with the Regulatory Compliance Mark (RCM) for Australia and New Zealand.
 SCAN FOR DETAILED
PRODUCT INFORMATION
https://rebrand.ly/ES8100
Manufacturer Details
ASSA ABLOY Australia Pty Ltd.
235 Huntingdale Road, Melbourne
Victoria, 3166, Australia
Phone: 1300 LOCK UP (1300 562 587)
www.assaabloyopeningsolutions.com.au
ASSA ABLOY Australia Pty Limited, 235 Huntingdale Rd, Oakleigh, VIC 3166 ABN 90 086 451 907 ©2022
Experience a safer and more open world
ASSA ABLOY


