Bkav QCS605 Open Development Kit
Revision history
| Revision | Date | Description |
| A | April 2021 | Initial release |
Figure
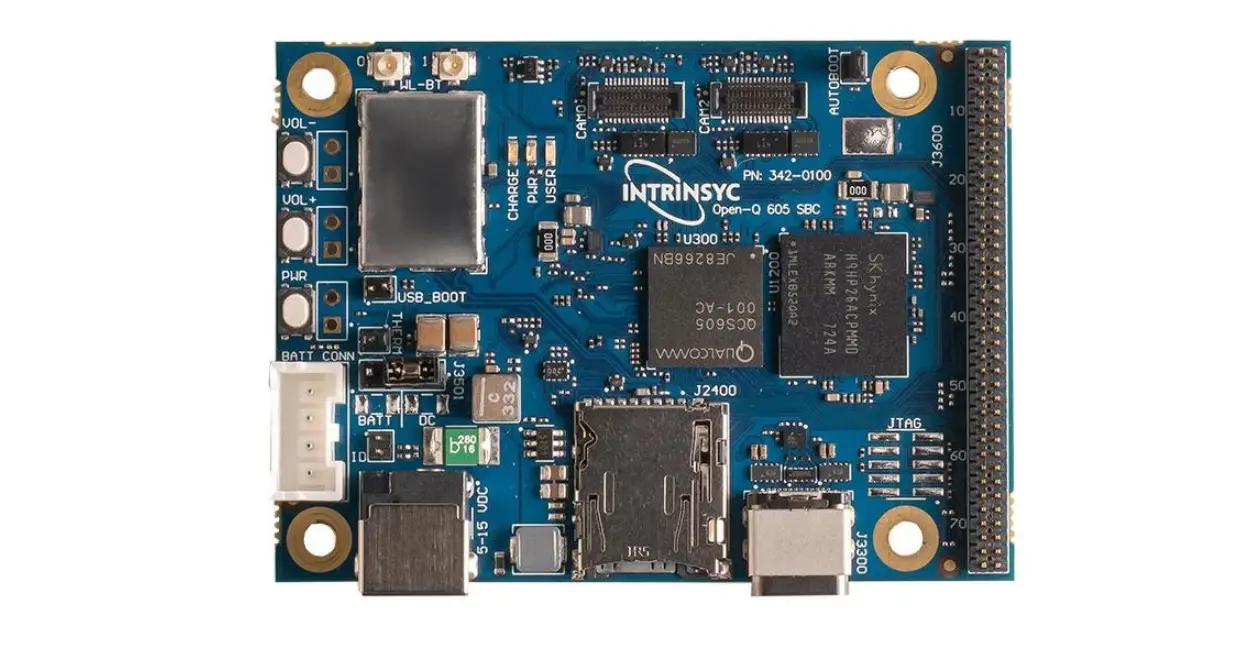
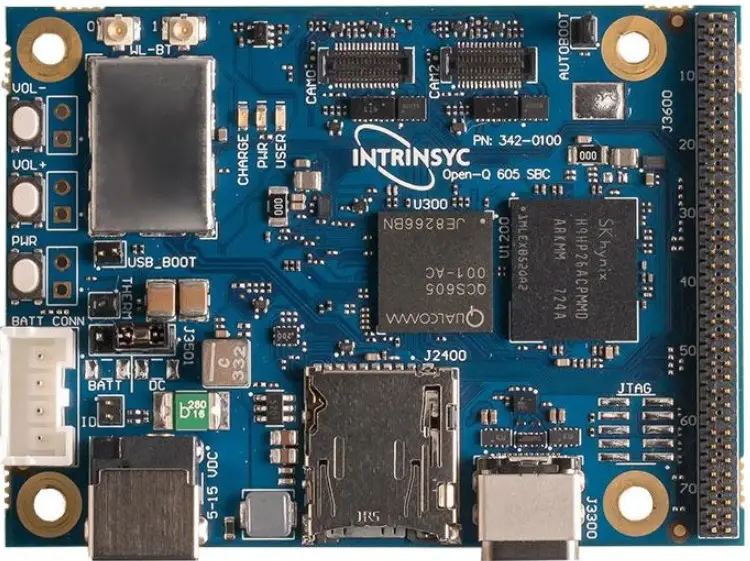
Figure 2.1 – Qualcomm® QCS605 K01 Open Development Kit
Figure 4.1 – Diagram of a reference solution
Introduction
Purpose
Describes the overview, specifications, and operation instructions for the QCS605 K01 Open Development Kit.
Conventions
Function declarations, function names, type declarations, attributes, and code samples appear in a different font, for example, cp armcc armcpp.
Code variables appear in angle brackets, for example, <number>.
Commands to be entered appear in a different font, for example, copy a:*.* b:. Button and key names appear in bold font, for example, click Save or press Enter.
Technical assistance
For assistance or clarification on information in this document, submit your inquiry by filling out a form at https://www.excelpoint.com/.
For assistance or clarification on information in this document, submit a case to Qualcomm Technologies, Inc. (QTI) at https://createpoint.qti.qualcomm.com/.
If you do not have access to the CDMATech Support website, register for access or send email to [email protected]
Device overview
 Figure 2.1 – Qualcomm® QCS605 K01 Open Development Kit
Powered by the Qualcomm® QCS605 SoC (System on Chip) also known as the Qualcomm® Vision Intelligence Platform, the QCS605 K01 Open Development Kit produced is the perfect reference design for the IP camera.
Coupling Qualcomm® Artificial Intelligence Engine with our industry expertise in camera and imaging, you are guaranteed to have the best in class visual quality for your product.
Device specifications
This section contains details of the device specifications.
Hardware specifications
| Key SOM Component | Name | Details |
| Processor | Qualcomm QCS605 chipset | |
| Image sensor | Sony IMX334 | 8.42 M effective pixels Type 1/1.8 |
| Memory | Samsung K4U6E3S4AM Samsung LMAG1JETD- B041 | LPDDR4x 2GB eMMC 16GB |
| Lens | Varifocal lens | Zoom 3x F1.2 FOV 112.0° – 47.2 ° |
| WiFi + Bluetooth/BT | WCN3990 | WLAN 802.11 a/b/n/ac 2.4/5GHz 2×2 MIMO Bluetooth 5.0 |
| Ethernet | LAN7800 | 1 x GbE Ethernet |
| Video out | DSI to HDMI bridge Lontium LT9611UCX | HDMI Type D, Resolution up to 4K/60Hz, Support with I2S audio |
| Audio amplifiers x2 | Support 2xWSA881x connected to the board | |
| Audio | D-MIC x4 | |
| USB connector | USB Type C | USB Type C 3.1 |
| Power input | DC 12V/2A power input PoE 802.3af/at | DC +12V from wall supply PoE 802.3af/at |
| Storage | eMMC/micro SD card | |
| Location | GPS | GPS/GLONASS |
| Debug port | JTAG/UART |
Software specifications
OS
- Android-based
- CC SDK – Framework QMMF for recording and playback
Audio
- PCM playback/record
- Stereo/multi-channel AAC encoder
- Fluency Pro multi-channel noise suppression
Imaging
- Basic image settings
- Joint manual control for WB, EV, shutter speed, and ISO for photo and video
- JPEG/RAW snapshot capture
- HW TNR
Video
- 4K30, 4K60
- H.264, H.265
- MPEG-4
- MPEG-H
- Overlay
- zzHDR
Connectivity
- Bluetooth
- WLAN 802.11
- USB 3.1 Gen 2
- USB video class V1.5 (driver only)
- USB audio class V2.0 (driver only)
NOTE: For a complete set of features and limitations refer to the latest release notes from QCS605 LA 2.0 platform (available in Create Point)
Operation
IP camera operation
A demo version of this software is available. Contact the QCT support team via https://createpoint.qti.qualcomm.com for further details.
Creating a build for the QCS605 Open Development Kit
See QCS605 Linux Android Software User Manual (SP80-PF105-4) for the steps to download and create a complete build.
Camera SDK
The reference design is built on top of a customized Android platform. OEMs can develop applications using the connected camera SDK, an open source SDK (based on C/C++). For further details on the connected camera framework, contact the QCT support team via https://createpoint.qti.qualcomm.com.
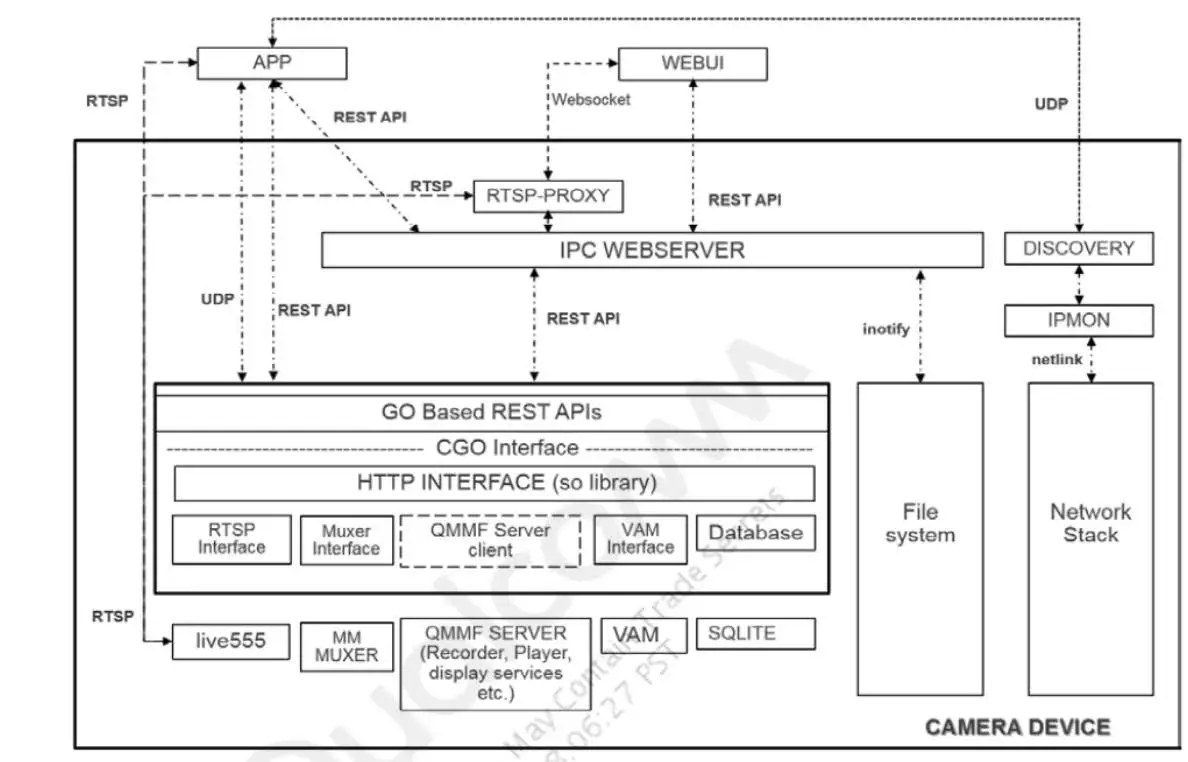 Figure 4.1 – Diagram of a reference solution
Software
Initial setup
- Ensure that you have the following items ready:
- QCS605 Open Development Kit
- USB type C cable
- AC adaptor (12V/2A, 6.4mm, 2mm) or PoE
- PC with the latest Qualcomm USB driver (QUD.WIN.1.1 Installer)
Powering on & turning off the device
Power on
- Insert AC adaptor to DC jack, device will boot-up automatically
- Insert USB (Type-C) into device and connect with PC check by “adb devices” to confirm if device is working
- One adb device should be detected by PC
Power off
- Remove AC adaptor from device directly to power off
Connecting to WIFI
- Ensure WLAN drivers are available
- Ensure wlan0 interface is up
- Ensure the configured network is available
adb root
adb remount
adb shell
iw dev wlan0 scan | grep SSID
(you can see the configured network details in the scan result.) - Ensure the required network details are configured in /data/misc/WIFI/WifiConfigStore.xml
- If not available in /data/misc/WIFI/WifiConfigStore.xml, follow below instructions to add a network:
-> Edit WifiConfigStore.xml
adb root
adb mount
adb push WifiConfigStore.xml /data/misc/wifi/WifiConfigStore.xml
adb reboot
Device functionality
LENS Control
- Input the following instructions 1 minute after boot-up
adb shell
adb root
adb remount
adb shell
driver_len
5 –> 4 –> 5 –> 4
Ethernet
- Input the following instructions 1 minute after boot-up
- Connect the device to one router.
- For example, router’s default IP address is 192.168.0.1
- Power on device and wait for 1 minute
adb shell “ifconfig | grep eth0” to confirm Ethernet is listed
adb shell “ping 192.168.0.1” to check if device can get response from the
router
Perform recording
Steps to test:
- Set the device in root privileges
adb root
adb remount - Using qmmf_recorder_test Menu Options
adb shell
qmmf_recorder_test
1 : Connect
3. Start Camera
6. Create 4K AVC Session
A. Start Session <recording in progress> To stop recording:
B –> D –> 4 –> 2 –> X - Once completed, output files are generated in /data/misc/qmmf folder
Troubleshooting
Problem & Debug instructions
| Problem | Debug instructions |
| Does not boot up |
|
| Lost WiFi/BT function | Flash all images by fastboot. If this does not work, return the device for further analysis. |
| No GPS data | |
| No Sensor data | |
| No image streaming | |
| No USB function | It means device not detected by PC via USB cable
|
| No HDMI output |
|
| |
| Cannot access the SD card | Try another SD card (SanDisk is recommended). If this does not work, return the device for further analysis. |
| No Ethernet function | Follow Section 5.4.1 step-by-step to enable and verify ethernet functionality
|
Device restore & recover
Using fastboot to flash all images
- Flat build SW packages are available for download. Please contact our support team for download SW packages
- Load adb command “adb reboot bootloader”
- Load fastboot command “fastboot devices” to confirm if the device is in fastboot mode
- If it is in fastboot mode, run upgrade.bat to flash all images
- If not, unplug/plug-in the USB cable several times until the device is in fastboot mode then run upgrade.bat to flash all images
- If it still is not in fastboot mode, use QFIL to re-flash the images
- Load fastboot command “fastboot reboot” to re-boot the device
Entering emergency download mode (EDL) by using a re-worked USB cable
- Short the D+ (green cable) and GND (black cable) of the USB cable
- Connect the device to a PC using this cable and then the device can enter 9008 mode
- Swap in a normal USB cable then connect the device to a PC again to flash the images using the QFIL mode.
A. References
| Title | Number |
| Qualcomm Technologies, Inc. | |
| QCS605 Linux Android Software User Manual | SP80-PF105-4 |
| QFIL User Guide | 80-NN120-1 |
| QCS605 VR360 Reference Device | 80-PF105-35 |


