DELL iDRAC9 Virtual Media Solution for ISO and IMG
iDRAC9 Virtual Media Solution supports HTML5 Virtual Media and Remote File Share which allows attaching of both and ISO and IMG file to Host as CD/DVD or Disk Drive. This Whitepaper captures Virtual Media Solution Enhancement and use cases.
December 2022
Version 1.0
Revisions
| Date/Version | Description |
| December 2022/ 1.0 | Launch release |
Acknowledgments
- Author: Jitendra Kumar
- Support: Rajesh Kumar Patel
- Other: Sindhu Karri, Texas Roemer
The information in this publication is provided “as is.” Dell Inc. makes no representations or warranties of any kind with respect to the information in this publication, and specifically disclaims implied warranties of merchantability or fitness for a particular purpose.
Use, copying, and distribution of any software described in this publication requires an applicable software license.
This document may contain certain words that are not consistent with Dell’s current language guidelines.
Dell plans to update the document over subsequent future releases to revise these words accordingly.
This document may contain language from third party content that is not under Dell’s control and is not consistent with Dell’s current guidelines for Dell’s own content. When such third-party content is updated by the relevant third parties, this document will be revised accordingly.
Copyright © November 2022 Dell Inc. or its subsidiaries. All Rights Reserved. Dell Technologies, Dell, EMC, Dell EMC and other trademarks are trademarks of Dell Inc. or its subsidiaries. Other trademarks may be trademarks of their respective owners. [12/23/2022] [White Paper] [Document ID: 559]
Executive summary
The iDRAC Virtual Media Solution supports HTML5 Virtual Media and Remote File Share (RFS) that allow both ISO and IMG file attach to Host as Virtual CD/DVD or Disk Drive. Existing iDRAC Virtual Media supports one instance of Remote File Share (RFS).
iDRAC Firmware Version 6.00.02.00 and greater supports two Instances of Remote File Share (RFS).
It also allows user to use HTML5 Virtual Media (local file) and Remote File Share concurrently.
Technical White Paper: Virtual Media Solution
Technical White Paper
Two major enhancements are added as part of iDRAC 6.00.02.00:
- iDRAC 6.00.02.00 extends Virtual Media solution to support Two Instances of Remote File Share along with HTML5 Virtual Media as listed below
- HTML5 Virtual Media
- Remote File Share 1 (RFS1)
- Remote File Share 2 (RFS2)
Both RFS1 & RFS2 allows user to attach either of ISO or IMG Image File hosted by Remote Share Location. Remote Share Location covers NFS/ CIFS/ HTTP/ HTTPS File Shares.


- HTML5 Virtual Media allows user to attach both local ISO and IMG image through HTML5 based vMedia and remote file share concurrently. That is, iDRAC allows user to use HTML5 Virtual Media, RFS1 and RFS2 concurrently. All four images can be seen with remote host server concurrently.
To use HTML5 Virtual Media, RFS1 & RFS2 concurrently, HTML5 Virtual Media Session needs to be started before attaching RFS1.
RFS2 has no dependency on HTML5 Virtual Media and RFS1 and can be started irrespective of HTML5 Virtual Media and RFS1.
Detailed Description
HTML5 Virtual Media, RFS1 and RFS2 Concurrent Sessions
HTML5 Virtual Media, RFS1 and RFS2 concurrent session are controlled as per Connection Matrix in Table 1.
Table 1 Connection Matrix
| Pre-Condition (existing session) | Virtual Media | Remote File Share 1 | Remote File Share 2 |
| Virtual Media Session Connected | Connected | Allowed | Allowed |
| RFS1 Connected | Blocked* | Connected | Allowed |
| RFS2 Connected | Allowed | Allowed | Connected |
(*Note: Before connecting Virtual Media, if there is existing session with RFS1, Virtual Media (local file) will be blocked.)
Limitation
In iDRAC firmware, prior to 6.00.02.00, HTML5 Virtual Media & RFS are mutually exclusive and both HTML5 Virtual Media & RFS exposes Virtual USB Device into Host with Product String i.e., Virtual CD/DVD and Virtual Floppy.
To maintain compatibility, when RFS1 is connected, the HTML5 Virtual Media Session launch will fail. RFS1 will expose Virtual USB device into Host either with “Virtual CD/DVD” or “Virtual Floppy” based on Image file.
iDRAC Interfaces Supporting HTML5 Virtual Media/ RFS1/ RFS2
iDRAC provides multiple interfaces to access BMC and Table 2, captures Interfaces which allow HTML5 Virtual Media/ RFS1/ RFS2 access.
Interfaces Supporting HTML5 Virtual Media/RFS1/RFS2
Table 2 Interfaces Supporting HTML5 Virtual Media/RFS1/RFS2
| Virtual Media Solution | iDRAC UI | RACADM | Redfish | Virtual Console |
| HTML5 Virtual Media Client | Allowed | Not Supported | Not Supported | Allowed |
| RFS1 | Allowed | Allowed | Allowed | Not Supported |
| RFS2 | Allowed | Allowed | Allowed | Not Supported |
Boot Host using HTML5 Virtual Media/ RFS1/ RFS2
The following is required to support Host boot using HTML5 Virtual Media and RFS1 & RFS2 session.
The product string with which Virtual USB Device would be exposed in to Host has been extended to include “Virtual Net File” and “Virtual NetFile2.” “Virtual Net File” and “Virtual NetFile2” will be used along with “Virtual CD/DVD” and “Virtual Floppy.”
iDRAC First Boot Device list has been extended to allow Host boot using HTML5 Virtual Media, RFS1 & RFS2 as per Table 3:
Table 3 First Boot Device Mapping
| Product String | User Visible String for First Boot Device |
| Virtual CD/DVD | Virtual Optical Drive |
| Virtual Floppy | Virtual Floppy Drive |
| Virtual Net File | Virtual Network File 1 |
| Virtual NetFile2 | Virtual Network File 2 |
Booting Host using HTML5 Virtual Media
HTML5 Virtual Media will use fixed Product String “Virtual CD/DVD” and “Virtual Floppy.” Host would boot to attached ISO and IMG file as per Table 4, by selecting corresponding First Boot Device.
Table 4 Frist Boot Device for HTML Virtual Media
| Image File Mapped Via Virtual Media | Product String | User Visible String for First Boot Device |
| ISO Image File | Virtual CD/DVD | Virtual Optical Drive |
| IMG Image File | Virtual Floppy | Virtual Floppy Drive |
Booting Host using RFS1
For RFS1, First Boot Device Selection will vary based on HTML5 Virtual Media Connection State and Type of Image file attached using RFS1. Host would boot to attached ISO and IMG Image file as per Table 5, by selecting corresponding First Boot Device.
Table 5 First Boot Device for RFS1
| Image File Mapped Via RFS1 | HTML5 Virtual Media Connection State | Product String | User Visible String for First Boot Device |
| ISO Image File | Not Connected | Virtual CD/DVD | Virtual Optical Drive |
| IMG Image File | No Connected | Virtual Floppy | Virtual Floppy Drive |
| ISO Image File | Connected | Virtual Net File | Virtual Network File 1 |
| IMG Image File | Connected | Virtual Net File | Virtual Network File 1 |
Booting Host using RFS2
RFS2 will use fixed Product String that is, “Virtual NetFile2” and Host would boot to attached ISO and IMG file as per Table 6, by selecting corresponding First Boot Device.
Table 6 First Boor Device for RFS2
| Image File Mapped Via RFS2 | Product String | User Visible String for First Boot Device |
| ISO Image File | Virtual NetFile2 | Virtual Network File 2 |
| IMG Image File | Virtual NetFile2 | Virtual Network File 2 |
How to use RFS 1 & RFS2
How to use RFS1
RACAMD/ Redfish/GUI allows commands and interface to manage RFS1.
RACADM
Use following RACADM commands to Manage RFS1 Session.
| ACTION | RACADM Command |
| Status | racadm remoteimage -s |
| Attach using HTTPS Share | racadm remoteimage -c -u “share username” -p “share password” -l <HTTPS remote share file path> |
| Attach using HTTP Share | racadm remoteimage -c -l <HTTP remote share file path> |
| Attach using CIFS Share | racadm remoteimage -c -u “share username” -p “share password” -l <CIFS remote share file path> |
| Attach using NFS Share | raced remote image -c -l <NFS IP>:/<NFS remote share file path> |
| Detach | raced remote image -d |
Redfish
Use following Redfish URIs to Manage RFS1 Session.
| ACTION | Redfish URIs | Request Method | Request Body |
| Status | /redfish/v1/Systems/System.Embedded.1/ VirtualMedia/1 | GET | Not Applicable |
| Attach using HTTPS Share | /redfish/v1/Systems/System.Embedded.1/ VirtualMedia/1/Actions/VirtualMedia.Insert Media | POST | {“Image”:”<HTTPS Remote Share Path”} {“Image”:”<HTTPS Remote Share Path”, “User Name”:”<User Name>”,”Password”:” <Password>” } |
| Attach using HTTP Share | /redfish/v1/Systems/System.Embedded.1/ Virtual Media/1/Actions/Virtual Media. Insert Media | POST | {“Image”:””<HTTP Remote Share Path”} |
| Attach using CIFS Share | /redfish/v1/Systems/System.Embedded.1/ VirtualMedia/1/Actions/VirtualMedia.Insert Media | POST | {“Image”:””<HTTPS Remote Share Path”,”UserName”:”<UserName>”,”Passw ord”:”<Password>”,”TransferMethod”:”Stre am”,”TransferProtocolType”:”CIFS”} |
| Attach using NFS Share | /redfish/v1/Systems/System.Embedded.1/ Virtual Media/1/Actions/Virtual Media. Insert Media | POST | {“Image”:””<HTTPS Remote Share Path”} |
| Detach | /redfish/v1/Systems/System.Embedded.1/ Virtual Media/1/Actions/Virtual Media. Eject Media | POST | {} |
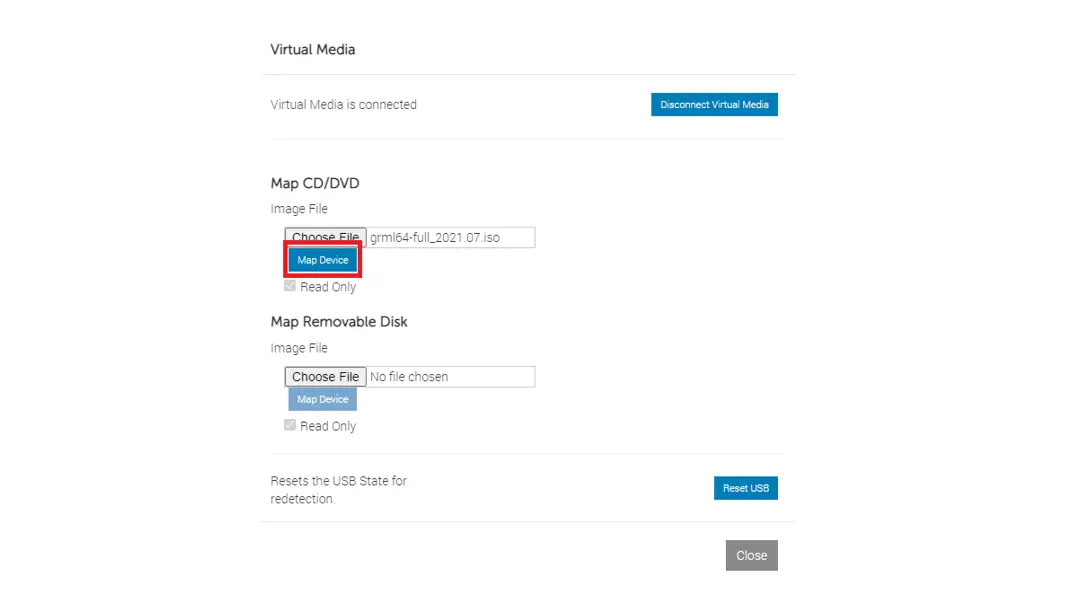
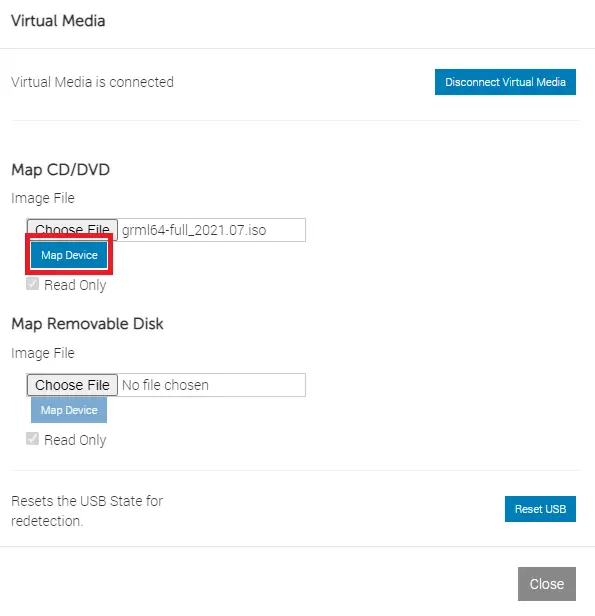
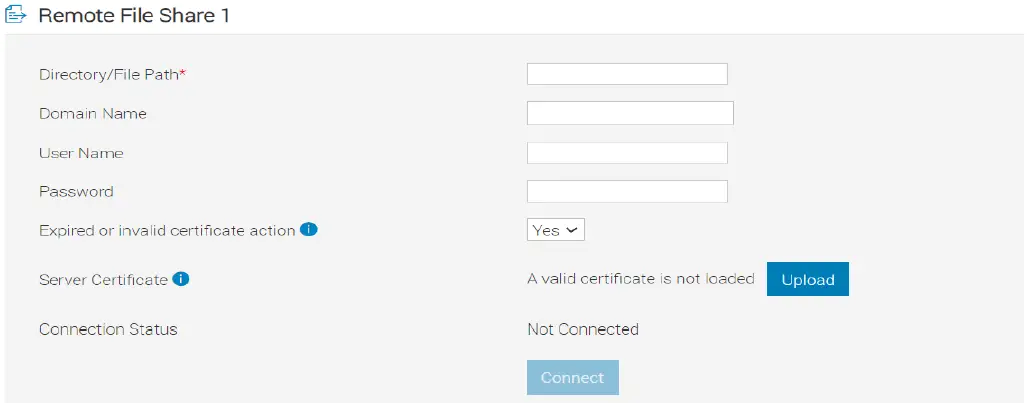
UI
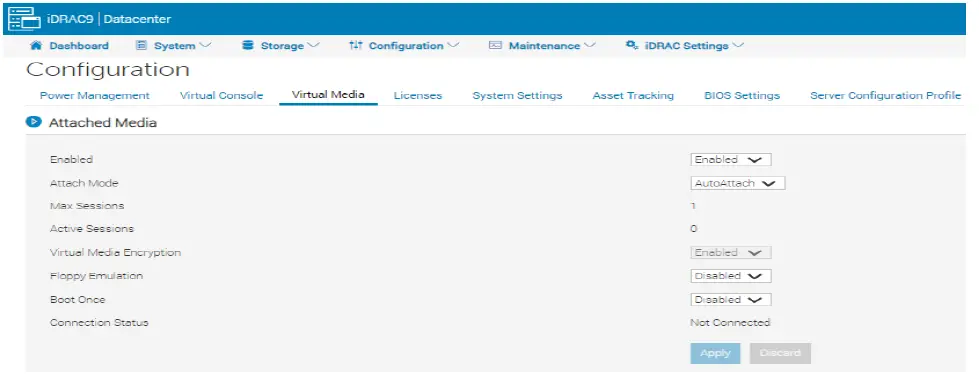
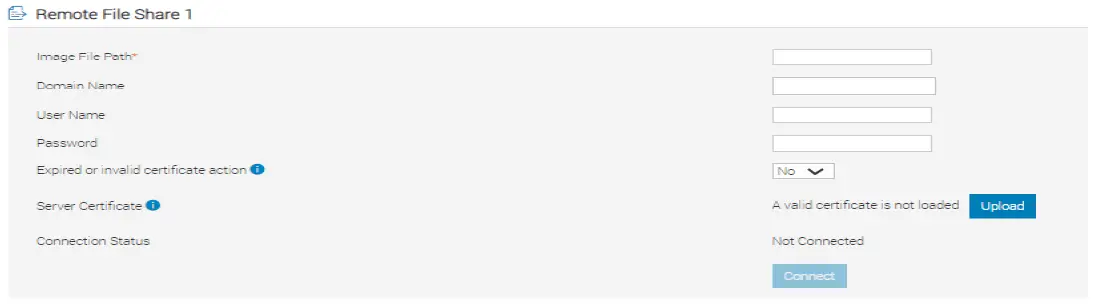
iDRAC UI allows users to manage RFS1 using IDRAC UI->Configuration->Virtual Media->Remote File Share 1
How to use RFS2
RACAMD/ Redfish/GUI allows commands and interface to manage RFS2.
RACADM
Use following RACADM commands to Manage RFS2 Session.
| ACTION | RACADM Command |
| Status | racadm remoteimage2 -s |
| Attach using HTTPS Share | racadm remoteimage2 -c -u “share username” -p “share password” -l <HTTTPS remote share file path> |
| Attach using HTTP Share | racadm remoteimage2 -c -l <HTTP remote share file path> |
| Attach using CIFS Share | racadm remoteimage2 -c -u “share username” -p “share password” -l <CIFS remote share file path> |
| Attach using NFS Share | racadm remoteimage2 -c -l <nfs ip>:<NFS remote share file path> |
| Detach | racadm remoteimage2 -d |
Redfish
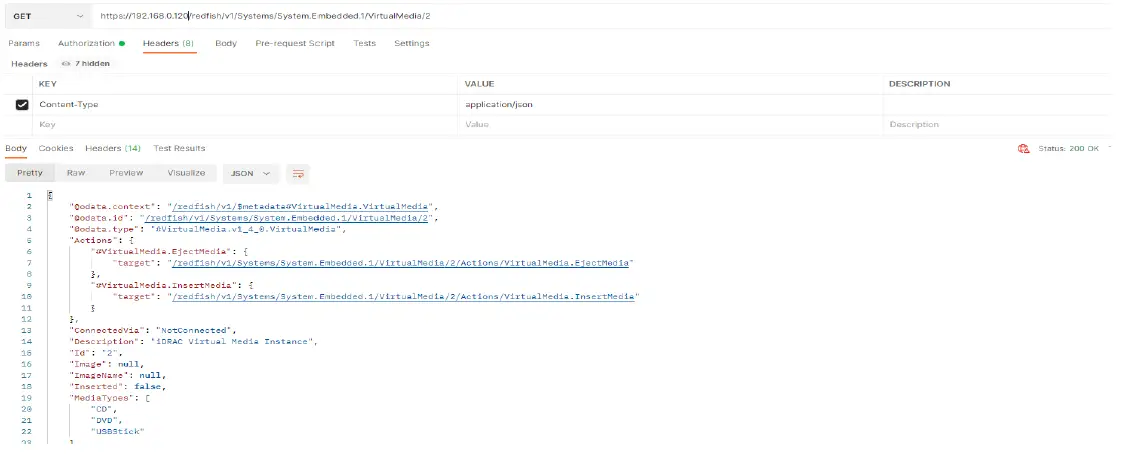
Use following Redfish URIs to Manage RFS2 Session.
![]()
| Status | /redfish/v1/Systems/System.Embedded.1/ VirtualMedia/2 | GET | Not Applicable |
| Attach using HTTPS Share | /redfish/v1/Systems/System.Embedded.1/ VirtualMedia/2/Actions/VirtualMedia.Insert Media | POST | {“Image”:”<HTTPS Remote Share Path”}{“Image”:”<HTTPS Remote Share Path”, “UserName”:”<UserName>”,”Password”:” <Password>” } |
| Attach using HTTP Share | /redfish/v1/Systems/System.Embedded.1/ VirtualMedia/2/Actions/VirtualMedia.Insert Media | POST | {“Image”:””<HTTP Remote Share Path”} |
| Attach using CIFS Share | /redfish/v1/Systems/System.Embedded.1/ Virtual Media/2/Actions/Virtual Media. Insert Media | POST | {“Image”:””<HTTPS Remote Share Path”, “User Name”:”<User Name>”,”Password”:”<Password>”,”Transfer Method”:”Stre am”, “Transfer Protocol Type”:”CIFS”} |
| Attach using NFS Share | /redfish/v1/Systems/System.Embedded.1/ Virtual Media/2/Actions/Virtual Media .Insert Media | POST | {“Image”:””<HTTPS Remote Share Path”} |
| Detach | /redfish/v1/Systems/System.Embedded.1/ VirtualMedia/2/Actions/VirtualMedia.Eject Media | POST | {} |
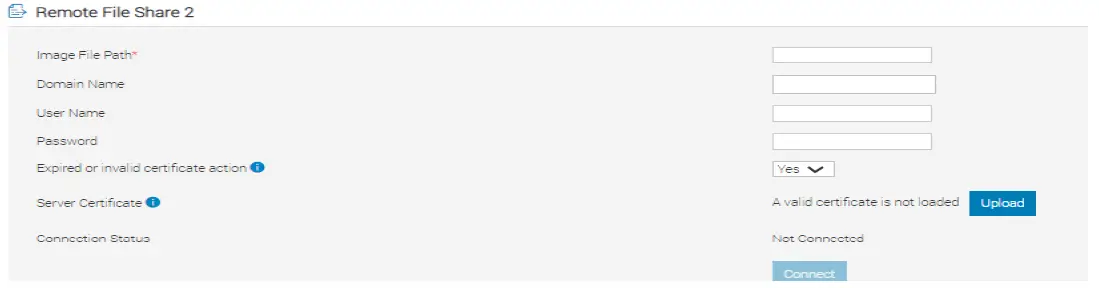
UI
iDRAC UI allows users to manage RFS2 using IDRAC UI->Configuration->Virtual Media->Remote File Share 2

Use Cases
Operating system Deployment using RFS1 & RFS2
With RFS1 & RFS2, it is possible to automate operating system Deployment process.
To automate operating system deployment, configure First Boot Device to allow Host boot with RFS1. Next, with RFS2, attach Configuration File/ Kick Start File/ Driver required by operating system installer during deployment.
See Appendix B for Redfish Method of operating system Deployment using RFS1 & RFS2.
Configuration details
Table 7 Component table
| Component | Description |
| iDRAC Firmware version | 6.00.02.000 |
Operating system Deployment Example using RFS1 And RFS2
Operating system Deployment workflow example using Redfish API for RFS1 & RFS2
This workflow will be attaching Windows ISO and IMG image (contains operating system drivers) simultaneously using Redfish DMTF actions. ISO and IMG image have already been copied over to Apache Webserver. For each Redfish command below, used “Postman” but this overall workflow can be easily automated using Python, Power-shell, or Curl commands.
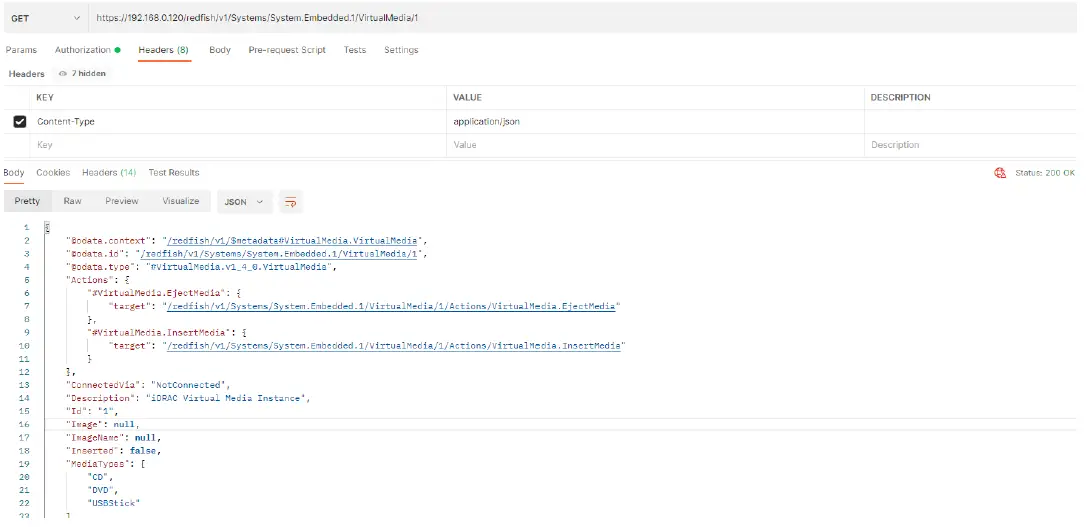
- First step is to run GET on URIs “redfish/v1/Systems/System.Embedded.1/Virtual Media/1” and “redfish/v1/Systems/System.Embedded.1/Virtual Media/2,” confirm no devices are currently attached.
Note: To simplify this process and only run one GET command, use $expand query parameter to get details for both URIs (example: redfish/v1/Systems/System.Embedded.1/Virtual Media?$expand=*($levels=1)

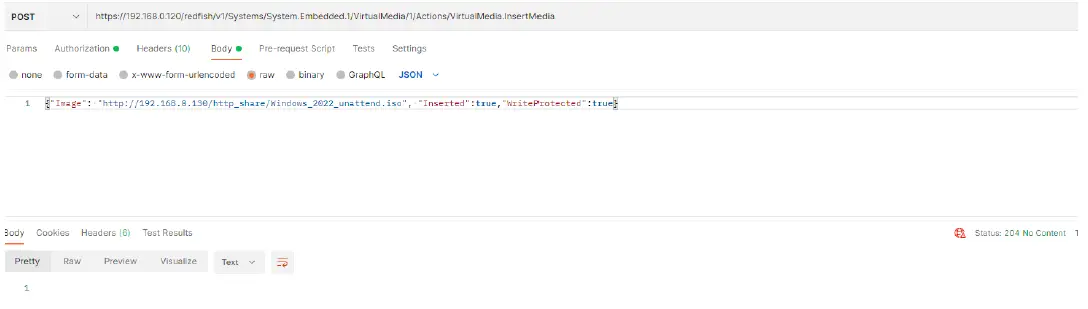
- Once you validated no devices are attached, let us first attach the ISO for virtual device ID 1 using POST action “VirtualMedia.InsertMedia.”
URI: redfish/v1/Systems/System.Embedded.1/VirtualMedia/1/Actions/VirtualMedia.InsertMedia Command: POST
Header: content-type application/json
Body: {“Image”: “<your URI network path with ISO name>”, “Inserted”:true,”WriteProtected”:true}
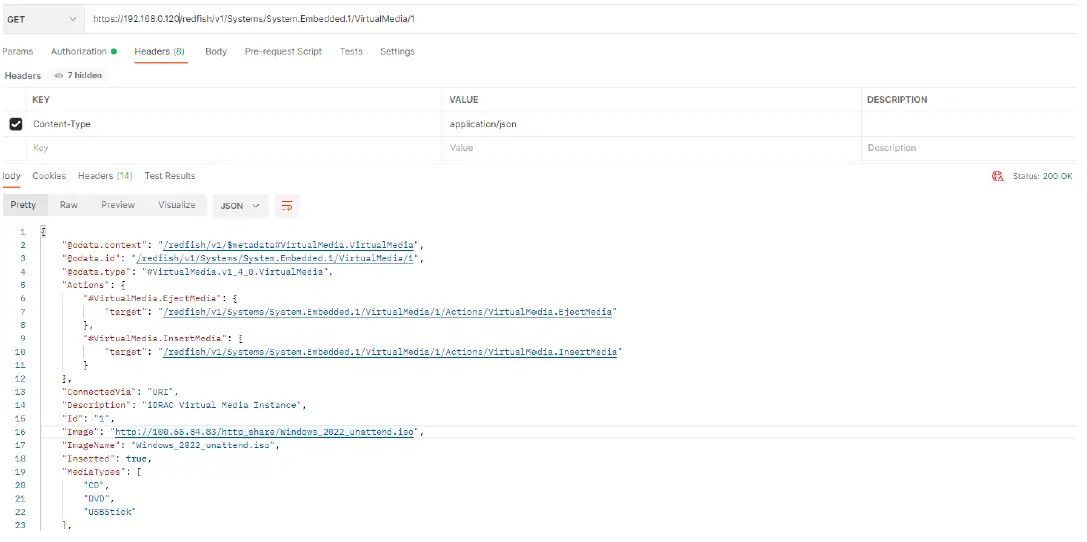
- Run GET on “redfish/v1/Systems/System.Embedded.1/VirtualMedia/1,” you should now see attached information about the ISO.

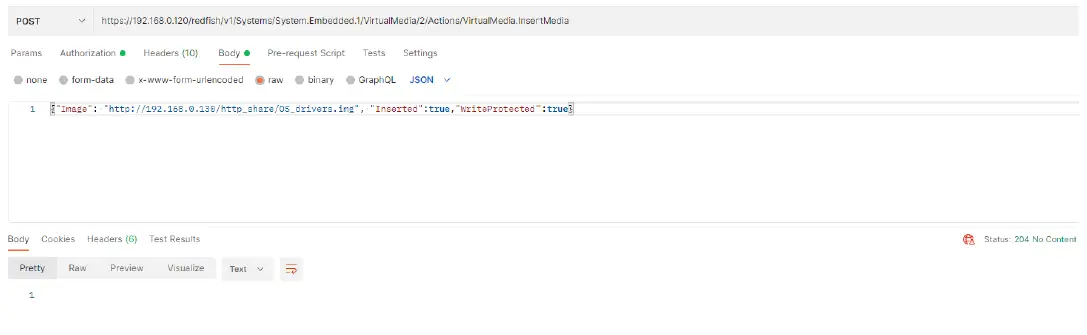
- Using the same POST action, let us attach IMG file now but we need to make sure we use index ID 2 URI.
URI: redfish/v1/Systems/System.Embedded.1/VirtualMedia/2/Actions/VirtualMedia.InsertMedia Command: POST
Header: content-type application/json
Body: {“Image”: “<your URI network path with IMG file name>”, “Inserted”:true,”WriteProtected”:true}
- Run GET on “redfish/v1/Systems/System.Embedded.1/VirtualMedia/2,” you should now see attached information about the IMG image file.
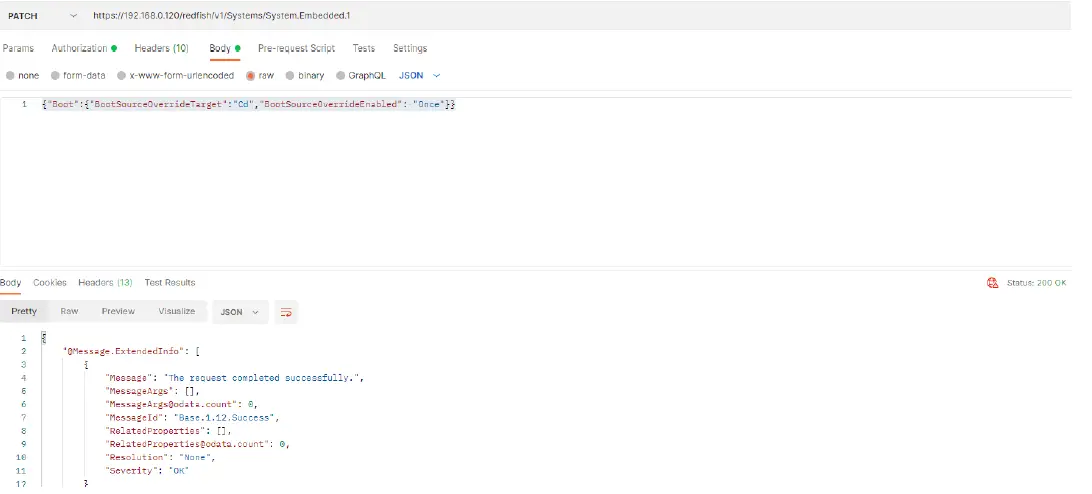
- Next step is to set next onetime boot to the ISO to start the operating system installation using PATCH.
Command: PATCH
URI: redfish/v1/Systems/System.Embedded.1
Header: content-type application/json
Body: {“Boot”:{“BootSourceOverrideTarget”:”Cd”,”BootSourceOverrideEnabled”: “Once”}}
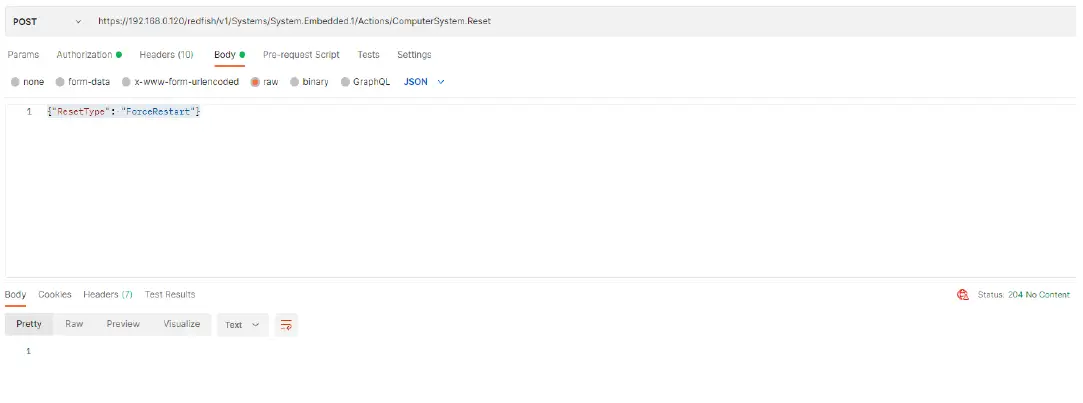
- Final step in the workflow is to reboot the server using POST. Once the server has been rebooted, flag will be set in POST to onetime boot to the ISO, and start the operating system install. Command: POST
URI: redfish/v1/Systems/System.Embedded.1/Actions/ComputerSystem.Reset
Header: content-type application/json
Body: {“ResetType”: “ForceRestart”}
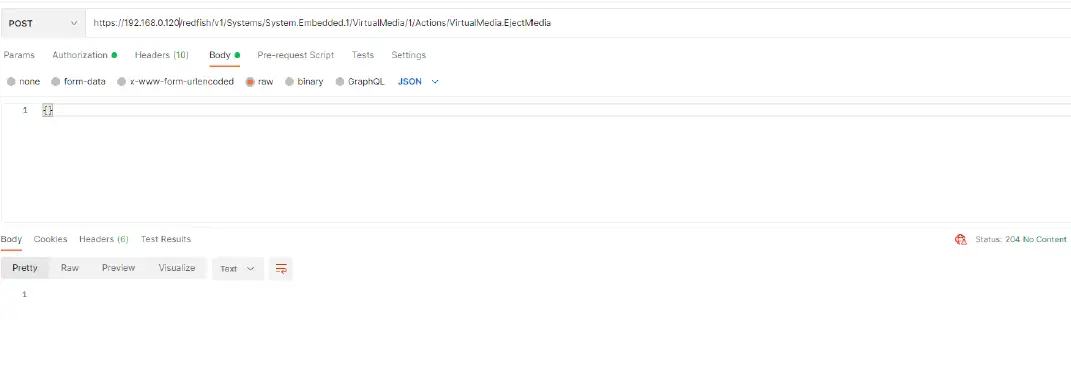
- Once you have completed the operating system installation, you need to eject or detach the ISO. To detach the ISO, use action VirtualMedia.EjectMedia and URI index ID 1.
Command: POST
URI: redfish/v1/Systems/System.Embedded.1/VirtualMedia/1/Actions/VirtualMedia.EjectMedia Header: content-type application/json
Body: {}
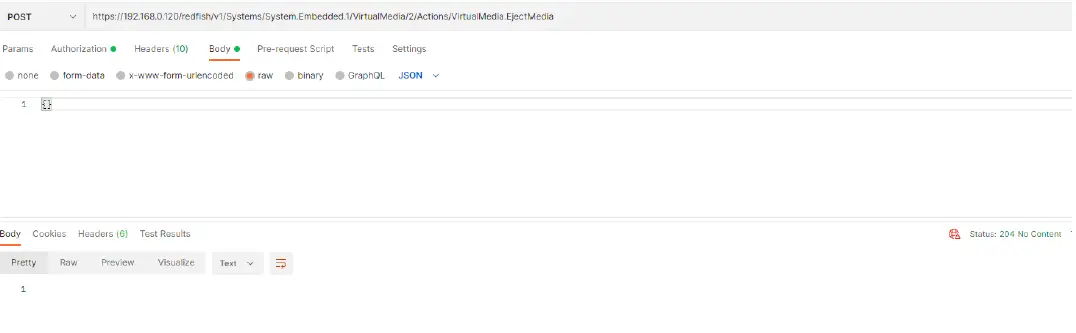
- Using same action to detach, pass in URI for index ID 2 to detach the IMG image.
Command: POST
URI: redfish/v1/Systems/System.Embedded.1/VirtualMedia/2/Actions/VirtualMedia.EjectMedia
Header: content-type application/json
Body: {}
Technical support and resources
Dell.com/support is focused on meeting customer needs with proven services and support.
Related resources
iDRAC9 User Guide 6.00.02.00 (6.xx series) onwards
Link: https://www.dell.com/support/home/en-us?app=manuals
iDRAC Redfish FAQ:
Link: https://dl.dell.com/content/manual16004247-idrac-redfish-faq.pdf?language=en-us
Redfish API guide: https://developer.dell.com/apis
iDRAC9 Virtual Media Solution for ISO and IMG | Document ID: 559


