DBPOWER RD828 Native 1080P WiFi Projector
IMPORTANT SAFEGUARDS
Read the instruction manual carefully before using your RD-828 and save it for future reference.
Installation
- To get the best watching experience, use your projector in a darkened room.
- Please use the projector carefully, dropping or crashing may damage its internal components.
Power
- Be careful while using the power cord, avoid excessive bending; the damage of power cable may cause electric shock and fire.
- Unplug the power cord if the projector is powered off and not in use.
Cleaning
- Unplug the power cord.
- Clean the outer surface of the projector regularly with a damp cloth. Neutral detergent can be used.
- Please wipe the lens down with the microfiber cloth to prevent scratches.
- Please clean projector’s vents and speakers regularly by banister brush.
Attention! High Temperature
- Avoid touching the projector ventilation (inlet) if the appliance is in use or was in use recently to prevent bums and scalds.
- Please do not look into the lens directly while the projector is turned on, it may cause damage to your eyes.
“Tips
- Please do not disassemble the projector by yourself, otherwise it will void your warranty.
- Please keep the projector away from water or any other liquid as it is not waterproof.
- Please do not put the projector in wet or moist conditions to prevent electric shock
- to ensure the stability of heat dissipation, please adjust tilt foot of the projector before starting.
PROJECTOR SCHEME
The projector can display Full HD video signal composite video signal. and supports stereo audio signal input and output. Please refer to the following figure to connect the projector and other audio equipment correctly.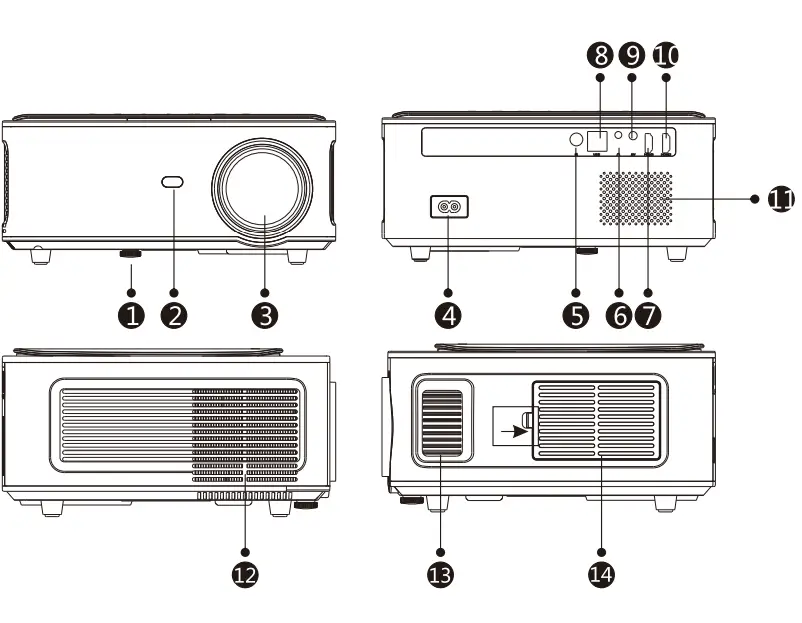
- Adjustable Tilt Foot
- IR Remote Sensor
- Projection Lens
- AC Input
- IR Remote Sensor
- 3.5mm Jack audio output
- HDMI 1 port
- USBport
- AV port
- HDMl2 port
- Speaker
- Ventilation Outlet
- Focus Ring
- Air Filter
PROJECTOR SCHEME
- External Control Panel
- Rating Label
- Projector Mounting Holes
- Adjustable Tilt Foot


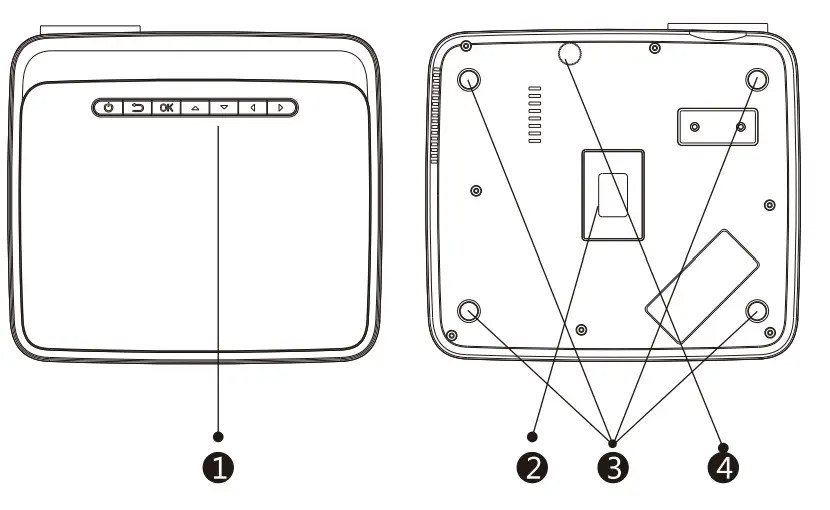
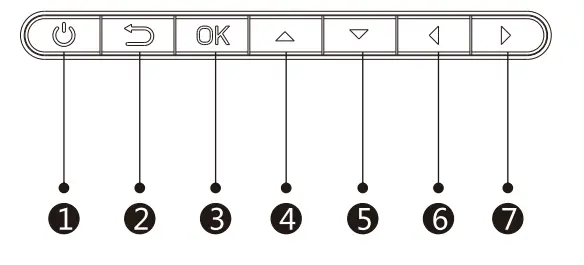
- PowerOn
- Exit Key
- OK (Enter)
- Up
- Down
- Left
- Right
REMOTE CONTROL
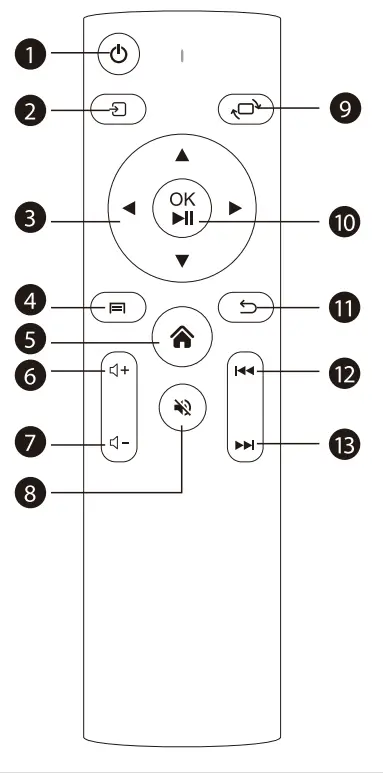
- Power
- Source
- Direction Buttons
- Menu
- Home pape
- Volume+
- Volume-
- mute
- Flip
- Direction Buttons (Play and Pause)
- Return
- Previous
- next
PROJECTOR INSTALLATION
Standard Setting
Please refer to the following table to adjust your picture size and distance (a projector’s distance from the lens to the screen surface).
| Aspect Ratio: 16:9 | |
| Distance(ft.) | Screen Size |
| 5.50 | 50″ |
| 7.80 | 70″ |
| 10.8 | 100″ |
| 13.0 | 120″ |
| 16.4 | 150″ |
The recommended projection distance is about 10.8ft, the shortest projection distance is 5.5ft.
The image size depends on the distance between projector and screen, there maybe 3% deviation among listed data. Different settings cause various distances.
Warning:
Ensure that the projector is square to the screen. If the image is displayed as a trapezoid shape-then refer to the diagram below for proper adjustment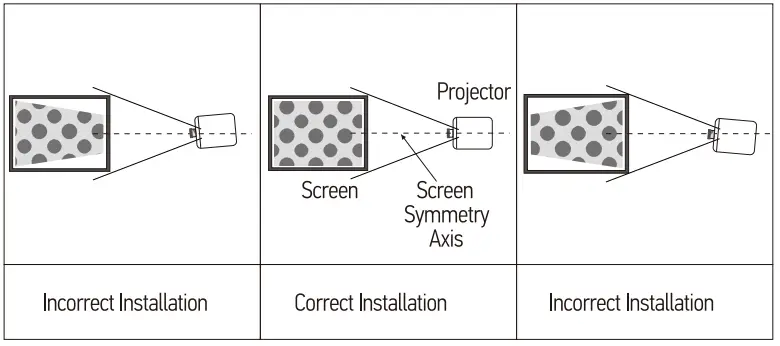
PROJECTOR INSTALLATION
Installation Method
The projector can be hanged on the ceiling with special hanger frame, and placed on the table desk to project the image according to the operating environment and requirement. In additional the projector can be installed as following methods: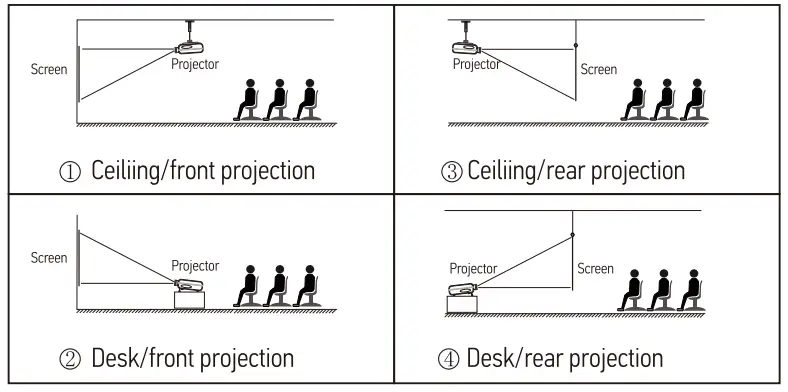
Install on the ceiling
- Contact a professional installer for the projector ceiling mounting;
- Please ensure that the screws used for ceiling mounting are of high quality and the length is enough to prevent the projector from falling;
- Please purchase a universal projector ceiling mount;
- Remove the four rubber pads on the bottom of the projector, you will see the screw holes and use the M5*11 mm screws for installing the ceiling, and then install it.
Warning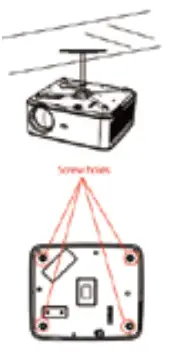
- The projector may be damaged beyond repair if it is incorrectly mounted on a ceiling or on a surface.
- The recommended ambient temperature range is 41 ‘F – 95
‘F. The incorrect temperature may lead to the device malfunction. - Please do not place the projector in wet, moist, or dusty conditions to prevent electric shock or malfunction.
- Poor ventilation can be a significant cause of overheating. It could cause a projector to be damaged.
STARTING PROJECTOR
- Press the power key on the remote or projector, the indicator light will turn blue;
- Adjust the focus ring on the leſt side of the projector to get the best image performance; (If it is still blurry, please try to adjust the projection distance)
- Use the 4D keystone function of the projector to get a rectangle projection screen;
- Connect the external device(Smart phone, iPad, Amazon Fire TV, TV box, DVD player, Computer, etc.) in the corresponding interfaces of the projector, please be sure to select the corresponding source. If you do not select the correct source, the projector will not be able to detect the signal;
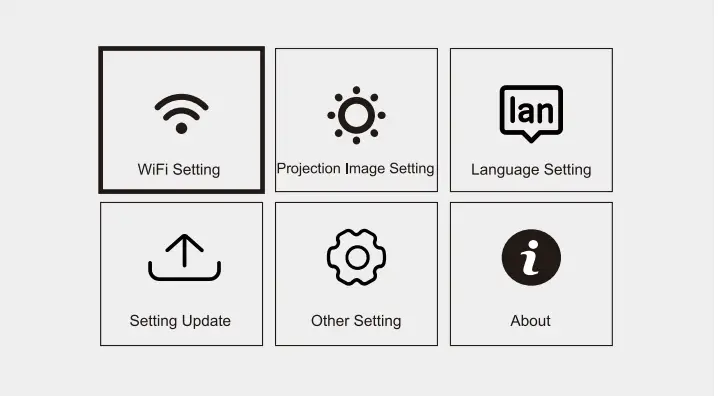
- Select the “ ” menu, enter the [Other Setting], then you can select the option [Language Setting] to set your preferred language.
FOCUS ADJUSTMENT
FOCUSING
When using the projector at the first time, it normally displays an unclear image. This is due to the lens being out of focus or the incorrect trapezoid setting. Please follow the below to correct them.
- Focus Adjustment (Make sure the projector is horizontal to the projector screen and rotate the focus ring to sharpen the projected image)
 Rotate the focus ring or lens slowly, at the same time, check the focus point carefully. The best focus point for the lens would be where the image is most Focus Ring is clear.
Note: If it is still blurry, please try to adjust the projection distance. - Digital 4D Keystone Correction Use the digital 4D keystone correction of the projector to change the image to be a rectangle (vertical and horizontal)
 Rotate the focus ring or lens slowly, at the same time, check the focus point carefully. The best focus point for the lens would be where the image is most Focus Ring is clear.
KEYSTONE ADVANCED & 4 POINT KEYSTONE
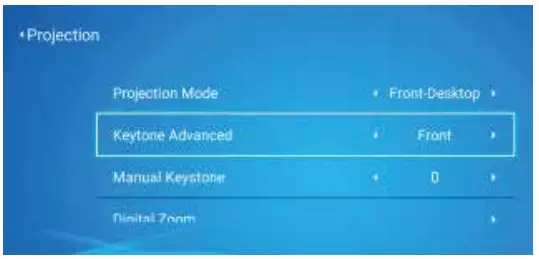
Vertical Keystone Correction
- Select the [Front] option in the [Keystone Advanced] menu, then press the button to enter the [Manual Keystone] menu.

- If the projection image shows as below (1 ), press the button on the remote or projector to increase the vertical parameter(-50-0) until to achieve the projection image (2).
- If the projection image shows as below (3), then press the button on the remote or projector and decrease the vertical parameter(0-50), until to achieve the projection image(4).


Horizontal & Vertical Keystone Correction
When the projection screen image is not rectangular, it can be adjusted by 4-point keystone correction.
- Select the [Side] option in the [Keystone Advanced] menu;
- Press the button to select the (4-Point Keystone] menu, then press the [OK] button the enter the sub-menu.

- Keep pressing the OK button on the remote control or projector to select the point.
- Press the arrow keys on the remote or projector to adjust the horizontal or vertical parameters. until the projection screen becomes the desired rectangle.


OK PICK POINT
Keep pressing the OK button on the remote control or the projector. until the positioning icon appears at the point desired, then release the button immediately.
ADJUSTMENT
Press the arrow keys on the remote control or projector to adjust the Horizontal or Vertical parameters.
BACK
Press the keys on the remote control to back to the home page.
RESET
Press the keys on the remote control to restore the original parameters.
INTERFACE OPERATING INSTRUCTIONS
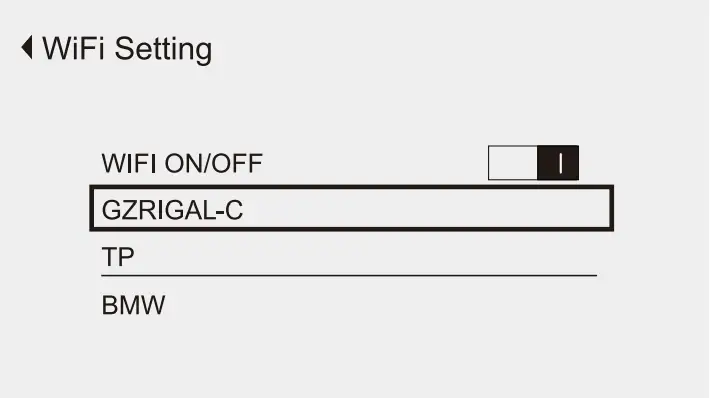
How to Connect to WiFi
Select the ‘Settings” icon in the upper-right comer of the main interface, press the “OK” key on the remote control to enter the settings interface, and select the “WiFi Setting” sub-menu. Select the WiFi you want to connect to in the list below. Enter the password to complete the connection.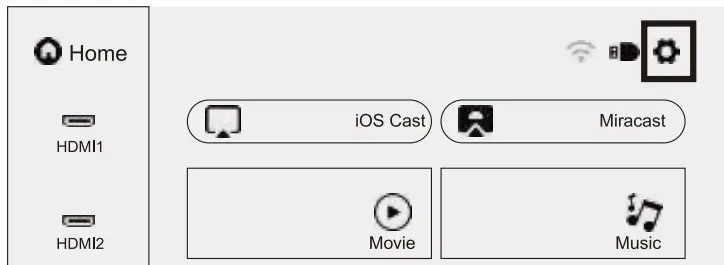
Warm Tips:
- The fluency of screen mirroring with wireless connection will be affected by the network environment. A bandwidth of 1 00Mb􀀈 or more is recommended when using screen mirroring.
- Make sure your mobile device is close to the projector when using wireless connection. A distance within 1 meter is recommended.
- Some mobile devices may not support screen mirroring due to compatibility.
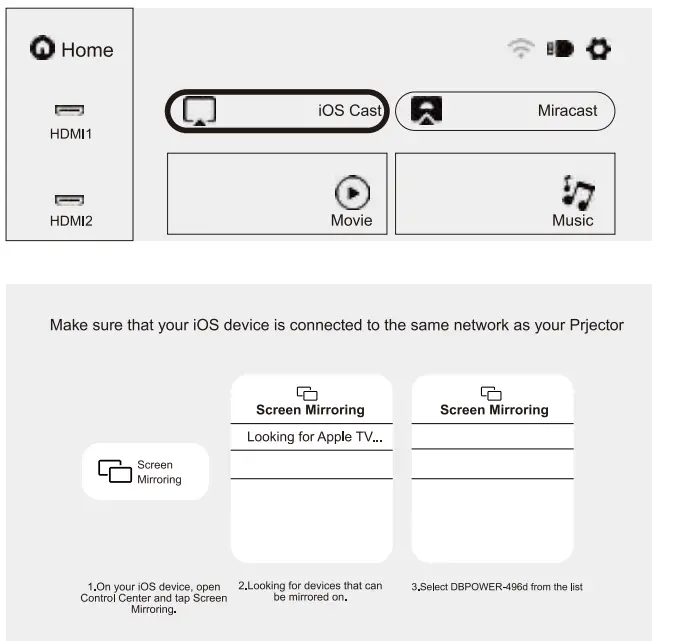
How to Use iOS Cast (Apple device)
Select “iOS Cast” in the main interface, press the “OK” key on the remote control to enter the setting interface.
Note: The projector should be connected to the Internet otherwise the iOS Cast is not available. You need to upgrade the projector while using it for the first time.
- The iOS device and the projector are connected to the same network;
- Open the iOS device control center and select ‘Screen mirroring’:
- Choose the corresponding projector name.
- Note, when iOS Cast is enabled on the projector, OLNA is disabled

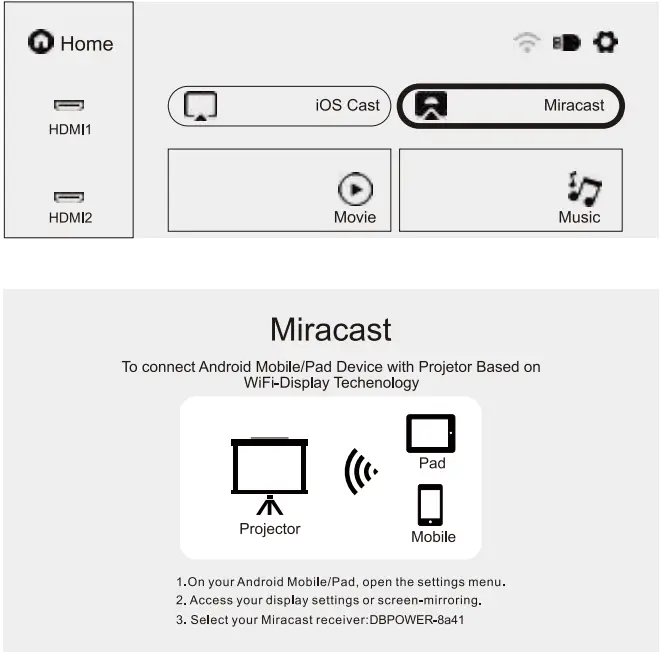
How to Use Miracast (Android device)
Select “Miracast’ in the main interface, press the “OK” key on the remote control to enter the setting interface.
- Connect the Android device to WiFi (the Android device and the projector are connected to the same network).
- Tum the Android device “Wireless Display” function on.
- Choose the corresponding projector name.
- Note, when Miracast is enabled on the projector, DLNA is disabled

How to Adjust the Projected Image
Select the “Settings” icon in the upper-right comer of the main interface. Press the “OK” key on the remote control to enter the settings interface, and select the “Projection Image Setting” sub-menu.
Select the setting row you need.
Manual Keystone: 4-point Keystone
Projection mode: Front-Desktop/ Rear-Desktop/ Front-Ceiling/ Rear-Ceiling
Digital Zoom: 50%-100%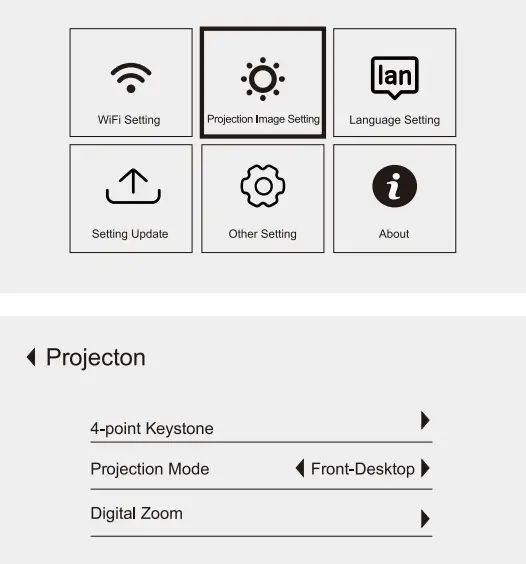
Digital Zoom
- Select the [Digital Zoom] option and press the OK button to enter the sub-menu.
- By pressing the button on the remote control or projector, you can reduce the height and width of the projection size up to 50%.
Play Movie/Music/Photo/Office Suite in the USB Disk Input Mode
- lnput the USS disk, select [USS) on the homepage and enter;
- Select the option [Movie/Music/Photo/Office)
- Select the desired file(or folder to enter the sub-folder) in the USS disk. then press the [OKI button to play it.


Play Interface 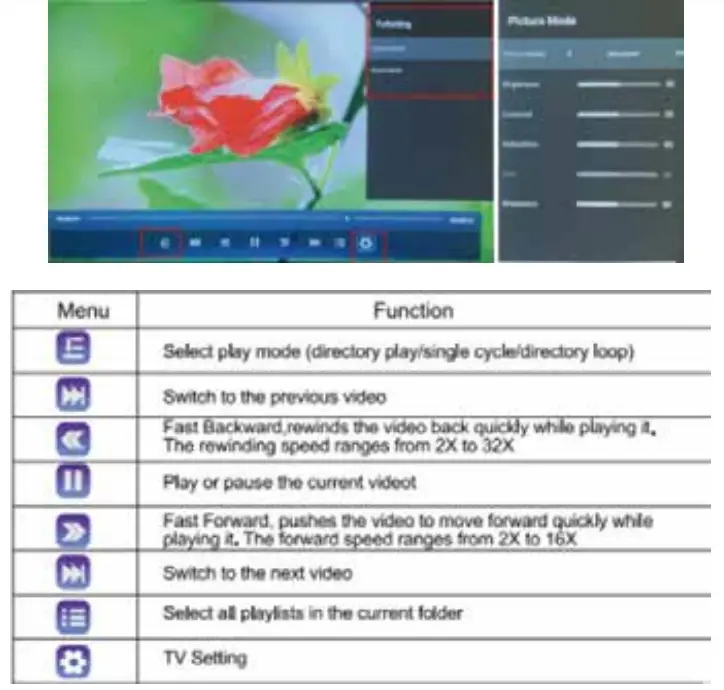 System Update
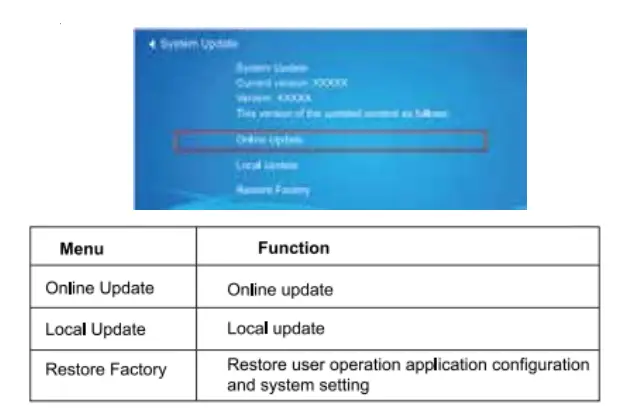
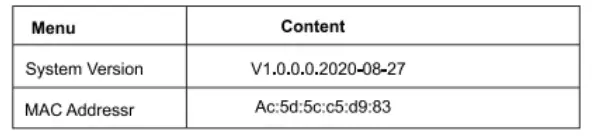 About Other Setting
 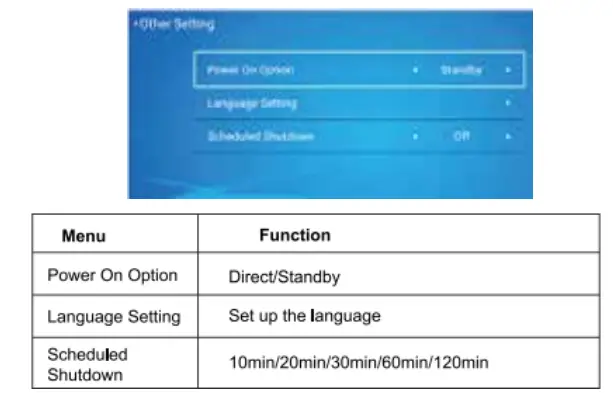 About the Direct/Standby Power On Option
Direct Mode: When the projector is powered on, the power will be automatically turned on. Standby Mode: When the projector is powered on. you need to press the button on the remote or projector to tum on the projector.
SINGLE LINES CONNECTION
DBPOWER RD828 projector has 6 interfaces, HDMI ports*2/USB ports*2/3.5mm headphone output/ AV output. Please select the correct connecting port to connect your device(PC. Phone. DVD Player. Sound bar. USB. PS4, etc. )
Connect the use Disk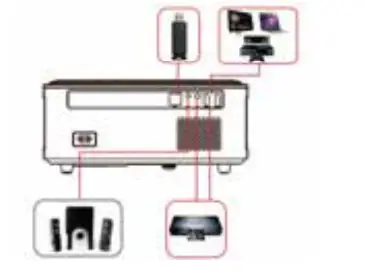
- Insert the U disk into either of two usb input ports;
- You can directly enter the start-up screen on the home page, select the option[Movie/Music/Photo/Oflice Suite]
- Select the desired file (or folder to enter the sub folder) in the USB disk, then press the [OK] button to play it.
Connect the Devices via the HDMI ports
- Connect your lV stick or laptop to any HDMI port of the projector;
- Enter the home page to select the corresponding HDMI 1 or HDMI 2 as the signal source.
Connect to the DVD Player
Use the 3-in-1 AV cable in the package.
- tum on your DVD player and the projector;
- Connect the colorful female connectors to your DVD player· s RCA cable with 3-in-1 AV cable in the package.
- Connect the black connectors to AV port of the projector, enter the home page to select [A VJ as the signal source.
 Or open the DVD Player with the HDMI cable in the package.
- Connect to the Sound bar/Speaker
If your speaker has AUX port, please use your 3.5mm audio cable connect the projector and your speaker as the picture shows, enter the home page to select [AV] as the signal source.
 Or open the DVD Player with the HDMI cable in the package.

SUPPORTED MULTIMEDIA FILE FORMATS
Video Format: 3GP/ AVI/FLV /MP4/MPG/VOB/TS/M2TS/DAT /MKV
Audio Format: MP3/ APE/ AAC/FLAC/OGG/WAV /WMA/MID/DTS/M4A
Image Format: BMP/ JPG/PNG/ JPEG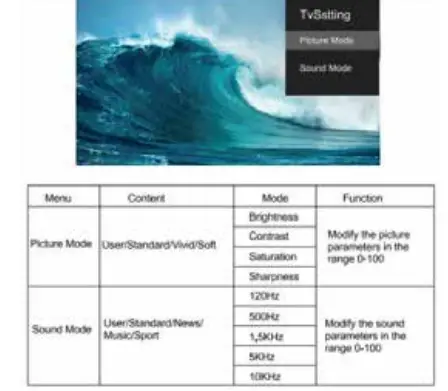
OFFICE SUITE PLAY INTERFACE
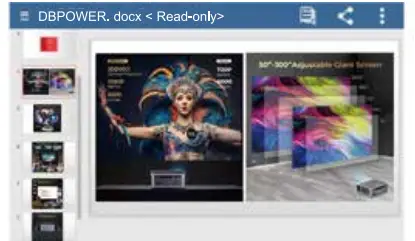
By pressing the button on the remote to enter the menus.
(Note: The Office version maybe automatically updated, then the updated function may change. Due to copyright. some functions are temporarily unavailable. Please refer to the actual version.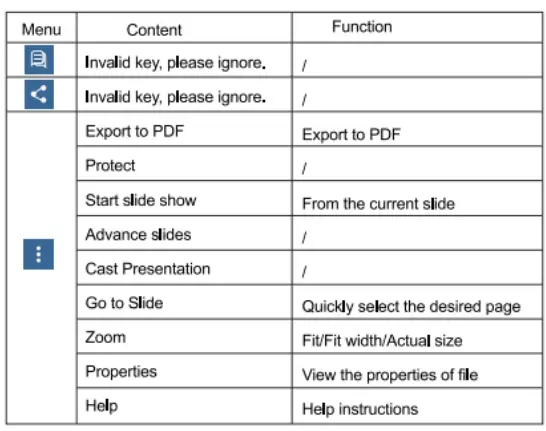
TROUBLESHOOTING
| Problem | Possible Causes |
| 1.The indicator light does not work when
the power switch is turned on. | @ Prower cable is not connected properly |
| @ The power switch is faulty | |
|
2. The projector cannot be controlled with the remote control | @ The power switch is turned off |
| @ The remote control has no batteries, the batteries are low or installed not properly | |
| @ The remote control is not being aimed at theIR receiver. | |
| @ A strong light source shines into the IR receiver. | |
|
3. No Image | @ The input source is not correct |
| @ No input signal | |
| @ The input cable is not connected | |
| @ If a PC mode is set, the PC output frequency is incorrect (not correspond to 50-60Hz). Make sure the PC output is connected withthe projector properly | |
| @ Check if the laptop connected to the right output signal (HDMll orHDM12) | |
|
4. Shuts off unexpectedly | @ The projector air vent is blocked |
| @ The voltage is not stable | |
| @ The projector is overheating – check if the fan is not broken |
SPECIFICATION
- Projection Technology: 5″ LCD TFT display
- Native Resolution: 1920x 1080
- Image Flip: 360°
- Projection mode: Front-Desktop/ Rear-Desktop/
- Front-Ceiling/ Rear-Ceiling
- Lens: 5 Glass Lenses
- Aspect Ratio: 16:9 & 4:3
- Lamp Type: LED lamp, 50,000 hours lifespan
- Image Size: 40-150 inch
- Digital Zoom: 50%-100%
- Working Voltage: AC100-240V/50-60Hz
- Power Consume: Light source-BOW /Whole Projector-120W Net Weight: 2.2kg
- Projector Size: 260x230x 110mm
FAQS
Can you see the projected images with sharp clarity in a room filled with sunlight?
Not really, it gets pretty washed out. But you can still see it.
Is the true 1080 or support?
Full hd with 1920*1080 native resolution.The picture is very sharp and clear. I am impressed and will be recommending dbpower in the future.
How to remove lens cover? Rotate focus knob wheel until lens is somewhat out, and then pull the lens cap away from body.
First, if the unit is hot (including the bulb) then it needs to run to help cooler the unit down. But it does seem off that it stays on for more than 10 mins like mine.
How is it for watching hockey or football via cable tv? Does it stutter or blur motion?
It took me a second as well but it’s simple actually. Just hold the cover with thumb on one side and finger on the other. Then pull straight out from lens. No turning or twisting necessary
The reviews say you cannot stream Netflix. Is this true?
Have not had any problems with watching sports.
How can i connect my iphone8 to the projector by wifi?
As long as you have a Roku or other device plugged into the projector that has Netflix, you can.
The settings options are very limited. How do you adjust brightness, color, and contrast?
Connect your device and projector to the same Wi-Fi router, use iOS Cast function to sync screen your iOS device to the projector by two steps setting. (Notice: IOS 30P Interface Device cannot support.)
How many hours of run time?
To adjust brightness, color, and contrast:
Press the menu button on remote.
Use Up and Down direction arrows on remote to set Picture Mode, Display Mode, or Sound Mode
Press center “OK” button to select desired mode.
Use Up and Down arrow to select setting you want to change.
Use Left and Right arrow to change settings
How many hours of run time?
Not sure for run time but iv had mine for less than a year and it’s getting orange spots on the picture. Polarization failures.
Is 40” the minimum screen size? Want to use it in my RV and need a bit smaller screen.
40″ X 21″ is the smallest size at 50% at 14ft away. Suppose, could get smaller by moving closer, but the focus may be an issue. However, he focus ring is 1/5 out (8 notches vs 37 notches total), so there is some latitude here.
Does this have a built in battery?
No battery, it runs on 110 V.
Will it project pictures off your phone
Use the USB port on the Projector and connect to phone
Does this work in a lighted room or must it be dark?
This projector is 8500 lumen which isn’t bad. If it’s really bright sun and large windows you may smuggle, but otherwise it’s probably OK. I’ve found the colour is really bright and I can accept it.
Can you connect to stereo reciever?
Yes, via an HDMI cable. Mine is connected to a Pioneer VSX-LX101. I had to reset the receiver once I connected them, but since then everything is all good.


