![]()
User Manual
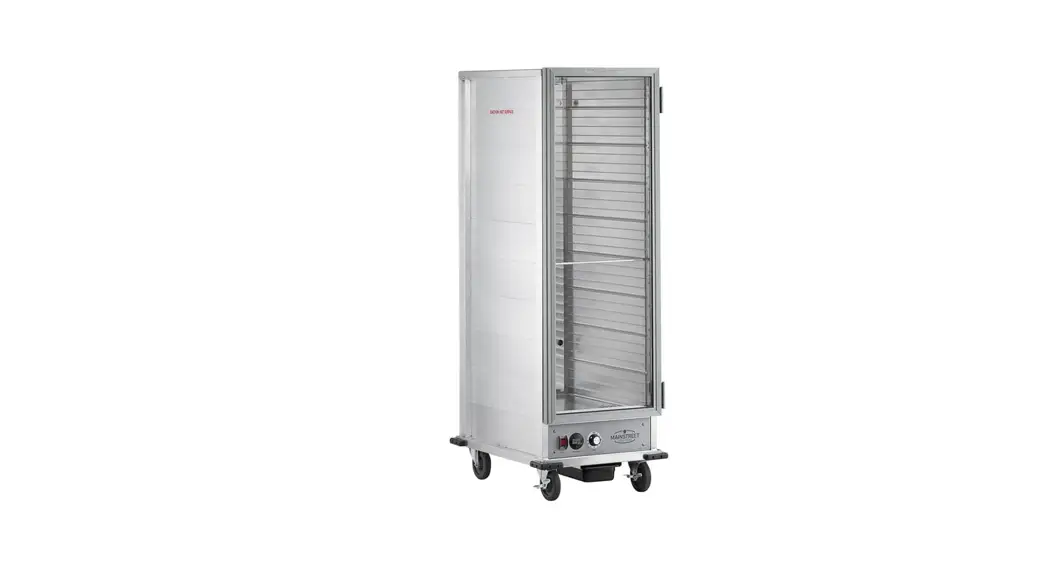
Holding Cabinets
Models: 541CH1836U, 541CHP1836U, 541CHP1836I

Please read and keep these instructions. Indoor use only.
General Information
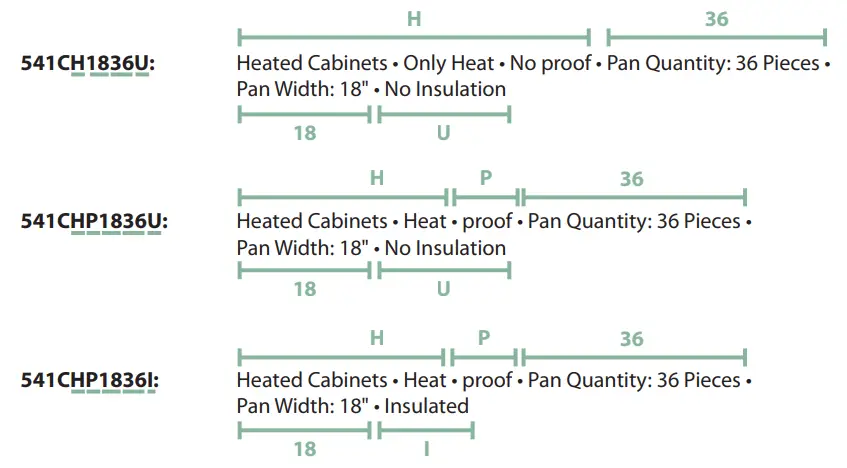
The models: 541C
- “HP” indicates Holding/Proofing Function and “H” indicates only Holding function
- PROOF “P”
- INSULATE “I” (With Insulate) or “U” (No Insulate)
- PAN WIDTH INCH, For example: 18″
- PAN QTY – From 12 to 36, For example: 36
![]() WARNING
WARNING
Improper installation, adjustment, alteration, service, or maintenance can cause property damage, injury, or death. Read the installation, operating, and maintenance instructions thoroughly before installing or servicing this equipment. If installing the fryer with Propane (LP) gas, a Commercially Approved Regulator MUST be installed on the fryer in addition to the tank regulator. Units installed without an external appliance regulator will cause damage to parts and will void the warranty.![]() WARNING
WARNING
Follow all food and safety guidelines. Pre-heat the cabinet to the desired temperature before placing cooked, hot food into the cabinet. This is not a re-thermalizing cabinet.
Food must be at the appropriate temperature before being placed into this cabinet. Use a food probe to check interal food temperature — the cabinet temperature is not necessarily the internal food temperature.![]() WARNING
WARNING
Only factory-approved service agents should attempt to service, repair, or replace electrical components, wiring, or power cord.![]() WARNING
WARNING
Unplug the cabinet before cleaning or servicing. Do not wash the cabinet with a water jet or high presure water.![]() WARNING
WARNING
This cabinet is for hot food holding applications only.![]() CAUTION
CAUTION
Do not spray or pour water into module. To clean the cabinet, wipe with a damp cloth and dry with a towel. Use only cleaning agents approved for aluminium.![]() CAUTION
CAUTION
Water dripping onto the floor from open doors can be a slip hazard.
Identifying Your Cabinet
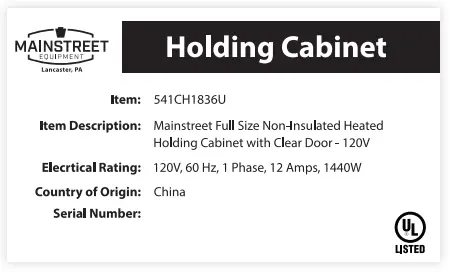
For future reference, record the cabinet model and serial number found on the serial plate located on the rear of the cabinet.
MODEL:
SERIAL#:
ITEM#:
QUANTITY:
These cabinets are designed to hold hot food at a constant temperature and/or supply humidity when proofing when the application applies. These cabinets are not cooking appliances, and should not be used as such. Safe holding temperatures and regular temperature checks are necessary for safe and sanitation food handling.
Product Specifications

| Item # | Function | Cabinet Size | Insulation | Voltage | Wattage | Overall Dimensions (W x D x H) |
| 541CH1836U | Heated Holding Only | Full Size | Non-Insulated | 120V | 1440W | 23.1″ x 33.2″ x 66.5″ |
| 541CHP1836U | Heated Holding/Proofing | Full Size | Non-Insulated | 120V | 1440W | 23.1″ x 33.2″ x 66.5″ |
| 541CHP1836I | Heated Holding/Proofing | Full Size | Insulated | 120V | 1440W | 23.1″ x 33.4″ x 67.5″ |
Installation:
- Upon delivery of the unit, check for shipping damage. Check the packaging and cabinet for shipping damage after unloading the unit, and after removing all packaging. Notify freight company immediately of shipping damage with pictures and description.
- After unpacking the cabinet, set on a stable ground and put casters in the lock position where applicable.
- Remove all tape and packing material from the outside and inside of the unit.
- Remove any protective covers on the door and corners of the unit.
NOTE: Use of scrapers(plastic/metal or other material) to remove the protective film on the door may cause scratches and impair see-through visibility . - After all packaging is removed, plug the cabinet into a dedicated grounded 120V 15 or 20 Amp outlet.
- Turn the unit on by using the power switch, flip the unit to “heat” mode, and adjust dial to maximum setting 9.
- Allow the unit to run for at least 1 hour to burn-in the elements and remove any odors evident from the manufacturing process.
Care & Maintenance:
![]() WARNING
WARNING
Unplug the cabinet before cleaning or servicing. Do not wash the cabinet with high-pressured water or a water jet.![]() WARNING
WARNING
Allow the unit to completely cool before cleaning. Not allowing the unit to cool causes risk of burn injury from the cabinet surfaces.![]() CAUTION
CAUTION
Do not spray or pour water into the heated control drawer module. Excess water may cause the heated control drawer module to short-circut or cease working.
CABINET MAINTENANCE & CLEANING: INTERIOR & EXTERIOR (EXCLUDING DOOR PANEL)
- Ensure the power cord is unplugged and the cord is securely coiled around hooks on back of the unit.
- Siphon out the extra water from the water pan and wipe down with a damp sponge or cloth between each use. This will prevent unwanted accumulation of food particles/debris in the pan.
- Remove the heated control drawer module by lifting the front up enough to clear the detent, then pull the module away from the cabinet with the power cord through the rear clearance hole.
- Using a mild detergent diluted to the manufacturer’s specification and a clean cloth, wipe down all interior and exterior surfaces excluding the polycarbonate panel.
- Using a clean cloth, wipe down all surfaces and then let them dry.
- Siphon out the extra water from the water pan and wipe down with a damp sponge or cloth between each use.
This will prevent unwanted accumulation of food particles/debris in the pan.
DOOR PANEL
- Ensure the power cord is not plugged in and the cord is off the ground.
- Using a cleaner recommended for polycarbonate plastics and a clean cloth, wipe down both sides of the door panel.
NOTE: Use of synthetic cloths or cleaners not intended for polycarbonate plastics may scratch or dull the door panel. - Isopropyl Rubbing Alcohol or a small amount of liquid dish detergent diluted with water may help remove tough grease smudges, dirt, or fingerprints as well as help make the panel antistatic and less likely to attract dust.
- Paste-wax recommended for polycarbonate plastics and approved for food service equipment can be used to help hide small scratches and return luster and clarity to the door panel as well as help make the panel antistatic and less likely to attract dust.
Operating Instructions:
- Refer to the Serial Plate for electrical requirements. These cabinets are rated at 120V 1440W and must be plugged into a dedicated grounded 120V 15 or 20 Amp outlet.
NOTE: Modification of cord and plug will void warranty and may cause the unit to be inoperable. - Ensure the power switch is OFF and plug into appropriate outlet.
- Fill the water pan to 1/2 from the top with clean HOT tap water for proofing or if moisture is desired for Holding.
NOTE: Check water level every 3 hours (3 hours when proofing) and refill with clean HOT tap water as necessary .
NOTE: Water pan does not have to be used/filled for heating applications that do not require moisture .
NOTE: Proofing mode requires use of water pan to be filled .
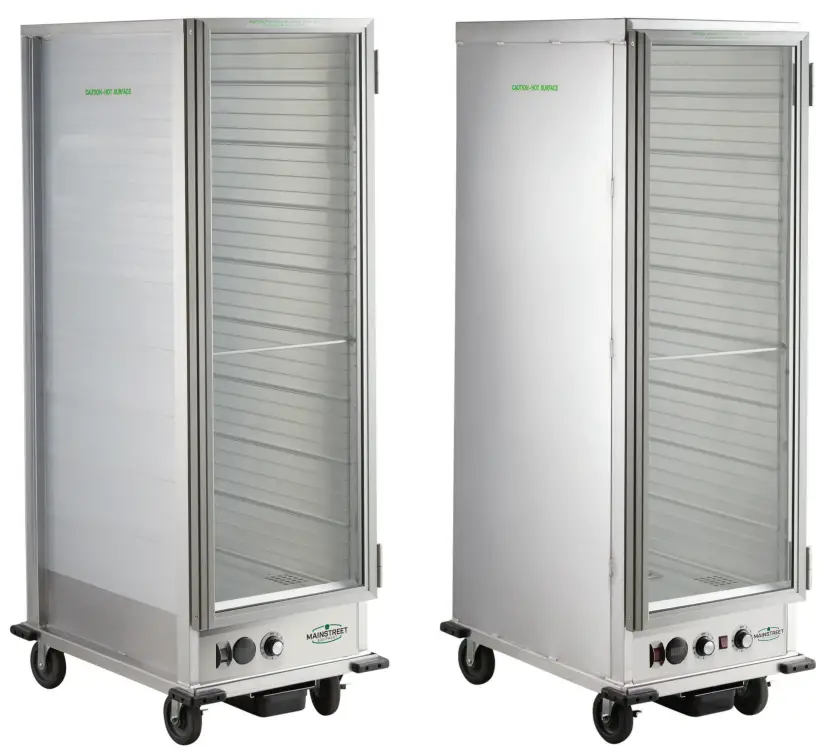
CONTROL PANELS
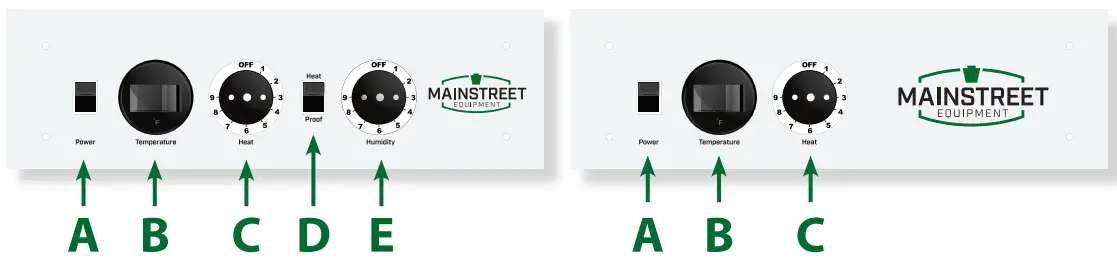
HEATING/HOLDING INSTRUCTIONS
- Set HEAT/PROOF Switch (D) to HEAT.
- Set POWER switch (A) to the ON position. Power indicator light will turn on.
- Set TEMPERATURE control (C) to 9, or your desired temperature.
- Pre-heat cabinet until desired temperature is reached (typical heat-up time from 77°F (25°C) ambient to 160°F (71°C) is approximatley 45 minutes. Cabinet temperature reaches 185°F (85°C) within approximately 45 minutes.
- Re-set TEMPERATURE control (C) and adjust as necessary to reach desired temperature (setting 6-8 is typical for 150°F (66°C)to 160°F (71°C).
- Adjust HUMIDITY control (E) to desired level. (9 being the highest, 1 being the lowest, OFF being no heat to the water).
The temperature range for heating/holding control is 80-185°F. The dial numbers 1-9 do not correspond or relate to a specific calibrated temperature. Exact temperature settings must be obtained through familiarization with the unit and are dependant on the ambient enviroment temperature and conditions where the unit is placed. The dial also has an OFF position to turn the heater off. Hot holding of food must be done to proper safe food handling and storage practices. This unit is not a cooker and not meant to cook or rethermalize food.
PROOFING INSTRUCTIONS
- Set HEAT/PROOF Switch (D) to PROOF.
- Set POWER switch (A) to the ON position. Power indicator light will turn on.
- Set TEMPERATURE control (C) to 2.
- Set HUMIDITY control (E) to 9.
- Pre-heat cabinet until desired temperature is reached (typical heat-up time from 77°F (25°C) ambient to 95°F (35°C) and 95% relative humidity is approximatley 30 minutes.
- Adjust HUMIDITY control (E) to desired level. (9 being the highest, 1 being the lowest, OFF being no heat to the water).
NOTE: Settings will need to be adjusted as necessary to reach desired temperature and humidity levels.
NOTE: The internal air circulation blower and 1440W heating element (controlled with the Heat Thermostat) will operate continuously when the power switch is turned ON.
The humidity range for humidity/ proofing control is 30-100%. The dial numbers 1-9 do not correspond or relate to a specific calibrated humidity %. Exact humidity settings must be obtained through familiarization with the unit and are dependant on the ambient enviroment temperarture and conditions where the unit is placed. The dial also has an OFF position to turn the heater off. To maintian low temperature range between 15-100°F, switch the proof mode and adjust the heat/holding control knob to desired heat range. Allow the unit 45 minutes to pre-heat in proofing mode.
NOTE: A use of a hygrometer is recommended for precsision proofing applications. For proofing, trial batches and altering control settings is recommended to dial in the unit to the users exact requirements based on the ambient temperature and conditions.
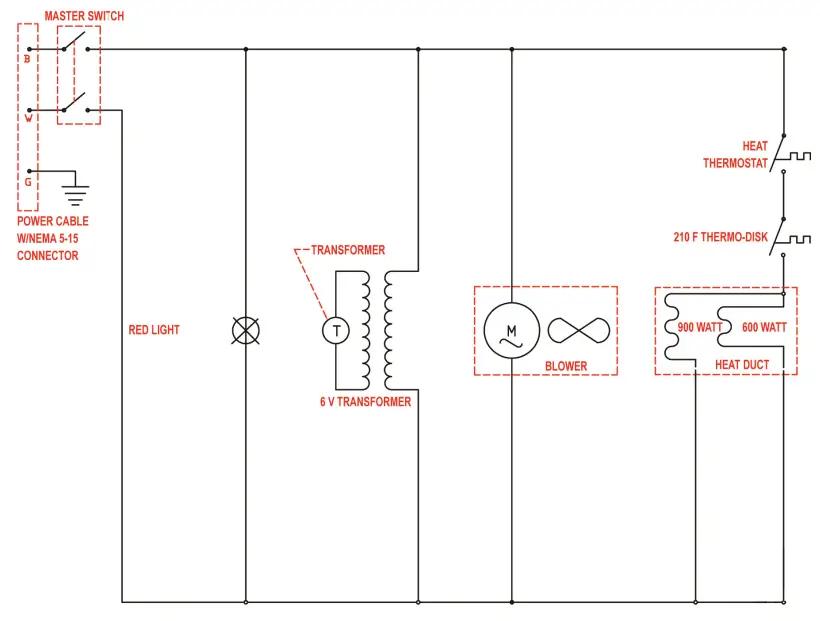
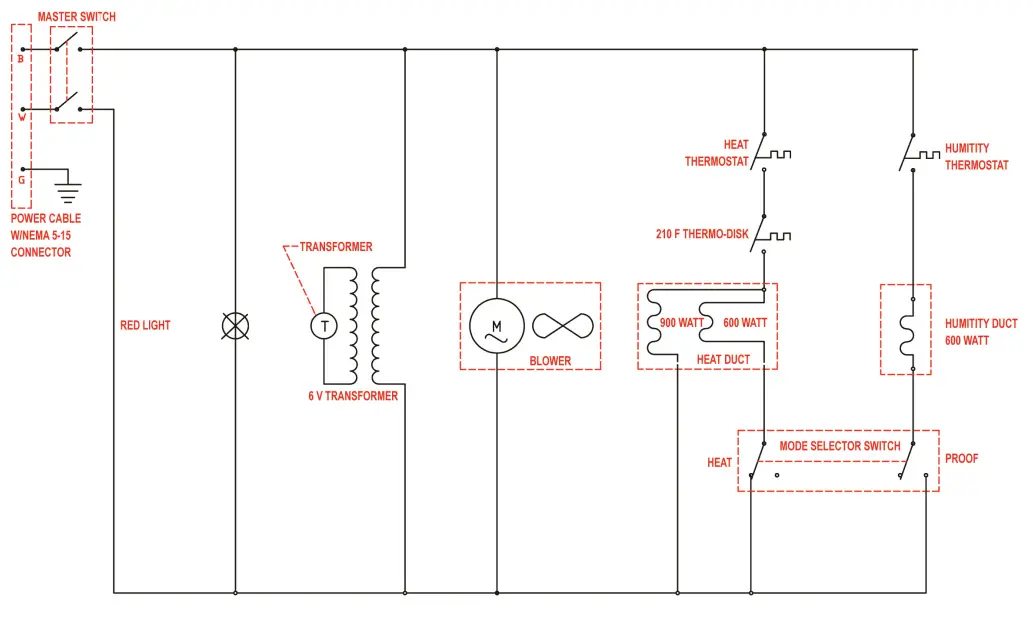
Service Specifications:
The Heater-Proofer is an aluminium transport cabinet with heaters to function as a hot food holding cabinet and/or as a proofing cabinet.
The heater, or heat drawer, is slid into place on the lower ledges of the cabinet. An electrical power cord is provided and plugged into the drawer through an access hole in the back of the cabinet. The main power switch on the front of the drawer, when switched ON, will turn on the light in the switch and turn on the air circulating fan in the drawer. The circulating fan and 1440W heater element will operate continuously while the unit is ON.
The thermostat control knobs are mounted to the left and right of the HEAT/PROOF switch. The left thermostat knob controls the heat in the cabinet from 1 (approx. 30% relative humidity) to 9 (100% relative humidity). Average setting is 6 (approx. 85% relative humidity).
| Food Product | Covered/Uncovered | Temperature Setting |
| Baked Fish | Uncovered | 175°F |
| Baked Potatoes | Uncovered | 180°F |
| Biscuit | Covered | 180°F |
| Broccoli | Uncovered | 170–175°F |
| Chicken Nuggets | Covered | 175°F |
| Corn on the Cob | Uncovered | 170–175°F |
| Croissants | Covered | 175°F |
| Egg Patties | Uncovered | 180°F |
| French Fries | Uncovered | 185°F |
| Fried Chicken | Uncovered | 180–185°F |
| Fried Fish | Uncovered | 180°F |
| Hamburgers | Covered | 180°F |
| Lasagna | Covered | 185°F |
| Mashed Potatoes | Covered | 175°F |
| Mixed Veggies | Covered | 170–175°F |
| Pancakes | Covered | 175°F |
| Pastas | Covered | 180°F |
| Peas | Covered | 170–175°F |
| Pizza | Uncovered | 175–180°F |
| Roast Beef | Uncovered | 170–180°F |
| Roast Pork | Uncovered | 170–180°F |
| Scalloped Potatoes | Covered | 175°F |
| Strip Steak | Uncovered | 160–170°F |
| Turkey | Uncovered | 170–180°F |
| Waffles | Covered | 175°F |
| Whole Chicken | Uncovered | 170–180°F |
Drawer Assembly
For Model: 541CH1836U
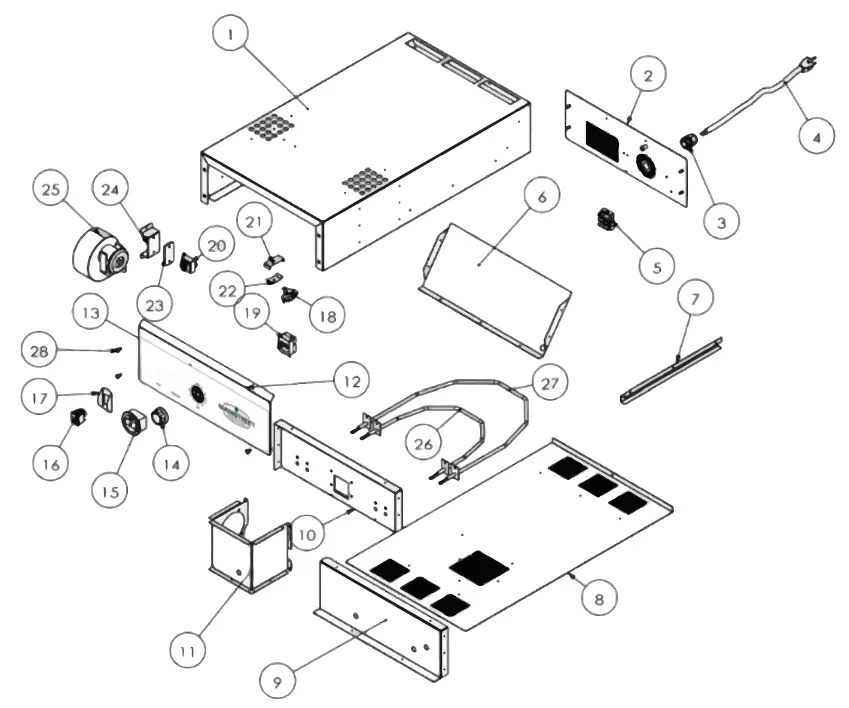
Drawer Replacement Parts
| Item # | Diagram # | Photo | Part No. | Description | 541DRWRHP Quantity | 541DRWRHP Quantity |
| – | 3 |  | HCD-030 | Cable Bushing | 1 | 1 |
| 541PCORD | 4 |  | HCD-031 | Power Cable | 1 | 1 |
| – | 5 | HCD-026 | Terminal Block | 1 | 1 | |
| 541PHCD035 | 14 |  | HCD-035 | Knob | 2 | 1 |
| – | 15 | 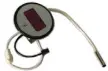 | HCD-024 | Thermometer | 1 | 1 |
| – | 16 |  | HCD-016 | Main Switch with Red Light | 1 | 1 |
| 541PFICD019 | 18 |  | HCD-019 | Limit Temperature Thermostat | 1 | 1 |
| 541PHCD034 | 19 | 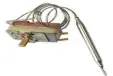 | HCD-034 | Temperature Thermostat | 2 | 1 |
| – | 20 |  | HCD-017 | Transformer | 1 | 1 |
| 541PHCD011 | 27 |  | HCD-011 | Heating Element 900W | 1 | |
| 541PHCD010 | 26 |  | HCD-010 | Heating Element 600W | 1 | |
| – | 29 | 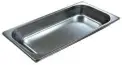 | HCD-008 | SS Water Pan | 1 | N /A |
| 541PHCD009 | 32 |  | HCD-009 | Heating Element 600W | 1 | N /A |
| 541PHCD036 | 36 |  | HCD-036 | Heat/Proof Switch with Red Light | 1 | N /A |
Cabinet Assembly
For Model: 541CHP1836I
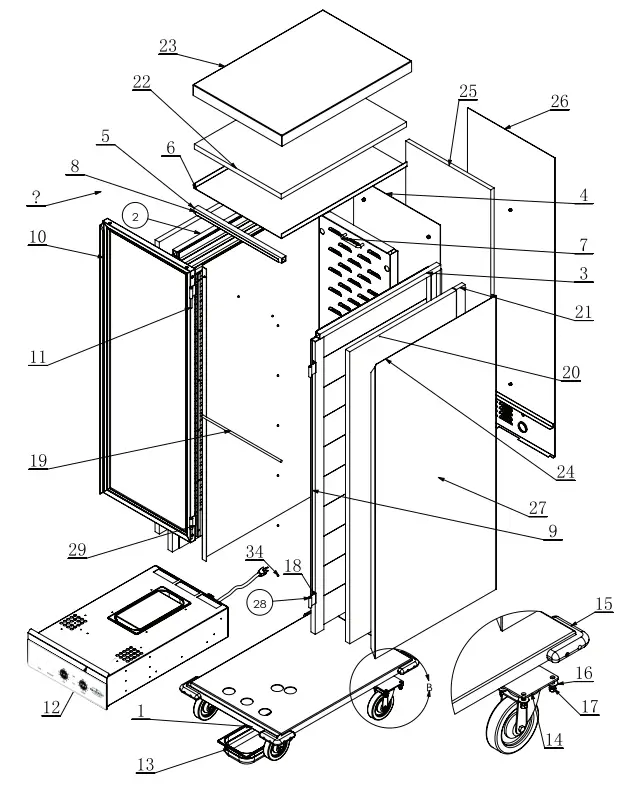
Cabinet Assembly
For Model: 541CHP1836U

Cabinet Assembly
For Model: 541CH1836U
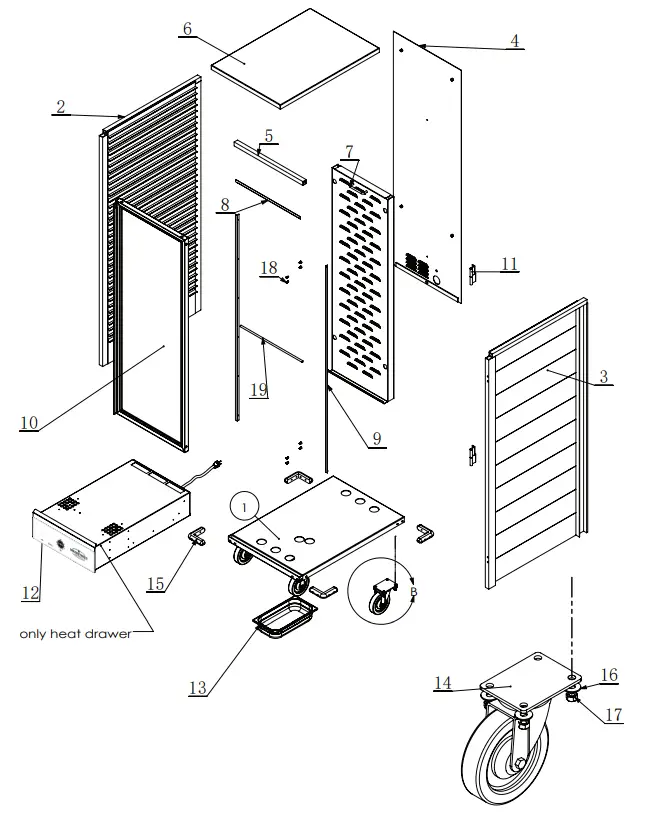
Cabinet Replacement Parts
| Item # | Description | Quantity | Use for Cabinets |
| 7 | Full Size Rear Hanging Panel | 1 | all models |
| 9-Aug | Magnetic Strips (Top 1 pc., Left/Right 2 pcs. Included) | 1 | all models |
| 10 | Full Size Door Assembly | 1 | all models |
| 11 | Hinge | 2 | all models |
| 12 | Combination Holding/Proofing Drawer | 1 | 541CHP1836I 541CHP1836U (ONLY) |
| 12 | Heating Drawer | 1 | 541CH1836U (ONLY) |
| 13 | Black Plastic Drip Pan | 1 | all models |
| 14 | 5″ Caster with Brake (Hardware Included) | 4 | all models |
| 15 | Rubber Corner Bumper | 4 | all models |
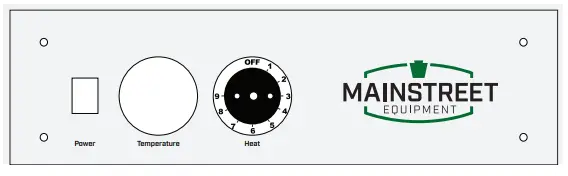
Only Heat Models
For Model: 541CH1836U
Heat/Proof Models
For Model: 541CHP1836U & 541CHP1836I
Troubleshooting
![]() CAUTION
CAUTION
Before disassembling unit, electrical power must be disconnected by unplugging the unit. Failure to unplug the unit prior to servicing may result in electrical shock.
Each unit is shipped with this instruction manual and should be used as a reference guide for all service areas. The manual provides a picture of the drawer, showing the location of electrical components and a description of each. If the unit does not operate correctly, or malfunctions for any reason, the following check list should provide a solution.
- Check to make sure power cord is firmly plugged into the wall outlet.
- Check circuit breaker of wall outlet and reset if necessary.
IF unit fails to start, please do the following: - Remove heat drawer from cabinet. Remove bottom cover of drawer. Visually inspect to observe for:
a. Loose or disconnected wires
b. Black or burnt marks on any components
c. Loose heating elements - If any burn marks or discoloration of wires is noted on any component, the component along with all wires attached to the damaged component must be replaced.
- If a heater element is loose, or if it has broken loose from mounting tabs, the wires will short out on the metal, causing permanent damage. Both the element and main power switch (with wires on switch) must be replaced.
- If the temperature on the LED Thermometer is not reading a constant temperature, it must be replaced along with its power supply transformer.
![]()
Mainstreet Equipment


