![]()
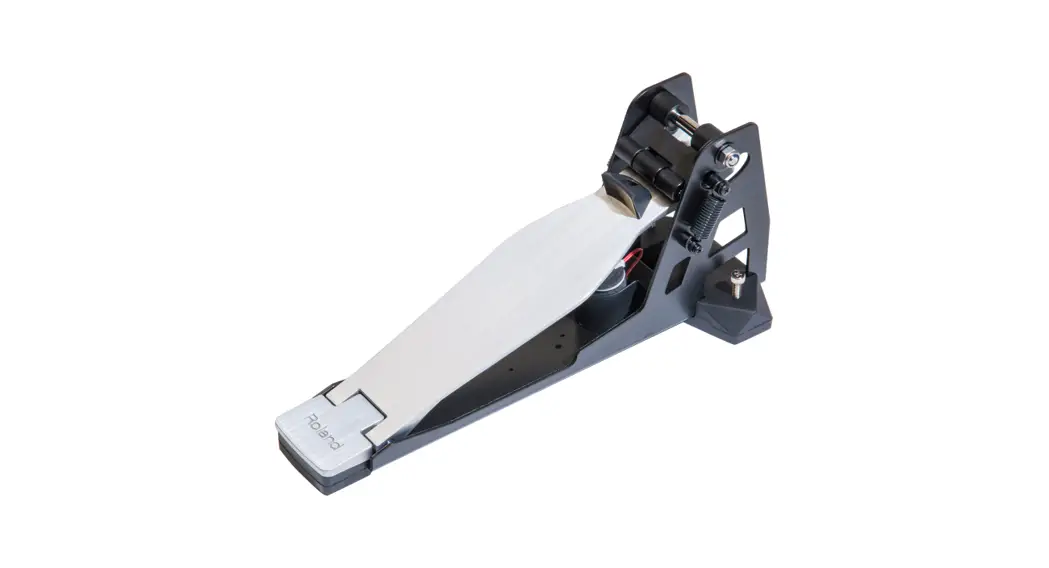
KT-9 Kick Trigger Pedal
FD-9 Hi-Hat Control Pedal
Owner’s Manual
KT-9 Kick Trigger Pedal
Before using this unit, carefully read “USING THE UNIT SAFELY” and “IMPORTANT NOTES.” After reading, keep the document(s) including those sections where it will be available for immediate reference.
Check the Included Items
After opening the package, check that all of the included items are present. If anything is missing, contact your dealer.
| 5 Unit (KT-9/FD-9) 5 Owner’s Manual 5 Connection cable | KT-9 only 5 Weight 5 Screw |
* A Phillips screwdriver for attaching the weight and anchor bolt is not included. You’ll need to provide a Phillips screwdriver of the appropriate size.
Main Features
This unit is a pedal featuring a stop mechanism using a link and spring. Since it tends to not produce loud noise or vibration, it remains quiet, allowing you to enjoy performing without inconvenience to other people nearby.
By using this unit in conjunction with the separately sold noise eater (NE-10), you can further reduce any noise or vibration transmitted to the floor below.
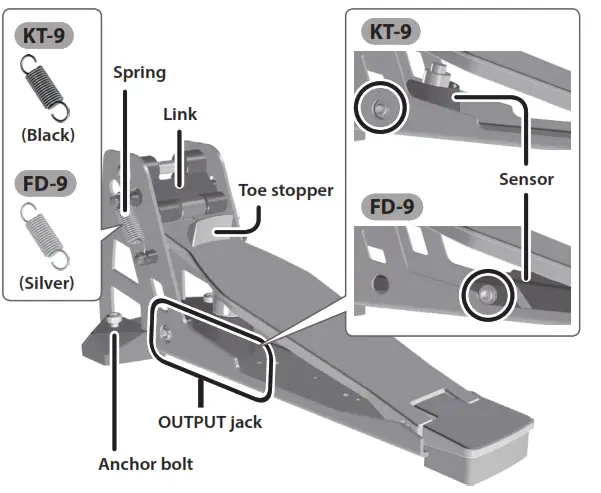
Descriptions
* Do not touch the sensor area or insert a foreign object into it. Doing so will cause faulty operation or malfunction.
Using the Anchor Bolts
If you’re using this unit on a V-Drums mat, on a noise eater (NE-10), or on a carpet, extending the anchor bolts will secure the unit in place, making it easier for you to perform.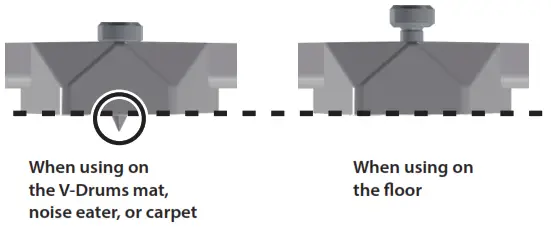
* When used on flooring, the anchor bolts may damage the floor
* The tips of the anchor bolts are sharp. Handle with care.
Setup
Connections
Connect this unit’s OUTPUT jack to your sound module, using the connection cable of your sound module or the included connection cable.
KT-9
| Sound module | Connection cable | Jack |
| TD-30 | Connection cable of the sound module (KIK) | KICK |
| TD-25/TD-15/ TD-11/TD-1 | – | |
| HPD-20 | The connection cable included with this unit | TRIG IN |
| SPD-30 | 1/KICK | |
| SPD-SX | TRIG IN 1/2, TRIG IN 3/4 | |
| TM-2 | TRIG IN 1, TRIG IN 2 |
FD-9
| Sound module | Connection cable | Jack |
| TD-30 | Connection cable of the sound module (HHC) | HH CTRL |
| TD-25/TD-15/ TD-11/TD-1 | – | |
| HPD-20 | The connection cable included with this unit | HH CTRL |
| SPD-30 | HH CTRL |
Sound Module Settings
| Sound module | Value | |
| TD-30 | “TRIGGER”0“TRIGGER SENSITIVITY”0“KICK” | Trig Type: KT-10 |
| “TRIGGER”0“TRIGGER ADVANCE”0“THRU”0“KICK” | Threshold: 13 | |
| TD-25 | “MENU”0“SETUP”0“TRIGGER SETTINGS”0“KICK” | Type: KT-10 Threshold: 13 |
| TD-15 | “KIT MENU”0“SYSTEM”0“PAD SETTINGS”0“KIK” | Pad Type: KT-10 Threshold: 13 |
| TD-11 | ||
| TD-1 | “Pad type” | Kick pedal: 3 |
| HPD-20 | “MENU”0“SYS”0“ExtTrigger Settings”0“TYPE” | Type: KD-140 |
| “MENU”0“SYS”0“Pad Settings”0“SENS” | Threshold: 13 | |
| SPD-30 | “MENU”0“PAD SETTING”0“EXTERNAL” | Type: KD-140 Threshold: 13 |
| SPD-SX | “SETUP”0“TRIG IN”0“INPUT MODE”0“TRIGx2” or “SETUP”0“TRIG IN”0“INPUT MODE”0“HEAD&RIM” | TRIG 1 TYPE: KT-10 (“TRIG 3 TYPE” if connected to the TRIG IN 3/4 jack) or TRIG 1/2 TYPE: KT-10 (“TRIG 3/4 TYPE” if connected to the TRIG IN 3/4 jack) |
| “SETUP”0“PAD SENS” | THRESHOLD: 13 | |
| TM-2 | “SETUP”0“TRIGGER SETUP” | Type: KT-10 Threshold: 13 |
* Use the Sensitivity setting (Sens) to adjust the sensitivity of the pad to your taste.
* If double triggering occurs, adjust the sensitivity by increasing the value of the sound module’s trigger parameter “Threshold.”
* If you’re using any other sound module, set the parameters to approximately the following values: Sens: 10, Threshold: 13, and Scan Time: 2.8.
FD-9
| Sound module | Value | |
| TD-30 | “TRIGGER”0“TRIGGER HI-HAT” | Trig Type: VH11 |
* This setting is not necessary for sound modules other than the TD-30.
Adjusting the Feeling
By Adjusting the Spring
You can lighten the feeling by removing either the left or the right spring.
* Take care not to pinch your finger when removing or installing spring.
By Attaching the Weight
KT-9 only
You can make the feeling heavier by installing the included weight.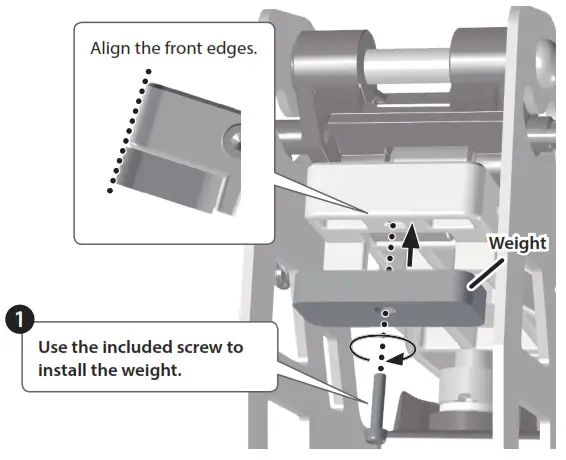
* After installing the weight, make sure that the screw is tight.
Adjusting the feeling will change the amount of noise/vibration
Be aware that removing the spring or installing the weight will increase the noise/vibration when performing.
| Springs | Two | One |
| Noise/vibration | Less | More |
| Feeling | Heavy | Light |
| Weight | Removed | Installed |
| Noise/vibration | Less | More |
| Feeling | Light | Heavy |
USING THE UNIT SAFELY
![]() WARNING
WARNING
![]() Do not disassemble or modify by yourself
Do not disassemble or modify by yourself
Do not carry out anything unless you are instructed to do so in the owner’s manual. Otherwise, you risk causing malfunction.
Do not repair or replace parts by yourself![]() Refer all servicing to your retailer, the nearest Roland Service Center, or an authorized Roland distributor, as listed on the “Information.”
Refer all servicing to your retailer, the nearest Roland Service Center, or an authorized Roland distributor, as listed on the “Information.”
Do not use or store in the following types of locations
 Subject to temperature extremes (e.g., direct sunlight in an enclosed vehicle, near a heating duct, on top of heat-generating equipment); or are
 Damp (e.g., baths, washrooms, on wet floors); or are
- Exposed to steam or smoke, or are
- Subject to salt exposure, or are
- Exposed to rain, or are
- Dusty or sandy, or are
- Subject to high levels of vibration and shakiness, or are
- Placed in a poorly ventilated location.
Do not place in an unstable location![]() Otherwise, you risk injury as a result of the unit toppling over or dropping down.
Otherwise, you risk injury as a result of the unit toppling over or dropping down.
![]() WARNING
WARNING
Do not allow foreign objects or liquids to enter the unit; never place containers with liquid on the unit![]()
![]() Do not place containers containing liquid (e.g., flower vases) on this product. Never allow foreign objects (e.g., flammable objects, coins, wires) or liquids (e.g., water or juice) to enter this product. Doing so may cause short circuits, faulty operation, or other malfunctions.
Do not place containers containing liquid (e.g., flower vases) on this product. Never allow foreign objects (e.g., flammable objects, coins, wires) or liquids (e.g., water or juice) to enter this product. Doing so may cause short circuits, faulty operation, or other malfunctions.
Be cautious to protect children from injury ![]() Always make sure that an adult is on hand to provide supervision and guidance when using the unit in places where children are present, or when a child will be using the unit.
Always make sure that an adult is on hand to provide supervision and guidance when using the unit in places where children are present, or when a child will be using the unit.
Do not drop or be subject to a strong impact![]() Otherwise, you risk causing damage or malfunction.
Otherwise, you risk causing damage or malfunction.
![]() CAUTION
CAUTION
![]() Route all power cords and cables in such a way as to prevent them from getting entangled
Route all power cords and cables in such a way as to prevent them from getting entangled
The injury could result if someone were to trip on a cable and cause the unit to fall or topple.
Disconnect all cords/cables before moving the unit![]() Damage or malfunction may result if you fail to disconnect all cables before moving the unit.
Damage or malfunction may result if you fail to disconnect all cables before moving the unit.
Take care so as not to get fingers pinched![]() When using this unit, take care not to pinch your fingers. Whenever a child uses the unit, an adult should be on hand to provide supervision and guidance.
When using this unit, take care not to pinch your fingers. Whenever a child uses the unit, an adult should be on hand to provide supervision and guidance.
Keep small items out of the reach of children![]() To prevent accidental ingestion of the parts listed below, always keep them out of the reach of small children. Included Parts (KT-9 only):
To prevent accidental ingestion of the parts listed below, always keep them out of the reach of small children. Included Parts (KT-9 only):
- Weight
- Screw
Removable Parts: - Spring
- Screws
IMPORTANT NOTES
Placement
- When moved from one location to another where the temperature and/or humidity are very different, water droplets (condensation) may form inside the unit. Damage or malfunction may result if you attempt to use the unit in this condition. Therefore, before using the unit, you must allow it to stand for several hours until the condensation has completely evaporated.
- Depending on the material and temperature of the surface on which you place the unit, its rubber feet may discolor or mar the surface.
- In some cases, grease might seep out from the link, but this is not a problem for use. If it is a concern, wipe it off with a soft cloth.
Maintenance
- Never use benzine, thinners, alcohol, or solvents of any kind, to avoid the possibility of discoloration and/or deformation.
Additional Precautions
- To avoid malfunctions, do not apply excessive force to the jack.
- When disconnecting all cables, grasp the connector itself—never pull on the cable. This way you will avoid causing shorts, or damage to the cable’s internal elements.
- This instrument is designed to minimize the extraneous sounds produced when it’s played. However, since sound vibrations can be transmitted through floors and walls to a greater degree than expected, take care not to allow these sounds to become a nuisance to others nearby.
Trademarks
- Roland, BOSS, V-Drums, and Noise Eater are either registered trademarks or trademarks of Roland Corporation in the United States and/or other countries.
- Company names and product names appearing in this document are registered trademarks or trademarks of their respective owners.
Main Specifications
| Roland KT-9: Kick Trigger Pedal | Roland FD-9: Hi-Hat Control Pedal | |
| Dimensions | 139 (W) x 365 (D) x 158 (H) mm 5-1/2 (W) x 14-3/8 (D) x 6-1/4 (H) inches | |
| Weight | 2.0 kg/4 lbs 7 oz | |
| Accessories | Owner’s manual, Weight, Screw, Connection cable | Owner’s manual, Connection cable |
| Option (sold separately) | Noise eater (NE-10) | |
* In the interest of product improvement, the specifications and/or appearance of this unit are subject to change without prior notice.
Copyright © 2016 ROLAND CORPORATION![]()


