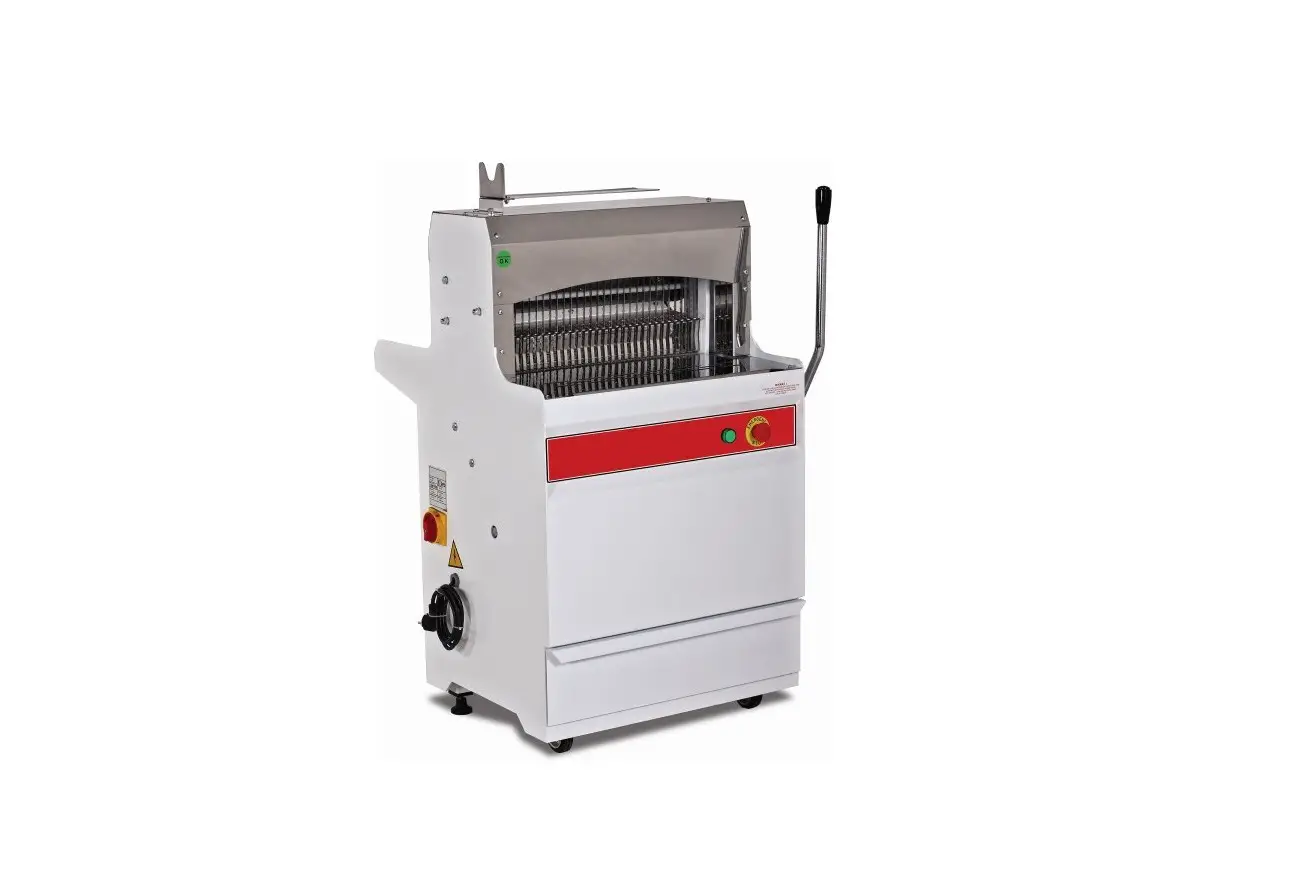
ADEXA EMP.3001 Bread Slicer
GENERAL INFORMATION
Before installing the appliance, read operation and maintenance instructions carefully. Wrong installation and part changing may damage the product or may cause injury on people. These are not in our company’s responsibility to damage the appliance intentionally, negligence, detriments because of disobeying instructions and regulations, wrong connections. Unauthorized intervention to appliance invalidates the warranty.
- This instruction manual should be kept in a safe place for future reference.
- Installation should be made in accordance with ordinances and security rules of that country by a qualified service personnel.
- This appliance has to be used by trained person.
- Please turn off the appliance immediately in the event of malfunction or failure. The appliance should be repaired only by authorized service personnel. Please demand original spare part.
PRODUCT DESCRIPTION
*The Professional Bread Slicer ,that provides high efficiency has been designed to be used in industrial kitchens.
| Product Code | Dimensions (mm) | Weight (kg) | Packaging Dimensions (mm) |
| EMP.3001 | 717x686x1140 | 125 | 760x760x1200 |
| EMP.3002 | 717x686x1140 | 125 | 760x760x1200 |
| EMP.3004 | 733x643x682 | 86 | 780x710x820 |
TECHNICAL INFORMATION
| Product Code | Capacity (slice/h) | Bread Dimens. (mm) | Slice Thickn ess (mm) | Blade (piece) | Power (KW) | Oper. Voltage (V) | Cable (mm²) | Fuse (A) |
| EMP.3001 | 500 | 500×140 | 10-13- 16 | 46-36- 30 | 0,37 | 220 | 3×1,5 | 16 |
| EMP.3002 | 500 | 500×170 | 20 | 24 | 0,37 | 220 | 3×1,5 | 16 |
| EMP.3004 | 500 | 480×130 | 10-13- 16 | 42-30- 26 | 0,37 | 220 | 3×1,5 | 16 |
TRANSPORTATION
*This appliance can be moved by hand from area to area.Do not crash and drop the appliance while transporting.
UNPACKING
*Please unpack the package according to the security codes and ordinances of current country and get rid from the pack.Parts which contacts with food are produced by stainless steel.All plastic parts are marked by material’s symbol.
*Please check that all the parts of appliance had come completely and if they are damaged or not during the shipping.
INSTALLATION
*Please place the product to straight and sturdy ground, please take necessary steps against possibility of overturn.
*Technician who will serve for installation and service for the appliance must be professional on this subject and must have installation and service licenses by the company.
*Connection to Electric Power Supply must be done by authorized person.
*Please be sure that the voltage connected to appliance must be equal with the voltage which is on appliance’s label.
![]() This appliance must be connected to an earthed outlet in accordance with safety rules and standards.
This appliance must be connected to an earthed outlet in accordance with safety rules and standards.
*Appliance’s earthing must be connected to earthing line on panel which is nearest to electric installation.
*Connection to the main fuse and leak current fuse must be done in accordance with the current regulations.
SAFETY INSTRUCTIONS
- Do not use the appliance in insufficient lighted place.
- Do not touch the moving attachments while the appliance operates.
- Do not install the appliance in the presence of flammable or explosive materials.
- Do not operate the appliance when the machine is empty.
- Do not load so less or more than appliance’s capacity.
- Do not attempt to use the appliance without suitable protective equipments.
- Because of any reason if there is a fire or flame flare where the appliance is used,turn off all gas valves and electric contactor switch quickly and use fire extinguisher .Never use water to extinguish the fire.
- All the damages because of not having earthing connection will not be on warranty.
OPERATION
*Control Panel;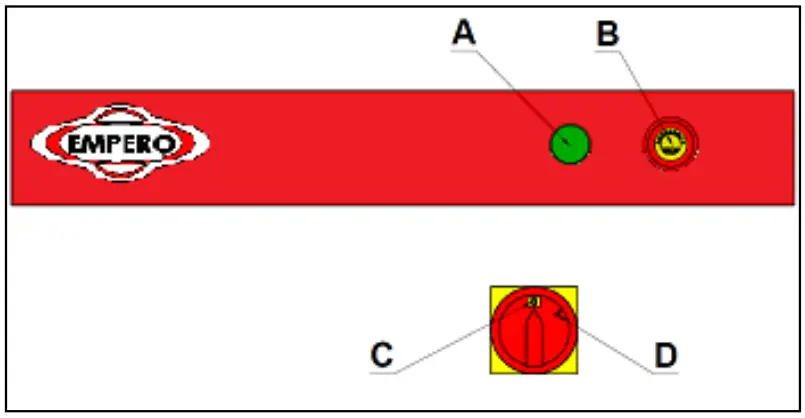
- A : Signal lamp
- B : Urgent STOP button
- C : Switch OFF position
- D : Switch ON position
*Operating;
- Clean the bread tank and blade with wet cloth.
- Switch to (l) position.
- When the appliance is operated green lamp at the front side of the appliance signals.
- Pull the pushing handle tha is with spring to front and keep with your hand.
- Place the breads that will be sliced into the bread tank.
- In order to slice the breads, leave the pushing handle to free.
- Bread tank will come to blades with the breads in it and the breads will be sliced by movement blades.
- Blades stop when pushing handle comes back to beginning position.
- In order to stop the appliance press URGENT STOP button.
- When the operation is completed, switch to (0) position or unplug the appliance.
CLEANING & MAINTENANCE
CLEANING AND MAINTENANCE AFTER EVERY USE
- Always turn off the appliance and disconnect from the power supply before cleaning.
- Clean the outer surface of the appliance ,tank and cutting blades with wet cloth and then dry.
- Do not use abrasive cleaning chemicals as these can leave harmful residues.
- Do not clean the appliance by spraying water directly, otherwise electric motor may get damaged.
PERIODIC CLEANING AND MAINTENANCE
- Maintenance should be done by qualified person.
- Get the periodic maintenance of the appliance once in every 15 days.
- The Bread Slicers require low maintenance (Motor and ball bearings are lubricated).
- Check the spring of pushing handle in periodic times.
TROUBLESHOOTING
| THE APPLIANCE DOESN’T OPERATE |
|
| THE BREAD SLICES DON’T GO OUT |
|
| THE APPLIANCE STOPPED |
overloaded. |
- If bread slicing is not done at suitable quality
- If any function of security doesn’t work
- Do not use the appliance.
*If these problems are still going on, contact with our authorized services.
SPARE PART LIST-EXPLODING DRAWING
EMP.3001-10-13-16
EMP.3002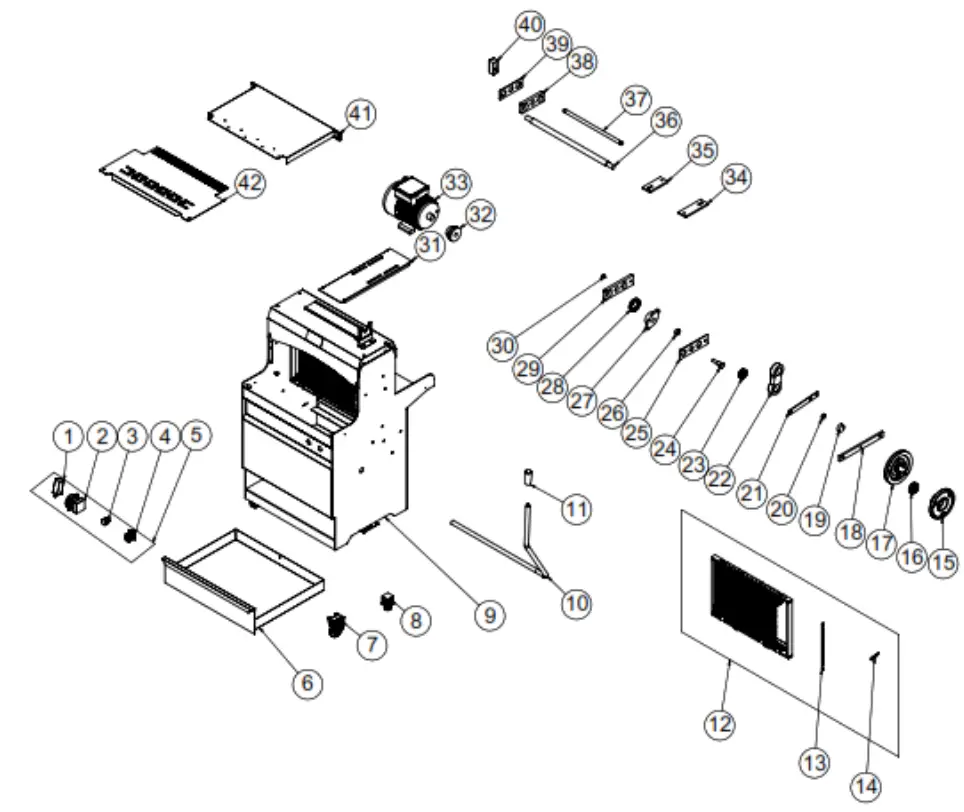
| PRODUCT CODE : EMP.3001-10-13-16 3002 | ||
| NO | PRODUCT NAME | P.CODE |
| 1 | L5K13M1P311 SWITCH | ERS.M.ELK-SWC-EMAS-001 |
| 2 | SWITCH | M.ELK-SLT-MK-001 |
| 3 | GREEN LED SIGNAL | M.ELK-LED-LMB-002 |
| 4 | EMERGENCY STOP BUTTON | M.ELK-SLT-BTL-003 |
| 5 | PANEL GROUP | M.ELK-KD-EDM-001 |
| 6 | DRAWER FRAME | – |
| 7 | WHEEL | M.AKS-TKR-KN-002 |
| 8 | ROLLER FOOT | ERS.M.AKS-AYK-RTL-001 |
| 9 | CHASSIS | – |
| 10 | DRIVE ARM | YTL-ERS.EDM-KS-0008 |
| 11 | HANDLE | ERS.M.AKS-KLP-BKL-009 |
| 12 | TAPE | ARA-ERS.EDM-0016 |
| 13 | SLICING KNIFE | M.BCK-BED-002 |
| 14 | KNIFE TENSIONING SHEET | YSC-ERS.EDM-LZ-0027 |
| 15 | FIXED PULLEY | YMH-ERS.EDM-FSM-0001 |
| 16 | BEARING ( 6204 ZZ ) | M.RLM-NRM-044 |
| 17 | BIG PULLEY | YDK-ERS.EDM-CN-0001 |
| 18 | DERLIN | HDM-KR-DRL-001 |
| 19 | PRINTING SUPPORT ELEMENT | YTL-ERS.EDM-KS-0011 |
| 20 | PRINTING APPARATUS | YTL-ERS.EDM-KS-0009 |
| 21 | COMB PRINTING ARM SHEET | YSC-ERS.EDM-LZ-0124 |
| 22 | GLASSES | YMH-ERS.EDM-FSM-0002 |
| 23 | BEARING ( 6202 2RS ) | M.RLM-NRM-003 |
| 24 | PULLEY INTERMEDIATE ELEMENT | YTL-ERS.EDM-KS-0006 |
| 25 | CLOSING LEFT SHEET | YSC-ERS.EDM-LZ-0001 |
| 26 | PULLEY INTERMEDIATE ELEMENT | YTL-ERS.EDM-KS-0007 |
| 27 | BEARING Ø20 | ERS.M.RLM-YTK-003 |
| 28 | ARM BUSH | YTL-ERS.EDM-KS-0002 |
| 29 | ECCENTRIC LEFT PLATIN | M.PLTN-ERS-EDM-001 |
| 30 | CONNECTION SCREW | YTL-ERS.EDM-KS-0012 |
| 31 | ENGINE PLATE | YSC-ERS.EDM-LZ-0022 |
| 32 | BELT PULLEY | YDK-ERS.EDM-CN-0003 |
| 33 | ELECTRIC MOTOR | M.ELK-MTR-RSM-034 |
| 34 | TYRE | M.MUH-088 |
| 35 | TYRE | M.MUH-090 |
| 36 | MIDDLE SHAFT | YTL-ERS.EDM-KS-0004 |
| 37 | RIGHT LEFT SHAFT | YTL-ERS.EDM-KS-0003 |
| 38 | ECCENTRIC RIGHT PLATINUM | M.PLTN-ERS-EDM-002 |
| 39 | CLOSING RIGHT SHEET | YSC-ERS.EDM-LZ-0002 |
| 40 | KNIFE OPERATING ELEMENT | YTL-ERS.EDM-KS-0001 |
| 41 | UPPER REAR SHEET | YSC-ERS.EDM-LZ-0032 |
| 42 | UPPER FRONT SHEET | YSC-ERS.EDM-LZ-0086 |
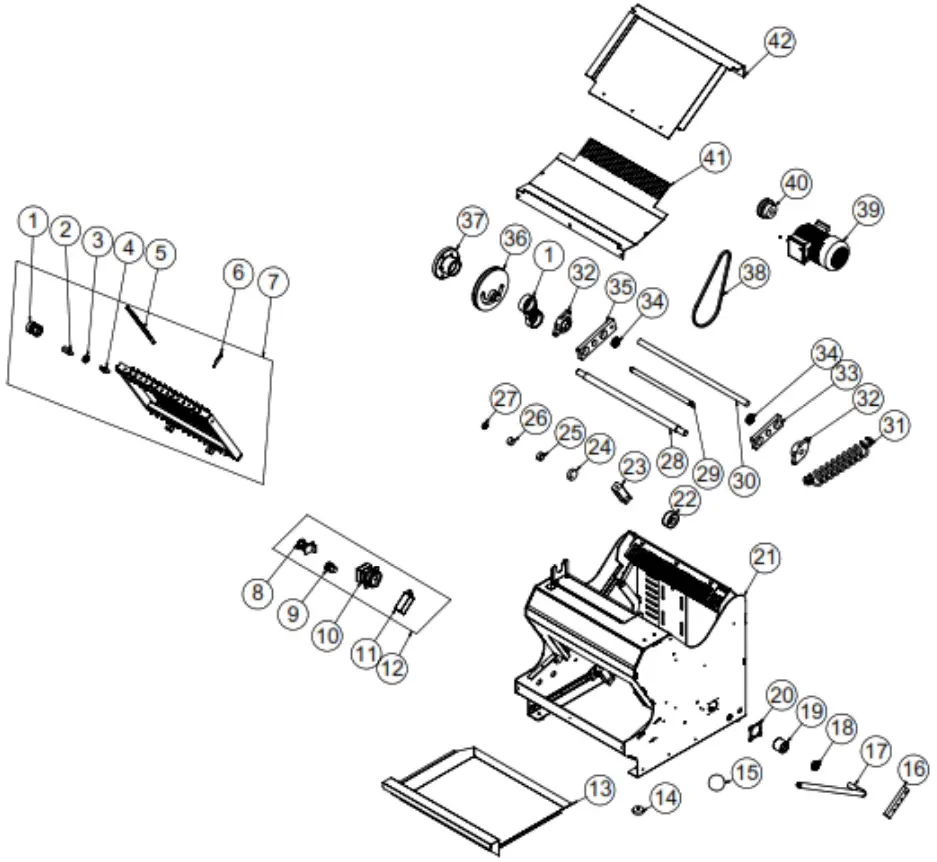
| PRODUCT CODE : EMP.3004-10-16 | ||
| NO | PRODUCT NAME | P.CODE |
| 1 | GLASSES SMALL | YMH-ERS.EDM-FSM-0004 |
| 2 | HANGER PIN | YTL-ERS.EDM-KS-0019 |
| 3 | BEARING ( 6202 2RS ) | M.RLM-NRM-003 |
| 4 | FIXED PIN | YTL-ERS.EDM-KS-0018 |
| 5 | SLICING KNIFE | M.BCK-BED-002 |
| 6 | KNIFE TENSIONING SHEET | YSC-ERS.EDM-LZ-0027 |
| 7 | TAPE | ARA-ERS.EDM-0010 |
| 8 | EMERGENCY STOP BUTTON | M.ELK-SLT-BTL-003 |
| 9 | GREEN LED SIGNAL | M.ELK-LED-LMB-002 |
| 10 | SWITCH | M.ELK-SLT-MK-001 |
| 11 | L5K13M1P311 SWITCH | ERS.M.ELK-SWC-EMAS-001 |
| 12 | CABLE BACKET | M.ELK-KD-EDM-001 |
| 13 | DRAWERSHEET | YSC-ERS.EDM-LZ-0067 |
| 14 | FOOT | M.AKS-AYK-INX-004 |
| 15 | SPHERE KNOB | M.AKS-KLP-BKL-024 |
| 16 | DERLIN | HDM-KR-DRL-002 |
| 17 | DRIVE ARM | YTL-ERS.EDM-KS-0017 |
| 18 | BEARING ( 6003 ZZ ) | M.RLM-NRM-004 |
| 19 | ARM BUSH | YTL-ERS.EDM-KS-0021 |
| 20 | BUSH CLOSING SHEET | YSC-ERS.EDM-LZ-0072 |
| 21 | CHASSIS | – |
| 22 | SHAFT BUSHING | YTL-ERS.EDM-KS-0020 |
| 23 | KNIFE OPERATING ELEMENT | YTL-ERS.EDM-KS-0015 |
| 24 | BRAKE POLYAMIDE | YTL-ERS.EDM-KS-0025 |
| 25 | PULLEY INTERMEDIATE ELEMENT | YTL-ERS.EDM-KS-0007 |
| 26 | COMB SUPPORT POLYAMIDE | YTL-ERS.EDM-KS-0024 |
| 27 | CARD POLYAMIDE | YTL-ERS.EDM-KS-0023 |
| 28 | CENTER SHAFT | YTL-ERS.EDM-KS-0014 |
| 29 | MOVEMENT SHAFT RIGHT-LEFT | YTL-ERS.EDM-KS-0013 |
| 30 | HANDLE MOVEMENT SHAFT | YTL-ERS.EDM-KS-0016 |
| 31 | HANDLE SPRING | M.YAY-ERS-039 |
| 32 | BEARING Ø20 | ERS.M.RLM-YTK-003 |
| 33 | CLOSING RIGHT SHEET | YSC-ERS.EDM-LZ-0002 |
| 34 | BEARING ( 6004 ZZ ) | M.RLM-NRM-018 |
| 35 | CLOSING LEFT SHEET | YSC-ERS.EDM-LZ-0001 |
| 36 | BIG PULLEY | YDK-ERS.EDM-CN-0001 |
| 37 | FIXED PULLEY | YMH-ERS.EDM-FSM-0003 |
| 38 | STRAP (13*700) | M.KYS-VKY-017 |
| 39 | ELECTRIC MOTOR | M.ELK-MTR-RSM-034 |
| 40 | BELT PULLEY | YDK-ERS.EDM-CN-0003 |
| 41 | FRONT COMB | YSC-ERS.EDM-LZ-0069 |
| 42 | FRONT COMB | YSC-ERS.EDM-LZ-0070 |
ELECTRIC CIRCUIT SCHEMA
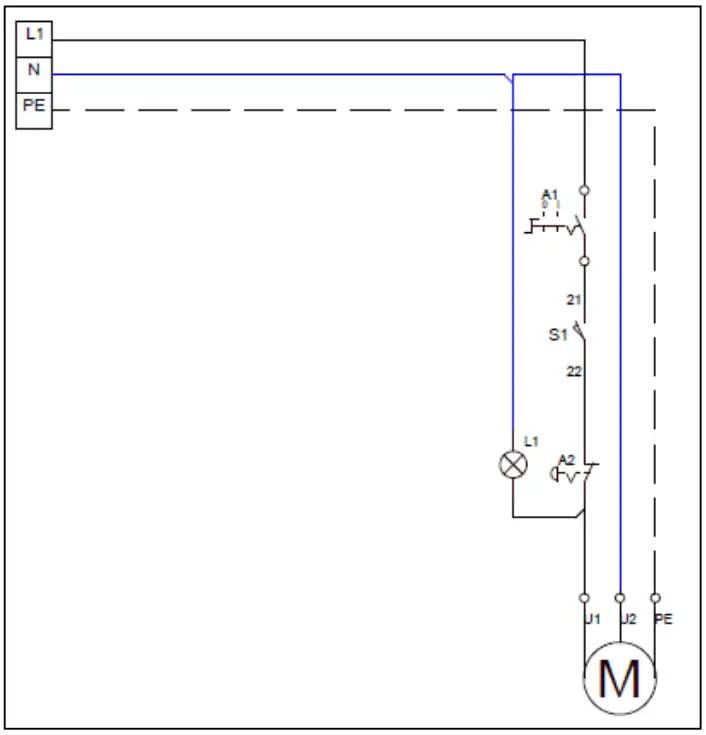
| PRODUCT CODE | KW | RPM | VOLTAGE |
| EMP.3001 | 0,37 | 1400 | 220 |
| EMP.3002 | 0,37 | 1400 | 220 |
| EMP.3004 | 0,37 | 1400 | 220 |
| A1 | A2 | M | S1 | L1 |
| (0-1) Monophase PAKO Switch | URGENT STOP | Motor | Mechanic Switch | Signal Lamp |