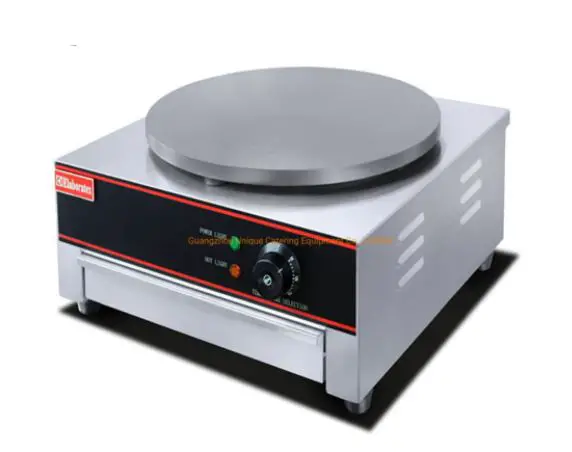
Adexa EC1 Electric Crepe Maker

Please read this manual carefully before use to understand the correct use of the function.
The Electric Crepe Maker design combines the advantages of stylish design, efficient construction, ease of operation and simple maintenance. The Crepe maker temperature can be easily adjusted to suit cooking requirements, and, while mainly used for crepe.
WARNING: Any modifications or incorrect installation, unauthorized adjustments or maintenance by unauthorized personnel may result in property loss or injury. Please contact the supplier for any necessary adjustment or repair, which should only be done by trained professionals.
CAUTION: For your safety, do not place or store any flammable liquid or gas items near the sandwich grill.
WARNING: This equipment must be connected to a grounded power outlet for your safety.
Notes
- This product is intended for commercial use only.
- Do not disassemble or modify the machine.
- Before cleaning, disconnect power and allow machine to cool.
- Do not immerse in water or spray water onto the grills. Water may cause short circuit and injury or damage.
- To avoid damage, do not jam materials onto the grill or place heavy objects there.
- When the machine is in use, the body and grill plates are hot, and will cause burns if touched. Do not use an un-grounded power supply cord.
- It is recommended that the machine be unplugged during thunderstorms to avoid potential damage from nearby lightning strikes.
- Avoid damaging the controls or grill surfaces with sharp or heavy objects.
- Turn off power after daily use.
- Do not use the machine with a damaged power cord.
- Any internal repair or maintenance should be performed by a factory authorized repair technician.
Features
- External shell and grease collector tray are stainless steel
- The g to be easy to use and maintain
- Grill temperature skills are designed may be set for different uses at the same time (double unit)
- Convenient independent temperature controls are easy to set and may result in overall power savings (double unit).
- Over-heat temperature controller for safety using
Instructions for First Time Use
There is a thin layer of wax paper on top of the grill plate that must be removed prior to using the griddle. In order to protect the plates of your new grill during transportation, a layer of food-safe oil was coated on the surface prior to shipment. This oil is harmless, but must be removed before you begin to use. To remove, preheat the grill until the oil liquefies. Next, carefully wipe away the melted oil with a clean, soft cloth. Once all of the oil is removed you can begin to use your grill.
Specification
| Model | Voltage | Power | Hotplate Diamater | Dimension/mm |
| EC1 | 220-240V/50HZ | 2000 Watt | 400mm | 450x490x225 |
| EC2 | 220-240V/50HZ | 2000 Watt | 400mm x2 | 890x490x225 |
| EC1N | 220-240V/50HZ | 2000 Watt | 400mm | 400x400x160 |
Mainly part
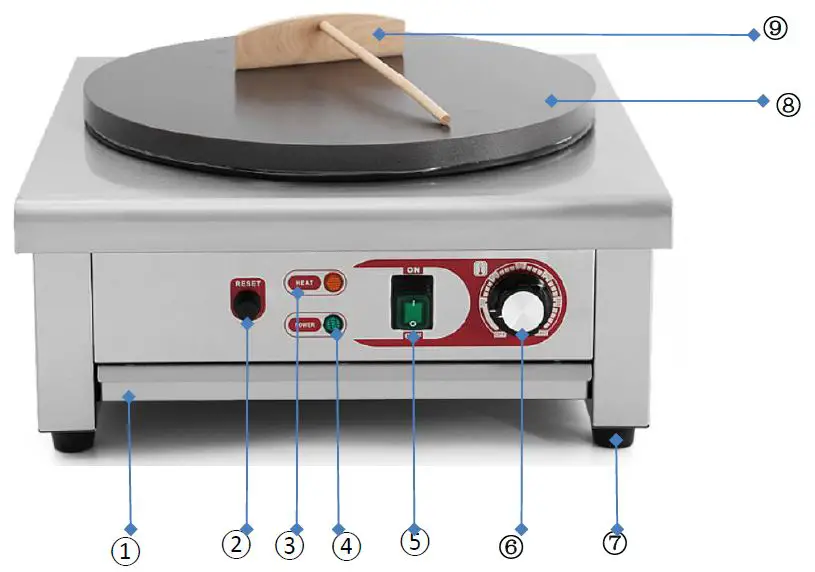
- Drip Tray
- Temperature Limiter
- Heat Indicator
- Power Indicator
- On & Off Power Switch
(EC 1N without the device) - Thermostat
- Rubber Feet
- Heavy Duty Cast Iron Plate with Teflon Coating
- T Spreader
Thermostat:50-300C: Used to set or adjust the temperature of the cooking plate.
The numbers on the dial correspond with the grill plate temperature. The “0” position is off.
Reset Bottom(Over-temperature Device): The power would be cut off automatically once the temperature over 350C
Power Indicator: This light indicates the power on.
Heat Indicator: This light indicates the element is heating. Once the set temperature has been reached the light will go out.
Unit will continue to maintain heat and temperature with the light cycling. This is not a power indicator light.
Drip Tray. A container that collects grease, oil and liquid from the bottom grill plate. This is removable for draining and cleaning
On & Off Power Switch: Turn on the power ,the power indicator “Green Light” would be on
How to use it
- Plug the power cord into the appropriate outlet.
- Turn on the power switch .the green “Power” light will illuminate.
- Set the desired temperature by turning the rotary temperature knob clockwise.
- The heating element will begin to heat up and the yellow “Heating” light will illuminate.
- When the temperature reaches the desired setting, the yellow “Heating” light will cycle on and off with the heating element to maintain the set temperature.
- Pour a teaspoon of vegetable-based cooking oil onto the center of the griddle.
- Spread the oil evenly over the entire griddle surface
- Wipe the griddle after every two crepes.
- If the crepes begin sticking, spread a small amount of oil around the griddle.
- Use additional oil on the griddle in between crepes as needed
- Turn temperature knob to the “Off” position to turn the yellow “Heating” light and heating element off.
- Turn off power switch ,the green “Power” light off.
Cleaning and Maintenance
- Disconnect machine before cleaning and allow to cool.
- Unplug the unit
- Use only a damp towel with non-corrosive cleaner. Do not immerse or flush with water.
- Wipe down outside surface to remove any soil.
- Store in a dry clean area when not in use
- Wipe the griddle using a clean, non-abrasive cloth
- Wipe the frame of the unit with a non-abrasive cloth dampened in warm water and a mild soap. Stubborn stains may be removed with a good stainless steel cleaner. Hard to reach areas should be cleaned with a small brush and mild soap.
- Dry the frame of the unit using a clean, dry, non-abrasive cloth.
- NOTE: Oil and fats will build up on the griddle surface over time. This eventually will begin affecting the performance of the Crepe Maker. An abrasive stone is available as an accessory (see OPTIONS AND ACCESSORIES). Use the abrasive stone to strip the griddle on a regular basis to maintain performance of the unit. The “Seasoning the Griddle” procedure must be performed after stripping the griddle
WARNING: Electrical Shock Hazard
- Keep water and other liquids from entering the inside of the equipment.
- Liquid inside the equipment could cause an electrical shock.
- Do not spray the unit or controls with water or cleaning products.
- Liquid could contact the electrical components and cause a short circuit or an electrical shock.
- Do not use unit if power cord is damaged or has been modified
WARNING: BURNED HAZARD
- Do not touch hot food, liquid or heating surfaces while equipment is heating or operating.
- Hot surfaces and food can burn skin. Allow the hot surfaces to cool before handling.
- Do not drop or spill water into the cooking surface as it can spray or splatter.
Trouble Shooting
| Problem | Caused | Solution |
| Indicator light will not turn on and unit will not heat | Plug not properly in-serted On & Off power switch broken | Plug unit in Replace power switch |
| Heating indicator is not on. The temperature is not increasing | Electric heater tubes is not properly connected. Heater is defective | Tighten both sides of electric heater Replace electric heating tube. |
| Power indicator is on but the desired temperature is not reached | Temperature controller is burned out | Replace Thermostat Control |
| Temperature control is normal but indicator is not on | Indicator light is burned out | Replace indicator. |
| Temperature indicator is on.But heater tube is not hot | Temperature limiter has tripped | Reset over heating protecting button by hand on bottom of electrical box |
| Temperature can not be controlled | Temperature Limiter is out of order | Replace temperature limiter/Rest Button |
Do not use the machine if any of the above occur.
Any troubleshooting corrections should be performed by a qualified technician
Daily Check
Before using the machine, visually inspect for any signs of damage or frayed power cord. Be certain machine is on a level countertop.
After turning it on, check for anything unusual before you use it.
Inspect the machine every day before using. If there is any question about operation, do not use
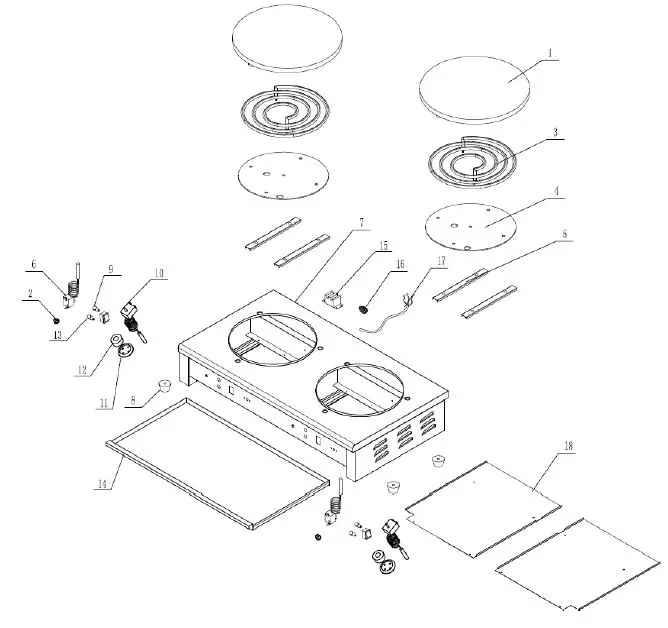
Explosive View: EC1
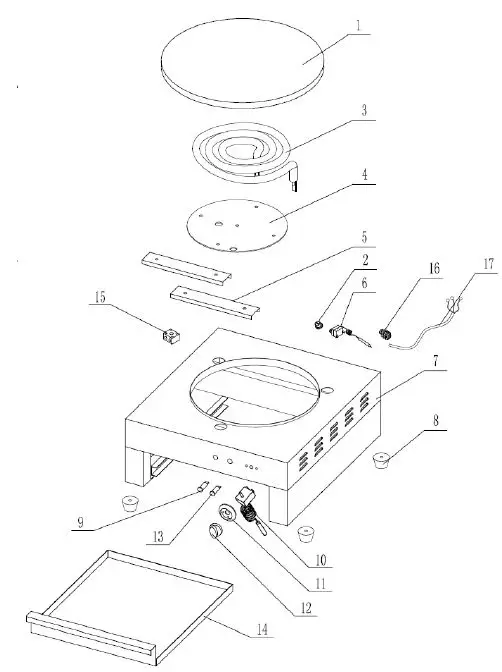
| NO. | ITEM NAME | QTY/PCS |
| 1 | COOKING PLATE | 1 |
| 2 | TEMPER LIMITER COVER | 1 |
| 3 | HEATER | 1 |
| 4 | HEATER’S COVER | 2 |
| 5 | FIXED BOARD | 2 |
| 6 | TEMPER LIMITER | 1 |
| 7 | MACHINE’S BODY | 1 |
| 8 | RUBBER FEET | 4 |
| 9 | POWER INDICATOR | 1 |
| 10 | THERMOSTAT | 1 |
| 11 | THERMOSTAT DIAL | 1 |
| 12 | THERMOSTAT KNOB | 1 |
| 13 | HEAT INDICATOR | 1 |
| 14 | OIL CONTAINER | 1 |
| 15 | TERMINAL BLOCK | 1 |
| 16 | CABLE LOCK | 1 |
| 17 | POWER CABLE | 1 |
Circuit Diagram EC1
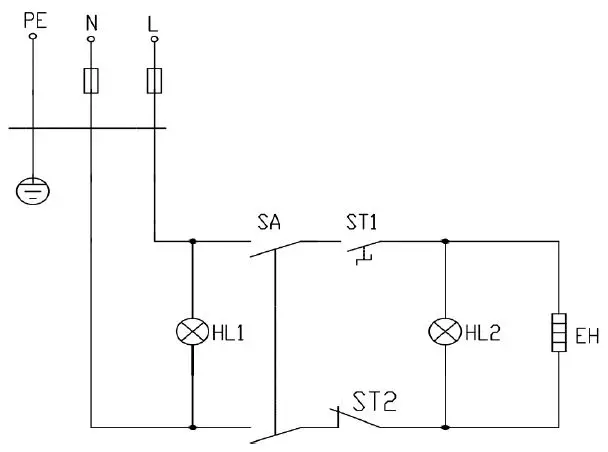
ST1:Thermostat
HL2:Power Indicator
HL2:Heater Indicator
SA1:Power Switch
EH: Heater
ST2:Temperature Limiter
Explosive View: EC2
| NO. | ITEM NAME | QTY/PCS |
| 1 | COOKING PLATE | 2 |
| 2 | TEMPER LIMITER COVER | 2 |
| 3 | HEATER | 2 |
| 4 | HEATER’S COVER | 2 |
| 5 | FIXED BOARD | 4 |
| 6 | TEMPER LIMITER | 2 |
| 7 | MACHINE’S BODY | 1 |
| 8 | RUBBER FEET | 4 |
| 9 | POWER INDICATOR | 2 |
| 10 | THERMOSTAT | 2 |
| 11 | THERMOSTAT DIAL | 2 |
| 12 | THERMOSTAT KNOB | 2 |
| 13 | HEAT INDICATOR | 2 |
| 14 | OIL CONTAINER | 1 |
| 15 | TERMINAL BLOCK | 1 |
| 16 | CABLE LOCK | 1 |
| 17 | POWER CABLE | 1 |
| 18 | BOTTOM BOARD | 2 |
Circuit Diagram EC2
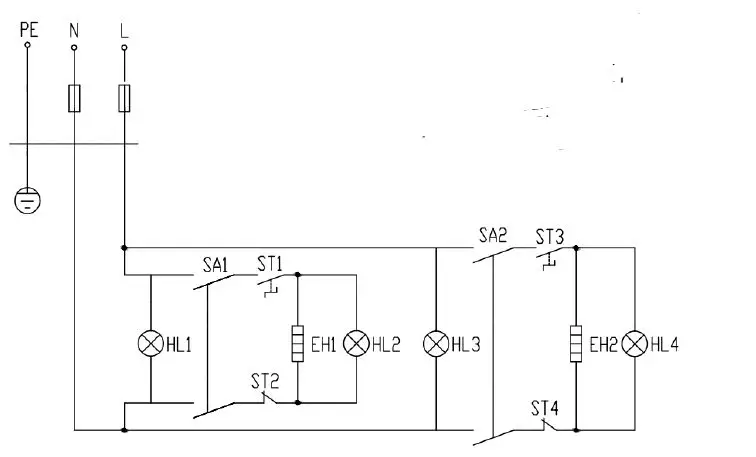
ST1:Thermostat
HL1-HL3:Power Indicator
HL2-HL4:Heater Indicator
SA1-SA2:Power Switch
EH1-EH2:Heater
ST2-ST4:Temperature Limiter
Explosive View: EC1N
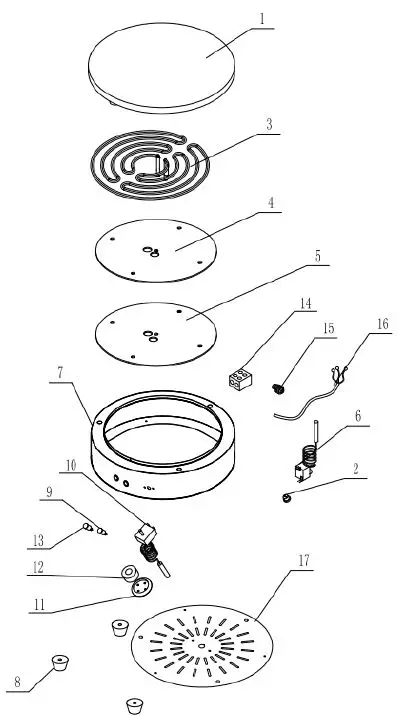
| NO. | ITEM NAME | QTY/PCS |
| 1 | COOKING PLATE | 1 |
| 2 | TEMPER LIMITER COVER | 1 |
| 3 | HEATER | 1 |
| 4 | HEATER’S COVER | 2 |
| 5 | Insulation plate | 2 |
| 6 | TEMPER LIMITER | 1 |
| 7 | MACHINE’S BODY | 1 |
| 8 | RUBBER FEET | 3 |
| 9 | POWER INDICATOR | 1 |
| 10 | THERMOSTAT | 1 |
| 11 | THERMOSTAT DIAL | 1 |
| 12 | THERMOSTAT KNOB | 1 |
| 13 | HEAT INDICATOR | 1 |
| 14 | TERMINAL BLOCK | 1 |
| 15 | CABLE LOCK | 1 |
| 16 | POWER CABLE | 1 |
| 17 | Bottom Plate | 1 |
Circuit Diagram EC1N
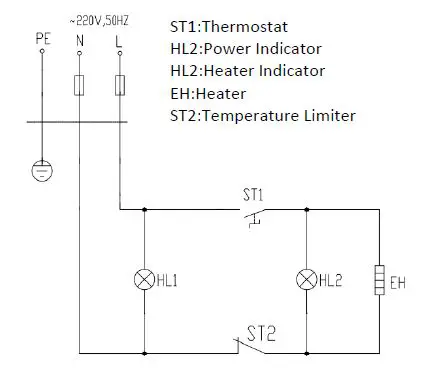
ST1:Thermostat
HL2:Power Indicator
HL2:Heater Indicator
EH: Heater
ST2:Temperature Limiter


