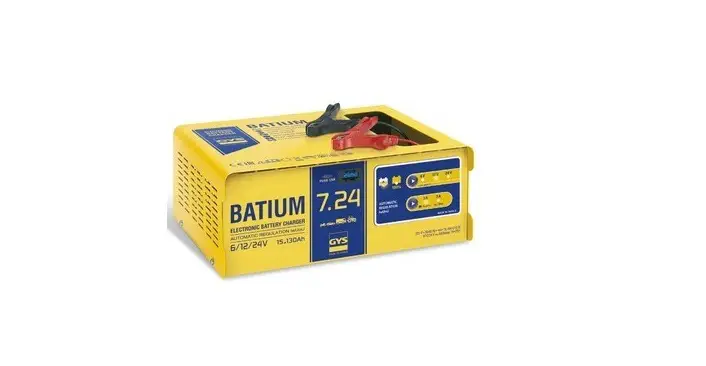
GYS 024625 BATIUM Electronic Battery Charger User Manual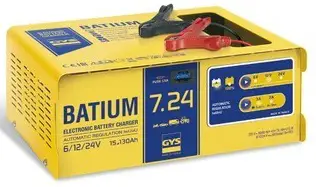
SAFETY INSTRUCTIONS
 This manual includes guidelines on the operation of your device and the precautions to follow for your own safety.Ensure it is read carefully before first use and keep it handy for future reference. These instructions should be read and understood before anyone operates the product. Any modifications or maintenance that are not specified in the manual should not be undertaken. The manufacturer is not liable for any injury or damage due to noncompliance with the instruction manual. In case of problems or uncertainties, please consult a qualified person that is able to handle the device correctly. This device should only be used for charging within the limits indicated on the device and in the manual. The safety instructions must be followed. In case of improper or unsafe use, the manufacturer cannot be held responsible
 Device suitable for indoor use only. Do not expose to rain or excessive moisture
This device may be used by children from age 8 and by persons with reduced physical, sensory or mental capabilities or lack of experience and knowledge, provided that they are under supervision or have been told how to use the device safely and are aware of the potential risks. Children must not use the device as a plaything. Cleaning and servicing tasks may not be carried out by children unless they are supervised.
Do not use for charging non-rechargeable batteries
Do not operate the device with a damaged power supply cord or a damaged mains plug
Do not use the device if the charging cable appears to be damaged or assembled incorrectly in order to avoid any risk of short circuiting the battery
Never charge a frozen or damaged battery.
Do not cover the device
Do not place the device near a fire or subject it to heat or to longterm temperatures exceeding 50°C
Do not obstruct the cooling vents. Refer to the installation section before operating the machine.
Risk of explosion or acid projection in case of short-circuit of the clamps or if the 12V booster is connected to a 24V vehicle or vice versa.
The automatic mode of operation and usage restrictions are explained below in these operating instructions.
 Risk of explosion and fire!
A battery being charged can emit explosive gas.
- During the charge, the battery must be placed in a well ventilated area.
 Avoid flames and sparks. Do not smoke.
- Protect the electrical contacts of the battery against shortcircuiting
Do not leave a charging battery unattended for a long time
 Avoid flames and sparks. Do not smoke.
 Acid projection hazard!
- Wear safety goggles and protective gloves.
 If your eyes or skin come into contact with battery acid, rinse the affected part of the body with plenty of water and seek immediate medical assistance
 If your eyes or skin come into contact with battery acid, rinse the affected part of the body with plenty of water and seek immediate medical assistance
Connection / disconnection:
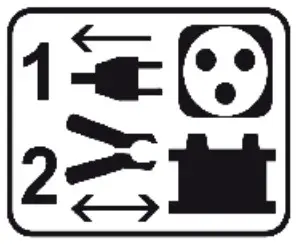
- Disconnect the power supply before connecting/disconnecting the device to/from the battery
 The terminal of the battery that is not connected to the car frame must be connected first. The other connection must be made on the car frame, far from the battery and the fuel line. The battery charger must be connected to the power supply network.
- After the charging process, disconnect the battery charger from the power supply network and remove the connector from the car frame and then the connector from the battery, in this order.
 The terminal of the battery that is not connected to the car frame must be connected first. The other connection must be made on the car frame, far from the battery and the fuel line. The battery charger must be connected to the power supply network.
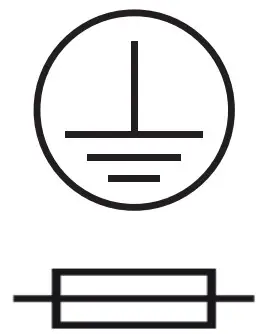 Connection
- This device must be connected to an earthed power supply.
- This machine is fuse-protected.
- Connection to the mains must be made according to the national installation regulations.
Maintenance:
 If the power supply cable is damaged, it must be replaced by the manufacturer, its service agent or an equally qualified person.
- Service should be performed by a qualified person.
 Warning! Always remove the power plug from the wall socket before carrying out any work on the device.
- If the internal fuse is blown, it must be replaced by the manufacturer, its after-sales service or an equally qualified\ person.
- Regularly take off the cover and remove dust with an air gun. Take the opportunity to have a qualified person check the electrical connections with an insulated tool.
- Under no circumstances should solvents or other aggressive cleaning agents be used.
- Clean the device’s surfaces with a soft, dry cloth.
 If the power supply cable is damaged, it must be replaced by the manufacturer, its service agent or an equally qualified person.
 Warning! Always remove the power plug from the wall socket before carrying out any work on the device.
Regulations:
 The device complies with European Directive.
- The certificate of compliance is available on our website.
 EAC conformity mark (Eurasian Economic Commission).
 Equipment in compliance with British requirements. The British Declaration of Conformity is available on our website (see home page).
 Equipment in conformity with Moroccan standards.
- The declaration Cم) CMIM) of conformity is available on our website (see cover page)
 EAC conformity mark (Eurasian Economic Commission).
 Equipment in compliance with British requirements. The British Declaration of Conformity is available on our website (see home page).
 Equipment in conformity with Moroccan standards.
 Disposal:
- This product should be disposed of at an appropriate recycling facility. Do not dispose of in domestic waste.
GENERAL DESCRIPTION
The Batium range is designed to charge all common batteries including lead-acid , electrolyte or gel batteries.
| Reference | 7 / 12 | 7 / 24 | 15 / 12 | 15 / 24 | ||||||
| Voltage | 6 V | 12 V | 6 V | 12 V | 24 V | 6 V | 12 V | 6 V | 12 V | 24 V |
| Battery capacity | From 15 Ah to 130 Ah | From 35 Ah to 225 Ah | ||||||||
CONNECTIONS AND GENERAL OPERATIONS
Ensure that the correct sequences are followed.
Precaution: Check the electrolyte level for open batteries. Fill it up if necessary, before starting the charge.
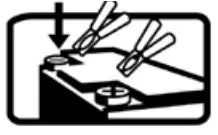
 Connect the clamps : Red clamp to the battery’s (+) and black clamp to the battery’s (-).
 Connect the charger to the mains on a 230 V socket. An indicator A (interface diagram p.44) and B switches on that matches the latest saved data.
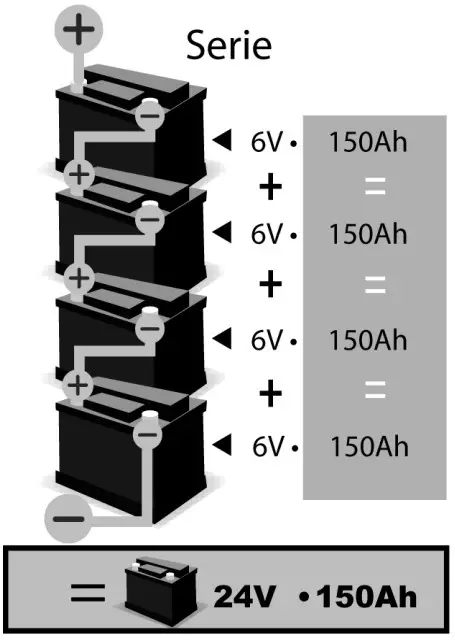
 Select the battery voltage (6, 12, 24 V) according to the recommendations features on the battery or according to the battery coupling (series or parallel cfp.44).
 Risk of explosion or acid projections if the wrong voltage is selected (24V for a 12V battery).
 Select the battery capacity. The Batium automatically determines the char- ging current.
To confirm the selec- tion, do not press any button for 5 seconds.- The charge starts automatically. The display indicates the battery’s state of charge. (indicators 1 and 2 )
Light on État Step 1 : Voltage rises 
Permanent Step 2 : Voltage regulation (duration : 2h). 
Flashing Step 3 : Charge ends (Floating charge). 
Green  In the event of a power cut, the BATIUM saves the state of charge (except in « SOS Recovery » mode), and resumes the charge using the latest settings.
 Disconnect the clamps or the battery connectors.
 Connect the clamps : Red clamp to the battery’s (+) and black clamp to the battery’s (-).
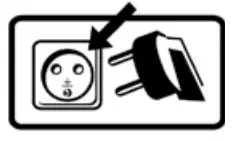 Connect the charger to the mains on a 230 V socket. An indicator A (interface diagram p.44) and B switches on that matches the latest saved data.
 Select the battery voltage (6, 12, 24 V) according to the recommendations features on the battery or according to the battery coupling (series or parallel cfp.44).
 Risk of explosion or acid projections if the wrong voltage is selected (24V for a 12V battery).
 Select the battery capacity. The Batium automatically determines the char- ging current.


 In the event of a power cut, the BATIUM saves the state of charge (except in « SOS Recovery » mode), and resumes the charge using the latest settings.
 Disconnect the clamps or the battery connectors.
FORCED CHARGE
If the battery is deeply discharged (very low voltage <2 V), the charge doesnt not start automatically. The charge indicator 1 does not switch on. The battery voltage indicators A , and capacity indicator B are switched on. In this situation, select the voltage and the charging current, then press the battery voltage button 3 during 5 seconds to start a “forced charge”. The indicator 1 switches on once the buttton is released. If no indicator switches on, your battery cannot be recovered (<0.5 V (± 0.3)).
« SOS RECOVERY » (BATIUM 15/12 AND 15/24)
When connecting the battery, the SOS Recovery indicator 6 flashes to signal that the battery suffered a deep discharge over a long period, with a start in sulfation.
The « SOS Recovery » mode uses a specific curve to repair the battery over a 24 to 48 hours cycle.
To activate this feature, follow these steps :
- Disconnect the battery from the vehicle. (OVERVOLTAGE DANGER)
- Connect the Batium to the battery.
- Connect the Batium to the mains.
- Choose the charging voltage.
- Activate « Sos Recovery » by pressing the button 4 during 5 seconds, until the indicator 6 switches on (the indicators B are switched off).
- The indicator 1 switches on and blinks when the “Sos Recovery” stops and the normal charge resumes.
- The green indicator 2 indicated the charge is over.
PROTECTIONS
The Batiums are protected against short-circuits, polarity reversals and vehicle start (they maintain a constant charge even when the vehicle is started). It has an anti-spark feature which prevents sparks whilst connecting the Gysflash to the battery. The Batium will not deliver current if there is no battery detected (no voltage in the clamps).
TROUBLESHOOTING
| ANOMALIES | CAUSES | SOLUTIONS | |
| 1 | The charge indicator 1 is switched off. The battery voltage indicators blink alternatively after 1 minute of charging | The selected voltage does not match the battery voltage. |
|
| The battery cannot be recovered. | Change the battery. | ||
| 2 | The battery capacity indicators flash alternatively. | The battery is in short circuit or damaged | Change the battery. |
| A power consumer has been left on accidentally (e.g. lights). | Switch off the power consumer and continue/restart the charge | ||
| The charger is used as a power supply to compensate for the use of power consumers that are dragging the battery’s energy | Charger behaves normally but incorrect use. The indicator that signals the end of the charge cannot switch on | ||
| The battery capacity (Ah) is higher than the charger’s | The charging time will be abnormally long. If possible, use a more powerful charger | ||
| Choose the capacity indicated on your battery | |||
| The battery voltage does not rise, the battery is damaged. | Change the battery. | ||
| 3 | The battery is connected. The charge indicator 1 does not switch on. The battery voltage indicators and battery capacity indicators are switched on. | Polarities + and – are reversed | Put the red clamp at the + the black clamp at the – |
| Bad clamp connections | Clean the terminals and reconnect the clamps. | ||
| The battery is deeply discharged. | Use the « forced charge » mode (see the procedure on the previous page) | ||
| The fuse is melted. | Disconnect the machine from the mains. Remove the clamps from the battery. Replace the fuse with regard to its size (15 A for a Batium 7-12 7-24 or 30 A for a Batium 15-12 and 15-24). | ||
| 4 | The indicator light «SOS Recovery» (Batium 15.12 et 15.24) flashes after one minute of charge. | The battery has suffered a deep discharge over a long period, with a start in sulfation. . The charge continues but it is recommended to switch to « SOS recovery ». | Disconnect the machine from the mains, then the clamps. Activate the « SOS Recovery » mode, see the previous page. |
| 5 | SOS RECOVERY (Batium 15.12 / 15.24) : after 24 hours, the charge and end of charge indicators are switched off. | Battery cannot be recovered | Battery to be replaced |
| 6 | Forced charge : After pressing the battery voltage button during 5 seconds to start the forced charge, the indicator does not switch on. | Battery voltage < 0.5 V (± 0.3) | Battery to be replaced |
| 7 | When connecting to the mains, no indicator switches on | Disconnect the Batium from the mains during 10 sec., then reconnect it. |
WARRANTY
The warranty covers faulty workmanship for 2 years from the date of purchase (parts and labour).
The warranty does not cover:
- Transit damage.
- Normal wear of parts (eg. : cables, clamps, etc..).
- Damages due to misuse (power supply error, dropping of equipment, disassembling).
- Environment related failures (pollution, rust, dust).
In case of failure, return the unit to your distributor together with:
- The proof of purchase (receipt etc …)
- A description of the fault reported
PRODUCT INTERFACE
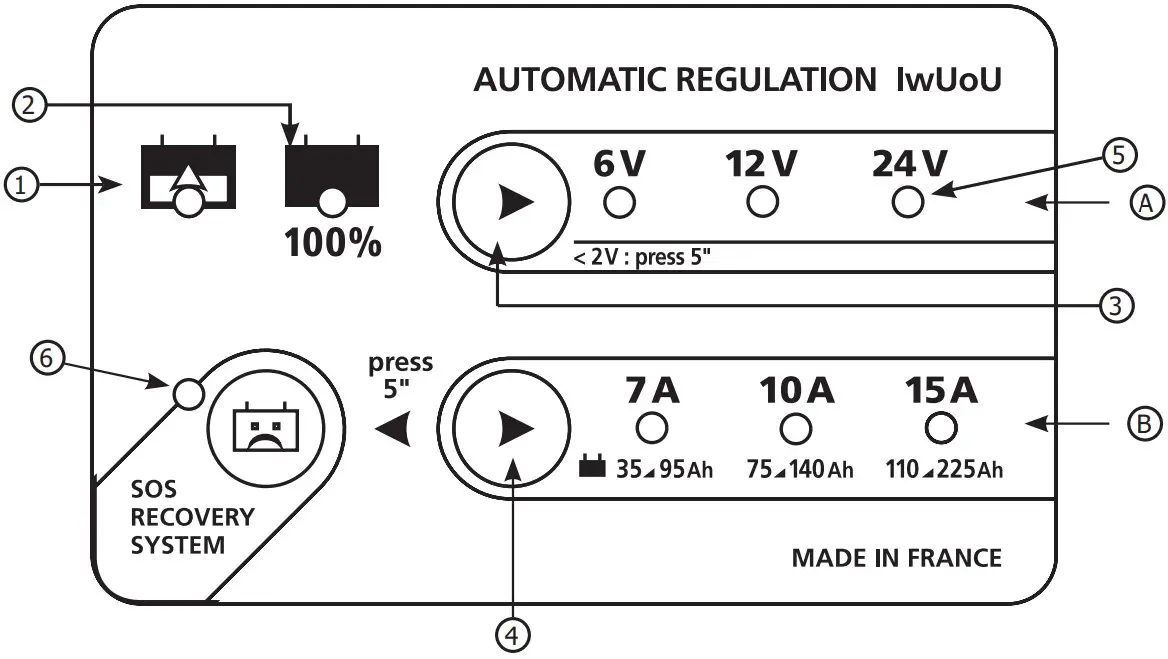
- Charge indicator : lights up and flashes according to charging state
- End of charge indicator : lights up when the battery is fully charged
- Battery voltage selection key + forced start (5 sec)
- Battery capacity selection key (+ SOS : press 5 sec)
- 24V position only for BATIUM 7/24 – 15/24 / Stellung
- SOS Recovery : indicating the battery requires recovering (available for batium 15-12 & 15/24 /
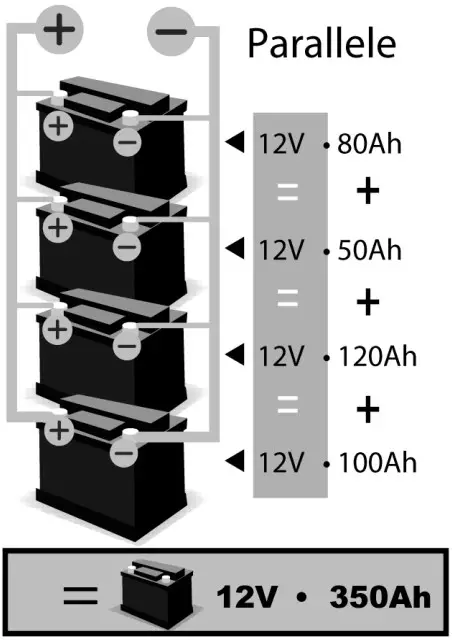
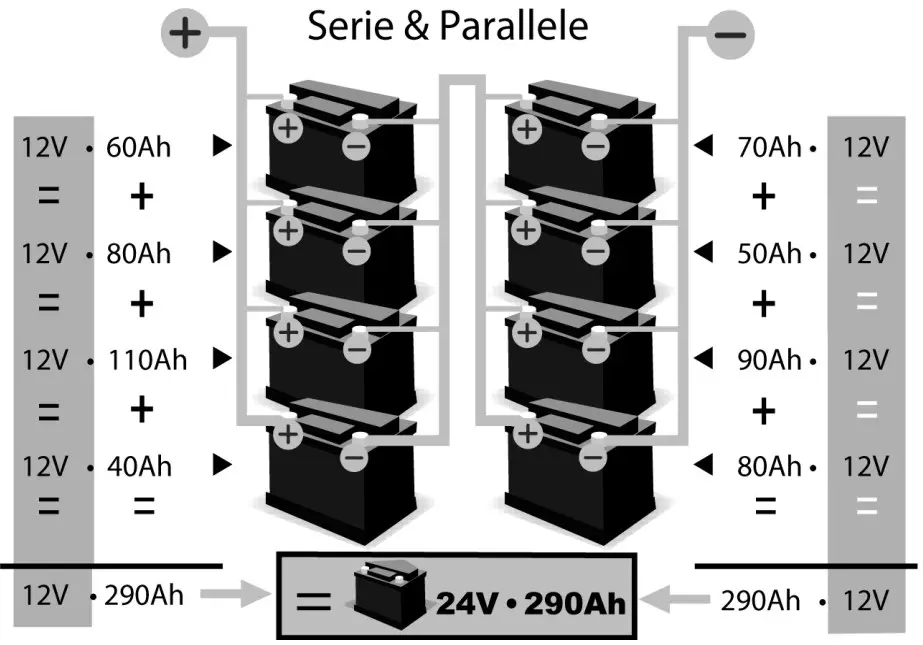
BATTERIES COMBINATION
TECHNICAL FEATURES
| 7.12 | 7.24 | 15.12 | 15.24 | |
| Supply Voltage | 230V50/ 60Hz | |||
| Max nominal power | 105 W | 210 W | 225 W | 450 W |
| Charge voltage | 6 V / 12 V | 6 V / 12 V / 24 V | 6 V / 12 V | 6 V / 12 V / 24 V |
| Charge current | 3 A – 7 A (Boost) | 7 A – 10 A – 15 A (Boost) | ||
| Charging curve | IWUoU | |||
| Battery capacity | 3A : 15 – 60 Ah7A : 50 – 130 Ah | 7A : 35 – 95 Ah10A : 75 – 140Ah15A : 110 – 225Ah | ||
| Operating tempera- ture | 0°C / 50°C | |||
| Stocking temperature | -20°C / 50°C | |||
| Protection index | IP21 | |||
| Primary fuse | T2A | T3.15A | T5A | T6.3A |
| Secondary fuse | 15A | 30A | ||
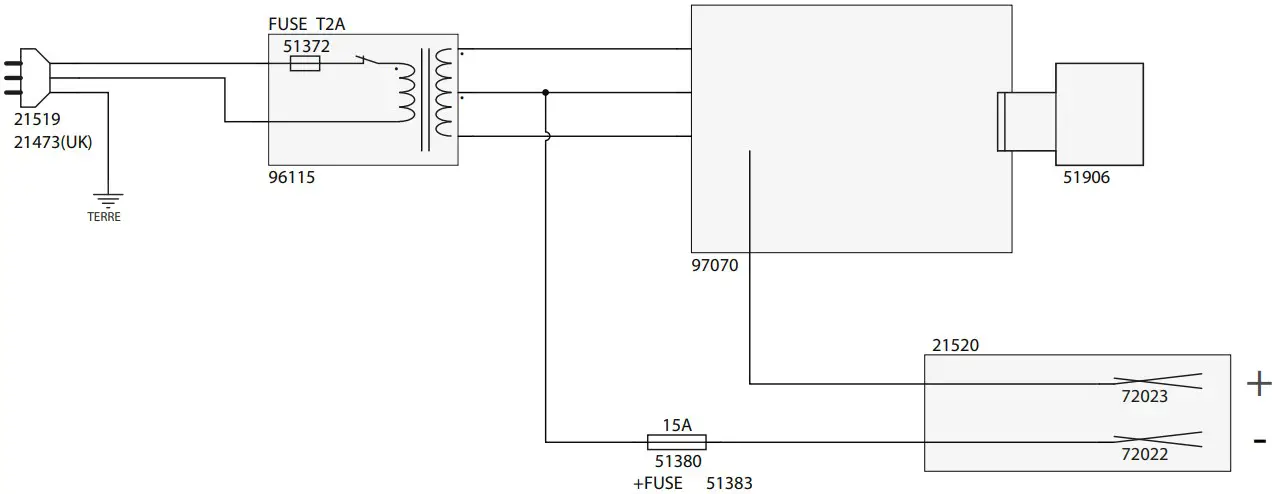
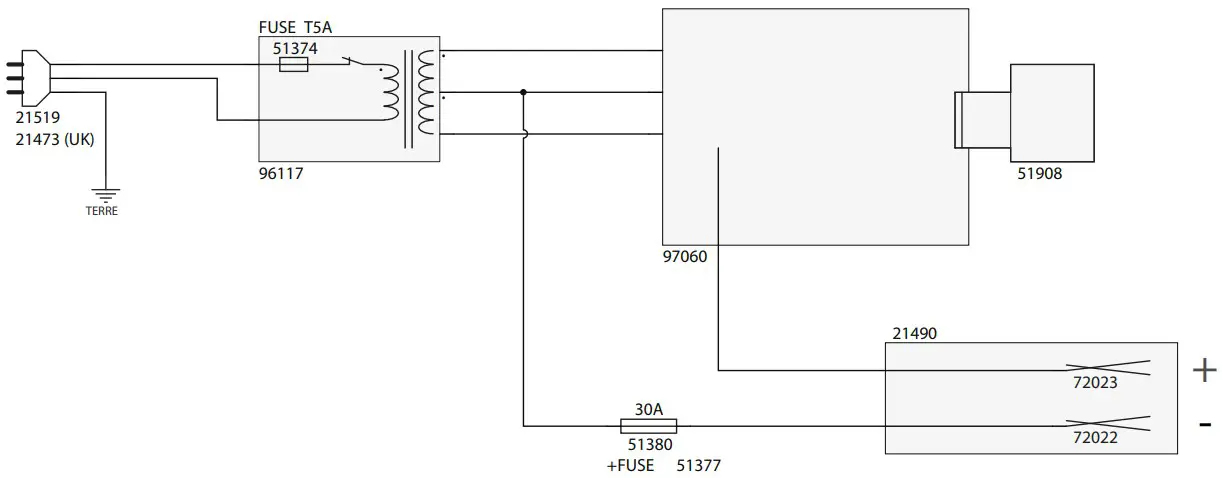
CIRCUIT DIAGRAM
BATIUM 7/12
BATIUM 7/24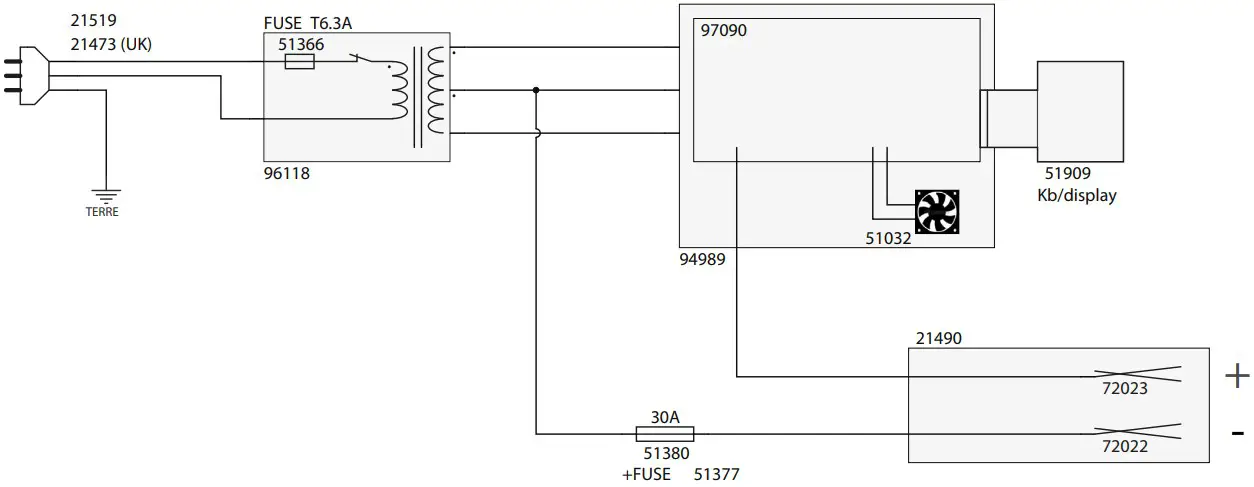
BATIUM 15/12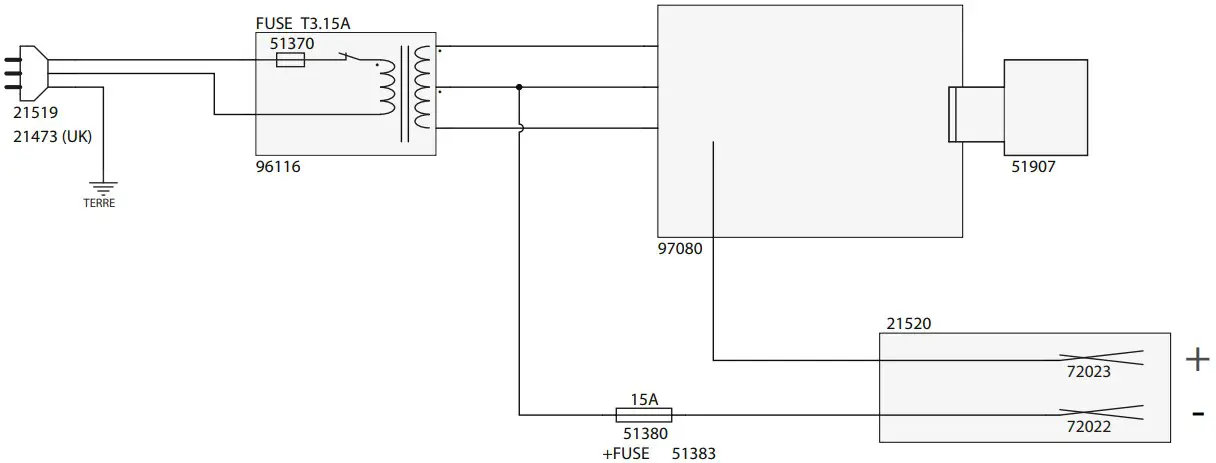
BATIUM 15/24
SPARE PARTS
| 7/12 | 7/24 | 15/12 | 15/24 | |
| Fuse 15A (x10) | 054493 | – | ||
| Fuse 30A (x10) | – | 054523 | ||
| Complete circuit | 97070C | 97080C | 97060C | – |
| Complete circuit with fan | – | – | – | S91757 |
| Black clamp 40A | 053106 | |||
| Red clamp 40A | ||||
| Power supply cable | 21519 | |||
| Keypad | 51906 | 51907 | 51908 | 51909 |
| Transformer | 12071IND4 | 12076IND5 | 12072IND5 | 96118 |
| Transformer fuse | 51372 | 51370 | 51374 | 51366 |
| Fuse holder | 51380 | |||
SYMBOLS
 | Recyclable product that falls within waste sorting recommendations (according to Decree n° 2014-1577 |
| Protected against rain and against fingers access to dangerous parts | |
| Noise level |
 SAS GYS
1, rue de la Croix des Landes CS 54159
53941 SAINT-BERTHEVIN Cedex


