S866 LCD Instruments V1.0
S866 LCD Instruments V1.0
Chinese Operating Manual for S866 LCD Instruments V1.0
Distinguished users, before you use the S866 LCD instrument, please read this operation manual in detail.The manual will guide you to use the instrument correctly to realize various vehicle control and vehicle display functions.
Function and Display
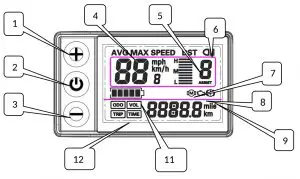
 : Operation button UP key
 : Operation button SW key
 : Operating button key
- km/h : Real-time riding speed (metric)
- mph : Real-time riding speed (British system)
 : Brake sign
 : Troubleshooting (not used)
 : 5Section Electricity Indicator
- km : Riding mileage (metric system)
Functional operation
Turn on and turn off
Long press ![]() Keyboard, boot; long press
Keyboard, boot; long press ![]() Key, shut down.When the vehicle stops driving and does not operate the instrument for 10 minutes, the instrument will automatically shut down and turn off the power supply of the electric vehicle.
Key, shut down.When the vehicle stops driving and does not operate the instrument for 10 minutes, the instrument will automatically shut down and turn off the power supply of the electric vehicle.
Display Interface 1
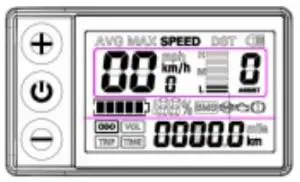
Long press ![]() Keyboard,boot, enter the display interface one.
Keyboard,boot, enter the display interface one.
Turn on the headlights

Long press ![]() Keyboard, turn on backlights and car lights; press again
Keyboard, turn on backlights and car lights; press again ![]() Keyboard, turn off backlights and car lights.
Keyboard, turn off backlights and car lights.
Help shift
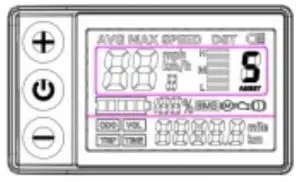
Short press ![]() or
or ![]() Key, switch 1-5 files.The lowest power level in
Key, switch 1-5 files.The lowest power level in
1 gear and the lowest power level in 5 gear
High power.The initial gear is automatically restored every time the machine is turned on.0 gear powerless function.
km/h to promote functions
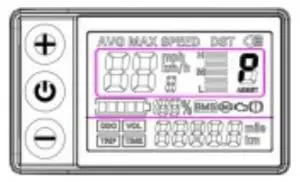
Hold down ![]() Key, Gear Area Display
Key, Gear Area Display ![]() Vehicles travel at speeds not exceeding 6Km/h.release Key, function revocation.
Vehicles travel at speeds not exceeding 6Km/h.release Key, function revocation.
Multifunctional Area Display
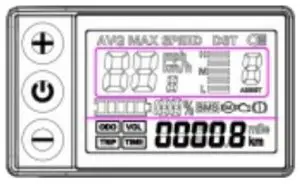
Short press ![]() Key, looping switch to view ODO-TRIPVOL- IME-ODO information.
Key, looping switch to view ODO-TRIPVOL- IME-ODO information.
3 Fault code display
P01-P20 Menu Display Interface and Significance Explanation
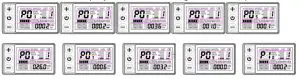
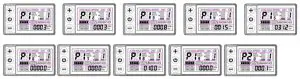
P01: Backlight brightness: the darkest level 1, the brightest level 3
P02: mileage unit: 0: KM; 1: MILE
P03: Voltage level: 24V, 36V, 48V, 60V
P04: Dormancy time: 0, not dormancy; Other numbers are
dormancy times, range: 1-60; Unit minutes.
P05: PAS number selection: 0,3 file mode;1,5 gear mode:
P06: Wheel setting: unit, inch.
wheel diameter value: 5.0 ~ 50 Precision: 0.1 inch This parameter is related to the meter display speed and needs to be entered correctly;
P07: Speed gauge magnetic steel number: range: 1-100.
This parameter is related to the meter display speed and needs to be entered correctly. If it is an ordinary hub motor, the number of magnetic steel is input directly. If it is a high-speed motor, it is also necessary to calculate the deceleration ratio, and the input data = the number of magnetic steel × deceleration ratio. For example: number of motor magnets 20, deceleration ratio 4.3: input data is: 86 = 20 × 4.3
P08: Speed limit setting: Agreement No. 2 range 0-100km /H, 100 means no speed limit. The input data here represents the maximum operating speed of the vehicle: for example, input 25, indicating that the maximum operating speed of the vehicle will not exceed 25km/h.The drive speed is maintained at the set value, Error: ± 1km/h; (The speed limit for power and turning is equal).
Note: The value here is based on kilometers. When the unit setting is converted from kilometers to miles, the speed value of the display interface automatically converts to the correct mile value, but the speed limit value data set at this menu under the mile interface is not converted. Is inconsistent with the actual speed limit of the mile speed.
P09: zero start, non-zero start setting: 0: zero start; 1: Non-zero start.
P10: The drive mode is setting: 0: Power Drive(how much power is output is determined by the power file bit, and the switch is invalid at this time).
- Electric drive(by turning the handle drive, the power file bit is invalid at this time).
- Power Driven and Electric Driven Coexistence
P11: Help sensitivity setting: range: 1-24
P12: Help start intensity setting: range: 1-5
P13: Power Magnetic Steel Disk Type Setting: 5, 8, 12
Magnetic Steel Types
P14: Controller limit value setting range: 1-20A
P15: Controller undervoltage
P16: ODO zero setting: length press key 5 seconds ODO zero
P17 :Automatic cruise optional: 0: No enabling cruising, 1: enabling cruising; (valid for protocol 2 only)
P18: Display speed ratio adjustment: range: 50 % ~ 150%,
P19:Zero PAS selection: 0: 0 file, 1: does not include 0 file
P20 :0:2 Protocol 1:5 S Protocol 2: Standby 3: Standby
Menu option parameter modification operation
After the instrument is turned on, press long at the same time ![]() key+
key+ ![]() Key into P01 menu interface, press short
Key into P01 menu interface, press short ![]() Keys can be switched to the next menu; in the current menu, Click
Keys can be switched to the next menu; in the current menu, Click![]() Key sum
Key sum ![]() Keys can modify the current menu parameters; after modification, press short
Keys can modify the current menu parameters; after modification, press short ![]() Keys can be switched to the next menu.After menu parameters have been modified, press again at the same time
Keys can be switched to the next menu.After menu parameters have been modified, press again at the same time ![]() key+
key+ ![]() Key, Exit menu interface, return to normal display interface. Among them, the P16 menu parameter value is the current cumulative total mileage, the value can not be modified, but can be cleared.Long press
Key, Exit menu interface, return to normal display interface. Among them, the P16 menu parameter value is the current cumulative total mileage, the value can not be modified, but can be cleared.Long press ![]() Keyboard 5 seconds, total mileage cleared.
Keyboard 5 seconds, total mileage cleared.
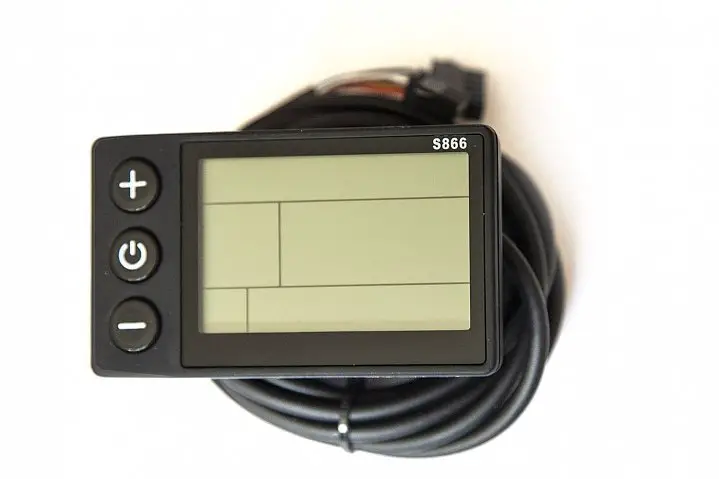
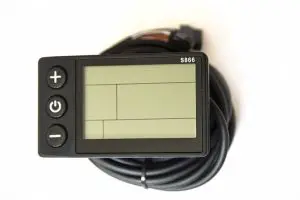
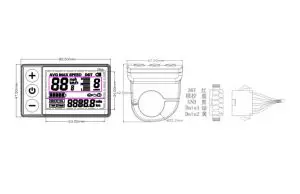
Instrument body shape size and wiring indication
S866 LCD Instruments V1.0 Operating Manual – Download [optimized]
S866 LCD Instruments V1.0 Operating Manual – Download
FAQ’S
Please check whether the instrument is in the boot state, and then turn off the power supply and try again.
Removing the Rear Wheel Magnet.
Using a Tuning Toolkit.
Getting a More Powerful Motor.
Changing the Tires.
Improving the Aerodynamics.
Adjusting the Settings.
Installing a More Powerful Battery.
Ride Like a Professional.
According to federal regulation and electric bike must: Have fully operational pedals. Be equipped with 750 watts or less. The maximum speed that can be attained, with assistance from the motor, is 20mph.
A speed limiter is a safety device that’s fitted to a car, to prevent the vehicle from exceeding certain pre-set speed limits. Although it sounds like cruise control, speed limiters allow you to accelerate and decelerate as normal, but act as a speed warning system when you drive above the limit that has been set.
i’m going to enter the menu by pressing the two buttons plus and minus. And i get to p 0 1 which is the first parameter. This is the backlight level for the display.
At 25 kilometers per hour and to remove the limit you have to go into the settings by pressing plus and minus both for about two three seconds then i’m going to go to p 0 8 setting.
By pressing both plus and minus. And then you are going to go to p09. And put this setting on zero by pressing minus or plus. This will reset.
An E-bike controller is a component that connects all electrical parts on the bike together. It connects the things like the battery, motor, throttle, display, pedal-assist, and various sensors. It is a small computer that acts as the heart of the e-bike. It can manage the overall functioning of the bike.
Remove all of them gently, by pressing the plug pins. Unscrew the speed limiter and remove the metal that connects the wires to the scooter. If you can’t get this out, add a tape so that the cables can’t restrict speed any further.
Select on that and then. When you press cancel it means you’re done and the tune will start to upload you’ll hear the fan kick on and then when you’re all done it’ll say the press select to enter.
Chip Performance can disable the speed limiter of your company car. For example, vehicles for which we regularly perform this are Volkswagen Crafters and Mercedes Sprinters. These are set at 90 km/h. Chip Performance can increase or remove the limiter.
Know your electric scooter’s battery capacity and true range. …
Don’t drain your battery. …
Charge your electric scooter regularly. …
Avoid overcharging your electric scooter battery. …
Keep the battery charged even when not in use. …
Use the correct charger for your battery.


