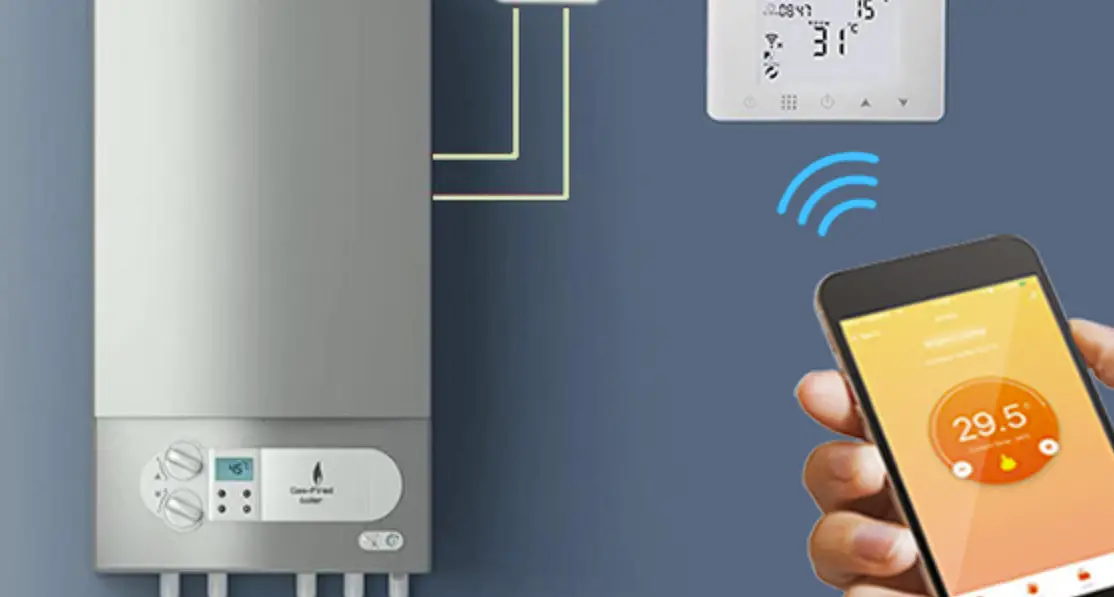
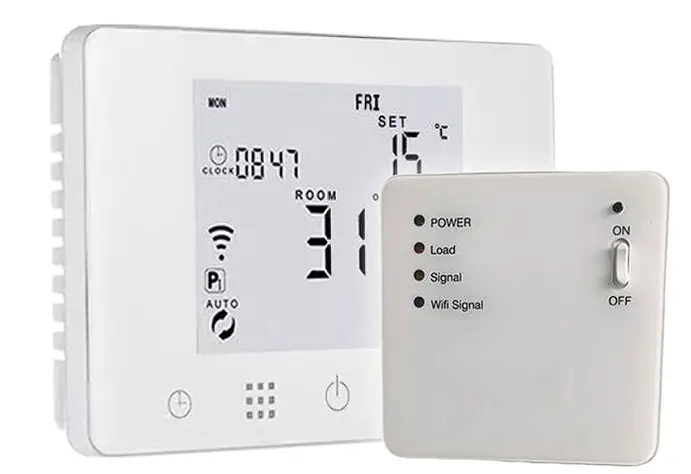
HOMECLOUD XH-CTB Smart WiFi Homcloud Chronothermostat RF
PRODUCT SPECIFICATIONS
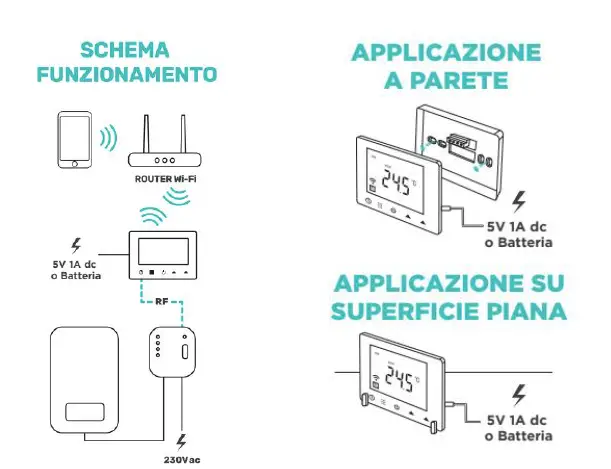
- Power Chronothermostat: USB 5V 1A DC or 4xAAA batteries ☆ Power RF Receiver: 90-240V AC 50/60HZ
- Temperature range: 1~70°C
- Display accuracy: 0.5°C
- Probe sensor: NTC (10k) 1%
- Temperature range: 5~35°C
- Contact capacity:5A/250V
- Size(mm):130*90*25
- Homcloud code: XH-CTB
- Model n°: HY09RF WIFI
- Output: Switch relay
- Wireless frequency 2.412GHz ~ 2.484GHz
- Max transmitting power: 802.11b:20dBm@1Mbps
- Network protocol: IEEE 802.11 b/g/n 2.4 GHz
- Encryption type: WPA/WPA2
- Antenna: PCB antenna
DECLARATION OF CONFORMITY
Hereby, Life365 Italy S.p.A., declares that this wireless device complies with the essential requirements and other related provisions of Directive 2014/53/EU of the European Parliament and of the Council. The declaration can be consulted on the website www.homcloud.com/doc. “Homcloud” is a registered trademark of Life365 Italy S.p.A.
INTEGRATION WITH ALEXA AND GOOGLE
Download and install Google Home or Amazon Alexa App and control your devices with your voice with Smart Speakers or directly with your smartphone.
Important: If you want to link Homcloud App to Google Home or Alexa App you need to select “Smart Life” App between the list of Google Home partners or Alexa skills. (after that passage the user will be automatically direct to Homcloud App). NO NEED TO DOWNLOAD SMART
LIFE APP. JUST HOMCLOUD APP IS OK.
Please visit www.homcloud.com/config for support.
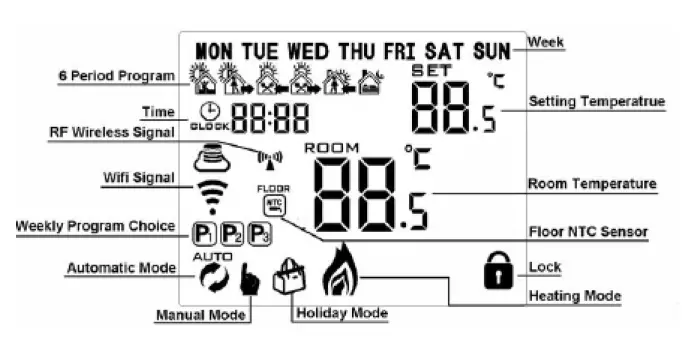
MAIN ICONS
- Automatic Mode: run the pre-set programmable mode
- Manual mode
Holiday mode: you can set days and temperature of holiday (countdown mode) - Heating (if disappears means stop heating)
- Clock Run the programmable
- mode P1 – run 5+2days 6 periods weekly programmable mode P2 – run 6+1days 6 periods weekly programmable mode P3 – run 7days 6 periods weekly
- programmable mode
P1、P2、P3 select in the advanced setting option AB (default is P1) - WIFI link status: connected
- WIFI link status and cross:
- disconnected
- Cloud icon
- ATTENTION: DISCONNET ELECTRICITY POWER BEFORE WORKING.
- CONNECT THERMOSTATE AND RF RECEIVER TO POWER AND HEATING. SWITCH THEM ON.
- DOWNLOAD HOMCLOUD APP AND CREATE ACCOUNT.
- WHEN THERMOSTAT AND RECEIVER ON, ON RECEIVER PRESS AND HOLD “PUSH” BUTTON FOR 5-8 SEC UNTIL LED LIGHT ON RECEIVER IS SOLID BLUE (NOT BLINKING).
- FOLLOW STEP ON APP TO FINISH CONFIGURATION. (ADD DEVICE..)
- DEFAULT EXCHANGE OF INFORMATIO AND TEMPERATURE BETWEEN THERMOSTATE AND RECEIVER AFTER THE FIRSTS 3 MINUTES WILL BECOME 20 MINUTES. (YELLOW/ORANGE LIGHT ON RECEVIER BLINKING). IF YOU WANT TO SHORTEN INTERVAL, JUST IF POWER IS BY USB, GO TO IP SETTINGS. (B5 AND B6)
- DOWNLOAD AMAZON ALEXA or GOOGLE ASSISTANT APP AND LINK THEM TO HOMCLOUD APP TO CONTROL DEVICE ALSO VOCALLY.
HOME SCREEN
BEFORE WIRING AND INSTALLING…
- Keep out of the reach of children and away from water, dump or a wet environment.
- Read these instructions carefully. Failure to follow them could damage the product or cause a hazardous condition.
- Check the ratings given in the instructions and on the product to make sure the produce is suitable for your application.
- Installer must be a trained experienced service technician.
- After installation is complete, check out produce operation as provided in these instructions
- Please remove batteries when USB power is working for a better using.
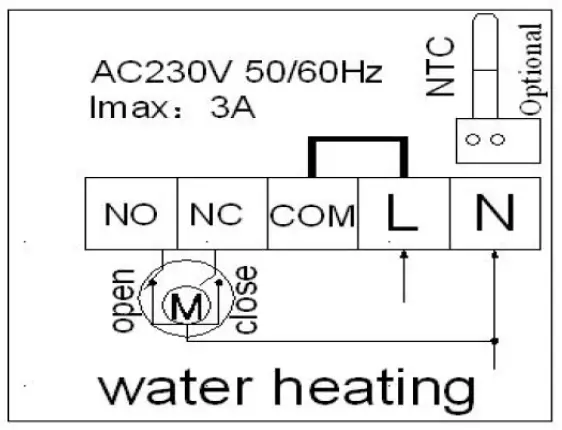
WIRING DIAGRAMS
CAUTION
Please arrange professional technician to install the product according to drawings and instructions. Disconnect power supply before making any connection. Contact with components carrying hazardous voltage can cause electrical shock.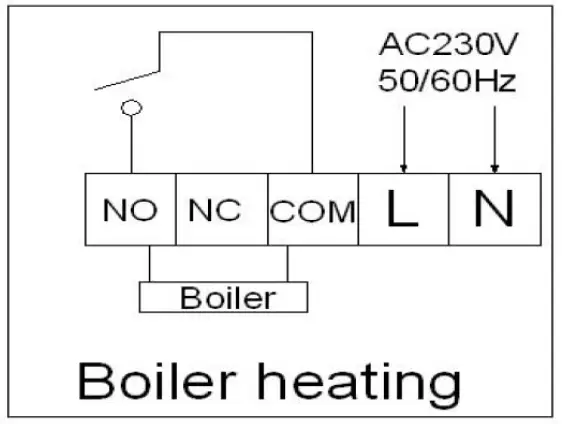
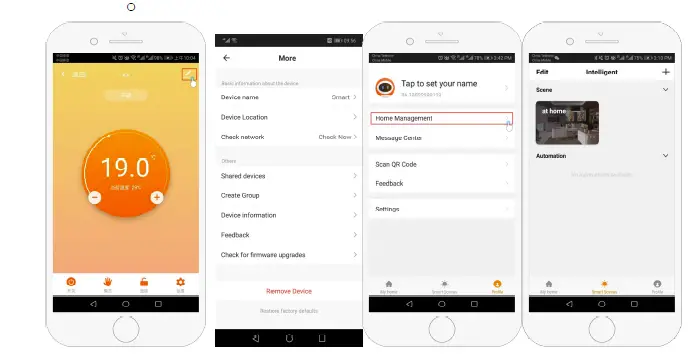
- Device information;Contains virtual ID;IP address;Mac address;Device time zone
- Remove device: After deleting the device, you need to reconnect the network if you want to use it.
- Third-party controls supported: amazon alexa/google assistant/IFTTT, click to enter, you will see the steps
Imported by: Life365 Italy S.p.A. – European General Agency
Viale Roma 49/a, 47122 Forlì, Italy – Made in China
When no fault, normally on when loading or exchanging information temporary.
PERMANENT RED LIGHT (solid or blinking): Faulty
When fault:
- IP fault (IP:FFFF) : Light blinks 2 times every 2s
- No wifi signal within 1h: Light blinks 3 times every 2s
- External sensor fault: Light blinks 4 times every 2s
- Sensor fault: Display says error “E1” or “E2”. Thermostat stop heating until the fault I eliminated.
YELLOW/ORANGE LIGHT: RF matching
(B3 – IP matching code) When receiver is power-on, orange light is normally on within 10s. Light goes off when finish matching. When receiver is power-off, orange light is blinking within 10s.
BLUE LIGHT: Wifi matching
When power on state, long press receiver button “push” to match wifi. SOLID BLUE: Normal pairing on EZ mode. BLINKING BLUE: AP mode.
MAIN FEAUTURES ON APP
- Power on/off button
- Mode key: Manual mode, Auto mode, Holiday mode.
- Child lock: If turned on, thermostate on wall cannot be operated.
- Set key: After clicking on, you can select the programmed mode (5+2, 6+1, 7 days) and set the temp and time for 6 periods of the weekdays and weekend.
- Settings:
- Device location: it is important to set a location if you want to use device with geolocalization
- Share device: Share the device to the mobile phone or email account of the registered family member
- Create Group: Add all the devices which need to operate at the same time to
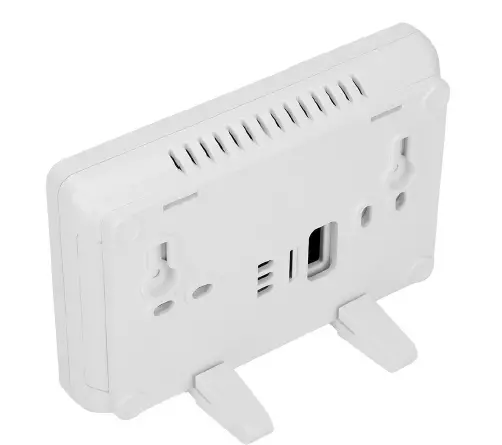
INSTALLATION AND WI-FI SCHEME
DOWNLOAD AND REGISTRATION
(if you have got already Homcloud App on your mobile and an Account go to Configuration).
- Download Homcloud App from App Store or Google Play or scan QR code below.
- Enter the register/login interface and register with your country area code and phone number/email address.
- Wait a few minutes for verification code (by email or text message) and enter it where required along with a password. (between 6 and 20 numbers and letters).
CONFIGURATION
Our App only support 2.4GHz Wi-Fi networks IEEE 802.11 b/g/n. For configuration both device
IMPORTANT: Considering battery usage, RF data updates every 20 minutes. If you prefer to shorten interval, please use USB power and remove batteries. Follow B5 and B6 operation to change this setting. (see below)
| NO | Setting Options | Data Setting | Factory Default |
| B1 | IP code low setting | 00-FF | 00 |
| B2 | IP code high setting | 01-FF | 01 |
| B3 | IP matching code (if any problem, you can pair thermostate and reciver here again) | When you on B3 page, switch off and then on at this moment receiver. After that you should see “55” on display, and that means IP matched successfully. After that press “ ” on thermostat to exit. | – |
| B4 | Sensor state | Sensor state N1:single built-in sensor N3:both built-in sensor and external sensor. (when receiver with external sensor, this option is automatically recognized and cannot be changed) | N1 |
| B5 | Minute interval of RF transmission | 1: 1-30 minutes 2: 0 (set seconds on B06) | 20 min |
| B6 | Second interval of RF transmission | 3-30 seconds | 30 s |
| A1 | Temperature Calibration | 9-+9℃ | 0.5℃ |
| A2 | Temp tolerance of built in Sensor | 0.5-2.5℃ | 1℃ |
| A3 | Temp tolerance of external Sensor | 1-9℃ (NOT THIS MODEL) | 2°C |
| A4 | Children Lock | 0:half lock 1:full lock | 0 |
| A5 | Max temp of External sensor | 35-70℃ (If when setting temp is lower than 35℃, screen display【—】, cancel high temp protection)(NOT THIS MODEL) | – |
| A6 | Min temp of integrated sensor (anti-freeze protection) | 1-10℃ (If when setting temp is higher than 10℃, screen display【—】, cancel anti freeze protection ) | 5℃ |
| A7 | Min Temp Setting | 1-10℃ | 5℃ |
| A8 | Max Temp Setting | 20-70℃ | 35℃ |
| A9 | Descaling function | 0:Close descaling function 1:Open descaling function(Function works for 3 minutes every no-operating 100 hours) | 0 |
| AA | Power off Memory when power cutting | 0: Stay last state before power cutting 1: Electricity back – turn off 2: Electricity back – turn on | 0 |
| AB | Weekly Programmable Function | P1: 5+2 days P2: 6+1 days P3: 7 days | P1 |
| AC | Restore to factory defaults | Display A o, long press until show the whole screen | – |
IP SETTING (RF RECEIVER)
Power off state, long press “ “ for 3-5 seconds to do advanced setting. Short press “ ” to switch and confirm. Press “ ” and “ ” to adjust options from B1 to B6. After finish setting, standing for 5 seconds it will save setting then exit. and smartphone need to be connected at the same Wi-Fi network. If you can, it is better to switch off temporary 5GHz networks just during
configuration. Thermostate and Receiver are already paired. (yellow/orange light blinking when powered both on). If any problem please enter in advanced IP settings (B3) and re-pair them. (see IP advanced setting instructions)
STANDARD – EZ MODE
- See “Wiring diagrams” if you haven’t done it yet and connect thermostat and receiver to power accordingly.
- OPTION 1 (PAIRING ON RECEIVER): Connect to the power and turn on thermostate and receiver. Then press and hold receiver button “push” for 5-8 seconds until solid blue led light (EZ matching mode). If blue light is blinking (AP MODE) it means it is not ready to pair so please, please try above passage again until blue led light on receiver is solid and continuose.
- Or OPTION 2 (PAIRING ON THERMOSTATE DISPLAY): Connect to power and turn on thermostat and receiver. On thermostate press and hold “ ” for 3-5 seconds untill the icon with text “OFF” and icon “ ” are blinking together on display. Then short press one time “ ” to enter into wifi config.
- Press “Add Device” or “+” in the upper right corner to add the device and select the device type “Smart wifi Homcloud Chronotermostat RF”
- On your app, Click “Confirm icon rapidly blink”, then select your network and back to your app to enter the password of your wireless router and confirm. The app will connect automatically. This may typically take up to 5~90 seconds to complete.
- Your room name could be edited when the device is connected and you can choose the corresponding room location.
OPTION B – AP MODE – MANUAL MODE (ONLY IF STANDARD EZ MODE FAILED)
- Same step as before to make this icon“ “ blinking. On app, click “AP Mode” on the upper right corner.
- Click “Confirm icon is blinking” then select your network and back to your app to enter
the password of your wireless router and confirm. The app will go into another page with all wireless connections available. - Press Connect now to select the wifi signal Smartlife-XXXX of your thermostat (thermostate hot spot).
- Go back to your app and click “Connect now” then the app will connect automatically. This may typically take up to 5~90 seconds to complete.
QUICK OPERATIONS – BASIC OPTIONS
| NO | Icon | Description |
| A | Turn ON/OFF | |
| B | 1 | 1 Short press to switch automatic mode and manual mode 2 Power on state, long press for 3-5 seconds to do programmable setting 3 Power off state, long press for 3-5 seconds to do advanced setting |
| C | 2
| 1 Confirm value: press “ ” 2 Short press it: set time 3 Long press: Holiday mode setting: OFF close this function, ON open thisfunction. |
| D | 3 | 1 Decrease value 2 Long press to lock /unlock |
| E | 4
| 1 Increase value 2 When in Auto mode state, press or to enter into temporary manual mode 3Long press to check external sensor temperature (only used for the receiver with external sensor) |
PROGRAMMABLE MODE SETTING
6 times period setting and weekly programmable mode setting: 5+2 days (factory default), 6+1 days, 7 days
TIME SETTING: Power on state, long press “ ” 3-5 seconds to enter into first time period then set hour, minutes, period temperature, press “ ” and “ ” to adjust values. Same for all 6 periods. After finish setting, stand for about 10 sec will save setting and exit. The most comfortable temperature is 18°C-22°C. – 6 times period setting –
| Wake up | Out door | Back home | |||
| 6:00 | 20℃ | 8:00 | 15℃ | 11:30 | 20℃ |
| Out door | Back home | Sleep | |||
| 13:30 | 15℃ | 17:00 | 21℃ | 22:00 | 18℃ |
HOLIDAY MODE SETTING
Power on state, long press for 3-5 seconds to set holiday mode setting. Press “ ” and “ ” to change ON to OFF. Then press to switch days and temperatures, press “ ” and“ ” to change values. Press again to confirm. If you want to close holiday mode press


