![]() MBQX-STG3-1 800 Watt STAGE 3 Can-Am X3 Tuned System
MBQX-STG3-1 800 Watt STAGE 3 Can-Am X3 Tuned System
Instruction Manual
MBQX-STG3-1 800 Watt STAGE 3 Can-Am X3 Tuned System
| Model: | Polaris General |
| Description: | Stage 3 Install |
| Part Number: | MBQG-STG3-1/MBQG-STG3-RC-1 |
| Assembly Time: | 120 Min (2-Hours) |
Before you begin, read through these instructions and check that all parts are present. Always disconnect the negative battery terminal prior to installation. Please note that MB Quart cannot assume any responsibility for damage resulting from incorrect installation.
| Parts List | ||
| No. | Component Name | Qty |
| 1 | GMR-LED with Housing (MBQG-RAD-1) | 1 |
| 2 | 6.5” Dash Speakers (MBQG-FPOD-1) | 2 |
| 3 | 10” Subwoofer w/Enclosure (MBQG-SUB-1) | 1 |
| 4 | NA2-500.5 Amplifier | 1 |
| 5 | MBQG-ACC-1 | 1 |
| Tools Required | |
| 1 | Bojo Tool |
| 2 | Panel Clip Pliers |
| 3 | 10mm & 13mm Socket |
| 4 | Rachet |
| 5 | 7mm & 13mm Wrench |
| 6 | T25 and T40 Torx Driver |
| 7 | 11/32” Drill Bit |
| 8 | Drill |
| 9 | Phillips Screwdriver |
| 10 | 4mm & 5mm Allen Wrench |
Dash Disassembly
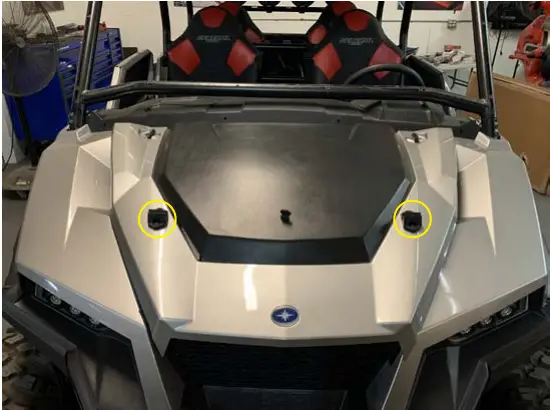 |  | 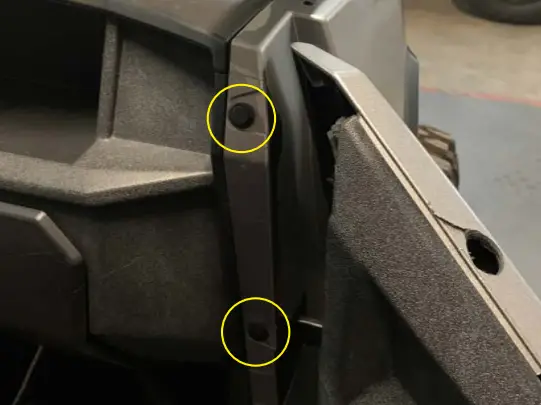 |
| ● Remove the hood by turning two latches | ● Remove seven push clips from the front of the dash | ● Remove the top two push pins from the driver and passenger door opening |
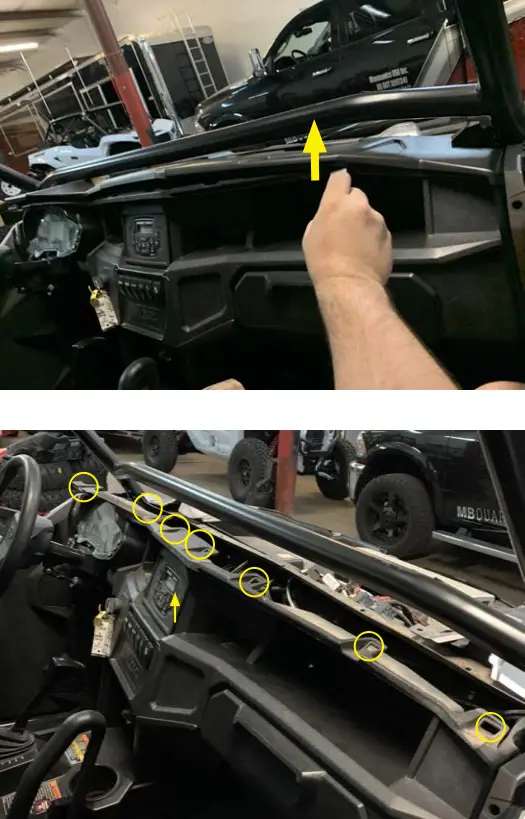 | 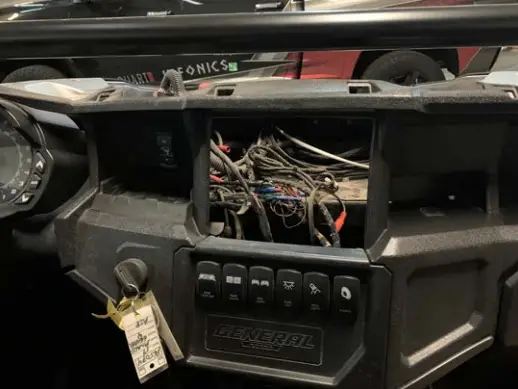 | 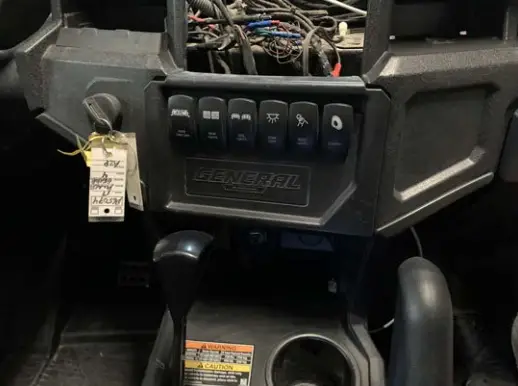 |
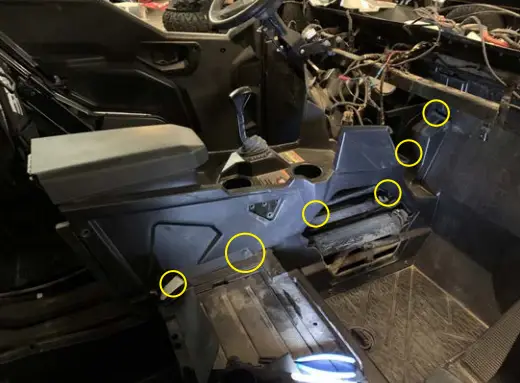
| ● Lift the front of the dash at eight locations with the Bojo tool | ● Remove if your machine has an upper pocket | ● Remove lower switch locations (If your vehicle has switches installed note connections and disconnect) |
 | 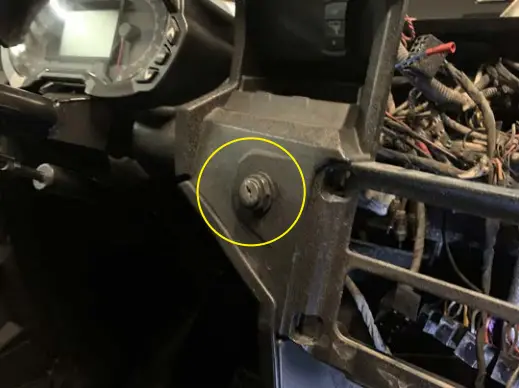 |  |
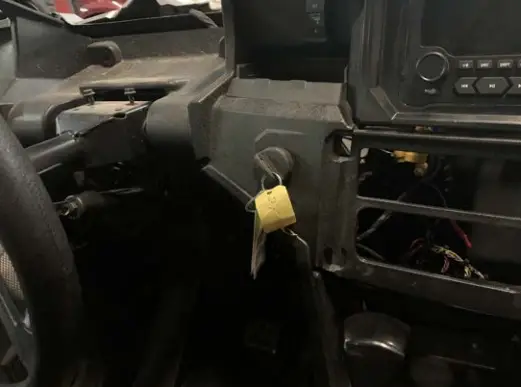
| ● Disconnect wires from the back of 12 volt accessory port | ● Remove the plastic nut from the ignition switch and remove it from the dash | ● Lower the steering column and disconnect wiring from the back of the instrument cluster, and Remove the two 10mm bolts to remove the instrument cluster |
 |  |  |
| ● Disconnect the connectors from the back of the light and four-wheel drive switches | ● Remove two T40 bolts from the instrument cluster pocket | ● Remove two T40 bolts in front of the shift knob |
 |  | 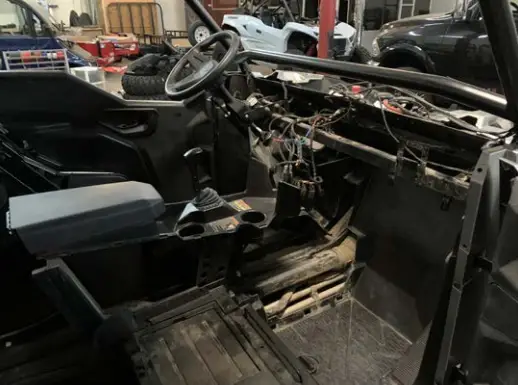 |
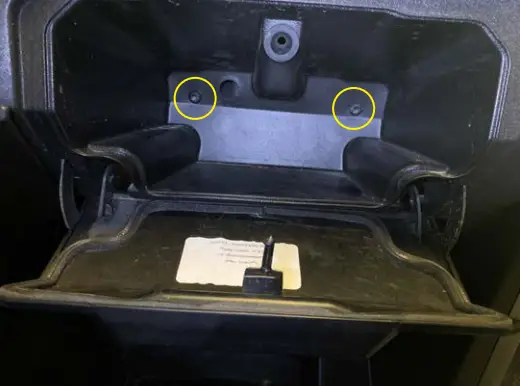
| ● Remove two T40 bolts from inside the glove box | ● Carefully pull the dash toward the rear of the vehicle by the door opening on the driver and passenger sides | ● Carefully remove the dash from the vehicle by lifting it up and out of the vehicle |
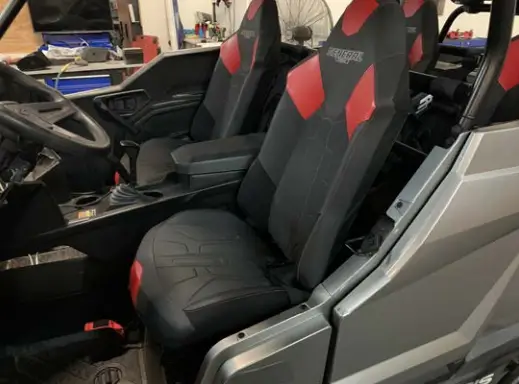 |  |  |
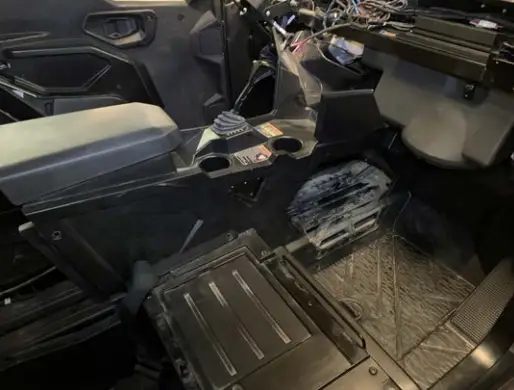
| ● Remove seats from the vehicle | ● If your General is a 4-seat version continue, but if you have a 2-seat please skip Remove six push pins from the driver and passenger side rear center console | ● Remove two push pins under the center console lid Lift up the center console and disconnect the 12-volt accessory port in the center console and remove the center console from the vehicle |
 |  |  |
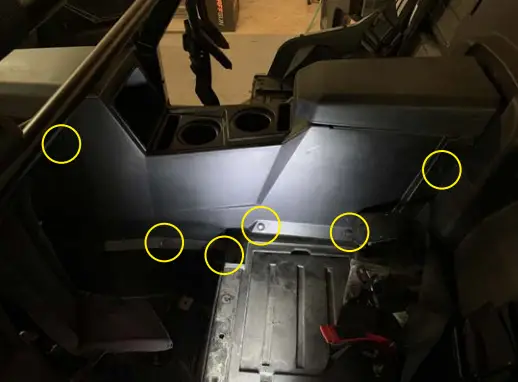
| ● Remove two push pins from the lower front center console and remove | ● Remove (4) 13mm bolts and the grab handle | ● Remove six push pins and three T40 bolts |
● Remove the passenger center console side panel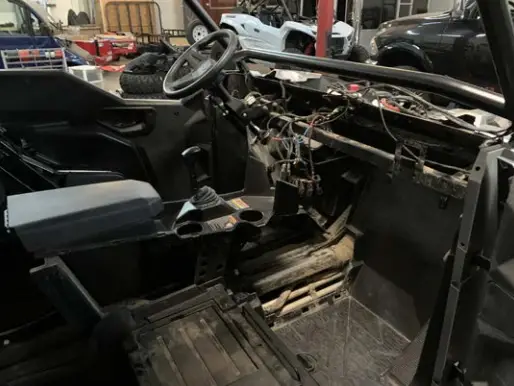
Harness Installation
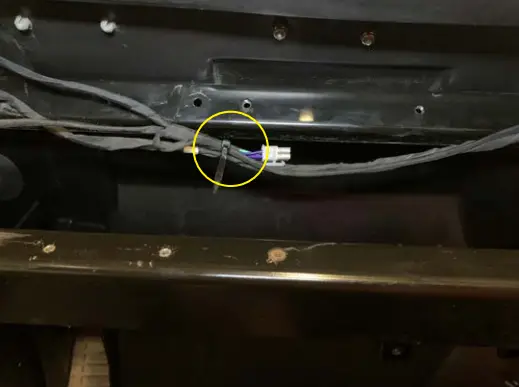 | 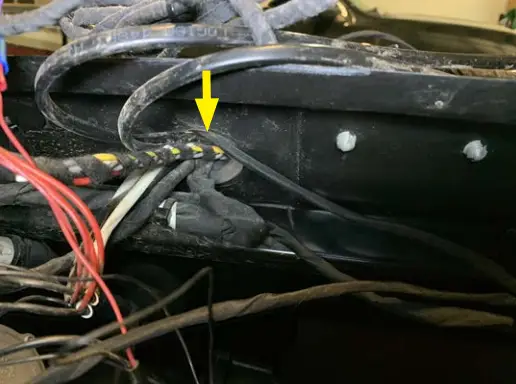 | 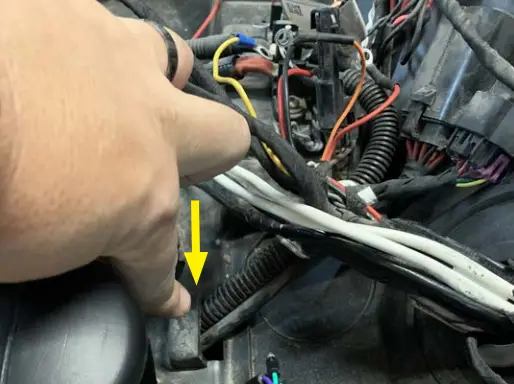 |
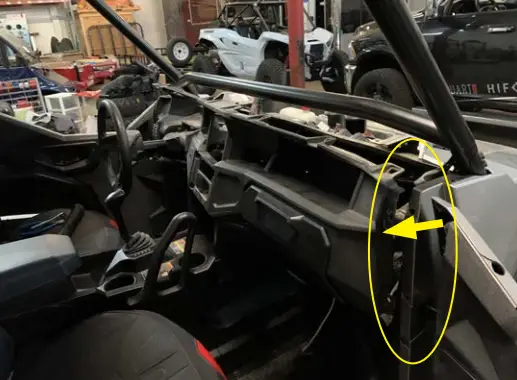
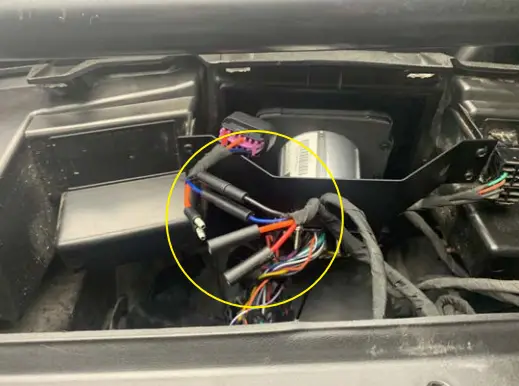
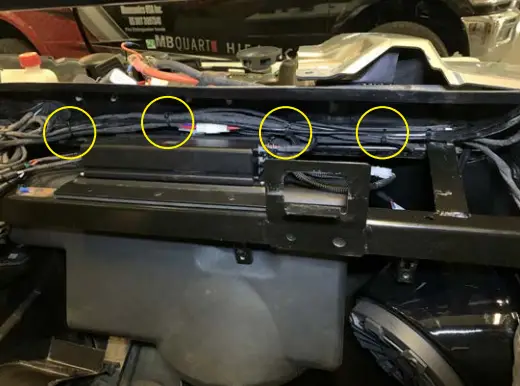
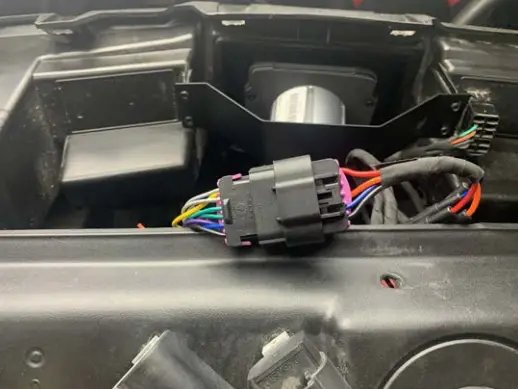
| ● Temporary zip tie speaker harness as pictured on the passenger side | ● Route left and right front speaker wires to each appropriate kick area | ● Route rear wires out grommet toward under hood area as seen by arrow (May need to reach from inside the console area) |
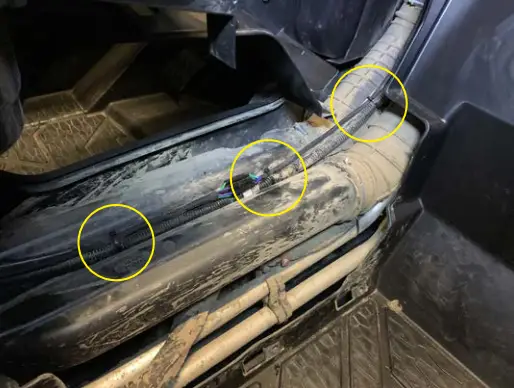 | 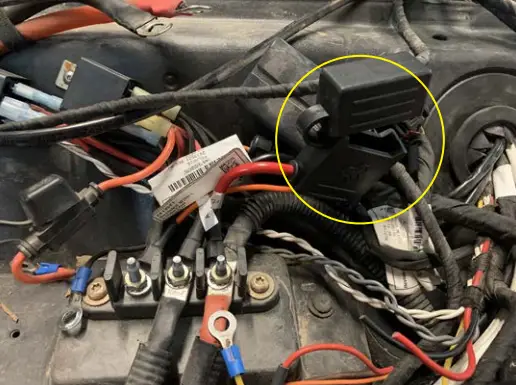 |  |
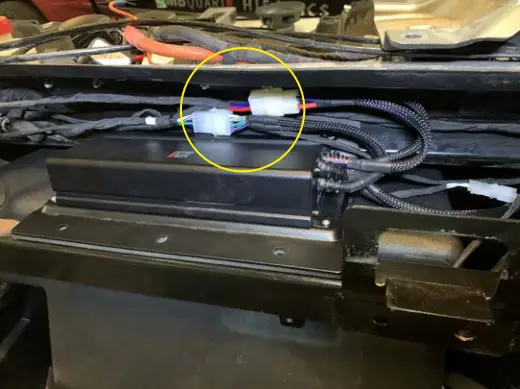
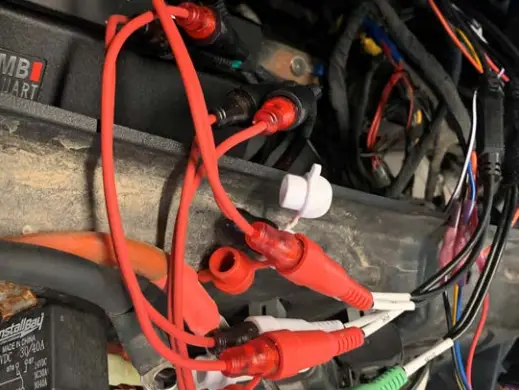
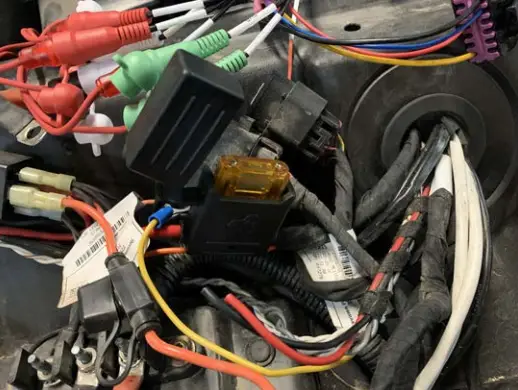
| ● Zip tie the rear speaker harness along the power harness in the center console. If you have a four-seat, use an extension harness to extend to the back of the vehicle | ● Remove the fuse from the holder and connect power wires to the bus bar Note: If you have the Pulse connector, remove the ring terminal from the orange wire and connect the three-position connector to plug into an open spot on the Pulse block | ● Remove the Delphi connector at the bullet and pass these wires along with the amplifier connector from the hood area to the inside through the grommet |
 | ||
| ● Connect the Delphi harness connector back to the appropriate wire | ||
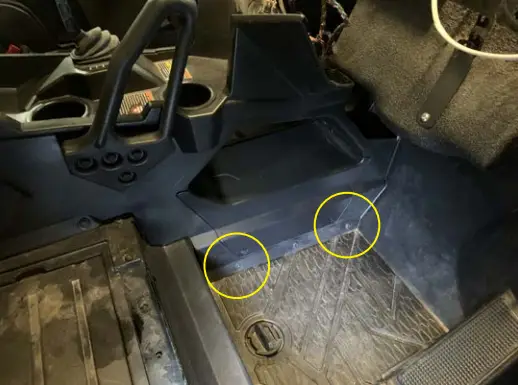
Front Speaker Pod Install
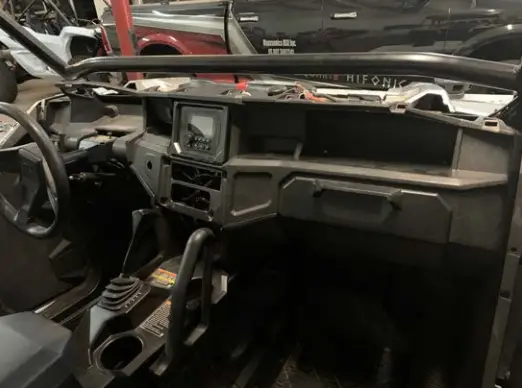
- Temporarily place the dash in the vehicle and do NOT secure it in place

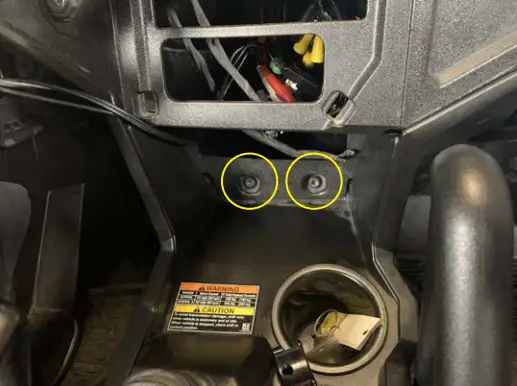
- Connect speaker wires and then hold the passenger side pod up high to the dash till it slides into place using an 11/32” drill bit, drill the four holes and secure with four push pins

- Repeat Step 2 on the driver’s side and drill the five lower holes with an 11/32” drill bit and secure with five push pins

- Remove the dash and connect each pod to the speaker harness routed earlier


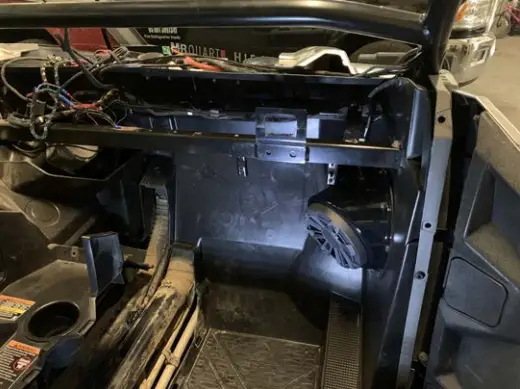
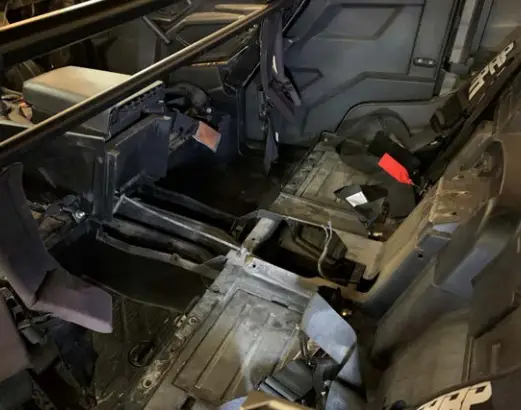
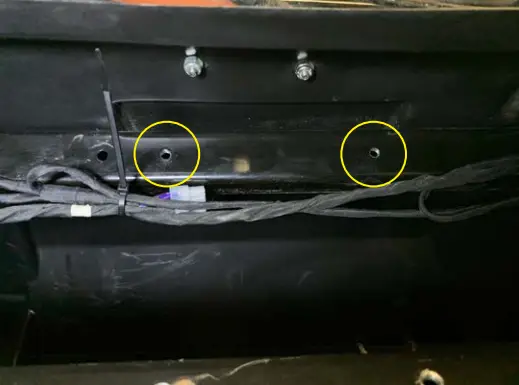
Subwoofer Enclosure Install
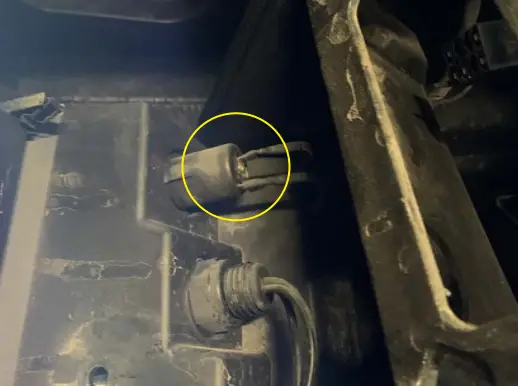
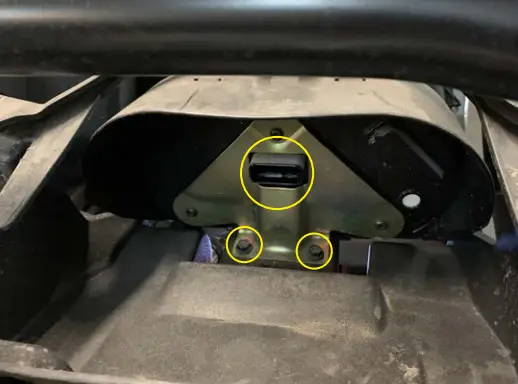
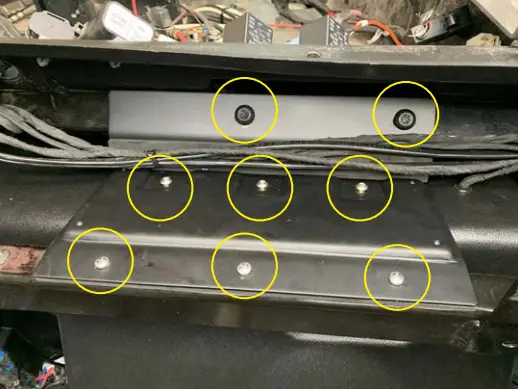
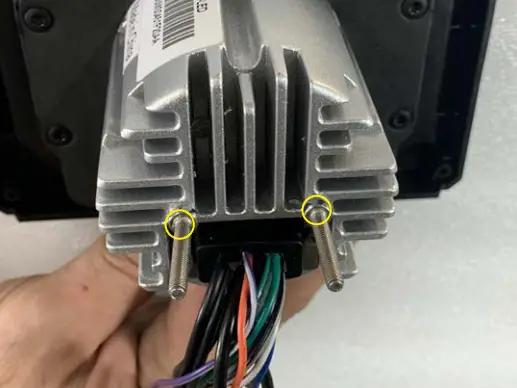
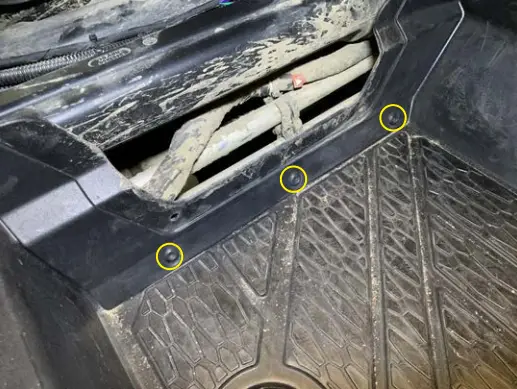
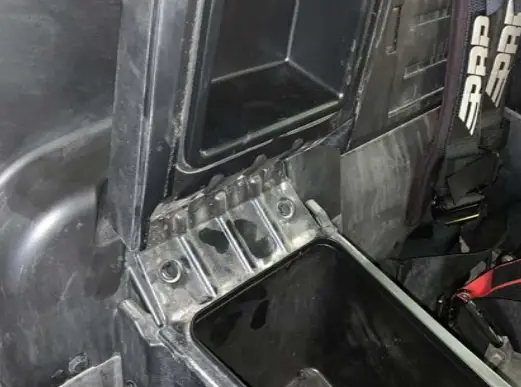
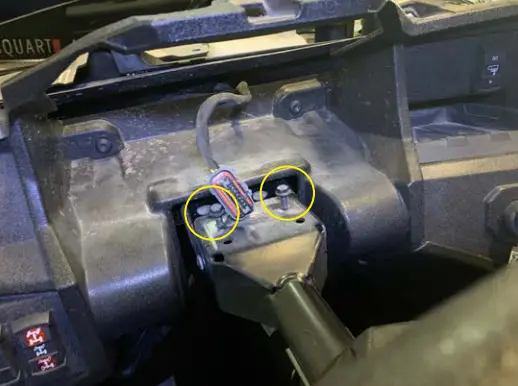
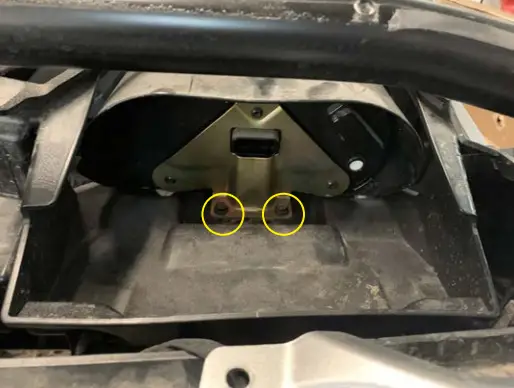
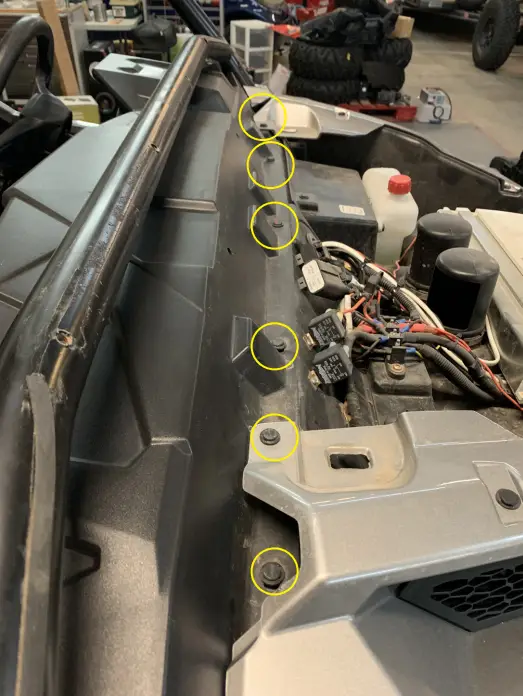
- Install the amplifier plate using two T40 self-cutting screws into the two existing holes circled. (You may have to remove a wire clip if present) Leave screws loose with another step

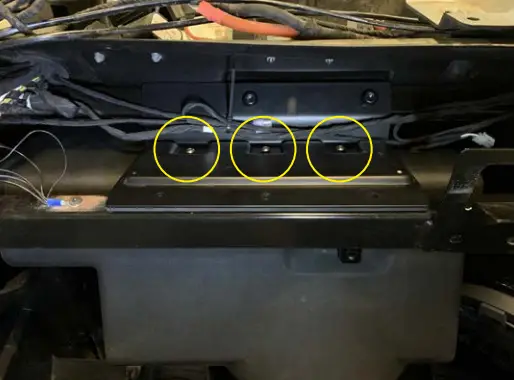
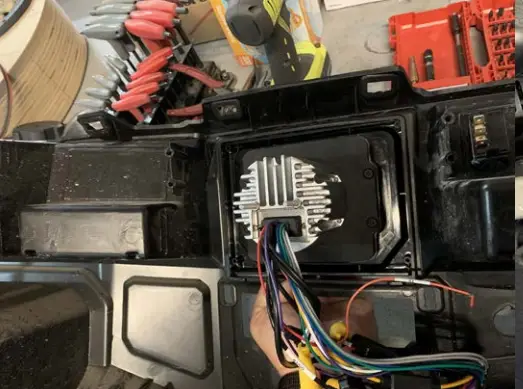
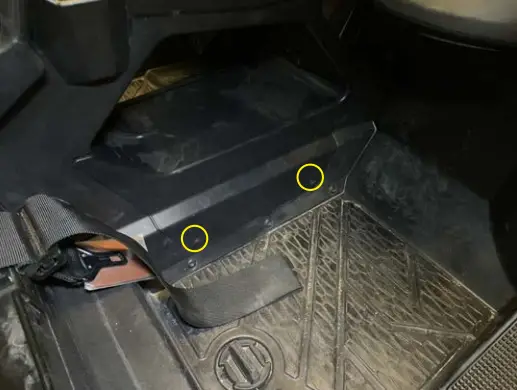
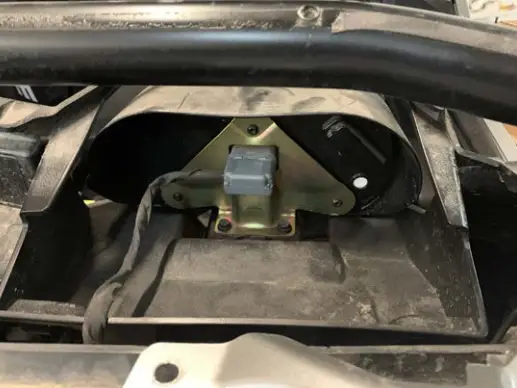
- Rotate the enclosure toward the bracket lifting upward and using a 4mm Allen wrench loosely install the three M5 button head bolts with thread patch to the top of the enclosure

- Rotate the enclosure toward the bracket lifting upward and using a 4mm Allen wrench loosely install the three M5 button head bolts with thread patch to the top of the enclosure

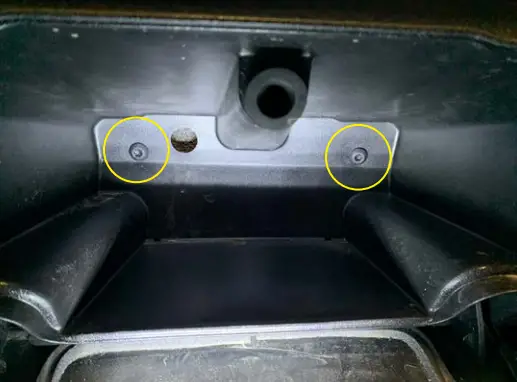
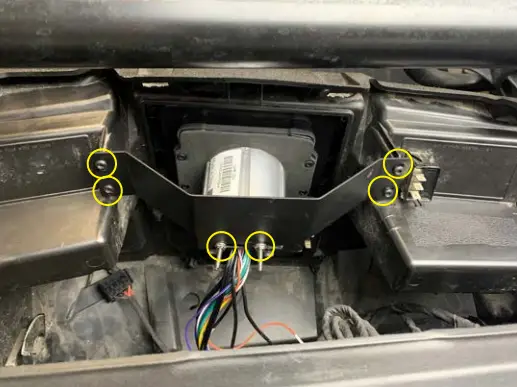
- Tighten three M5 bolts on top of the enclosure with a 4mm Allen wrench and also tighten two T40 Torx bolts and three Phillips self-tapping screws on the front of the plate

Amplifier Install
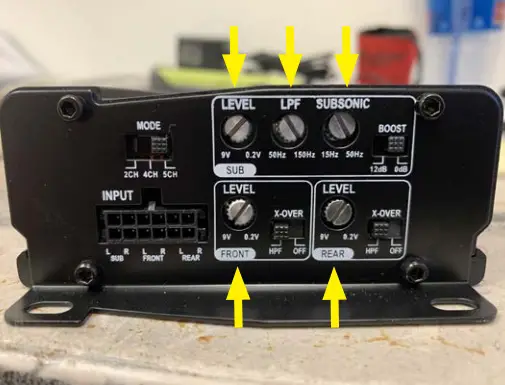
- Adjust amplifier gain and crossover as pictured
Gains all to the last “L” on Level Front & Rear X-Over to “HP” Mode to “5CH” Sub LPF to 100Hz going to “L” on LPF Subsonic set to 31Hz going to “B” on Subsonic Boost to 0dB
- Use four M3 Philips screws to secure the amplifier to the plate and position the gain/crossover facing toward the center of the vehicle

- Connect Power, Subwoofer, Speaker, and RCA pigtail connectors. (Note – Bass knob can be connected if wanted but the GMR-LED has subwoofer level control)
- Zip tie wires to secure

Radio Install
- Install two double-threaded bolts in the back of the radio with a 7mm wrench
NOTE
Disregard if you have RIde Command
- Place the radio and dash kit from the front side of the dash

- Position the rear bracket and loosely install the two nuts on the back of the radio
Loosely install four High-Low thread-forming screws with a T25 Torx
Then position the radio in the opening moving left and right, and up and down, once happy, tighten the nuts on the back of the radio with a 7mm wrench and T25 Torx on the bracket
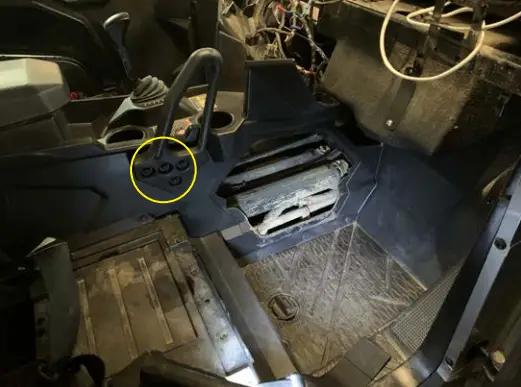
- On the lower switch panel, remove one of the two hole plugs beside the 12-volt accessory port

- Install the USB / AUX port in this hole (PASP-18)


Reassembly
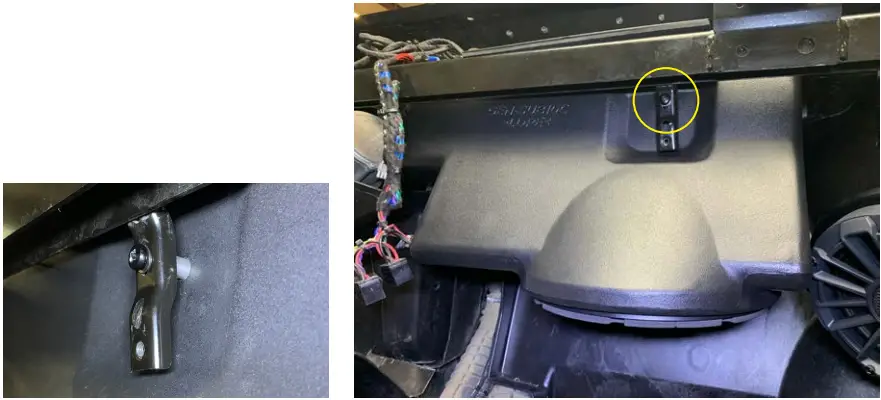
 |  |  |
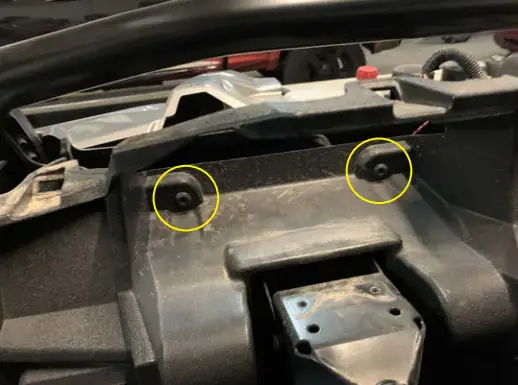
| ● Install the front passenger center console, carefully sliding it into place around the subwoofer enclosure | ● Install six push pins NOTE The two up high by the firewall will need to be inserted from the driver’s side by the steering wheel. | ● Install three T40 bolts |
 |  |  |
| ● Install passenger grab handle with four 13mm bolts | ● Install center cover with two push pins | ● If two-seat skip ahead if four-seat then install the rear console and install six push pins on the driver and passenger side |
 |  |  |
| ● Install the rear glove box in the rear center console. Remember to connect wires to the bottom 12-volt accessory port | ● Install two push pins under the glove box lid | ● Re-install the dash in the vehicle |
 |  |  |
| ● Connect the radio harness to the power harness | ● Connect the RCA input from the amplifier to the RCA output of the radio with the three 6” RCAs. Note White RCA from the amplifier goes to the front left RCA of the radio Gray RCA from the amplifier goes to the front right RCA of the radio Green RCA from the amplifier goes to the rear left RCA of the radio Violet RCA from the amplifier goes to the rear right RCA of the radio Brown and Orange RCA from the amplifier goes to the green RCA of the radio | ● Install the main fuse under the hood |
 |  |  |
| ● Turn the vehicle on and do a preliminary test of the audio to see if all speakers are performing (If testing is good continue assembly) | ● Install the key switch and align it to detent | ● Install two T40 bolts on the driver’s side instrument cluster area |
 |  |  |
| ● Install two T40 bolts in the center console | ● Install two T40 bolts in the passenger glove box | ● Install instrument cluster with two 10mm bolts |
 |  |  |
| ● Connect instrument cluster connector | ● Connect switches, 12-volt accessory port, and connect USB / AUX port to the radio then snap center section to dash | ● Install the top of the dash, snapping eight push clips on the front of the dash |
 |  | |
| Step 22 ● Install six push pins on the front of the dash | Step 21 ● Install hood | |
![]() MBQuart.com
MBQuart.com
#MUSUC DEFINED
FCC Notice
This equipment has been tested and found to comply with the limits for a Class B digital device, pursuant to part 15 of the FCC Rules. These limits are designed to provide reasonable protection against harmful interference in a mobile installation. This equipment generates, uses, and can radiate radio frequency energy and, if not installed and used in accordance with the instructions, may cause harmful interference to radio communications. However, there is no guarantee that interference will not occur in a particular installation.
WARNING: Changes or modifications not expressly approved by the party responsible for compliance could void the user’s authority to operate the equipment.
This equipment complied with FCC radiation exposure limits set forth for an uncontrolled environment. This equipment should be installed and operated with a minimum distance of 20cm between the radiator & your body.
WARRANTY
Maxxsonics USA Inc. warrants this product, to the original consumer purchaser, to be free from defects in material and workmanship for a period of one (1) year from the date of purchase. Maxxsonics USA Inc. will, at it’s discretion, repair or replace defective products during the warranty period. Components that prove to be defective in materials and workmanship under proper installation and use must be returned to the original authorized Maxxsonics USA Inc. retailer from where it was purchased. A photocopy of the original receipt must accompany the product being returned. The costs associated with removal, re-installation and freight are not the responsibility of Maxxsonics USA Inc. This warranty is limited to defective parts and specifically excludes any incidental or consequential damages connected therewith. To view the full warranty, please visit the website.
The Bluetooth® word mark and logos are registered trademarks owned by Bluetooth SIG, Inc., and any use of such marks by MB Quart is under license.
All product names, logos, and brands are the property of their respective owners. All company, product, and service names used in this literature are for identification purposes only. Use of these names, logos, and brands does not imply endorsement.
![]() ©2021 Maxxsonics USA, Inc.
©2021 Maxxsonics USA, Inc.
MBQuart products are designed and engineered in the USA by![]() www.maxxsonics.com
www.maxxsonics.com
MBQG-STG3-1/MBQGG-STG3-RC-1 REV 01


