Sure Wood HOW TO REMODEL YOUR STAIR
TERMINOLOGY AND DESIGN
There are two basic types of handrail systems. “Post to Post” and “Over the Post. The type of newel posts you choose will determine your handrail style. However, you may select any baluster type (metal, pin-top wood, square-top wood) and use it with an over-the-post or post-to-post rail system.
POST TO POST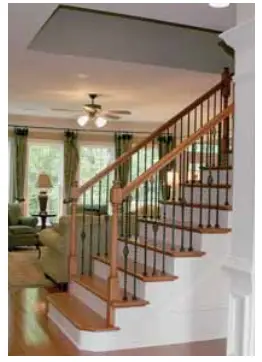
Handrails in post-topost newel systems attach to block-top or box newels. These types of handrail systems require few, if any rail fittings. Handrails are attached to newels using screws, nails or rail bolts. Generally, these rail systems are easier to assemble and can be less expensive when used with common newel posts.
To construct a post-to-post handrail system, you will need the following types of newels, depending on the configuration of your staircase. Using the diagram below, the newels you would need are:
- A. Starting Newel
- B. Landing Newel
- C. Rosette
- D. Half Newel
OVER THE POST
Handrails in over-thepost newel systems travels over the newel posts, allowing the hand to run along the handrail continuously. These systems require handrail fittings that fit on top of newel posts. Handrails are attached to fittings using rail bolts. Over-the-post systems are generally more expensive and labor intensive.
Constructing an over-the-post handrail system requires specific types of rail fittings that are unique to the configuration of your staircase. Using the diagram below, the most commonly used newels and fittings are listed.
- A. Starting Newel
- B. Landing Newel
- C. Rosette
- D. Straight Gooseneck (fitting)
- E. 90o Gooseneck (fitting
- F. 180o Gooseneck (fitting)
- G. Starting Fitting (volute or starting easing)

Deciding on the type and style of your staircase is up to you. Updating your staircase with new components will create a dramatic first impression, and doing the job right includes getting the right parts. The drawings below illustrate basic staircase designs and the stair parts used to construct them.
A. POST TO POST RAIL SYSTEM.
A traditional post to post newel system is shown with a few variations
- Block top newels where handrail attaches.
- Block top newels that require a handrail fitting.
B. OVER THE POST RAIL SYSTEM.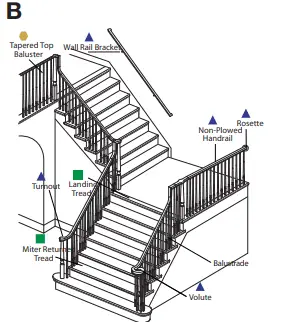
An over the post system comprises handrail fittings that fit on top of pintop newel posts, allowing the hand to flow interrupted over the railing. These systems are generally more expensive than post-to-post. Many fittings are available through special order.
C. BOX NEWEL WITH METAL.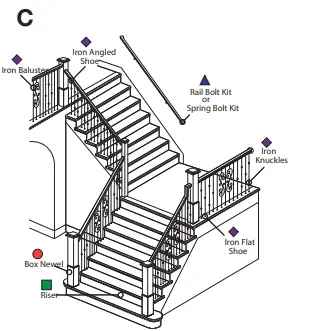
Box newels require few, if any handrail fittings. This stair shows a double bullnose starting step. While this system is viewed as postto-post, the use of box newels can make it more expensive than the traditional post-to-post system.
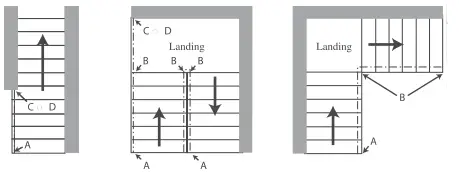
RISE, RUN & RAKE. Two terms that apply to every staircase is the “rise” and the “run.” If you are going to use handrail fittings, knowing the rise and run of your staircase is essential. Using the diagram at right, the terms are defined as follows: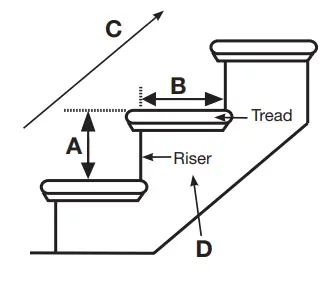
- A. RISE. The measurement between the surface of one tread to the surface of the tread above it.
- B. RUN. The measurement between the face of one riser to the face of riser above it.
- C. RAKE. The angle of ascent up the stairs is called the “rake”. The rake also defines the balusters, newels and rail that are attached to the staircase.
- D. STRINGER. The wood that supports the treads and risers is called the “stringer.”
USING THIS GUIDE
This guide will cover the basic steps necessary to renovate your staircase. It is recommended that you read through this guide before attempting any demolition or removal of your existing staircase. The tools needed to finish this project are listed in each section. Many tools are available from tool rental stores or home centers. To help make your project a safe work site, it is recommended that you:
- Wear eye protection at all times.
- Wear hearing protection when using power tools.
- Use utility gloves when removing old lumber and when handling material to be installed.
Tips on making your project more efficient are included throughout this guide.
BUILDING CODES:
Before beginning your staircase project, it is important to check with your local authorities about building code requirements for your area. Throughout these instructions, where you see this icon , that step may have code requirements in your jurisdiction. Building code interpretation and enforcement can vary greatly from city to city. The most commonly accepted code requirements are shown below, but may have changed since this writing. Check with your municipality before beginning your project.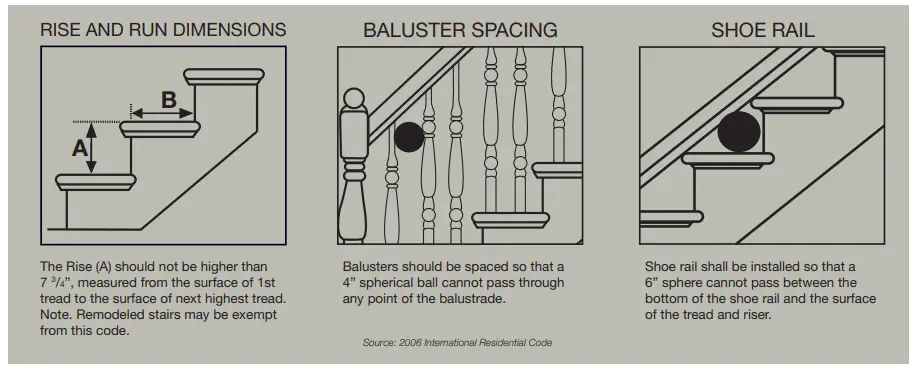
GETTING STARTED
TREAD & RISER REPLACEMENT
- Remove existing wood balusters by cutting them 12-inches below where they are attached to the handrail. Twist to remove them, ensuring holes are clear of wood glue, nails or other debris.
- Remove any carpet from surface of staircase to expose wood treads and risers.
- Remove treads and risers using hammer or prybar. Remove any nails and debris.
- Once old treads and risers are removed, install new risers first. Apply bead of adhesive to face of stringer. Nail or screw risers in place.
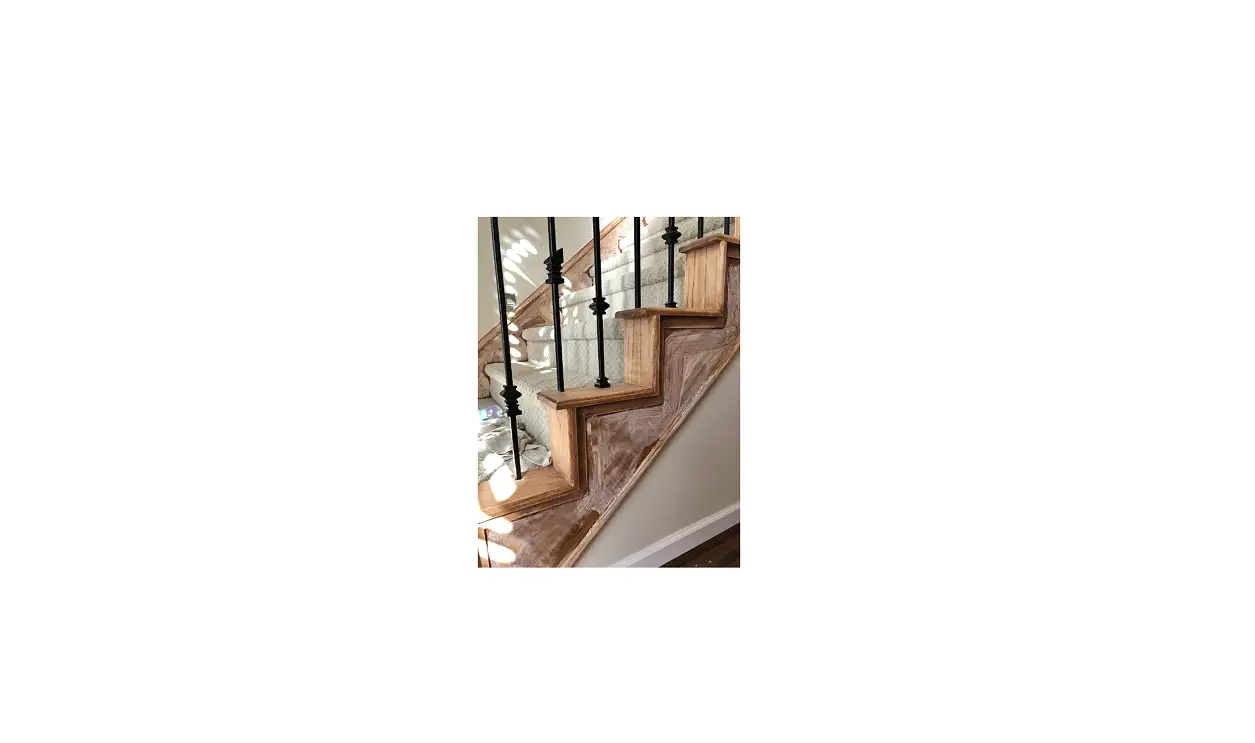
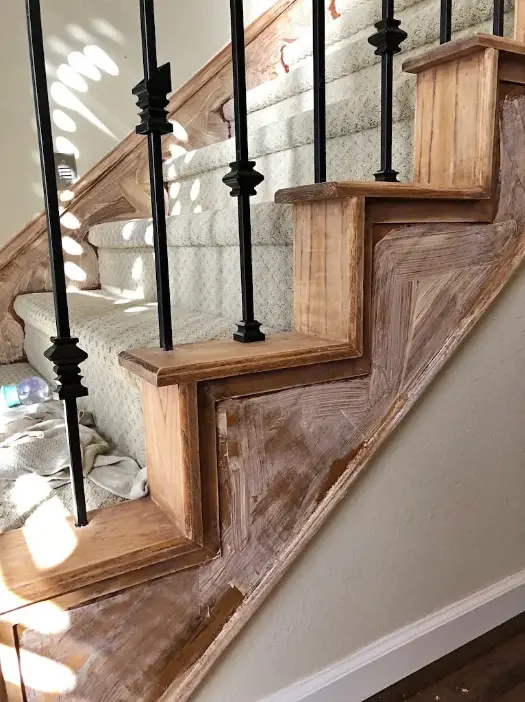
- Install treads (FIG 1-1) by applying bead of adhesive to stringer run. Place treads on stringer. Nail or screw in place (FIG 1-2).
- Install landing tread at landings and any balconies (FIG 1-3). Apply bead of adhesive on subfloor and nail in place.
- Landing tread (FIG 1-3) can be used with 3/4” oak flooring along a landing when solid oak treads are used. Use landing tread on balconies and at the top of your staircase.
- Add a finished look by applying oak returns (FIG 1-4) to the ends of exposed treads on open stairs. Apply with wood glue and nails.


INSTALLATION
NEWEL POST INSTALLATION FOR POST-TO-POST SYSTEMS
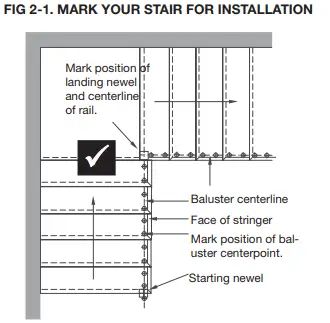
- Layout your staircase directly on your treads and landings (FIG 2-1). Mark newel and baluster position and centerlines. See diagram at right.

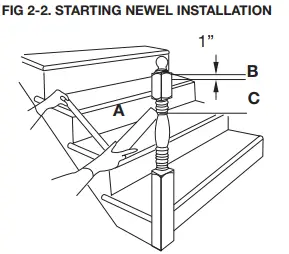
- With newel in position where it is to be mounted (FIG 2-2), slide short end of framing square along the slope of the stairway.

- Slide edge of square onto post as shown (A). Make mark.
- Measure down 1” from top of newel block (B). Make mark.
- Note measurement (C) between the two marks “A” and “B”. This is the measurement to use when cutting the bottom of the newel.
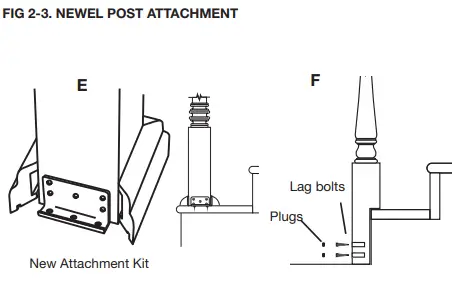
- Trim and fasten starting newels (FIG 2-3)in place using Newel Attachment Kits (E) or lag bolts and wood plugs (F).

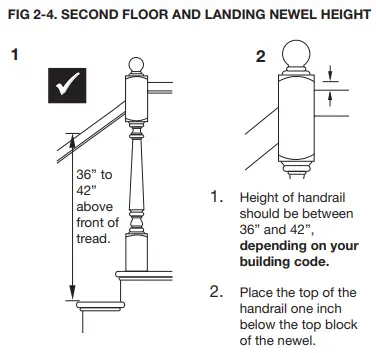
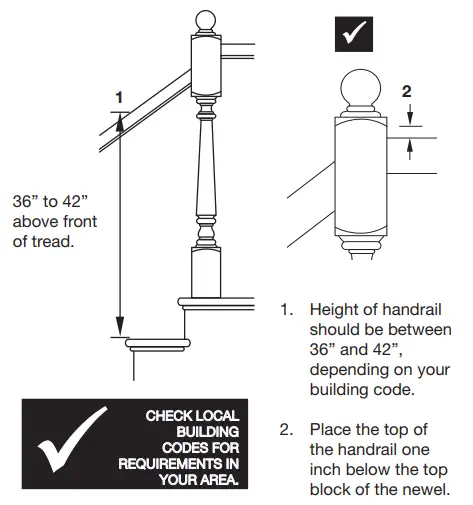
- For 2nd floor and balcony newels (FIG 2-4), rail should be set 1” below the top of square part of newel. Check local building codes for proper rail height.

TOOLS YOU NEED
- Wear Safety glasses
- Drill
- Measuring tape
- Saw
- Framing Square
- Pencil
MATERIALS:
- Block top / box newels
- Newel attachment kits
- Lag bolts
- Oak plugs
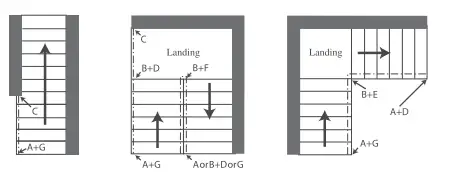
NEWEL POST AND RAIL ASSEMBLY FOR OVER-THE-POST SYSTEMS
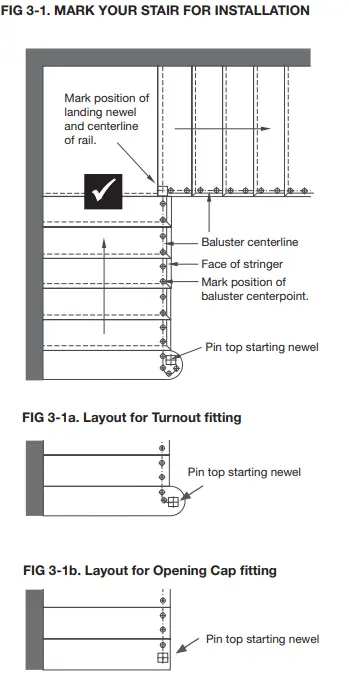
- Layout your staircase (FIG 3-1)directly on your treads and landings. Mark newel and baluster position and centerlines. Use layouts for Turnouts (FIG 3-1a) and Opening Cap (FIG 3-1b) if applicable.
- For a volute fitting, the centerline of the balustrade (assembled set of balusters, rail and newels) should be laid out. On a kneewall stair, the balustrade should be centered on the kneewall. On an open tread stair, the centerline should be 1/2 of the baluster square in from the face of the stringer (ex. 5/8” for a 1-1/4” baluster).
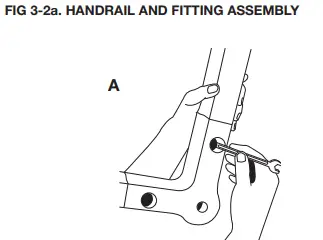
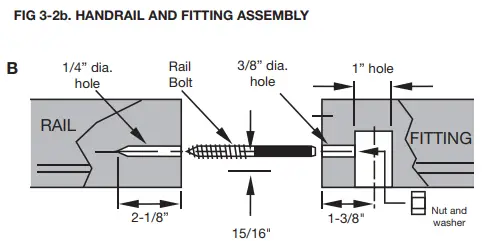
- Assemble the handrail and fittings (FIG 3-2a) with rail on the staircase. Use rail bolts or Spring Bolts® to assemble fittings to handrail. See diagram 3-2b for rail bolt details.

- Apply wood glue to ends of rail and fittings. Assemble and install nut. Tighten nut with wrench, then glue wood plug into hole.
- Clamp or securely assembled handrail on top of stair. Note centerpoints of newels and mark on treads. In some cases, a notch will have to be cut in nosing of a tread on a landing.
 See FIG 3-3. Measure and trim newel posts using guide at left.
- Rake rail height (H1) should be between 36″ and 42″ depending on your local building code.
- Center the assembled handrail over the newel locations. Measure distance between the tread and the bottom of the handrail fitting (A1 and A2).
- Measure the thickness of the handrail (T1).
- Use the following formula to calculate the starting newel height: H1 + A1 – T1 = Starting Newel Height
- If newel starts from the floor or a lower tread, add that distance.
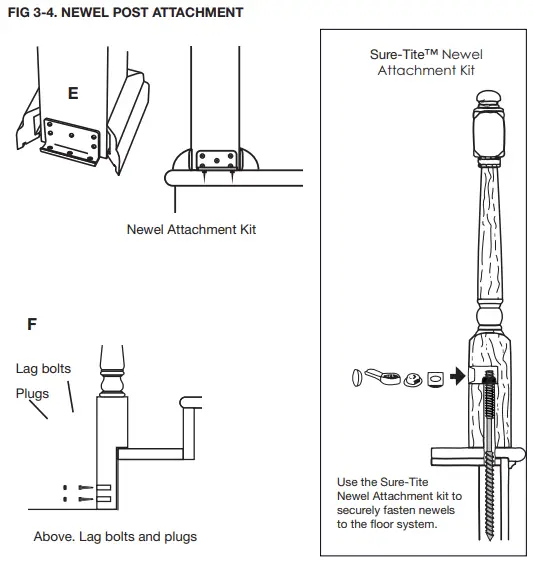
- See FIG 3-4. Trim and fasten newels using Newel Attachment Kits or Lag Bolts and plugs, or use the Sure-Tite™ Newel Attachment Kit.

 See FIG 3-3. Measure and trim newel posts using guide at left.
TOOLS YOU NEED:
- Wear Safety glasses
- Drill
- Drill bit set
- Wrench set
- Measuring tape
- Saw
- Framing Square
- Pencil
MATERIALS:
- Block top / box newels
- Newel attachment kits
- Lag bolts
- Oak plugs
- Wood glue
PIN-TOP BALUSTER AND HANDRAIL INSTALLATION
TOOLS YOU NEED:
- Wear Safety glasses
- Drill
- Drill bit set
- Drill guide
- Measuring tape
- Level
- Saw
- Framing Square
- Pencil
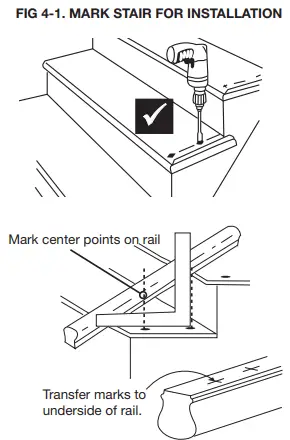
- See FIG 4-1. Mark baluster placement on treads allowing for equal spacing and no greater than 4” on center.

- Drill treads the same size and depth as pin on the bottom of baluster.
- Lay handrail along stairs allowing extra length for proper fit to newel posts.
- Being sure that rail does not move, use framing square to transfer wood tread markings from each tread to side of handrail.
- Transfer markings to bottom center of handrail. Locate markings on bottom of handrail. Mark center line of handrail.
- POST-TO-POST. (FIG 4-2)Rotate handrail 180o on stairs so balcony side of handrail is at base of stairs.

- Using newels as guides, mark handrail (a) and cut to proper length. Follow instructions for attaching newels.
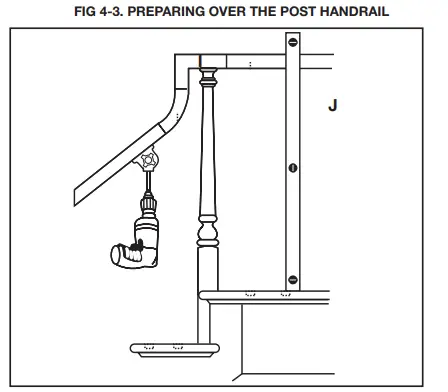
- OVER-THE-POST. (FIG 4-3) Place handrail on top of pin top newels (I), but do not glue or nail in place. Use level to mark centers of balusters (J) on rail, balcony and treads of stair. Drill holes with drill guide using 5/8″ drill bit.

- For balconies, follow same procedures, keeping rail on flat surface when drilling.

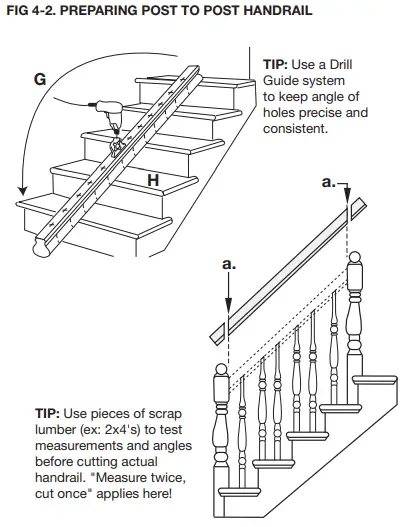
TIP 1: Install pin top balusters first. Then lower handrail down onto the balusters after holes are drilled into handrail.
TIP 2: Practice rail cuts with scrap lumber before cutting final piece.
SQUARE TOP BALUSTER AND HANDRAIL INSTALLATION
TOOLS YOU NEED:
- Wear Safety glasses
- Drill
- Drill bit set
- Drill guide
- Measuring tape
- Level
- Adjustable Square
- Miter Saw
- Framing Square
- Pencil
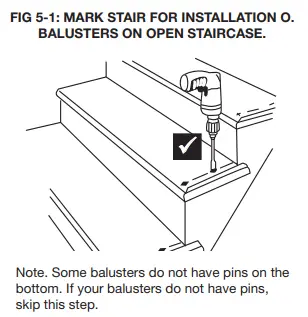
- FOR OPEN STAIRS ONLY. To install square top balusters, drill holes (FIG 5-1) in treads according to your layout from Step 3. Use same size drill bit as the size of the pin on the bottom of baluster (ex: 3/4″ pin = 3/4″ bit. Make sure baluster holes are spaced evenly. Check local building codes for proper baluster spacing requirements.

- See FIG 5-2 (NEXT PAGE).

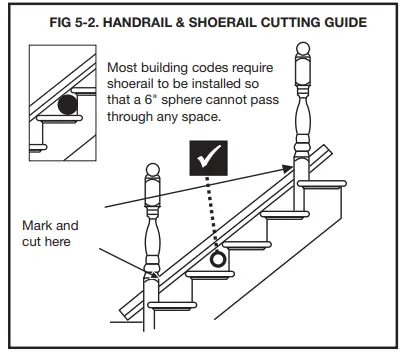
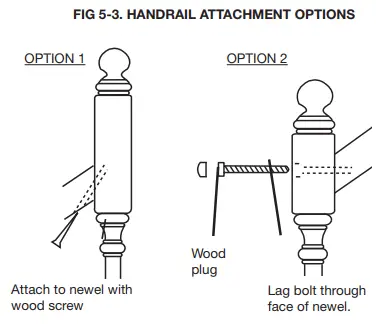
Lay handrail and shoe rail (if used) along stairs, marking where they intersect with newels. Cut rail along marks using miter saw. Use scrap lumber to test cuts before cutting finish material. - Attach handrail (FIG 5-3) (NEXT PAGE) using option #1 (3” wood screws) or option #2 (4-1/2” lag bolts through front of rail). Both options require pre-drilling a pilot hole.

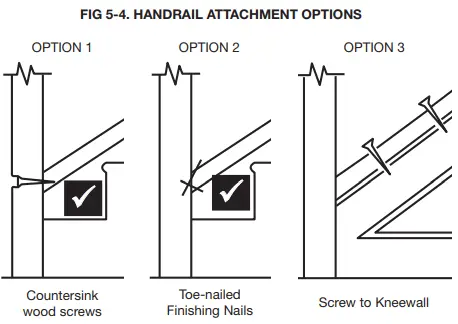
- SHOE RAIL OPTION. Measure and cut shoe rail using same angles as handrail cuts. See FIG 5-4 (NEXT PAGE). Attach shoe rail using OPTION 1 (3” wood screws), OPTION 2 (toe-nailed finish nails), or OPTION 3 (screwed to kneewall)

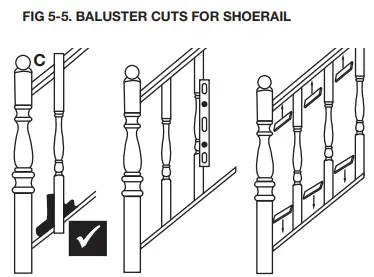
- BALUSTER INSTALLATION ON SHOERAIL (FIG 5-5):

- Use an adjustable square (C) and level to determine the angle to cut balusters. Allow for 1/4” plow depth on handrail and shoerail.
- Cut balusters to correct length. Once spacing is determined, glue and toe nail balusters in place. Check your local building code for baluster spacing requirements.
- Cut fillet pieces, being sure to match angles. Glue and nail in place using 1/2” finishing nails.
- OPEN TREAD OPTION. Using marks on tread made from Step 2, drill holes using the same size bit as the pin on the bottom of baluster (ex: 3/4″). If your balusters do not have pins on the bottom, do not drill holes in your treads.
- Cut balusters to correct length.
- Insert baluster into handrail and adjust with level.
- Apply wood glue and nail baluster in place, making sure balusters are evenly spaced. Check your local building code for baluster spacing requirements.
- Cut handrail fillet, being sure to match angles. Glue and nail in place using 1/2″ finishing nails.
ATTACHING HANDRAIL SYSTEMS TO WALL
- Attach rosette or half newel directly to handrail through the back of rosette (A)
- Secure handrail and rosette or half newel to wall with finish nails or screws (B). Use wood plugs to plug screw holes.
- Leave no less than 1-1/2” of space between wall and wall rail.
- Secure wall rail to walls with handrail brackets. Be sure handrail brackets are anchored into studs through dry wall.
- If attaching fittings to ends of wall rail is preferred, use the same method for attaching fittings from Step 3-2 on page 9.


Miter Cutting Handrails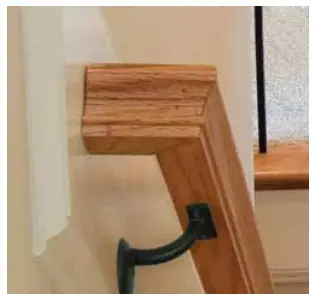
Handrail can be miter cut at the ends and returned to the wall. In all instances of attaching handrails to walls, handrail brackets should be used to add strength and structural support.
GETTING THE RIGHT PARTS
Listed below are the basic parts you will need to complete your staircase project. Of course, every staircase is different, so you may need to special order certain parts.
ITEM
- Select one tread for each step.
- RISERS: Select one riser for each step, then add one more riser per each staircase.
- LANDING TREAD: Select enough lineal footage for entire balcony and width of stairs at landings.
- RETURN NOSING (For open stairs): Select one return nosing for each tread. Select two returns if tread is open on each end.
- STARTING FITTING: For over-the-post rail systems, usually a volute, turnout, or starting easing. See “Balusters for Starting Fittings” if selecting an over-the-post system.
- STARTING NEWEL: Use at the bottom of the staircase.
- LANDING NEWELS: Use at the corner of L-shaped stairs and second floor landings.
- BALCONY NEWELS: If balcony is longer than 10 feet, use one newel for every 5 or 6 feet. Use a newel at every corner. Match top blocks of newels to maintain consistency.
- ROSETTE or HALF NEWELS: Use where handrail connects to a wall.
- NEWEL MOUNTING HARDWARE: Select one newel mounting kit for each newel post mounted to the top of a tread.
- BALUSTERS FOR STARTING FITTINGS: Balusters needed for starting fittings:
- Volutes: Five 1-1/4″x 41″ balusters Four 1-3/4″ x 41″ balusters
- Turnouts: Two 1-1/4″ x 41″ balusters One 1-3/4″ x 41″ balusters Starting Easings require one baluster each.
- RAKE BALUSTERS*: (For open stairs) For stairs using two balusters per tread, select 34” balusters for the front baluster and 41” balusters for the rear baluster. If there are three balusters per tread, select one 34” baluster for the front, a 36” baluster for the middle, and a 41” baluster for the rear.
- RAKE BALUSTERS FOR KNEEWALL*: Select 34” balusters at rate of two balusters per tread that are no wider than 4” on center.
- LEVEL BALCONY BALUSTERS*: For 36” rail height, use 34” balusters. For 42” rail height, use 41” balusters.
- HANDRAIL: Select 13” of handrail for each step, and enough for total lineal footage of level rail.
- SHOERAIL FOR RAKE (optional): For kneewall and shoerail applications. Select 13” of shoerail for each step.
- SHOERAIL FOR BALCONY (optional): Select enough to cover all level runs.
- PLUGS: Select two wood plugs for every newel mounting using lag bolts. Select one plug for every handrail or shoerail mounting using lag bolt or wood screw.


