![]() Sensor Urinal Flush Valve (Hardwired/Battery)
Sensor Urinal Flush Valve (Hardwired/Battery)
Repair Parts and Maintenance Guide
Instruction Manual
0344056 Sensor Urinal Flush Valve
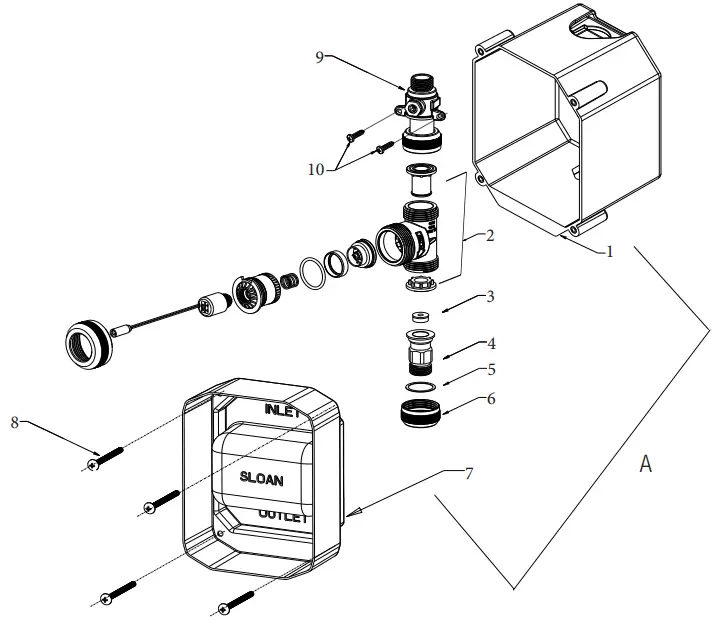
| Item No. | Part No. | Description |
| 1 | 344056 | ELG SOLENOID VALVE |
| 2 | 344077 | ELG WALL BOX W/ INSERTS |
| 3 | 344074 | ELG FLOW REGULATOR |
| 4 | 344061 | ELG OUTLET PORT G 1/2 |
| 5 | 365325 | SLIP RING SOLENOID |
| 6 | 365318 | END CAP SOLENOID |
| 7 | 344063 | ELG MUD GUARD |
| 8 | 344058 | GBL112 #8-32 X 2″ TRUSS HEAD PHILLPS HD |
| 9 | 340112 | ELG INLET VALVE ASSLY G/12 |
| 10 | 9103496 | SCREW THREAD CUTTING ST4.2 x 13 |
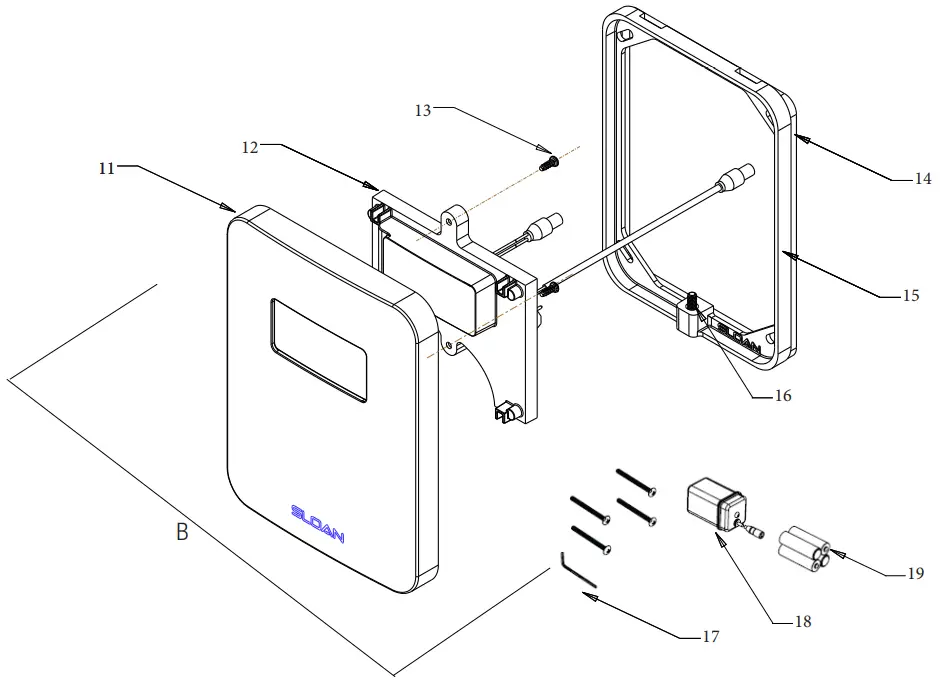
| Item No. | Part No. | Description |
| 11 | 344066 | ELG CP TRIM PLATE W/ SLOAN LOGO |
| 12 | SEE TABLE | ELG SENSOR ASM |
| 13 | 3440001 | SCREW M3-0.5×8 MM 18-8 STL |
| 14 | 344073 | ELG SPACER 5MM |
| 15 | 344070 | ELG PLATE W/ INSERT |
| 16 | 340111 | GBL111 #8-32 x .75 LP SOCKET HEAD SCREW |
| 17 | 9103681 | SCREW KIT |
| 18 | 344076 | ELG 79 BATTERY PACKAGE |
| 19 | 9103279 | EBV9 BATTERY “AA” SIZE (4 PACK) |
ELG SENSOR ASM SELECTION GUIDE
| Code No. | Description |
| 344067 | ELG SENSOR ASM 0.5 LPF |
| 344080 | ELG SENSOR ASM 1 LPF |
| 344081 | ELG SENSOR ASM 1.5 LPF |
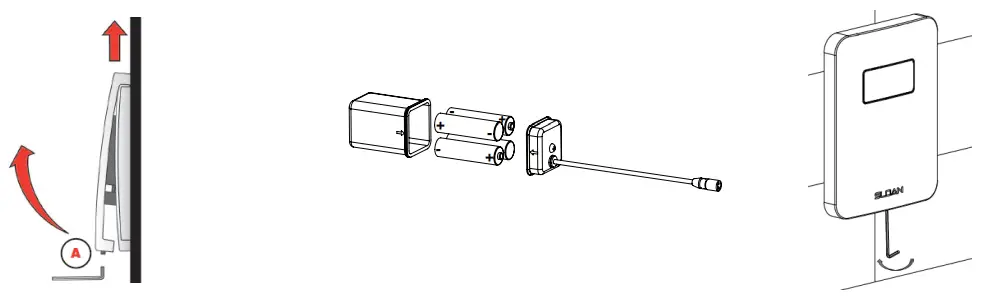
BATTERY REPLACEMENT
When required, replace batteries with four (4) Alkaline AA-Size Batteries.
NOTE: WATER DOES NOT HAVE TO BE TURNED OFF TO REPLACE BATTERIES. USE ALKALINE BATTERIES FOR PROPER UNIT OPERATION.
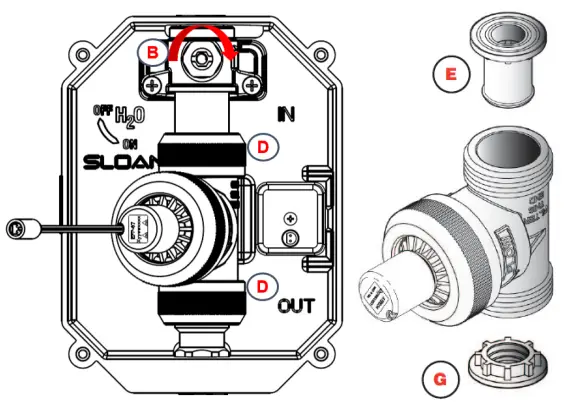
A. Loosen Set Screw at bottom of Wall Plate & Remove Wall Plate
B. Disconnect Battery Pack from Sensor Assembly.
C. Remove battery box from inside the Wall Box
D. Remove the battery box cover by loosening screw using a Philips head screwdriver.
E. Replace the batteries with 4 new AA Alkaline batteries as shown.
F. Reinstall the Battery cover and using a screwdriver tighten the screw until the battery cover is tightly secure.
G. Insert the Battery Compartment into the Battery Compartment Slot of the Wall Box.
H. Connect the Battery Pack to the connector located on the Sensor Assembly
I. Install Wall Plate and secure with Set Screw.
FILTER CLEANING AND REPLACEMENT
A. Loosen Set Screw at bottom of Wall Plate & Remove Wall Plate
B. Turn off water and activate Solenoid Valve to release water pressure.
C. Disconnect Battery Pack and Solenoid Coil from Sensor .
D. Unscrew Inlet and Outlet Coupling from Solenoid Valve and remove Solenoid Valve from Wall Box.
E. Remove Filter Assembly and rinse out or replace with new Filter Assembly.
F. Reinstall Filter Assembly into Valve Body.
G. Make sure Outlet Seal is installed in outlet end of Valve Body.
H. Reinstall Solenoid Valve into Wall Box. Make sure arrow on Valve Body faces direction of water flow.
I. Reconnect all Couplings and Electrical Connections.
J. Install Wall Plate and secure with Set Screw.
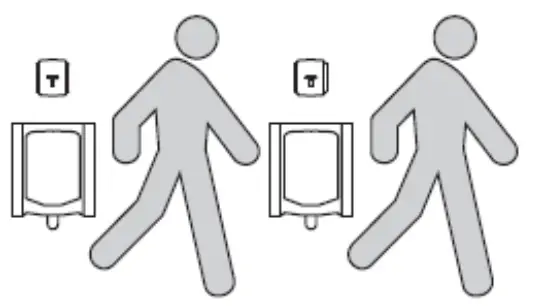
OPERATION
When the user steps away (after a minimum of 8 seconds), the flush valve automatically activates.
CARE AND CLEANING OF CHROME AND SPECIAL FINISHES
DO NOT use abrasive or chemical cleaners (including chlorine bleach) to clean Wall Plate Cover that may dull the luster and attack the chrome or special decorative finishes. Use ONLY mild soap and water, then wipe dry with clean cloth or towel.
While cleaning the bathroom tile, protect the Wall Plate Cover from any splattering of cleaner. Acids and cleaning fluids will discolor or remove chrome plating.
TROUBLESHOOTING GUIDE
- Valve does not function.
A. No power to sensor:
For battery powered model — Make sure that four (4) new AA-size Alkaline batteries are properly installed in Battery Compartment. Refer to Battery Replacement instructions for battery orientation. Make sure that Battery Compartment Plug is connected properly into back of Sensor.
For Transformer Powered Model — Make certain that main power is on. Check Transformer, leads and connections.
Repair or replace as necessary.
B. ELG Sensor asm, Sensor not operating. Replace Sensor Assembly.
C. Main Valve or Ball Valve is Closed. Open Main Valve and adjust the Ball Valve to meet the flow rate required for the proper cleansing of the urinal. - Valve delivers only a slow flow or dribble when Sensor is activated.
A. Ball Valve not open enough. Adjust the Ball Valve to meet the flow rate required for the proper cleansing of the urinal.
B. Solenoid Filter is clogged. Replace Filter .
C. Water pressure is too low. Water pressure should be 0.7 to 5.5 Bar. - Valve does not stop delivering water or continues to drip after user is no longer detected (automatic shut-off fails even when batteries are removed or Power is disconnected from the electric supply).
A. Solenoid Valve seat is dirty. Remove, clean, and reinsert Solenoid Filter. Activate valve several times to flush out dirt.
B. Solenoid Valve is dirty. Backflush by reversing water flow (opposite to the direction shown by the arrow on the side of the Solenoid Valve) through the Solenoid Valve. Reconnect the fittings in the correct orientation. Activate valve.
C. Solenoid Valve Assembly is defective. Replace with Solenoid Valve Assembly. - Water Splashes from Fixture.
A. Supply volume is excessive. Adjust the Ball Valve to meet the flow rate required for the proper cleansing of the urinal.
The information contained in this document is subject to change without notice.


