SIEMENS HB13AB521B Stainless Steel Oven Instruction Manual
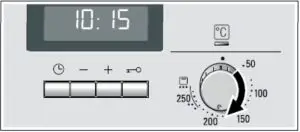
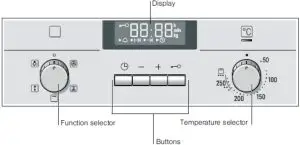
Control Panel
| Button | Use |
| Selects | |
| – Minus + Plus
| Reduces the settings. Increases the settings.
|
 Childproof lock Childproof lock | Locks and unlocks the control panel. |
Function Selector
Setting Use | Use |
| The oven is switched off.
| |
| For cakes and pastries on one to three levels. The fan distributes the heat of the ring heating element in the rear wall evenly throughout the cooking compartment.
| |
| For roasting meat, poultry and whole fish. The grill element and the fan switch on and off alternately. The fan circulates the hot air around the dish.
| |
| For grilling steaks, sausages, toast and pieces of fish. The whole area below the grill element becomes hot.
|
| For defrosting, e.g. meat, poultry, bread and cakes. The fan causes the warm air to circulate around the dish.
| |
| Switches on the oven light
|
Temperature selector
The temperature selector is used to set the temperature or grill setting.
| Setting Use | Meaning |
| The oven does not heat up.
| |
| 50-270 Temperature Range | The temperature in the cooking compartment in °C.
|
| The grill settings for “Grill, large area” • = setting 1, low •• = setting 2, medium ••• = setting 3, high
|
Setting the oven
Use the function selector to set the type of heating
Set the temperature or grill using the temperature selector
The oven will then begin to heat up.
Switching the oven off
Turn the function selector to the off position
Changing the settings
The type of heating and temperature or grill setting can be changed at any time using their respective selectors.
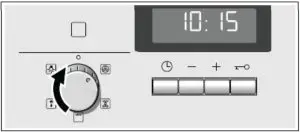
Setting the time-setting options
Your oven has various time-setting options. You can use the ![]() button to call up the menu and switch between the individual functions. All the time symbols are lit when you can make settings. The
button to call up the menu and switch between the individual functions. All the time symbols are lit when you can make settings. The ![]() arrow shows you the timesetting option that is active. A time-setting option that has already been set can be changed direction with the + or – button when the
arrow shows you the timesetting option that is active. A time-setting option that has already been set can be changed direction with the + or – button when the ![]() arrow is next to the relevant time symbol.
arrow is next to the relevant time symbol.
Timer
You can use the timer as a kitchen timer. It runs independently of the oven. The timer has its own signal. In this way,
you can tell whether it is the timer or a cooking time which has elapsed.
- Press the button once. The time symbols light up in the display and the
 arrow is next to
 - Use the + or – button to set the timer duration.
Default value for + button = 10 minutes
Default value for – button = 5 minutes
After a few seconds, the time setting is adopted. The timer starts. The  symbol lights up in the display and the timer duration counts down. The other time symbols go out.
The timer duration has elapsed
A signal sounds 0:00 is shown in the display. Use the ![]() button to switch off the timer.
button to switch off the timer.
Changing the timer duration
Use the + or – button to change the timer duration. After a few seconds, the change is adopted.
Cancelling the timer duration
Use the – button to reset the timer duration to 0:00. The change will be adopted after a few seconds. The timer is switched off.
Checking the time settings
If several time-setting options are set, the relevant symbols are illuminated on the display. The time-setting options symbol is in the foreground preceded by the ![]() arrow.
arrow.
To call up the![]() timer,
timer, ![]() cooking time,
cooking time,![]() end time or
end time or ![]() clock, press the
clock, press the ![]() button repeatedly until the
button repeatedly until the ![]() arrow is next to the relevant symbol. The display shows the value for a few seconds.
arrow is next to the relevant symbol. The display shows the value for a few seconds.
Cooking time
The cooking time for your dish can be set on the oven. When the cooking time has elapsed, the oven switches itself off automatically. This means that you do not have to interrupt other work to switch off the oven. The cooking time cannot be accidentally exceeded.
- Use the function selector to set the type of heating
- Set the temperature or grill setting using the temperature selector
- Press the
 button twice. 0:00 is shown in the display. The time symbols light up and the arrow is next to
- Use the + or – button to set the cooking time.
Default value for + button = 30 minutes
Default value for – = 10 minutes
The oven will start up after a few seconds. The cooking time counts down in the display and the symbol lights up. The other time![]()
![]() symbols go out.
symbols go out.
The cooking time has elapsed
A signal sounds. The oven stops heating. 0:00 is shown in the display. Press the ![]() button. You can set a new cooking time using the + or – button. Or press the
button. You can set a new cooking time using the + or – button. Or press the ![]() button twice and turn the function selector to the off position. The oven switches off.
button twice and turn the function selector to the off position. The oven switches off.
Changing the cooking time
Use the + or – button to change the cooking time. After a few seconds, the change is adopted. If the timer has been set, press the ![]() button beforehand.
button beforehand.
Cancelling the cooking time
Use the – button to reset the cooking time to 0:00. After a few seconds the change is adopted. The cooking time is cancelled. If the timer has been set, press the ![]() button beforehand.
button beforehand.
End time
You can change the time at which you wish your dish to be ready. The oven starts automatically and finishes at the desired time. You can, for example, put your dish in the cooking compartment in the morning and set the cooking time so that it is ready at lunch time. Ensure that food is not left in the cooking compartment for too long as it may spoil.
- Adjust the function selector
- Set the temperature selector
- Press the button twice
- Use the + or – button to set the cooking time
- Press the button. The arrow is next to . The time when the dish will be ready is displayed.
- Use the + or – button to set a later end time
After a few seconds, the oven adopts the settings and switches to standby position. The display shows the time at which the dish will be ready and the arrow is next to the  symbol.
The ![]() and
and ![]() symbols go out. When the oven starts, the cooking time counts down in the display and the
symbols go out. When the oven starts, the cooking time counts down in the display and the ![]() arrow is next to the
arrow is next to the ![]() symbol. The
symbol. The ![]() symbol goes out.
symbol goes out.
The cooking time has elapsed
A signal sounds. The oven stops heating. 0:00 is shown in the display. Press the ![]() button. You can set a new cooking time using the + or – button. Or press the
button. You can set a new cooking time using the + or – button. Or press the ![]() button twice and turn the function selector to the off position. The oven switches off.
button twice and turn the function selector to the off position. The oven switches off.