![]()
LED Canopy Light
Installation Instruction 
130W LED Canopy Light
Cautions:
- Can not use the electric generator to test the LED lamp.
- Please abide by related country, regional and local law and regulations when install this fixture.
- Please turn off the power before installation or maintenance.
- Proper earth grounding is required to ensure safety.
Notice:
- To avoid possibility of electrical shock or fire, the installation personnel must have professional electric knowledge.
- Please wear gloves to avoid injury before installation.
- If any smoke or spark of the wire happened, please turn off the power immediately and notify relevant personnel.
Attention:
- Please check if there is any damage during shipping. If so, please contact manufacturer timely.
- Please read the installation instruction carefully to check whether all the accessories are complete. After confirmation, then install the fixture according to installation steps.
- The installation of the product can be used when it is marked with” 7 “.
Wiring Diagram: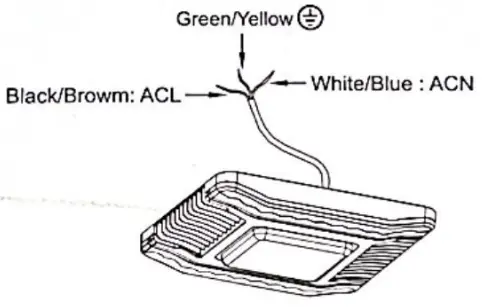
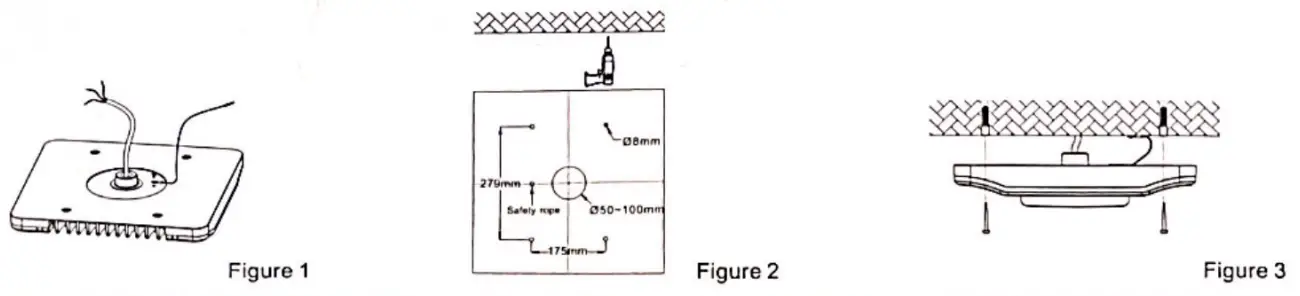
 Installation Method !:
- Fix the safety rope on the back of fixture(Figure 1).
- Drill the alignment holes on the top ceiling, make them match to the holes on fixture (Reference supplied screws for diameter of holes (Figure 2).
- Insert the supplied rubbers into the alignment holes, lock the safety rope on the ceiling. Make wiring connections per “Electrical Connections” section and make sure the good wire protection.
- Mount the fixture on the ceiling by supplied screws(Figure 3).
[![]() ] Installation Method II:
] Installation Method II:
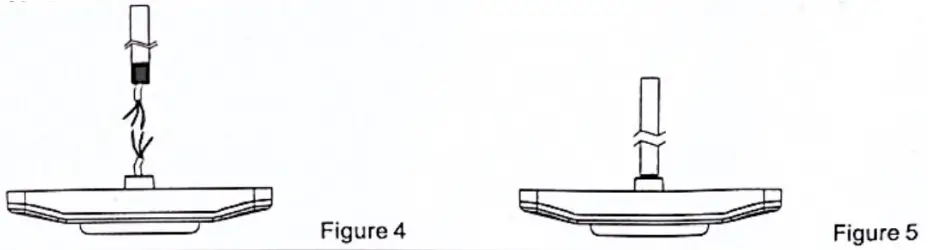
- Connect the wring to the local power supply in the 3/4″NPT Stem (Figure 4).
- Screw the fixture to the 3/4″NPT Stem(Figure 5).
[] Installation Method I:
|:
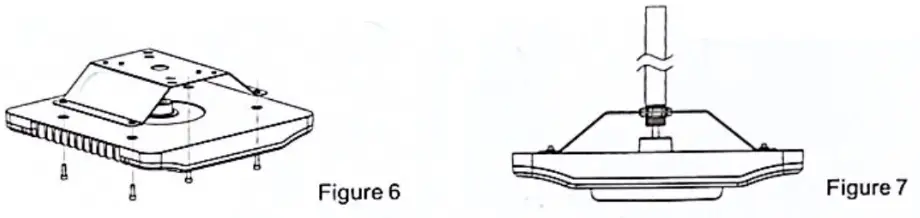
- Fix the mounting bracket on the back of fixture by supplied screws. (Figure 6)
- Unscrew the nut from customer supplied 3/4″NPT stem, make the stem hole on mounting bracket through 3/4″NPT stem, then screw the nut back to 3/4″NPT, and fix it. (Figure 7)
- Make wiring connections per “Electrical Connections” section and make sure the good wire protection.
Il:
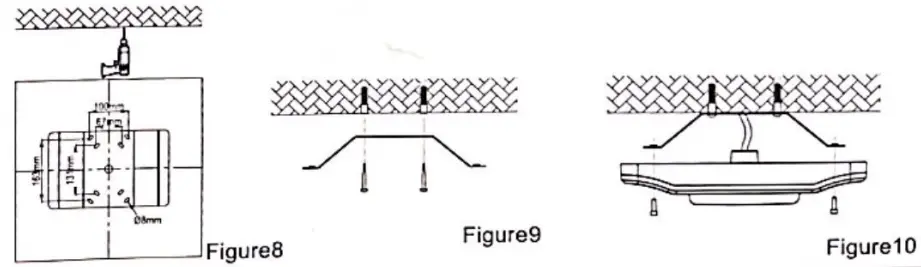
- Drill the alignment holes on the top ceiling, make them match to the holes on mounting bracket.(Figure 8)
- Insert the supplied rubbers into the alignment holes, then fix the mounting plate on the ceiling by supplied screws. (Figure 9)
- Mount the fixture on the mounting plate by supplied screws.(Figure 10)
- Make wiring connections per “Electrical Connections” section and make sure the good wire protection.
Warning / Avertissement
MIN 75°C SUPPLY CONDUCTOR
THIS PRODUCT MUST BE INSTALLED IN ACCORDANCE WITH THE APPLICABLE INSTALLATION CODE BY APERSON FAMILIAR WITH THE CONSTRUCTION AND OPERATION OF THE PRODUCT AND THE HAZARDS INVOLVED.![]()


