Inspire Classic Lifter
Installation Instructions
Parts checklist
| ITEM | PART NUMBER | DESCRIPTION | QTY |
| A | 1001 | SUPPORT ARM – 20” X 40” | 2 |
| B | 1002 | FOAM GRIP 8” | 2 |
| C | 1003 | CENTRE COUPLER 1-1/8” X 3’7” | 1 |
| D | 1004 | PIVOT ARM 1-1/4” X 3’2” | 2 |
| E | 1005 | PIVOT ARM CAP | 2 |
| F | 1006 | BUSHING .8825” thick | 4 |
| G | 1007 | MOUNTING BRACKET | 2 |
| H | 1008 | 3/8 X 3” HEX CAP SCREW | 2 |
| I | 1009 | 3/8 NYLON LOCKNUT | 2 |
| J | 1010 | 3/8 FLAT WASHER | 4 |
| K | 1011 | 5/8” SELF TAPPING SCREWS | 12 |
| L | 1012 | 1” MOUNTING SCREWS | 24 |
| M | 1013 | LARGE BLACK DOME SCEREW CAP | 2 |
| N | 1014 | SMALL BLACK DOME SCREW CAP | 36 |
| O | 1015 | 7/16” PLUG | 2 |
| P | 1016 | TOWEL HOOKS | 3 |
Step 1
Position the spa cover (in the closed position) on the spa, making sure that all 4 corners are properly positioned and square on the spa.
Step 2
Using ITEM L attach the left and right mounting brackets (PART G) to the appropriate sides of the spa.
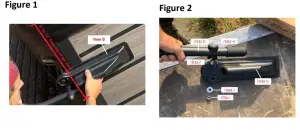
CAUTION: To prevent wooden side cabinets from splitting, pre-drill holes using a 1/16” drill bit. Mounting height is optional (See figure 1). By positioning the brackets 8 inches down from the top of the spa shell, approx. 9-10” of clearance will be required behind the spa. Mounted in this position approx. 75% of the spa cover will be standing above the spa surface when you have the cover off. By positioning the brackets 12” from the top of the spa shell, approx. 15” clearance behind the spa will be required. Mounted at this position, approx. 50% of the spa cover will be standing above the spa surface when you have the cover off.
Step 3
Connect the pivot arms (ITEM D) to the mounting brackets (See figure 2). After the pivot arms are connected, tilt them back into the upright position.
Step 4
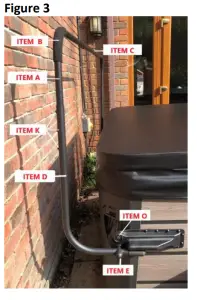
Insert the long end of the support arms (ITEM A) into the centre coupler piece (ITEM C). Then slide the support arms into the pivot arms (ITEM D) (See figure 3).
Step 5
Lay the cover lifter on the spa cover. Adjust the centre couple piece and support the arms so that the central couple is laying parallel to the spa covers hinge about ½” away. Using the self-tapping screws (ITEM K), fasten the support arms to the pivot arms and the centre couple piece.
NOTE: Be sure to rotate the centre couple so that the inserted screws are at a horizontal angle with the heads facing the back of the spa.
Step 6
Slip the black hand grips (ITEM B) n and to the edge of the spa cover and attach the small black plastic screw CAPS on (ITEM N). Push the plugs (ITEM O) into the unused holes in the brackets.
Step 7
Attach the provided 3 towel hooks to the preferred side of your cover lifter by simply snapping them into place and inserting the middle self-tapping screw (ITEM K) to secure them.
*Details correct at time of print
Produced by ![]()


