
![]() A31 Mini RC Drone Toy
A31 Mini RC Drone Toy
User Manual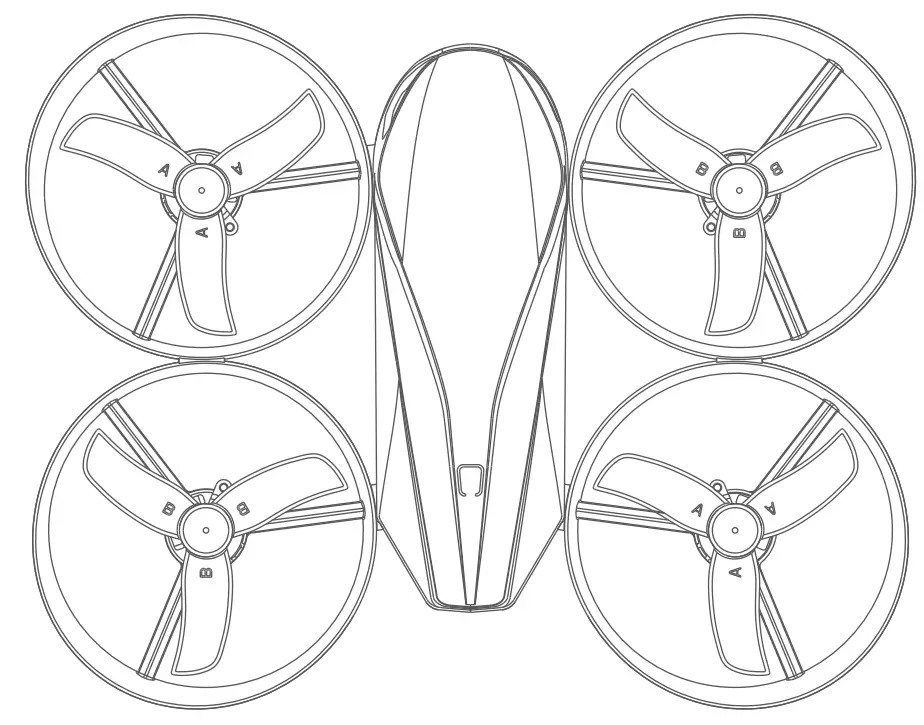 Flying Pig Multi-Language
User Manual
Email: [email protected]
[email protected]
[email protected]
Web: www.tomzontoys.com
[email protected]
[email protected]
FB: www.facebook.com/tomzonofficial/
[email protected]
[email protected]
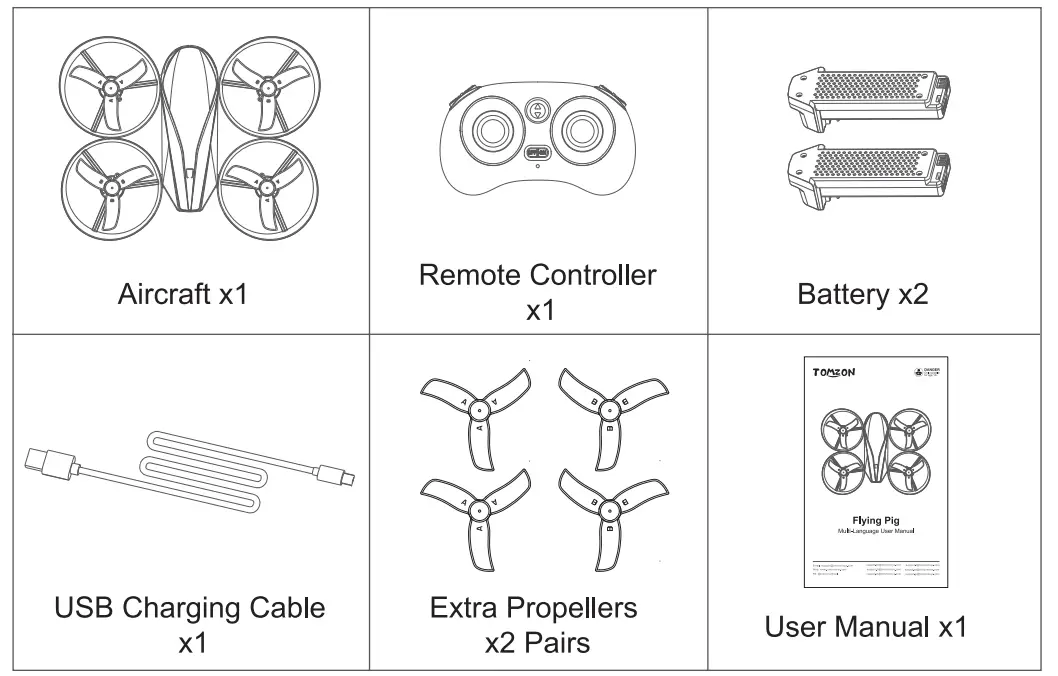
Package List
Know About The Remote Control
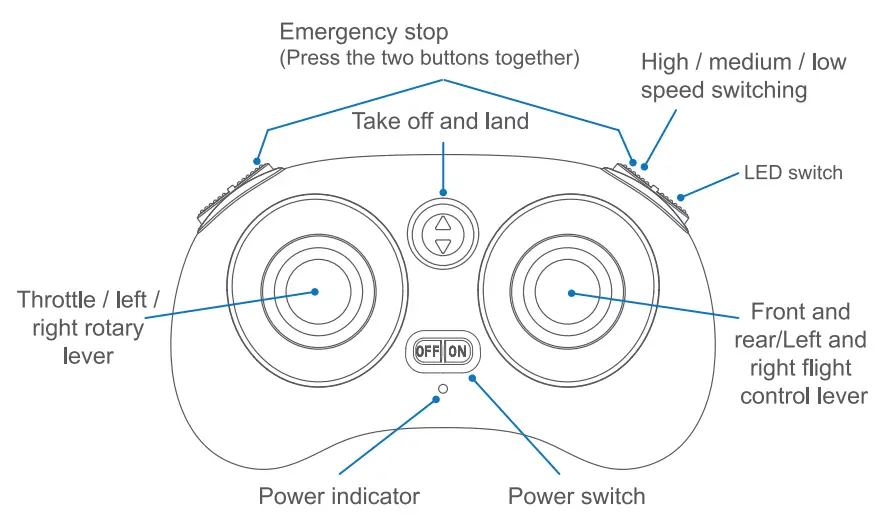
Prompt:
- Short press the power switch to turn on the remote control and long press to turn it off.
- After the emergency stop is activated, the drone will immediately cut off the power and stop flying in the air.
Know About The Aircraft
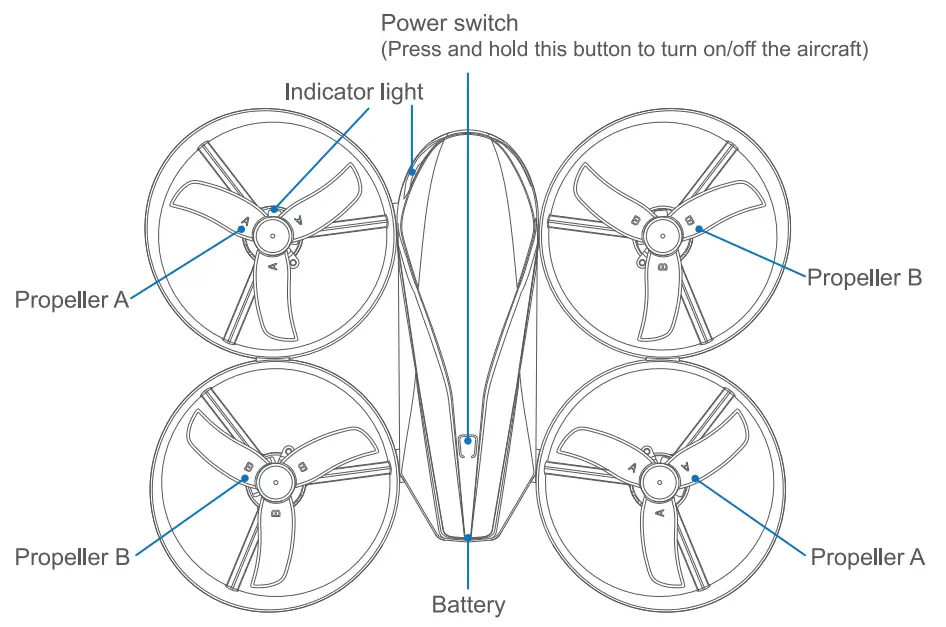
| LED flashes quickly and continually | Not connected to the remote control/ calibrating/low power |
| LED flashes twice and off, continually | Headless mode |
| Other status | Normal working |
- When flying, please point the nose to the front, which will help you better control the aircraft.
- There is a “A” or “B” mark on the propellers. When the blade is damaged, please replace the blade as shown in the figure above before taking off.
Battery Charging Of Aircraft
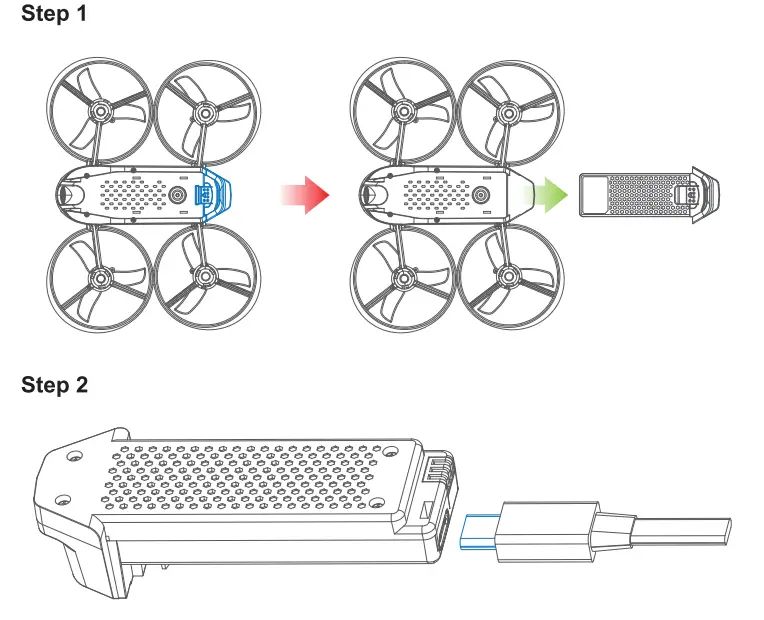 The attached charging line is used to charge the battery. When charging, the red light is always on; and the green light is always on after full charge. The charging time is about 65 minutes.
Flight Step
Flight step 1: Frequency matching between remote control and aircraft
Step 1 Press and hold the power switch to turn on the aircraft, and the indicator light is flashing. Place the aircraft on the flat ground and let the gyroscope carry out horizontal measurement.
Step 2 Press the power switch to turn on the remote control, when the remote control beeps twice, the indicator light of the aircraft turns to be normally on, and the frequency matching is completed.
Flight step 2: Calibrate the aircraft
Push the two control sticks downwards and insides as the figure below shows, then the aircraft indicator lights will flash quickly; when the indicator lights are always on, the calibration is finished.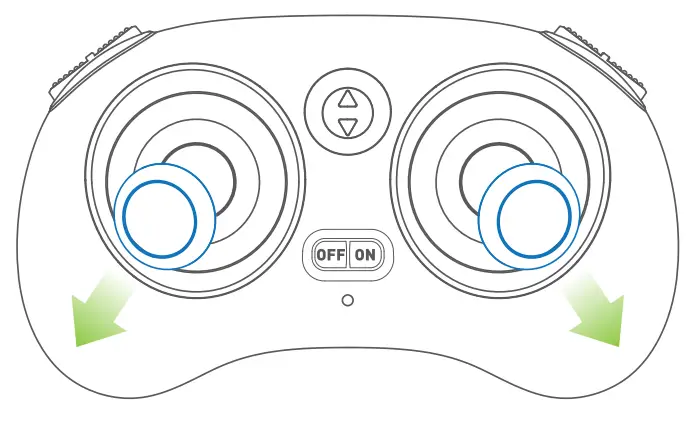 Flight step 3: Unlock the aircraft
Push the two control sticks downwards outward 45°together as the figure below shows to unlock the aircraft, then the motors start rotating.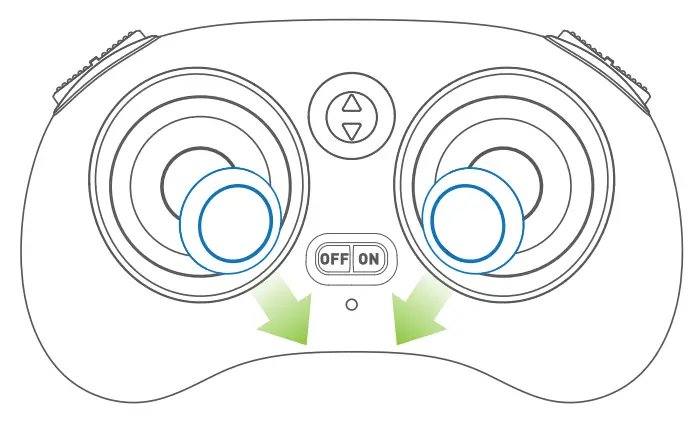 Flight step 4: Take off
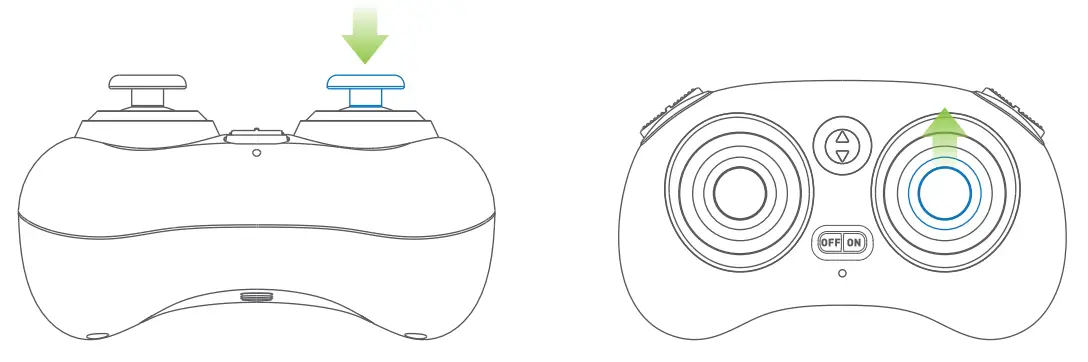
Method 1: After the aircraft is unlocked, push the left stick upward, and the aircraft can go up. Release the stick and stop the ascent.
Method 2: Press and hold the take-off / landing key on the remote control to take off to a height of about one meter. (Press and hold again after takeoff, and the aircraft will land.)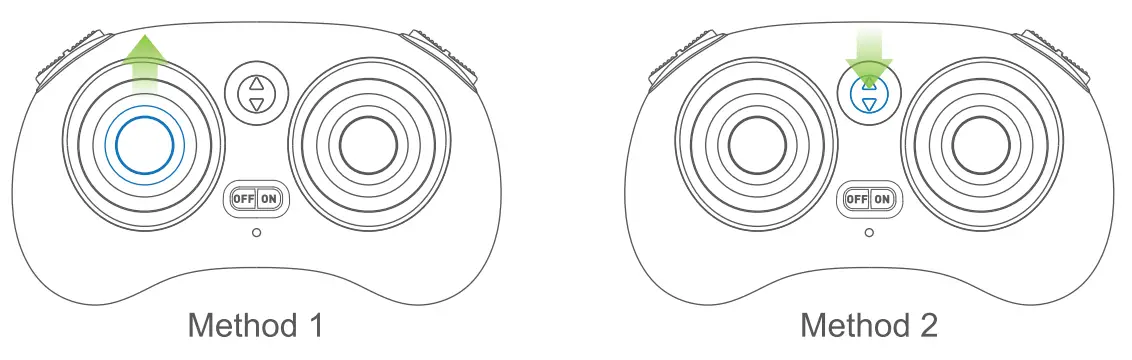
Direction Control During Flight
The default setting of remote control is “American hand”. The left-hand control stick controls the ascent, descent, left rotation and right rotation of the aircraft.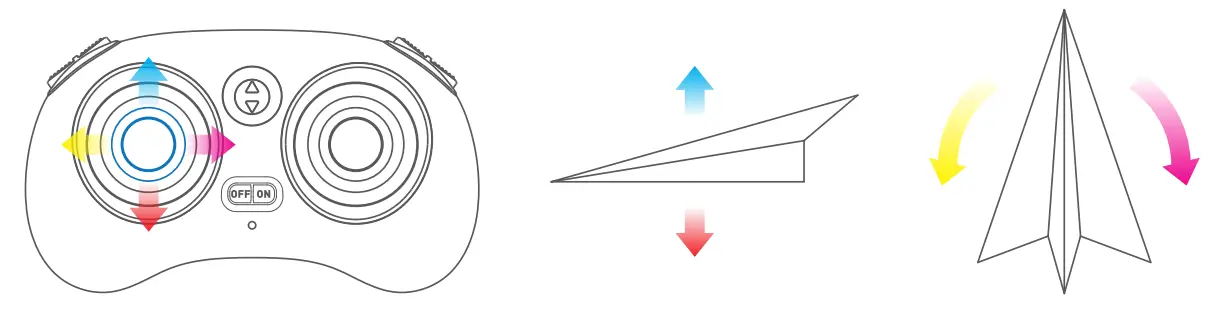 The right stick controls the forward and backward, left and right flight of the aircraft.
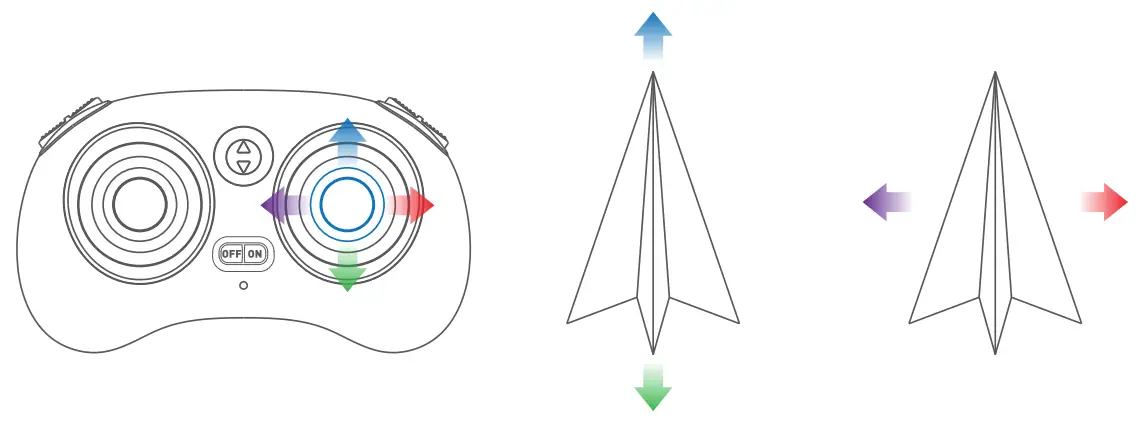
Roll Over Mode
Step 1 Press and hold the right control stick down, and the remote control will continue to beep and enter the roll over mode.
Step 2 Push the right control stick forward, and the aircraft will roll forward 360° immediately.
Step 3 After the roll over is completed, the buzzer of remote control stops to make a sound and automatically exits the roll over mode.
Tip: If you need to roll in other directions, push the right control stick to other directions.
Headless Mode
step 1 When flying, hover the aircraft in the air with the nose facing ahead and the tail facing the pilot.
step 2 Short press the left control stick downward to enter headless mode, then the LED lights of the aircraft will flash twice continuously for one second. At this time, no matter which direction the nose is in, as long as the right hand control stick is pushed forward, the aircraft will always fly accordingly in front of you.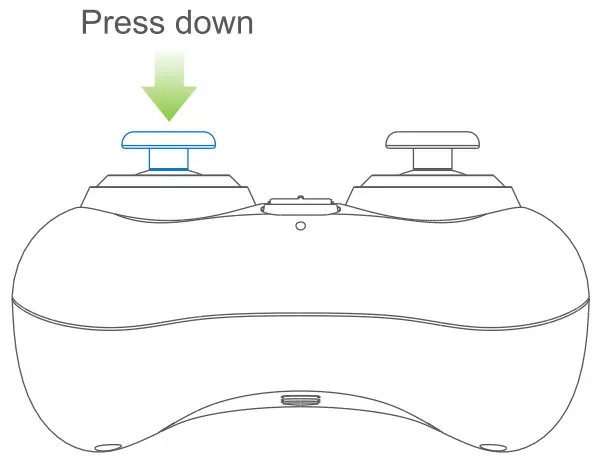 Tip: If you want to exit headless mode, press the left control stick down again.
One Key Return Mode
Method: Press and hold the left control stick down once, and the LED light at the tail of the aircraft will flash twice continuously for one second, and enter the return mode. The return direction is the direction that the tail is aligned when taking off. When the right control stick is pushed in any direction, the return flight will be terminated and the return mode will be automatically exited.
Method: Press and hold the left control stick down once, and the LED light at the tail of the aircraft will flash twice continuously for one second, and enter the return mode. The return direction is the direction that the tail is aligned when taking off. When the right control stick is pushed in any direction, the return flight will be terminated and the return mode will be automatically exited.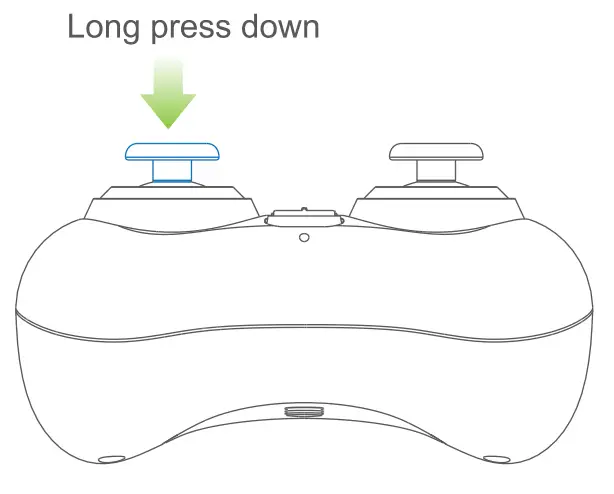 Tip: When one button return is activated, no matter which direction the tail is in, it will turn to the return direction.It’s always the direction the tail is aiming at when taking off.
The Operation Method Of Fine-tuning Mode
When the aircraft drifts while flying, it will always fly to the side automatically. You can use fine-tuning to correct the flight attitude.
step 1 Hold down the button in the upper left corner and don’t let go.
step 2 Control the right control stick and dial in the opposite direction of the aircraft’s automatic drift. Each click is equal to one fine-tuning. If the offset is large, you can fine-tune several times continuously.
step 3 After correcting the flight attitude, release the upper left button to exit the fine-tuning mode.
Long press and don’t let go
Precautions
- Limitations of the flight environment
- In order to ensure the requirements of electromagnetic environment of aviation radio station: it is forbidden to use various remote control models near the airport runway within the radius of 5000m/16404ft.
- During the period when the relevant state departments issue radio control orders, the use of the remote control models shall be stopped as required.
- Fly in warm, sunny and windless weather, and do not fly in severe weather conditions such as overheating, super cooling, strong wind and rainstorm.
- Choose indoor or outdoor open places, and keep a safe distance from people, pets, overhead wires and other obstacles, and make sure that there is no other use of the same frequency.
- Do not let the aircraft fly out of sight.
- Safe operation
- After the aircraft is started, please do not touch the high-speed rotating parts of the aircraft and keep a distance from them to avoid the risk of strangulation (including gears, rotors, etc.).
- During and after use of the aircraft, the motor and battery will generate high temperature. Please do not touch them to avoid injury.
- Do not look directly at the light-emitting diode beam to avoid eye damage.
- It is recommended for beginners to practice low-altitude flying for about 3 days in an empty place.
- Remote control weak signal alarm The aircraft is too far away from the remote control or there is signal interference around will cause the remote control signal weak, then it will send out continuous “beep” sounds. At this time, please shorten the distance between the aircraft and the remote control or stay away from the interference environment.
Specification
| Working frequency | 2.4GHz |
| Maximum remote control distance | 100m |
| One button take off/ land | yes |
| Headless mode | yes |
| 360 rotation | yes |
| One button return | yes |
| Battery | Li-ion 3.8V 710mAh 2.698Wh |
| Maximum flight time | 7.5mins |
| Charging | DC 5V |
| Take off weight | 68g |
| Size | 158x127x42mm |
| Working temperature | 040°C |
Troubleshooting
| Number | Problems | Solutions |
| 1 | The remote control can’t control the aircraft | 1.Please try to restart the aircraft and the remote controller, the remote controller will automatically connect with the aircraft; after connecting, the aircraft’s lights will change slowly (flashing quickly when not connected), and the remote controller indicator will always be on. 2.Make sure that the distance between the aircraft and the remote control is within the effective working range and fly in an open environment without interference. The maximum working distance is 100m. |
| 2 | The aircraft always flies to one side | 1.Please place the aircraft on a horizontal surface, and then push the left and right joysticks inside downwards 45° simultaneously to make the aircraft enter the horizontal calibration. At this time, the lights of the aircraft will flash quickly, then the lights will slowly flash after the calibration is completed. 2.Please check whether the blades are damaged. If necessary, please replace the blades. |
| 3 | The aircraft r flip can’t 36 | 1.Please make sure that the aircraft does not enter headless mode, as the aircraft will not be able to perform 360° flip function under the headless mode. 2.Ensure that the aircraft has sufficient power. |
| 4 | The lights don’t change automatically | 1.Please make sure that the aircraft does not enter headless mode, for the light will flash twice and off once under headless mode. 2.Make sure the aircraft has enough power. |
FCC
Changes or modifications not expressly approved by the party responsible for compliance could void the users authority to operate the equipment. This device complies with Part 15 of the FCC Rules. Operation is subject to the following two conditions:
- this device may not cause harmful interference, and
- this device must accept any interference received, including interference that may cause undesired operation.
This equipment has been tested and found to comply with the limits for a Class B digital device, pursuant to Part 15 of the FCC Rules. These limits are designed to provide reasonable protection against harmful interference in a residential installation. This equipment generates, uses, and can radiate radio frequency energy, and if not installed and used in accordance with the instructions, may cause harmful interference to radio communications. However, there is no guarantee that interference will not occur in a particular installation. If this equipment does cause harmful interference to radio or television reception, which can be determined by turning the equipment off and on, the user is encouraged to try to correct the interference by one or more of the following measures:
— Reorient or relocate the receiving antenna.
— Increase the separation between the equipment and receiver.
— Connect the equipment into an outlet on a circuit different from that to which the receiver is connected.
— Consult the dealer or an experienced radio/TV technician for help.
This equipment complies with FCC radiation exposure limits set forth for an uncontrolled environment. This equipment should be installed and operated with a minimum distance of 20cm between the radiator&your body. This transmitter must not be co-located or operating in conjunction with any other antenna or transmitter
![]() DANGER Only suitable for age 14+
DANGER Only suitable for age 14+
![]()


