![]()
Pioneer Elite SW-E10 Andrew Jones Home Audio Subwoofer
![]()
IMPORTANT NOTICE: The serial number for the equipment is located on the rear of the product. Please write this serial number on the warranty sheet and keep it in a secure area for future reference.
BEFORE USE – IMPORTANT SAFETY INSTRUCTIONS
- Thank you for buying this Pioneer® Elite® product.
- To assure maximum performance from your new subwoofer, please read through this operating guide before you install or use it. After you have finished reading this operating guide, store it in a safe place for future reference.
- This subwoofer is not waterproof. To prevent a fire or shock hazard, do not place any container filled with liquid near this equipment (such as a vase or flower pot) or expose it to dripping, splashing, rain or moisture. Do not install near any heat sources such as radiators, heat registers, stoves, or other apparatus (including amplifiers) that produce heat.
- When connecting or disconnecting cables, be sure the subwoofer is unplugged from the wall outlet.
- Do not use excessive volume if using a graphic equalizer to adjust the subwoofer’s frequency response
- When installing this unit, make sure to leave space around the unit for ventilation to improve heat radiation (at least 25 cm at the top, 15 cm at the rear, and 10 cm at each side).
- Do not defeat the safety purpose of the polarized or grounding-type plug. A polarized plug has two blades one wider than the other. A grounding-type plug has two blades and a third grounding prong. The wide blade or the third prong is provided for your safety. If the provided plug does not fit into your outlet, consult an electrician for the replacement of the obsolete outlet.
- To prevent a fire hazard, do not place any naked flame sources (such as a lighted candle) on the equipment.
- Protect the power cord from being walked on or pinched particularly at plugs, convenience receptacles, and the point where they exit from the apparatus.
- Unplug the subwoofer during lightning storms or when unused for long periods of time.
- Refer all servicing to qualified service personnel. Servicing is required when the apparatus has been damaged in any way, such as power-supply cord or plug is damaged, liquid has been spilled or objects have fallen into the apparatus, the apparatus has been exposed to rain or moisture, does not operate normally, or has been dropped.
POWER CORD CAUTION
Handle the power cord by the plug. Do not pull out the plug by tugging the cord and never touch the power cord when your hands are wet as this could cause a short circuit or electric shock. Do not place the unit, a piece of furniture, etc., on the power cord, or pinch the cord. Never make a knot in the cord or tie it with other cords. The power cords should be routed such that they are not likely to be stepped on. A damaged power cord can cause a fire or give you an electrical shock.
Check the power cord once in a while. When you find it damaged, ask your nearest PIONEER-authorized service center or your dealer for a replacement.
WARNING
Before plugging the subwoofer in for the first time, read the following section carefully. The voltage of the available power supply differs according to country or region. Be sure that the power supply voltage of the area where this unit will be used meets the required voltage (e.g., 230 V or 120 V) written on the rear panel.
If the AC plug of this unit does not match the AC outlet you want to use, the plug must be removed and an appropriate one fitted. Replacement and mounting of an AC plug on the power supply cord of this unit should be performed only by qualified servic personnel. If connected to an AC outlet, the cut-off plug can cause severe electrical shock. Make sure it is properly disposed of after removal. The equipment should be disconnected by removing the mains plug from the wall socket when left unused for a long period of time (for example, when on vacation).
CAUTION
The POWER switch on this unit will not completely shut off all power from the AC outlet. Since the power cord serves as the main disconnect device for the unit, you will need to unplug it from the AC outlet to shut down all power. Therefore, make sure the unit has been installed so that the power cord can be easily unplugged from the AC outlet in case of an accident. To avoid fire hazards, the power cord should also be unplugged from the AC outlet when left unused for a long period of time (for example, when on vacation). This product is for general household purposes. Any failure due to use for other than household purposes (such as long-term use for business purposes in a restaurant or use in a car or ship) and which requires repair will be charged for even during the warranty period.
WARNING
Handling the cord on this product or cords associated with accessories sold with the product may expose you to chemicals listed on proposition 65 known to the State of California and other governmental entities to cause cancer and birth defect or other reproductive harm.
OPERATING ENVIRONMENT
Operating environment temperature and humidity: +5 °C to +35 °C (+41 °F to +95 °F); less than 85% RH. Do not install this unit in a poorly ventilated area, or in locations exposed to high humidity or direct sunlight.
TERMINOLOGY AND CONTROLS
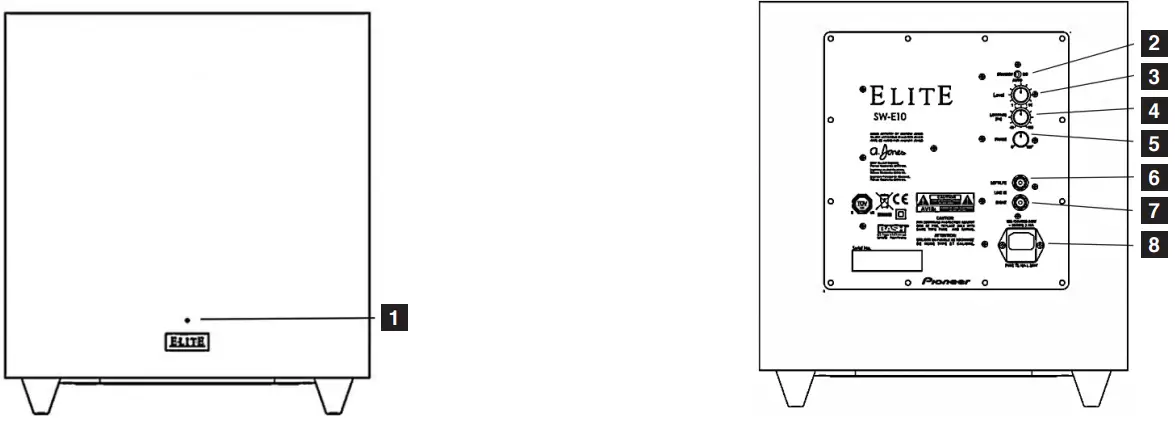
- STATUS INDICATOR – The LED found on the front panel will illuminate when the subwoofer is functioning. If the unit is in AUTO mode and is not receiving a signal, the light will remain off.
- POWER – This switch can be set to either ON, AUTO, or STANDBY. If the switch is in the ON position, it will constantly remain on. If the switch is set to the AUTO position when a signal is present the subwoofer will turn on and will automatically turn off several minutes after a signal is no longer present. If the switch is in the STANDBY position, the subwoofer will remain OFF
- LEVEL – This knob controls the output level (or volume) of your subwoofer. The level chosen should allow the subwoofer to blend its output with that of the rest of your audio system.
- LOWPASS (HZ) – This control adjusts the low-pass filter or crossover frequency. Adjustments can be made from 40 Hz to 150 Hz. This will determine the highest frequency that the subwoofer will reproduce.
- PHASE – This control adjusts the phase of the subwoofer, in relation to the speakers used in your system, from 0 to 180 degrees.
- LFE/LEFT INPUT – This jack is an RCA-type line-level input. If you are connecting your subwoofer to an A/V receiver or surround processor with an LFE or Subwoofer preamp output, connect a single RCA cable to this input. If you are connecting your subwoofer to a stereo receiver or preamp, such as in a stereo music system, use stereo RCA cables and connect to both this jack and the RIGHT input.
- RIGHT INPUT – This jack is an RCA-type line-level input. If you are connecting your subwoofer to a stereo receiver or preamp, such as in a stereo music system, use stereo RCA cables and connect to both this input and the LFE/ LEFT input.
- AC POWER INPUT – This is a standard IEC-type input for a 15-amp AC power cord. A cord is supplied with the subwoofer.

CONNECTING YOUR SYSTEM
CAUTION: All power should be turned off to your system before any connections are made. Careful attention should be taken to ensure that all electronic components are not connected to an AC source. Not doing so could result in potential damage to the system.
Correct wiring of your subwoofer is essential for achieving the best sound quality. We recommend the use of a high-quality interconnect cable or cables between your receiver or preamp and the subwoofer.
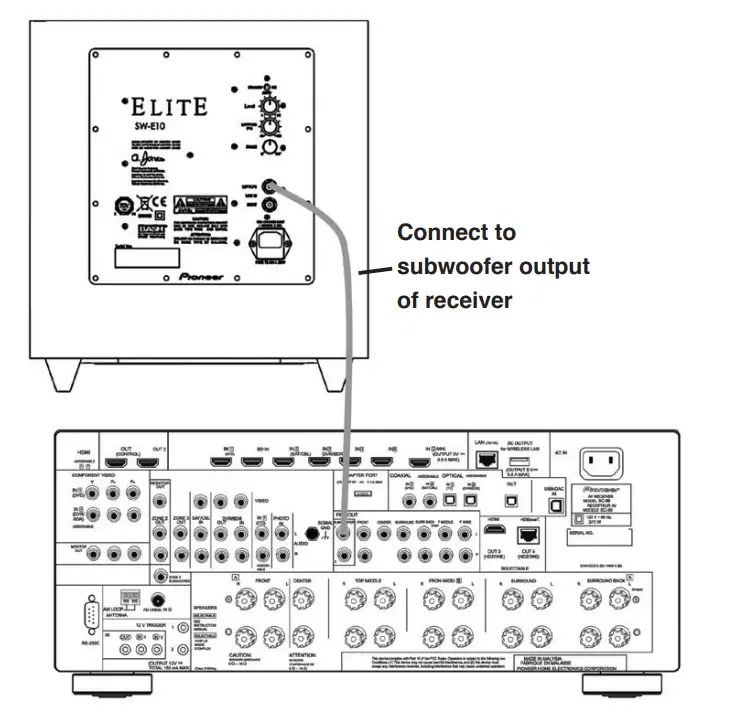
METHOD 1: FOR HOME THEATER OR LFE APPLICATIONS
- On the rear of the A/V receiver or surround processor, there should be a single RCA type jack marked SUBWOOFER OUT. Connect a single RCA cable from that jack to the top jack on the rear of the subwoofer labeled LEFT/LFE. A standard male to male RCA cable is needed.
- After connecting the cable to you’re A/V receiver or surround processor and subwoofer, plug your subwoofer into an AC outlet. Do not use the AC outlet on the rear of your receiver. After plugging in the unit, switch the Main Power to ON.
- See Final System Adjustments, below.

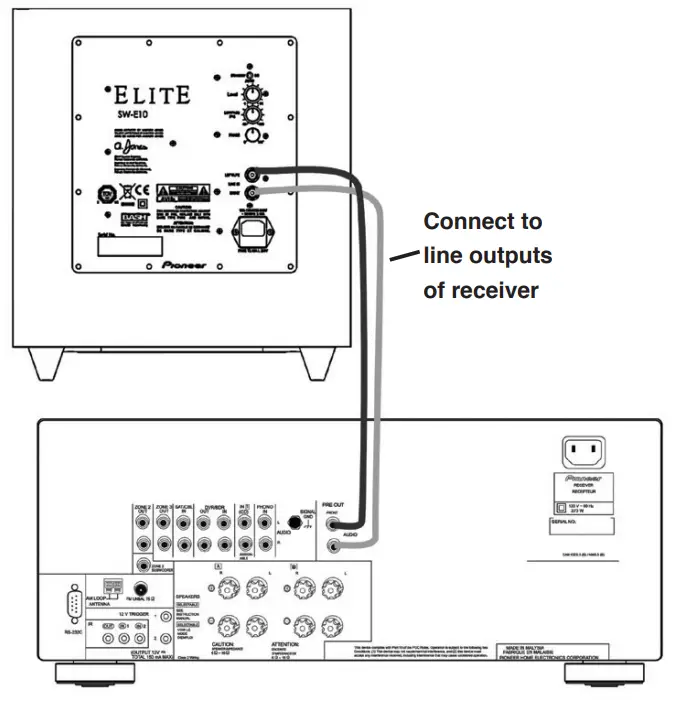
METHOD 2: FOR STEREO APPLICATIONS
- On the rear of the receiver or preamp there should be stereo (left and right) RCA type jacks marked LEFT and RIGHT PREAMP OUTPUT. Connect a pair of RCA cables from those jacks to the LEFT/LFE and RIGHT inputs on the rear of the subwoofer. Two standard male to male RCA cables are needed.
- After connecting the receiver or preamp to the subwoofer, plug your subwoofer into an AC outlet. Do not use the AC outlet on the rear of your receiver. After plugging in the unit, switch the Main Power to ON.
- See Final System Adjustments, below.

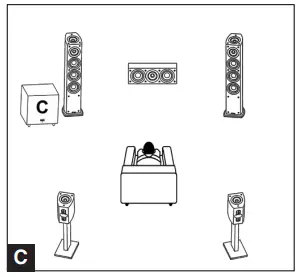
PLACEMENT AND FINE-TUNING
The placement of your new subwoofer is critical to its performance. The three most common locations include:
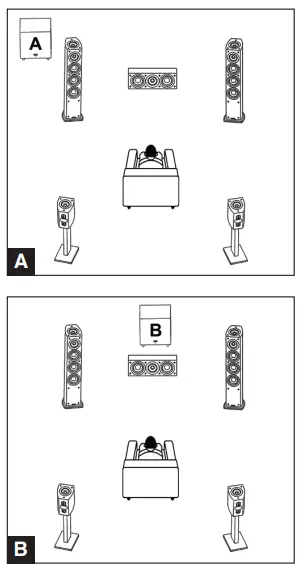
- In the corner of the room (which can result in a boomy or exaggerated low-frequency response)
- Placement along one wall but out of the corner (moderate bass performance with increased fidelity over corner placement)
- Alongside a front speaker (creating a better blend with the front speaker, but sacrificing overall volume). Experimentation with subwoofer placement is highly encouraged, as slight adjustments can create large benefits in sound reproduction. To further test subwoofer placement, place the subwoofer temporarily in your main listening chair and while playing a familiar piece of music, crawl around the listening room until you find the best-sounding position. This is usually a place where the subwoofer will perform well, and possibly at its best.


FINAL SYSTEM ADJUSTMENTS
- After you have made all connections, but before making final adjustments, we recommend you let your new subwoofer play with an action movie or pop music for a few hours to let it break in.
- Select the correct position for the POWER switch, either ON or AUTO depending on your system. The AUTO selection will leave the unit in a self-sensing mode, such that should
the unit sense an audio signal it will turn itself on and then shut down after several minutes without a signal, while in the ON position the subwoofer always remains on. - Adjust the LEVEL control so that the volume of your subwoofer matches the overall system volume. This ensures a smooth transition between the low and high frequencies of your system. If the subwoofer is connected to an A/V receiver or surround processor, you will need to set this control so it gives you enough range to fine-tune the level using the channel level adjustments in the receiver or processor.
- Adjust the LOWPASS (HZ) control so that the frequency range of the subwoofer blends well with that of the front speakers. If you are using an A/V receiver or surround processor, we recommend you set this control to 150 Hz so the receiver or processor can perform the subwoofer crossover functions. If you are feeding the subwoofer from a stereo preamp or receiver, when using small satellite speakers, the appropriate crossover frequency should be from 90 Hz to 150 Hz, for bookshelf speakers 70 Hz to 90 Hz and for large floor-standing speakers 40 Hz to 70 Hz. Setting the crossover too low will create a gap between the frequency response of the front speakers and that of the subwoofer, while setting the crossover frequency too high will create a doubling of certain frequencies, making the music sound boomy.
- Adjust the PHASE so that the subwoofer integrates fully with the rest of your audio system. This control ensures that the subwoofer operates in phase with the rest of the system, as an out-of-phase subwoofer will either sound like it is lacking in bass performance or that its timing is off. This setting will be determined by your listening position, the characteristics of your listening room and its interaction with your subwoofer. We recommend you start with the control set to 0, then listen to music with a melodic bass line. Now set the control to 180. Whichever setting delivers the most tuneful and consistent bass output is usually the best one. Experiment with the in-between settings on the PHASE knob if you wish.
- Steps 2, 3 and 4 might require repeating in order to fine tune your system. Ensuring the proper blending between the speakers and the subwoofer is critical to the performance of your system, as a whole.
INSTALLATION PRECAUTIONS
- Do not install this subwoofer near a stove or other heating appliance, or put it in a place exposed to the sun. Such locations may cause the cabinet to change color and the subwoofer to break down.
- If the subwoofer or any other speaker is installed too close to the screen of a television set, color distortion may occur.
Pioneer will not be responsible for any accidents or damage that may result from improper installation.
CABINET MAINTENANCE
- Use a polishing cloth or dry cloth to wipe off dust and dirt.
- When the cabinet is very dirty, clean with a soft cloth dipped in some neutral cleanser diluted with six parts water to one part cleanser, and then wipe again with a dry cloth. Do not use furniture wax or cleaners.
- Never use paint thinner, benzine, insecticide sprays and other chemicals on or near the cabinets, since these will corrode the surfaces.
SPECIFICATIONS
| SW-E10 |
Enclosure | Sealed |
Frequency Range | 30 Hz – 150 Hz |
Maximum Output Power | 600 watt Peak, 300 RMS |
Cross-Over Frequency | 40 Hz – 150 Hz continuously adjustable |
Finish | Black Vinyl |
Magnetically Shielded | No |
Dimensions without feet (W x H x D) | 335 mm x 335 mm x 340 mm |
Dimensions with feet (W x H x D) | 335 mm x 390 mm x 340 mm |
Weight (each) | 34 lbs |
Power Consumption | Less than .5 watts in Standby |
Power Requirement | 100v – 240v |
Woofer | 10″ |
Complies with California Code of Regulations (CCR) 93120.2(a) Phase 2. Specifications and design are subject to modification without notice.
PIONEER, ELITE, the Pioneer, Elite, and A. JONES logo are registered trademarks of Pioneer Corporation.
LIMITED WARRANTY
WARRANTY VALID ONLY IN COUNTRY OF PRODUCT PURCHASE
WARRANTY
Pioneer Electronics (USA) Inc. (PUSA), and Pioneer Electronics Of Canada, Inc. (POC), warrant that products distributed by PUSA in the U.S.A., and by POC in Canada that fail to function properly under normal use due to a manufacturing defect when installed and operated according to the owner’s manual enclosed with the unit will be repaired or replaced with a unit of comparable value, at the option of PUSA or POC, without charge to you for parts or actual repair work. Parts supplied under this warranty may be new or rebuilt at the option of PUSA or POC.
THIS LIMITED WARRANTY APPLIES TO THE ORIGINAL OR ANY SUBSEQUENT OWNER OF THIS PIONEER PRODUCT DURING THE WARRANTY PERIOD PROVIDED THE PRODUCT WAS PURCHASED FROM AN AUTHORIZED PIONEER DISTRIBUTOR/DEALER IN THE U.S.A. OR CANADA. YOU WILL BE REQUIRED TO PROVIDE A SALES RECEIPT OR OTHER VALID PROOF OF PURCHASE SHOWING THE DATE OF ORIGINAL PURCHASE OR, IF RENTED, YOUR RENTAL CONTRACT SHOWING THE PLACE AND DATE OF FIRST RENTAL. IN THE EVENT SERVICE IS REQUIRED, THE PRODUCT MUST BE DELIVERED WITHIN THE WARRANTY PERIOD, TRANSPORTATION PREPAID, ONLY FROM WITHIN THE COUNTRY OF PURCHASE AS EXPLAINED IN THIS DOCUMENT. YOU WILL BE RESPONSIBLE FOR REMOVAL AND INSTALLATION OF THE PRODUCT. PUSA OR POC, AS APPROPRIATE, WILL PAY TO RETURN THE REPAIRED OR REPLACEMENT PRODUCT TO YOU WITHIN THE COUNTRY OF PURCHASE.
PRODUCT WARRANTY PERIOD Parts Labor
Home Audio and Video……………………………………………………………………………………………………… 2 Year 2 Year
Microphones, Headphones, Phono Cartridges and Styluses………………………………………………. 90 Days 90 Days
Shorter limited warranty periods apply to some models. Please refer to the limited warranty document enclosed with the product for a definitive statement of the warranty period. The warranty period for retail customers who rent the product commences upon the date product is first put into use (a) during the rental period or (b) retail sale, whichever occurs first.
WHAT IS NOT COVERED
IF THIS PRODUCT WAS PURCHASED FROM AN UNAUTHORIZED DISTRIBUTOR, THERE ARE NO WARRANTIES, EXPRESS OR IMPLIED, INCLUDING THE IMPLIED WARRANTY OF MERCHANTABILITY AND THE IMPLIED WARRANTY OF FITNESS FOR A PARTICULAR PURPOSE AND THIS PRODUCT IS SOLD STRICTLY AS IS AND WITH ALL FAULTS”.
PIONEER SHALL NOT BE LIABLE FOR ANY CONSEQUENTIAL AND/OR INCIDENTAL DAMAGES.
PIONEER DOES NOT WARRANT ANY PRODUCT LISTED ABOVE WHEN IT IS USED IN A TRADE OR BUSINESS OR IN ANY INDUSTRIAL OR COMMERCIAL APPLICATION.
THIS WARRANTY DOES NOT APPLY IF THE PRODUCT HAS BEEN SUBJECTED TO POWER IN EXCESS OF ITS PUBLISHED POWER RATING.
THIS WARRANTY DOES NOT COVER TELEVISION OR DISPLAY SCREENS DAMAGED BY STATIC, NON-MOVING, IMAGES APPLIED FOR LENGTHY PERIODS (BURN-IN).
THIS WARRANTY DOES NOT COVER THE CABINET OR ANY APPEARANCE ITEM, USER ATTACHED ANTENNA, ANY DAMAGE TO RECORDS OR RECORDING TAPES OR DISCS, ANY DAMAGE TO THE PRODUCT RESULTING FROM ALTERATIONS, MODIFICATIONS NOT AUTHORIZED IN WRITING BY PIONEER, ACCIDENT, MISUSE OR ABUSE, DAMAGE DUE TO LIGHTNING OR TO POWER SURGES, SUBSEQUENT DAMAGE FROM LEAKING, DAMAGE FROM INOPERATIVE BATTERIES, OR THE USE OF BATTERIES NOT CONFORMING TO THOSE SPECIFIED IN THE OWNER’S MANUAL.
THIS WARRANTY DOES NOT COVER THE COST OF PARTS OR LABOR WHICH WOULD BE OTHERWISE PROVIDED WITHOUT CHARGE UNDER THIS WARRANTY OBTAINED FROM ANY SOURCE OTHER THAN A PIONEER AUTHORIZED SERVICE COMPANY OR OTHER DESIGNATED LOCATION. THIS WARRANTY DOES NOT COVER DEFECTS OR DAMAGE CAUSED BY THE USE OF UNAUTHORIZED PARTS OR LABOR OR FROM IMPROPER MAINTENANCE.
ALTERED, DEFACED, OR REMOVED SERIAL NUMBERS VOID THIS ENTIRE WARRANTY
NO OTHER WARRANTIES
IN THE U.S.A. – PIONEER LIMITS ITS OBLIGATIONS UNDER ANY IMPLIED WARRANTIES INCLUDING, BUT NOT LIMITED TO, THE IMPLIED WARRANTIES OF MERCHANTABILITY AND FITNESS FOR A PARTICULAR PURPOSE, TO A PERIOD NOT TO EXCEED THE WARRANTY PERIOD. NO WARRANTIES SHALL APPLY AFTER THE WARRANTY PERIOD. SOME STATES DO NOT ALLOW LIMITATIONS ON HOW LONG AN IMPLIED WARRANTY LASTS AND SOME STATES DO NOT ALLOW THE EXCLUSIONS OR LIMITATIONS OF INCIDENTAL OR CONSEQUENTIAL DAMAGES, SO THE ABOVE LIMITATIONS OR EXCLUSIONS MAY NOT APPLY TO YOU. THIS WARRANTY GIVES YOU SPECIFIC LEGAL RIGHTS AND YOU MAY HAVE OTHER RIGHTS WHICH MAY VARY FROM STATE TO STATE.
IN CANADA – EXCEPT AS EXPRESSLY PROVIDED HEREIN, THERE ARE NO REPRESENTATIONS, WARRANTIES, OBLIGATIONS OR CONDITIONS, IMPLIED, STATUTORY OR OTHERWISE, APPLICABLE TO THIS PRODUCT.
TO OBTAIN SERVICE
PUSA and POC have appointed a number of Authorized Service Companies throughout the U.S.A. and Canada should your product require service. To receive warranty service you need to present your sales receipt or, if rented, your rental contract showing place and date of original owner’s transaction. If shipping the unit you will need to package it carefully and send it, transportation prepaid by a traceable, insured method, to an Authorized Service Company. Package the product using adequate padding material to prevent damage in transit. The original container is ideal for this purpose. Include your name, address and telephone number where you can be reached during business hours.
On all complaints and concerns in the U.S.A. call Customer Support at 1-800-421-1404, or, in Canada, call Customer Satisfaction at 1-877-283-5901.
DISPUTE RESOLUTION
IN THE U.S.A. – Following our response to any initial request to Customer Support, should a dispute arise between you and Pioneer, Pioneer makes available its Complaint Resolution Program to resolve the dispute. The Complaint Resolution Program is available to you without charge. You are required to use the Complaint Resolution Program before you exercise any rights under, or seek any remedies, created by Title I of the Magnuson-Moss Warranty-Federal Trade Commission Improvement Act, 15 U.S.C. 2301 et seq. To use the Complaint Resolution Program call 1-800-421-1404 and explain to the customer service representative the problem you are experiencing, steps you have taken to have the product repaired during the warranty period and the name of the authorized Distributor/Dealer from whom the Pioneer product was purchased. After the complaint has been explained to the representative, a resolution number will be issued. Within 40 days of receiving your complaint, Pioneer will investigate the dispute and will either:
- respond to your complaint in writing informing you what action Pioneer will take, and in what time period, to resolve the dispute;
- respond to your complaint in writing informing you why it will not take any action.
IN CANADA – Call the Customer Satisfaction Manager at (905) 946-7446 to discuss your complaint and to obtain a prompt resolution.
RECORD THE PLACE AND DATE OF PURCHASE FOR FUTURE REFERENCE
Model No. _________________________
Serial No. __________________________
Purchase Date ______________________
Purchased From ____________________
KEEP THIS INFORMATION AND YOUR SALES RECEIPT IN A SAFE PLACE
LIMITED WARRANTY
PIONEER ELECTRONICS (USA) INC.
PIONEER ELECTRONICS DU CANADA, INC.
IN THE U.S.A.
For hook-up and operation of your unit or to locate an Authorized Service Company, please call or write:
SERVICE SUPPORT DIVISION
PIONEER ELECTRONICS (USA), INC.
1925 E. Dominguez Street, Long Beach, California 90810
1-800-421-1404 • http://www.pioneerelectronics.com
IN CANADA
For additional information on this warranty, please call or write
CUSTOMER SATISFACTION GROUP
PIONEER ELECTRONICS OF CANADA, INC. 340 Ferrier Street, Unit 2, Markham, Ontario L2R 2Z5 Canada
(905) 479-4411 • 1-877-283-5901 • http://www.pioneerelectronics.ca
Dear Customer,
The Safety of Your Ears is in Your Hands. Get the most out of your equipment by playing it at a safe level – a level that lets the sound come through clearly without annoying blaring or distortion and, most importantly, without affecting your sensitive hearing. Sound can be deceiving. Over time, your hearing “comfort level” adapts to higher volumes of sound, so what sounds “normal” can actually be loud and harmful to your hearing. Guard against this by setting your equipment at a safe level BEFORE your hearing adapts.
ESTABLISH A SAFE LEVEL:
- Set your volume control at a low setting.
- Slowly increase the sound until you can hear it comfortably and clearly, without distortion.
- Once you have established a comfortable sound level, set the dial and leave it there.
BE SURE TO OBSERVE THE FOLLOWING GUIDELINES:
- Do not turn up the volume so high that you can’t hear what’s around you.
- Use caution or temporarily discontinue use in potentially hazardous situations.
PIONEER ELECTRONICS [USA] INC. 1925 E. Dominguez Street, Long Beach, California 90810
PIONEER ELECTRONICS OF CANADA, INC. 340 Ferrier Street, Unit 2, Markham, Ontario L2R 2Z5 Canada
PIONEER ELECTRONICS OF MEXICO S.A. De C.V. Blvd. Manuel Avila Camacho 138 piso 10
Col. Lomas de Chapultepec 11000 Delegacion Miguel Hidalgo Mexico, D.F.
Published by Pioneer Electronics (USA) Inc. Copyright © 2014 Pioneer Electronics (USA) Inc. All rights reserved
FAQS
Some plugs are snug and some are somewhat loose in the binding posts on my speaker, so it really just depends on your banana plugs. Some of them take a decent amount of force to push in and some slide right in. All of the plugs I have stay in the binding posts, but some are pretty easy to pull out.
Yes … this speaker comes with the grill. If seller doesn’t offer the grill, I would continue shopping around. Just a nice option if you prefer to display speaker with or without it.
The speaker covers on the newer book-shelf speakers are less rounded off than the older style. The old speaker covers rounded outward like a shallow dome. The body of the newer speakers curve just like the older style. I think that this being a center channel, any differences could be overlooked. Plus, if you take the speaker covers off… the differences willbe nearly unnoticeable… Unless you have a cat who hates speakers
Yes, they’re ported as well.
The requirements of ATMOS (which these have(top firing speakers)) is 8 or 12 foot ceilings. Other than that there is not necessarily any height requirement. That being said you generally want speakers that will be about the same height asyour head when in your most likely sitting listening/viewing position. You don’t want to install these speakers too high – it would probably mess up the ATMOS feature, but I’m not positive on that note. My stands are about 4 feet tall
All Yamaha AVR’s & Receivers are capable pf powering demanding loads
such as 6ohm loads etc.
Here’s what CNET says,
“Audio · AV Receivers · Yamaha R-S201 – receiver; Specs. Yamaha R-S201 – receiver Specifications. Overview · Specifications. Yamaha R-S201 – receiver. Part Number: RS201BL. Audio. Amplifier Output Details. 50 Watt – 8 Ohm – 40 – 20000 kHz – THD 0.2% – 2 channels (main).”
So, this Yamaha 2.0 Receiver is an entry level, “Audiophile” quality unit that will handily drive these
Pioneer Elite’s in a plain, 2.0 stereo mode.
It’s my bet, these Pioneer speakers will soar when driven by this Yamaha stereo unit.
Yamaha uses “Audiophile” grade inner parts, like Burr-Brown DAC’s.
To answer your question,”Yes, they will work great with the Yamaha R-S201.”
They are 4 ohm
yes
connect to the height terminals and make sure you go into the receiver’s menu and enable dolby speaker and set their location to front… the surround terminals on your receiver are for the rear channels, and you probably don’t want the rear channels audio coming out of the top of your front channels
There aren’t any brackets on them for wall mounting and between the 2 sets of terminal posts and the port there’s little room to install an aftermarket bracket, especially one strong enough to hold a speaker this heavy. Also, for best frequency response I think these are recommended to have more space between the rear port and the wall than a wall bracket would allow.
The intent of the top-firing speaker driven from the top set of terminals is to support Dolby ATMOS BluRay source material which provides a height dimension to soundtracks. This requires both specially encoded sources (BluRays) and a receiver or process to that decodes ATMOS data. For these receivers, there are specific amplifier outputs dedicated to the top firing (or equivalently, ceiling mounted speaker) channel. Therefore, for ATMOS enabled AVRs, the top terminals of the speakers are connected to the ATMOS height channels. Now, if you do not have an ATMOS enabled AVR, the top-firing speaker has no well-defined function. You could simply leave them unconnected; the speakers become high quality three-way monitors. Alternatively, if you want to experiment, you could connect the top firing speakers in a number of ways. If your AVR has outputs for height channels which would normally connect to high mounted front or rear speakers, you could try to emulate these speakers by reflecting off the ceiling from the top firing speakers. You would have to judge the effectiveness of this arrangement. You might also connect the top firing speakers either in parallel or series with the front firing speakers. This might enlarge or defuse the imaging. You would have to judge whether you “like” the result. Whether you use parallel of series connection depends on the output impedance of your AVR. Connected in parallel, the net speaker impedance would be half the impedance of the individual speakers or about 3 ohms. If your AVR is characterized to successfully drive low impedance (usually 4 ohms) it would probably be OK with the parallel connection. The series connection would double the speaker connection to about 12 ohms. This is an easy load for modern AVRs but the maximum power output would be reduced. This might also be OK if the result plays loudly and cleanly enough to satisfy you.
They are great speakers
Yes, they’re ported as well.


