
![]() RAIN HARVESTING
RAIN HARVESTING
by Blue Mountain Co
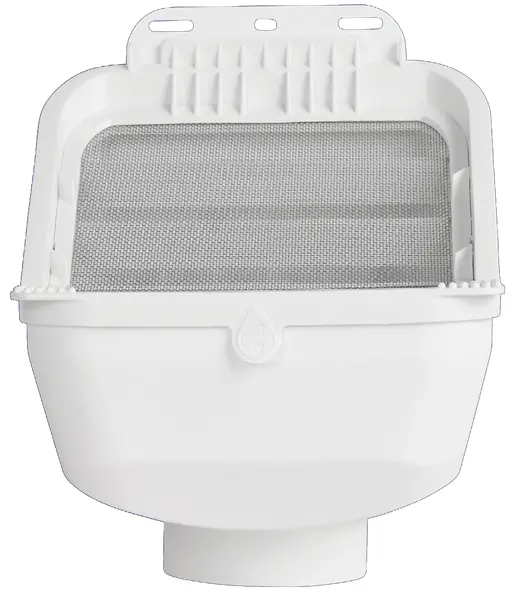
Leaf Eater Advanced
 Installation and Specification Guide
PRODUCT DETAILS
The compact size of the Leaf Eater Advanced allows it to squeeze into small spaces. Its swivelling base allows even more installation flexibility, allowing you to mount it easily to horizontal or vertical pipes.
Like all rain heads, it improves your water quality by filtering out leaves and debris with it’s fine, mesh screen.
| Code | Size | Country |
| RHAD01 | 90mm | Australia |
| RHAD02 | 100mm | |
| RHAD05 | 100x50mm | |
| RHAD06 | 100x75mm | |
| RHAD90 | 2×3″/3×4″ | USA |
| RHAD100 | 3″/4″ | |
| RHAD200 | 80/100mm | New Zealand |
| RHAD302 | 100mm | South Africa |
| RHAD502 | 68mm/110mm | UK |
| RHAD602 | 75/105/110mm | Europe |
| RHAD02 | 110mm | India |
Installation
WHAT’S IN THE BOX?
- Leaf Eater Advanced
TOOLS/MATERIALS YOU MAY REQUIRE
- Tape measure
- Marker pen
- Saw
- Screws
- Screwdriver or drill
- Solvent cement glue
NOTE 1: Ensure a suitable gap 20mm-50mm is placed between the open end of your downpipe and screen of your rain head, to allow debris to escape the flow of water.
This can vary depending on the type/size of leaf matter and debris you experience in your gutter.
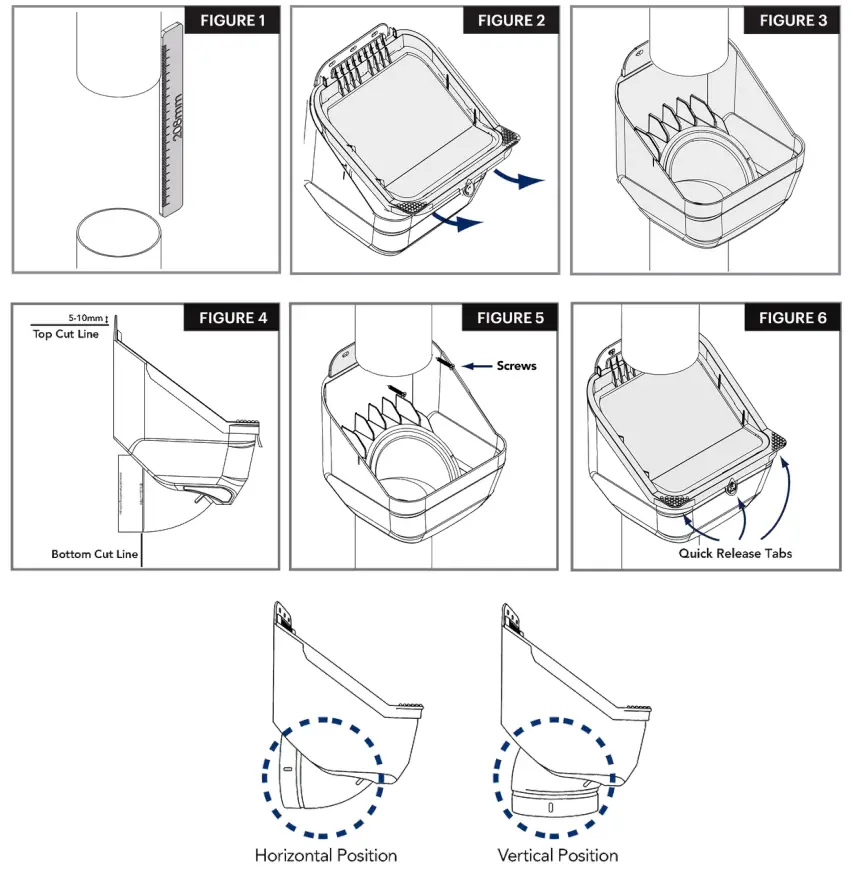
GUTTER, EAVE & “MID” MOUNT (VERTICAL)
- Locate the position at which you will be installing your Leaf Eater Advanced rain head. Whether this is directly under your gutter/eave or midway down your downpipe, it should be a minimum of 500mm above your tank inlet and tank overflow pipe.
- For installation on a vertical downpipe directly under your gutter, measure 208mm from the bottom of the existing gutter pop and remove this section of downpipe. For installation under your eaves or midway down your downpipe, remove a 208mm section of pipe at your desired installation point. Ensure all cut edges are clean and smooth (FIGURE 1).
- Remove the Clean Shield™ screen by lifting it up and then out (FIGURE 2).
- Insert your Leaf Eater Advanced rain head by sliding it up behind the top section of downpipe and then down into position. The rain head outlet pipe should be slid firmly into the bottom downpipe until it can be pushed no further (FIGURE 3).
- Using the screw slots provided, screw your Leaf Eater Advanced into position. Ensure appropriate screws (and anchors if required) are used (FIGURE 5).
- Reinsert the Clean Shield™ screen into your rain head. Ensure the screen sits firmly in place and check installation is secure (FIGURE 6).
- If desired, you can paint your rain head to match your downpipes and/or building.
GUTTER MOUNT (HORIZONTAL)
- Locate the position at which you will be installing your Leaf Eater Advanced rain head. Whether this is directly under your gutter/eave or midway down your downpipe, it should be a minimum of 500mm above your tank inlet and tank overflow pipe.
- Remove the Clean Shield™ screen by lifting it up and then out (FIGURE 2).
- Swivel the outlet to the horizontal position. Some force may be required.
- Position your Leaf Eater Advanced next to your existing pipework and use it as a template to mark top and bottom cutting lines. Cut the pipe where you have marked. Ensure all cut edges are clean and smooth (FIGURE 4).
- Use solvent cement to glue the rear outlet into the horizontal pipe. The back fixing plate should sit behind the top section of downpipe.
- Screw your Leaf Eater Advanced into position using the screw slots provided. Use appropriate screws (and anchors if required) (FIGURE 5).
- Reinsert the Clean Shield™ screen into your rain head. Ensure the screen sits firmly in place and check installation is secure (FIGURE 6).
- If desired, you can paint your rain head to match your downpipes and/or building.
Figure 1
Suggested Installation Orientations
Product Specifications
Leaf Eater Advanced
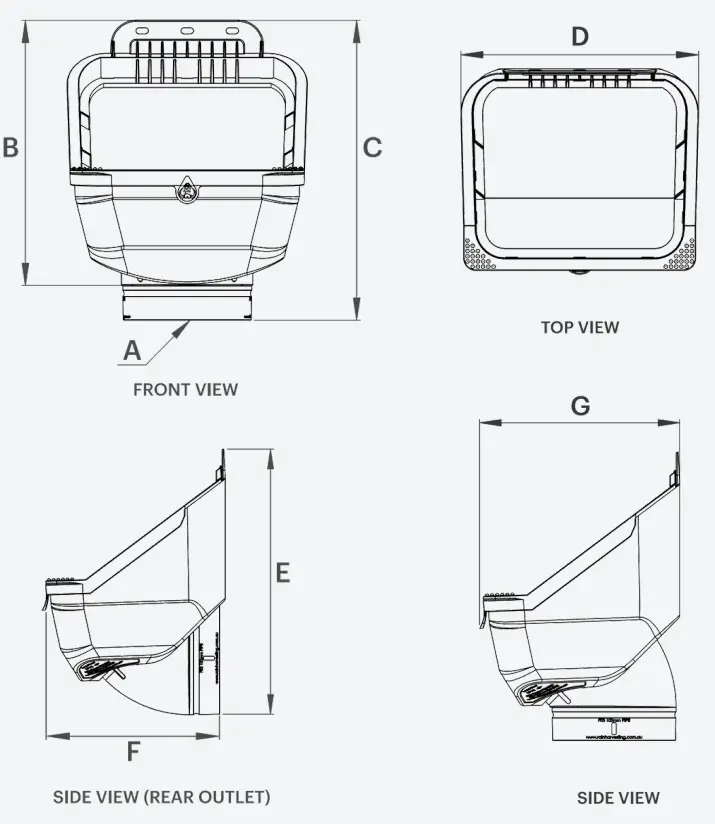
| Country | Code | A | B | C | D | E | F | G |
| Australia | RHADO1 | 90 F | 214 | 242 | 193 | 243 | 163 | 167 |
| RHADO2 | 100 F | 214 | 242 | 193 | 243 | 163 | 167 | |
| RHADO5 | 100 x 50 F | 214 | 289 | 193 | 243 | 210 | 167 | |
| RHADO6 | 100 x 75 F | 214 | 290 | 193 | 243 | 211 | 167 | |
| USA | RHAD90 | 2″ x 3′ F | 8.42″ | 10.89″ | 7.59″ | 10.94′ | 7.8″ | 6.57″ |
| 3″ x 4″ F | 8.42″ | 10.89″ | 7.59″ | 10.94′ | 7.8″ | 6.57″ | ||
| RHAD100 | 3′ SDR 35 F | 8.42″ | 10.71″ | 7.59″ | 10.94″ | 7.59″ | 6.57″ | |
| 3″ SCH 40 F | 8.42″ | 10.63″ | 7.59″ | 10.94″ | 7.48″ | 6.57″ | ||
| 4′ SDR 35 F | 8.42″ | 10.71″ | 7.59″ | 10.94″ | 7.59″ | 6.57″ | ||
| 4″ SCH 40 F | 8.42″ | 10.42″ | 7.59″ | 10.94′ | 7.28″ | 6.57″ | ||
| New Zealand | RHAD200 | 80 F | 214 | 267 | 193 | 243 | 188 | 167 |
| 100 F | 214 | 242 | 193 | 243 | 163 | 167 | ||
| South Africa | RHAD302 | 100 F | 214 | 242 | 193 | 243 | 163 | 167 |
| UK | RHAD502 | 68 F | 214 | 264 | 193 | 243 | 185 | 167 |
| 110 F | 214 | 242 | 193 | 243 | 163 | 167 | ||
| Europe | RHAD602 | 75 F | 214 | 264 | 193 | 243 | 185 | 167 |
| 105 F | 214 | 263 | 193 | 243 | 184 | 167 | ||
| 110 F | 214 | 242 | 193 | 243 | 163 | 167 | ||
| India | RHADO2 | 110 F | 214 | 242 | 193 | 243 | 163 | 167 |
All dimensions are in mm unless otherwise stated.
Fitting guide:
F = Female / Socket Fitting (Pipe fits inside)
M = Male / Spigot Gitting (Pipe size, fits into a socket)
Maintenance
Your rain head’s Clean Shield™ screen is mostly self-cleaning. If cleaning is required, simply take hold of the quick release tabs and pull the Clean Shield™ screen upwards and outwards, then hose or brush off before reinserting the screen.
![]()
A common misconception about collecting rainwater is that all you need is a roof, a tank and some rain. This ‘tanking’ approach cannot always be relied on to deliver the volume – or quality – of water that you require. That is where we can help.
With some thought, your rain harvesting system can provide you with cleaner water and lots of it. Whether you’re completely reliant on tank water or wanting
to keep the garden green, our simple steps will help you achieve your goal.
The Rain Harvesting approach to rainwater collection involves using tested and proven products to make quality rainwater available for use in and around your property. You don’t need much to get started and you will be surprised how easy it is to get the most out of your rainwater system.
How can we help you?
COMPLIANCE
- AS/NZS 3500.3:2003 Plumbing and
Drainage – Stormwater Drainage - enHealth Council
– Guidance on the Use of Rainwater Tanks
– Preventing Mosquitoes Breeding - HB230:2008 Rainwater Tank Design and
Installation Handbook - Queensland Health Regulations 1996 (Part 8 –
Mosquito Prevention)
DISCLAIMER This product specification is not a complete guide to product usage. Further information is available from Rain Harvesting Pty Ltd and from the installation and Operating instructions. This specification sheet must be read in conjunction with the installation and Operating Instructions and all applicable statutory requirement. Product specifications may change without notice. © Rain Harvesting Pty Ltd
RAIN HARVESTING
by Blue Mountain Co
For more information or to find out how we can help, just give us a call on
+61 7 3248 9600
Or visit our website at
rainharvesting.com


 Installation Guide")


