![]() SIRRUS, SIRRUS X Bicycle
SIRRUS, SIRRUS X Bicycle
User Manual
SPECIALIZED BICYCLE COMPONENTS
15130 Concord Circle, Morgan Hill, CA 95037 (408) 779-6229
0000164404 _UM_R2 06/21
We may occasionally issue updates and addendums to this document. Please periodically check www.specialized.com or contact Rider Care to make sure you have the latest information. Info: specialized.com / 877-808-8154
INTRODUCTION
THIS USER MANUAL CONTAINS IMPORTANT INFORMATION. PLEASE READ CAREFULLY AND STORE IN A SAFE PLACE.
This manual was drafted in the English language (original instructions) and may have been translated into other languages as applicable (translation of original instructions).
This user manual is specific to your Specialized Sirrus Carbon / Sirrus X Carbon bicycle and should be read in addition to the Specialized Bicycle Owner’s Manual (“Owner’s Manual”).
It contains important safety, performance, and technical information, which you should read before your first ride and keep for reference. You should also read the entire Owner’s Manual because it has additional important general information and instructions which you should follow. If you do not have a copy of the Owner’s Manual, you can download it at no cost at www.specialized.com, or obtain it from your nearest Authorized Specialized Retailer or Specialized Rider Care.
Please note all instructions and notices are subject to change and updates without notice.
Please visit www.specialized.com for periodic tech updates.
Additional safety, performance, and service information for specific components such as suspension on your bicycle, or for accessories such as helmets or lights, may also be available.
Make sure that your Authorized Specialized Retailer has given you all the manufacturers’ literature that was included with your bicycle or accessories. In case of a conflict between the information in this user manual and information provided by a component manufacturer, please contact your nearest Authorized Specialized Retailer.
ADDITIONAL LANGUAGES ARE AVAILABLE FOR DOWNLOAD AT www.specialized.com.
When reading this user manual, you will note various important symbols and warnings which are explained below:
 | WARNING! The combination of this symbol and word indicates a potentially hazardous situation which, if not avoided, could result in serious injury or death. Many of the Warnings say, “you may lose control and fall.” Because any fall can result in serious injury or even death, we do not always repeat the warning of possible injury or death. |
| CAUTION: The combination of the safety alert symbol and the word CAUTION indicates a potentially hazardous situation, which, if not avoided, may result in minor or moderate injury, or is an alert against unsafe practices. | |
| The word CAUTION used without the safety alert symbol indicates a situation which, if not avoided, could result in serious damage to the bicycle or the voiding of your warranty. | |
| INFO: This symbol alerts the reader to information which is particularly important. |
| GREASE: This symbol means that high-quality grease should be applied as illustrated. | |
| TECH TIP: Tech Tips are useful tips and tricks regarding installation and use. |
1.1 WARRANTY
Please refer to the written warranty provisions provided with your bicycle or visit www.specialized.com. A copy is also available at your Authorized Specialized Retailer.
GENERAL INFORMATION ABOUT YOUR SIRRUS CARBON / SIRRUS X CARBON
2.1 INTENDED USE
The Sirrus Carbon / Sirrus X Carbon is intended and tested for General Purpose Riding (Condition 2) use only.
| CONDITION 2 | Bikes designed for riding Condition 1, plus smooth gravel roads and improved trails with moderate grades where the tires do not lose ground contact. |
| INTENDED | For paved roads, gravel or dirt roads that are in good condition, and bike paths. | |
| NOT INTENDED | For off-road or mountain bike use, or any kind of jumping. Some of these bikes have suspension features, but these features are designed to add comfort, not off-road capability. Some come with relatively wide tires that are well suited to gravel or dirt paths. Some come with relatively narrow tires that are best suited to faster riding on pavement. If you ride on gravel or dirt paths, carry heavier loads, or want more tire durability, talk to your Authorized Specialized Retailer about wider tires. |
2.2 STRUCTURAL WEIGHT LIMITS
| MODEL | FRONT RACK WEIGHT (lb / kg) | MAX CARGO WEIGHT (lb / kg) | MAX STRUCTURAL WEIGHT INCLUDING CARGO AND RIDER (lb / kg) |
| SIRRUS 1.0 / SIRRUS 2.0 / SIRRUS 2.0 ST | 30 / 14 | 55 / 25 | 300 / 136 |
| SIRRUS X 2.0 / SIRRUS X 3.0 | 30 / 14 | 55 / 25 | 300 / 136 |
| SIRRUS 3.0 / SIRRUS 4.0 / SIRRUS X 4.0 | 30 / 14 | 55 / 25 | 275 / 125 |
| SIRRUS X 5.0 / SIRRUS 6.0 | 30 / 14 | 55 / 25 | 240 / 109 |
STRUCTURAL WEIGHT LIMIT: The maximum total weight (rider and cargo) a bike is designed and tested to support structurally.
CARGO WEIGHT LIMIT: The maximum cargo weight a bike has been designed and tested to support structurally.
| WARNING! The specified cargo weight limit applies only to compatible front and rear racks and seat bags where indicated. In case the specified cargo weight limit differs from the cargo weight limit specified by the rack or seat bag manufacturer, always use the lowest limit. If you add any other load-bearing accessories, including, but not limited to, baskets and child carriers, you do so at your own risk in that these accessories have not been tested for compatibility, reliability, or safety on your bicycle. Failure to follow this warning may result in serious personal injury or death. |
| For more information on the intended use and structural weight limits for the frame and components, please refer to the Owner’s Manual. |
GENERAL NOTES ABOUT RIDING
Regardless of your experience level, you should read the “FIRST” section of your Owner’s Manual (Bike Fit, Safety First, Mechanical Safety Check, and First Ride) and carry out all important safety checks.
GENERAL NOTES ABOUT MAINTENANCE
The Sirrus Carbon / Sirrus X Carbon is a high-performance bicycle. All regular maintenance, troubleshooting, repair, and parts replacement must be performed by an Authorized Specialized Retailer. For general information regarding the maintenance of your bicycle, please refer to the Owner’s Manual. In addition, routinely perform a mechanical safety check before each ride as described in the Owner’s Manual.
- Great care should be taken to not damage the frame material. Damage may result in a loss of structural integrity, which may result in a catastrophic failure. This damage may or may not be visible during inspection. Before each ride, and after any crash, you should carefully inspect your bicycle for any gouging, scratches through the paint, chipping, bending, or any other signs of damage. Do not ride if your bicycle shows any of these signs. After any crash, and before you ride any further, take your bicycle to an Authorized Specialized Retailer for a complete inspection.
- While riding, listen for any creaks as a creak can be a sign of a problem with one or more components. Periodically examine all surfaces in bright sunlight to check for any small hairline cracks or fatigue at stress points, such as welds, seams, holes, and points of contact with other parts. If you hear any creaks, see signs of excessive wear, discover any cracks (no matter how small) or any damage to the bicycle, immediately stop riding the bicycle and have it inspected by your Authorized Specialized Retailer.
- Lifespan and the type and frequency of maintenance depends on many factors, such as use, rider weight, riding conditions, and/or impacts.
- Exposure to harsh elements, especially salty air (such as riding near the ocean or in the winter), can result in galvanic corrosion of components such as the crank spindle and bolts, which can accelerate wear and shorten the lifespan. Dirt can also accelerate wear of surfaces and bearings. The surfaces of the bicycle should be cleaned before each ride. The bicycle should also be maintained regularly by an Authorized Specialized Retailer, which means it should be cleaned, lubricated, and (partially) disassembled and inspected for signs of corrosion and/ or cracks. If you notice any signs of corrosion or cracking on the frame or any component, the affected item must be replaced.
- Regularly clean and lubricate the drivetrain according to the drivetrain manufacturer’s instructions.
- Do not use a high-pressure water spray to wash your bicycle. Even water from a garden hose can penetrate seals and water may seep into components, such as cranks, bearings, or electronic components, potentially causing damage. Use a clean, damp cloth and bicycle cleaning agents (where appropriate) for cleaning.
- Do not expose the bicycle to prolonged direct sunlight or excessive heat, such as inside a car parked in the sun or near a heat source such as a radiator.
![]() WARNING! Failure to follow the instructions in this section may result in damage to the components on your bicycle and will void your warranty, but, most importantly, may result in serious personal injury or death. If your bicycle exhibits any signs of damage, do not use it and immediately bring it to your Authorized Specialized Retailer for inspection.
WARNING! Failure to follow the instructions in this section may result in damage to the components on your bicycle and will void your warranty, but, most importantly, may result in serious personal injury or death. If your bicycle exhibits any signs of damage, do not use it and immediately bring it to your Authorized Specialized Retailer for inspection.![]() WARNING! Use a proper repair stand to support the bicycle during assembly or maintenance and a high-quality bicycle rack for transportation. When placing the frame and/or bicycle in a repair stand, clamp the stand to the seatpost and not the frame. Clamping the frame can cause damage to the frame that may or may not be visible, and you may lose control and fall.
WARNING! Use a proper repair stand to support the bicycle during assembly or maintenance and a high-quality bicycle rack for transportation. When placing the frame and/or bicycle in a repair stand, clamp the stand to the seatpost and not the frame. Clamping the frame can cause damage to the frame that may or may not be visible, and you may lose control and fall.
4.1 REPLACEMENT PARTS AND ACCESSORIES
Specialized replacement parts and accessories are available through your Authorized Specialized Retailer.
GEOMETRY
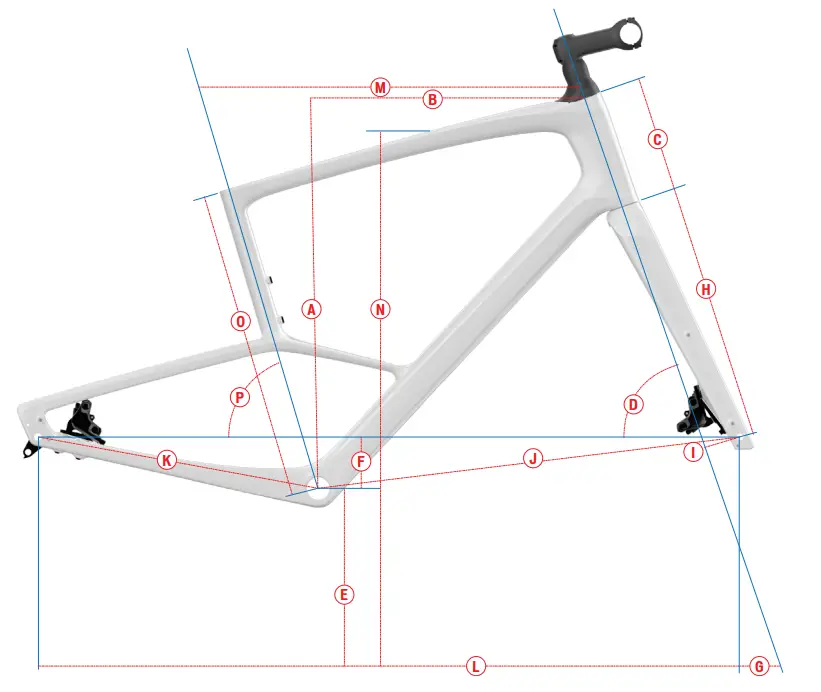
![]() The geometry as summarized in this manual is current as of the date this manual was written and is subject to change. Specialized reserves the right to change the components at any time and without notice, including modifying, reducing, and/or adding features.
The geometry as summarized in this manual is current as of the date this manual was written and is subject to change. Specialized reserves the right to change the components at any time and without notice, including modifying, reducing, and/or adding features.
| FRAME SIZE | XS | S | M | L | XL | XXL | |
| A | STACK (mm) | 533 | 553 | 577 | 602 | 632 | 662 |
| B | REACH (mm) | 368 | 383 | 397 | 412 | 427 | 441 |
| C | HEADTUBE LENGTH (mm) | 107 | 128 | 151 | 176 | 208 | 237 |
| D | HEADTUBE ANGLE (o) | 69.5 | 69.5 | 70 | 70.5 | 70.5 | 71 |
| E | BOTTOM BRACKET HEIGHT (mm) | 268 | 268 | 268 | 268 | 268 | 268 |
| F | BOTTOM BRACKET DROP (mm) | 80 | 80 | 80 | 80 | 80 | 80 |
| G | TRAIL (mm) | 76 | 76 | 72 | 69 | 69 | 66 |
| H | FORK LENGTH (FULL) (mm) | 395 | 395 | 395 | 395 | 395 | 395 |
| I | FORK RAKE/OFFSET (mm) | 51 | 51 | 51 | 51 | 51 | 51 |
| J | FRONT CENTER (mm) | 597 | 618 | 637 | 656 | 681 | 700 |
| K | CHAINSTAY LENGTH (mm) | 440 | 440 | 440 | 440 | 440 | 440 |
| L | WHEELBASE (mm) | 1024 | 1047 | 1065 | 1084 | 1109 | 1128 |
| M | TOP TUBE LENGTH,HORIZONTAL (mm) | 521 | 547 | 568 | 590 | 614 | 644 |
| N | BIKE STAND-OVER HEIGHT (mm) | 707 | 750 | 782 | 809 | 849 | 874 |
| O | SEAT TUBE LENGTH (mm) | 355 | 416 | 453 | 483 | 533 | 563 |
| P | SEAT TUBE ANGLE (o) | 74 | 73.5 | 73.5 | 73.5 | 73.5 | 73 |
| CRANK LENGTH (mm) | 165 | 170 | 172.5 | 172.5 | 175 | 175 | |
| HANDLEBAR WIDTH SIRRUS (mm) | 580 | 600 | 600 | 620 | 620 | 640 | |
| HANDLEBAR WIDTH SIRRUS X (mm) | 680 | 680 | 680 | 680 | 680 | 680 | |
| STEM LENGTH SIRRUS (mm) | 70 | 70 | 80 | 90 | 100 | 110 | |
| STEM LENGTH SIRRUS X (mm) | 60 | 70 | 80 | 90 | 100 | 110 | |
| SADDLE WIDTH (mm) | 155 | 155 | 143 | 143 | 143 | 143 | |
| SEATPOST LENGTH (mm) | 300 | 300 | 350 | 350 | 400 | 400 | |
| SEATPOST MIN INSERTION (mm) | 90 | 90 | 90 | 90 | 120 | 120 |
GENERAL NOTES ABOUT ASSEMBLY
This user manual is not intended as a comprehensive use, service, repair, or maintenance guide. Please see your Authorized Specialized Retailer for all service, repairs, or maintenance. Your Authorized Specialized Retailer may also be able to refer you to classes, clinics, or books on bicycle use, service, repair, and maintenance.
| WARNING! It is essential for your safety that the assembly, maintenance, and troubleshooting be performed by an Authorized Specialized Retailer. Before your first ride, make sure your components, such as brakes and drivetrain, are assembled and adjusted in accordance with the manufacturer’s instructions and are functioning properly |
| WARNING! Many components on the Sirrus Carbon / Sirrus X Carbon, including, but not limited to the frame, fork, kickstand, Future Shock, and stem, are proprietary to the Sirrus Carbon / Sirrus X Carbon. Only use originally supplied components and hardware at all times. The use of other components or hardware will compromise the integrity and strength of the assembly. Sirrus Carbon / Sirrus X Carbon specific components should only be used on the Sirrus Carbon / Sirrus X Carbon and not on other bicycles, even if they fit. Failure to follow this warning could result in serious injury or death. |
| WARNING! Never modify your frame or bicycle in any way. Do not sand, drill, file, or remove parts from your bicycle. Do not install incompatible components or hardware. Failure to follow this warning may result in serious personal injury or death. |
| WARNING! Correct tightening force on fasteners (nuts, bolts, screws) on your bicycle is important for your safety. If too little force is applied, the fastener may not hold securely. If too much force is applied, the fastener can strip threads, stretch, deform or break. Either way, an incorrect tightening force can result in component failure, which can cause you to lose control and fall. Where indicated, ensure that each bolt is torqued to specification. After your first ride, and consistently thereafter, recheck the tightness of each bolt to ensure secure attachment of the components. |
The following is a summary of torque specifications in this manual.
| LOCATION | THREAD | TOOL | TORQUE | |
| NM | IN-LBF | |||
| SEATPOST WEDGE BINDER | M5 X 0.8 | 4 mm HEX | 6.2 | 55 |
| FUTURE STEM @ STEERER TUBE | 4 mm HEX | 5 | 45 | |
| FUTURE STEM @ HANDLEBAR | 4 mm HEX | 5 | 45 | |
| DERAILLEUR HANGER | 4 mm HEX | 4.5 | 40 | |
| KICKSTAND BOLTS | M6 X 1.0 | 5 mm HEX | 8 | 71 |
| DISC BRAKE MOUNTS | M6 X 1.0 | MANUFACTURER’S SPECIFICATION | 6 | 53 |
| BLADE RACK MOUNT (FORK) | M5 X 0.8 | MANUFACTURER’S SPECIFICATION | 8 | 71 |
| THRU-AXLES | M12 X 1.0 | 6 mm HEX | 15 | 133 |
| DROPOUT FENDER MOUNT (PLUG-AND-PLAY) | M5 X 0.8 | MANUFACTURER’S SPECIFICATION | 2.8 | 25 |
| CROWN RACK MOUNT (FRONT) | M5 X 0.8 | MANUFACTURER’S SPECIFICATION | 6 | 53 |
| CROWN RACK MOUNT (REAR) | M5 X 0.8 | MANUFACTURER’S SPECIFICATION | 4.5 | 40 |
| TOP TUBE ACCESSORY MOUNT | M5 X 0.8 | MANUFACTURER’S SPECIFICATION | 4.5 | 40 |
| DOWN TUBE WATER BOTTLE CAGE (UPPER & LOWER) | M5 X 0.8 | MANUFACTURER’S SPECIFICATION | 4.5 | 40 |
| SEAT TUBE WATER BOTTLE CAGE | M5 X 0.8 | MANUFACTURER’S SPECIFICATION | 4.5 | 40 |
| SEAT STAY & CHAINSTAY YOKE FENDER MOUNT | M5 X 0.8 | MANUFACTURER’S SPECIFICATION | 4.5 | 40 |
| DROPOUT RACK MOUNT | M6 X 1.0 | MANUFACTURER’S SPECIFICATION | 4.5 | 40 |
![]() vFor all non-Specialized components, please refer to the manufacturer’s manuals for tools and torque settings.
vFor all non-Specialized components, please refer to the manufacturer’s manuals for tools and torque settings.
6.2 FUTURE SHOCK FRONT SUSPENSION
Your Sirrus Carbon / Sirrus X Carbon is equipped with a Future Shock steerer tube suspension system. This system requires very specific installation and adjustment. All installation, removal, and adjustment of the Future Shock should be performed by your Authorized Specialized Retailer.
For more technical information, please refer to the specific Future Shock manual that comes with your Sirrus Carbon / Sirrus X Carbon. For information regarding Future Shock maintenance, please contact your Authorized Specialized Retailer.
6.3 WATER BOTTLE / BAG MOUNTS
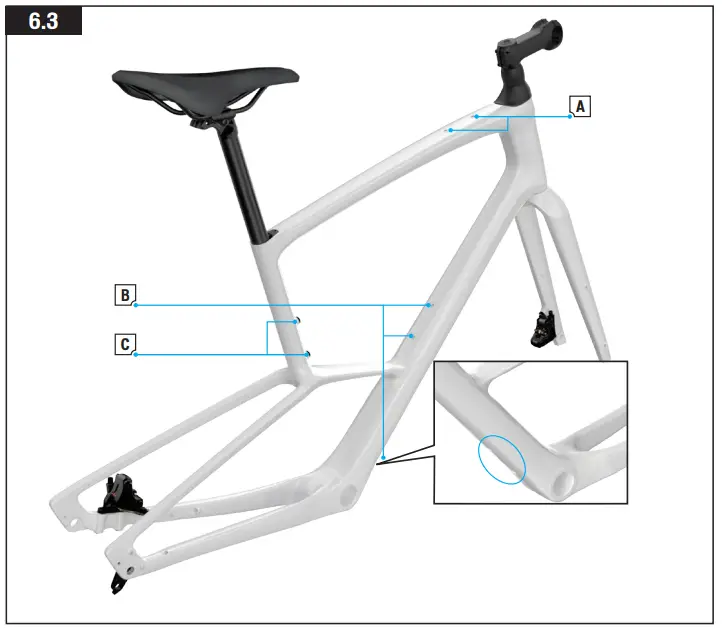
Fig. 6.3
There is a water bottle/accessory mount on the top tube (A). Water bottle cages can also be mounted to the top and bottom of the down tube (B), and the seat tube (C). Clearance will vary with frame size.![]() Make sure not to fasten bag straps around the Future Shock.
Make sure not to fasten bag straps around the Future Shock.
6.4 FENDERS AND RACKS
The Sirrus Carbon / Sirrus X Carbon is fender compatible. Optional front and rear racks can be fitted to the bicycle. For more information on fender and rack installation, please see your Authorized Specialized Retailer.
| PART NUMBER | PRODUCT DESCRIPTION | MARKETING DESCRIPTION |
| 98920-5020 | 42C DRY-TECH FENDER SET | SIRRUS FENDER |
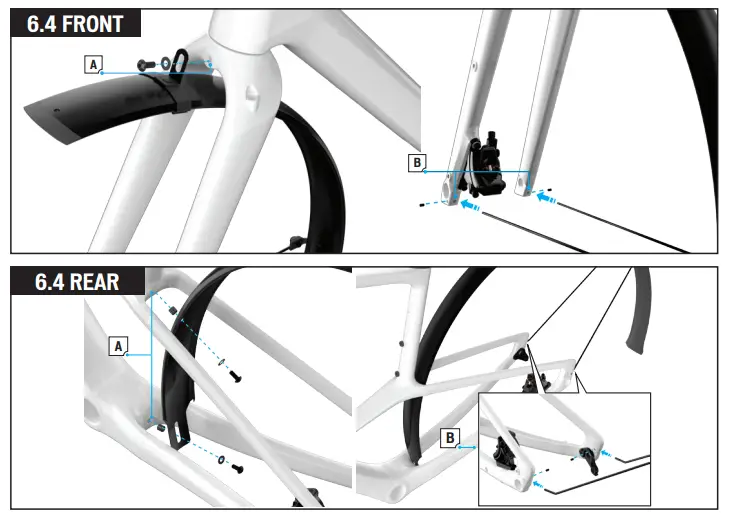
Fig. 6.4
„ Fenders attach via the M5 threaded holes (A) and Plug-and-Play holes in the dropouts (B).![]() A hole must be drilled into the rear fender in order to attach it to the bicycle. For that reason, we recommend having your Authorized Specialized Retailer install the fenders.
A hole must be drilled into the rear fender in order to attach it to the bicycle. For that reason, we recommend having your Authorized Specialized Retailer install the fenders.
6.5 KICKSTAND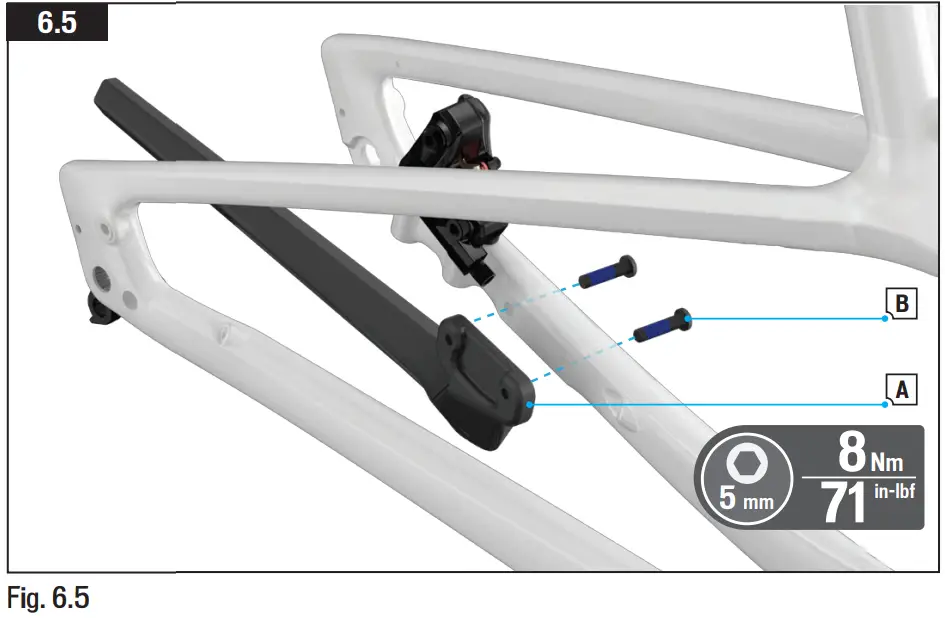
Align and hold the kickstand mount (A) against the mounting points on the inside of the drive-side chainstay. Insert the M6x30 mm bolts (B) through the chainstay and into the kickstand mount.
Using a 5 mm hex key, torque the bolts to 8 Nm / 71 in-lbf.
6.6 SEATPOST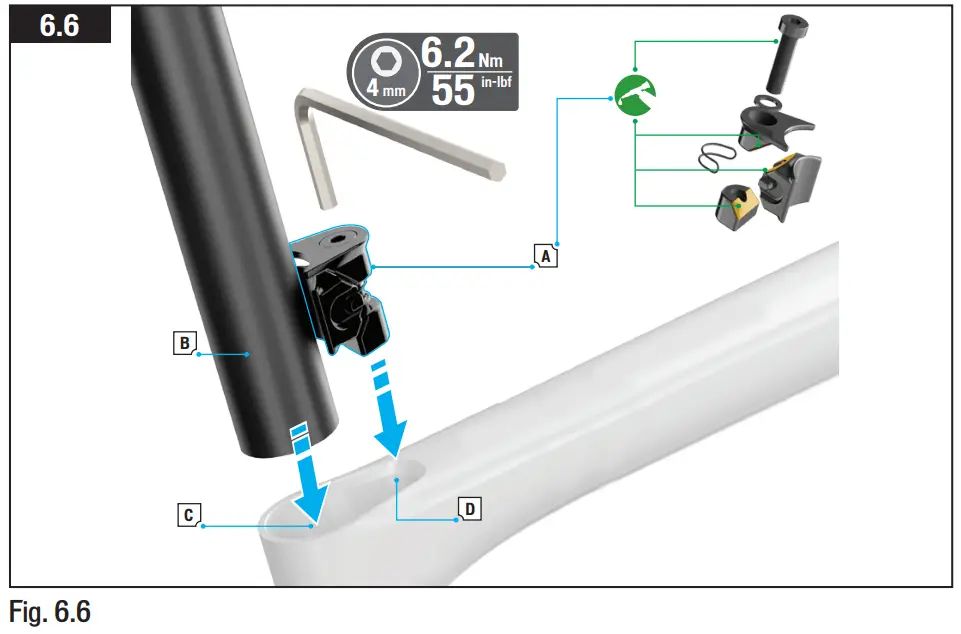
SEATPOST INSTALLATION – SEAT WEDGE
- Grease the bolt head and threads, as well as the mating wedge surfaces, then assemble the wedge (A).
- Slide the seatpost (B) into the seat tube (C) and insert the wedge assembly (A) into the wedge cavity (D).
- Adjust the saddle height and position.
- Using a 4 mm hex key, torque the wedge bolt to 6.2 Nm / 55 in-lbf.
The fit between the seatpost and the seat tube must allow the seatpost to slide into the seat tube smoothly and without twisting, but not so loosely that there’s excessive side-to-side play/wiggle. Any fit and/or torque issues should be inspected by your Authorized Specialized Retailer. If the seatpost does not fit properly or moves in the frame even though it is torqued to spec, you should have it inspected by your Authorized Specialized Retailer.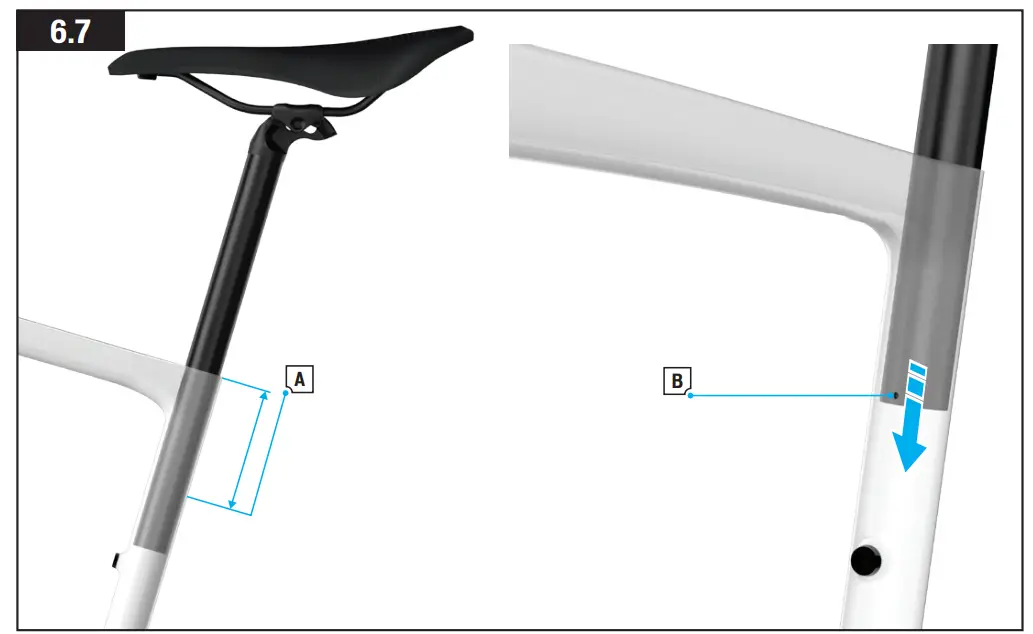
Fig. 6.7
Both the frame and seatpost have minimum insertion requirements (A). To meet the frame insertion requirement, the seatpost must be inserted deep enough into the frame to be visible through the minimum insertion hole (B). To meet the seatpost insertion requirement, the seatpost must be inserted deep enough so that the min/max line on the seatpost is no longer visible. While both insertion requirements need to be met, for this particular frame, the frame insertion requirement will generally be greater than the seatpost insertion requirement.
| BIKE SIZE | XS | S | M | L | XL | XXL |
| POST LENGTH (mm) | 300 | 300 | 350 | 350 | 400 | 400 |
| MIN INSERTION (mm) | 90 | 90 | 90 | 90 | 120 | 120 |
- Insert the seatpost into the seat tube deep enough that is passes the minimum insertion hole located on the front of the seat tube (B). The seatpost should always be visible through the minimum insertion hole.
- If the desired seat height cannot be achieved within the minimum insertion requirements because the seatpost is too long, your Authorized Specialized retailer can trim the seatpost to the appropriate length. If the desired seat height cannot be achieved within the minimum insertion requirements because the seatpost is too short, the seatpost must be replaced with a longer seatpost.
- Once the saddle height is determined, torque the supplied seat wedge bolt to 6.2 Nm / 55 in-lbf.
| The specified minimum insertion depths are listed in the table under Fig. 6.7. The tolerance of the ream depth can vary from frame to frame. Install a regular 27.2 mm seatpost in the seat tube to verify the actual ream depth of the frame. | |
| WARNING! Failure to follow the seatpost and frame insertion requirements may result in damage to the frame and/or seatpost, which could cause you to lose control and fall. If the seatpost is trimmed too short, the min/max mark on the seatpost will no longer be accurate. Before trimming the seatpost, note the min/max depth required by the seatpost manufacturer. |
| WARNING: If the seatpost needs to be trimmed, be sure to inspect it and remove any burrs or sharp edges with a fine-grit sandpaper. |
| WARNING! For general instructions regarding the installation of the seatpost, refer to the appropriate section in the Owner’s Manual. Riding with an improperly tightened seatpost can allow the saddle and seatpost to slide down, which can damage the frame and cause you to lose control and fall. |
RECOMMENDED TIRE PRESSURES
Proper tire pressure is critical for optimal performance. Tires with higher pressure will typically roll faster and provide less rolling resistance but provide less traction. Tires with lower pressure will typically provide increased traction and control at the expense of rolling resistance. Use a quality pressure gauge and refer to the tire pressure recommendations written on the side of the tires. Please refer to the Tires and Tubes section of the Specialized Bicycle Owner’s Manual for additional information.
SMALL PARTS
PART NUMBER | PART DESCRIPTION | MARKETING DESCRIPTION |
| S152600003 | HGR MY15-17 ROAD CARBON THRU AXLE DER HANGER | DERAILLEUR HANGER |
| S214800001 | STM SHIM, STEM D1.1 RBX,22ID X24.5OD, CARTRIDGE 1.5 | STEM SHIM |
| S192500011 | HDS MY20 ROUBAIX HEADSET CAP, 0MM, ROAD, END HT G2, NYLON | 0 mm HEADSET CAP |
| S192500010 | HDS MY20 ROUBAIX HEADSET CAP, 15MM, ROAD, END HT G2, NYLON | 15 mm HEADSET CAP |
| S194700001 | STC MY17 CROSSTRAIL CARBON & MY18 SIRRUS CARBON SEAT CLAMP WEDGE SB BLK W/BLK BOLT | SEAT CLAMP WEDGE |
| S182200002 | FND MY18 CROSSTRAIL SUSPENSION FORK FENDER MOUNT, SIZE 8.5D*4.2D*27L | FORK FENDER MOUNT |
| S192100009 | FHB BEAR PAWLS BRD-51812N FREEHUB BODY 8/9/10 SPD (HRK-3022) | FREEHUB BODY |
| S202500005 | HDS TOP CAP, WITH O-RING, CARTRIDGE 1.5, NON DAMPED | HEADSET TOP CAP WITH O-RING |
| S199900023 | MSC FUTURE SHOCK 1.5 & 2.0 STEM SHIM, 22.025ID X 28.7OD (1-1/8” STEM) | FUTURE SHOCK STEM SHIM |
| S209900001 | MSC FUTURE SHOCK BOOSTER SPRING (13LB/25LB/40LB) | FUTURE SHOCK BOOSTER SPRING |
| S194200040 | SUB MY20 FUTURE SHOCK CARTRIDGE 1.5, NON DAMPED, 24.5MM STEM SHIM | FUTURE SHOCK 1.5 CARTRIDGE ASSEMBLY |
| S212300023 | FRK MY22 SIRRUS X, FUTURE SHOCK, CRBN, DISC, TA, SIZE XS, STN BLK | SIRRUS FUTURE SHOCK FOR XS BICYCLE |
| S212300021 | FRK MY22 SIRRUS X, FUTURE SHOCK, CRBN, DISC, TA, SIZE S, STN BLK | SIRRUS FUTURE SHOCK FOR S BICYCLE |
| S212300020 | FRK MY22 SIRRUS X, FUTURE SHOCK, CRBN, DISC, TA, SIZE M, STN BLK | SIRRUS FUTURE SHOCK FOR M BICYCLE |
| S212300019 | FRK MY22 SIRRUS X, FUTURE SHOCK, CRBN, DISC, TA, SIZE L, STN BLK | SIRRUS FUTURE SHOCK FOR L BICYCLE |
| S212300022 | FRK MY22 SIRRUS X, FUTURE SHOCK, CRBN, DISC, TA, SIZE XL, STN BLK | SIRRUS FUTURE SHOCK FOR XL BICYCLE |
| S212300024 | FRK MY22 SIRRUS X, FUTURE SHOCK, CRBN, DISC, TA, SIZE XXL, STN BLK | SIRRUS FUTURE SHOCK FOR XXL BICYCLE |
| S212500023 | HDS MY22 SIRRUS X CRB, FUTURE SHK COMP RNG, 45.8X36.8X6.5X45 DEG SUJ2 BRG, W/O TOP COVER OR CROWN | FUTURE SHOCK HEADSET COVER |
| S210200004 | AXL WHL EXTERNAL AXLE, FRONT, 12MM THROUGH TYPE, CONICAL HEAD, 100MM SPACING, 129MM LENGTH, W/O LEVER | FRONT THRU AXLE |
| S210200005 | AXL WHL EXTERNAL AXLE, REAR, 12MM THROUGH TYPE, CONICAL HEAD, 142MM SPACING, 167MM LENGTH, W/O LEVER | REAR THRU AXLE |
| S216900007 | CSP MY22 SIRRUS X CARBON CHAINSTAY PROTECTOR | CHAINSTAY PROTECTOR |
![]()


