![]()
Sit-Stand Desk Wall Mount – Single Monitor

*Actual product may vary from photos
User Manual
SKUs: WALLSTS1 (Black)
WALL-WORKSTATION-S (Silver/White)
For the latest information and specifications visit
www.StarTech.com/WALLSTS1
www.StarTech.com/WALL-WORKSTATION-S
Manual Revision: 07/11/2022
Compliance Statements
Use of Trademarks, Registered Trademarks, and other Protected Names and Symbols
This manual may make reference to trademarks, registered trademarks, and other protected names and/or symbols of third-party companies not related in any way to StarTech.com. Where they occur these references are for illustrative purposes only and do not represent an endorsement of a product or service by StarTech.com, or an endorsement of the product(s) to which this manual applies by the third-party company in question. Regardless of any direct acknowledgement elsewhere in the body of this document, StarTech.com hereby acknowledges that all trademarks, registered trademarks, service marks, and other protected names and/or symbols contained in this manual and related documents are the property of their respective holders. PHILLIPS® is a registered trademark of Phillips Screw Company in the United States or other countries.
Safety Statements
Safety Measures
- Product installation and/or mounting should be completed by a certified professional as per the local safety and building code guidelines.
Warning Statements
- Assemble this product according to the instructions.
- Read the entire manual and ensure the instructions are fully understood before assembling and/or using this product.
- Do not exceed the weight capacity of this product. Overloading this product might result in injury or property damage.
- Weight capacity of the monitor arm: 4 to 17.6 lb. (2 to 8 kg).
- Weight capacity of the keyboard tray: 5.5 lb. (2.5 kg).
- Do not allow children to climb on this product, or use this product without proper supervision.
- This product is intended for indoor use only and should not be used outdoors.
- Do not over-tighten the screws. If any resistance is encountered, stop tightening.
- Assembling this product is a two-person task. Do not attempt to assemble this product and install equipment without assistance.
- Before adding equipment to this product, ensure the product has been properly assembled, and that the product can support the weight of the added equipment.
- Make sure all of the equipment has been properly secured before adjusting this product.
- Stored Energy Hazard! This product contains a spring mechanism that can cause the assembly and/or mounted equipment to move forcibly, and quickly, upwards. Always exercise caution when handling, or in close proximity to, the spring arm(s). Do not remove the mounted equipment unless the spring arm is moved to the highest position or (if possible) the spring force is adequately lowered to remove any danger posed. Failure to do so may result in property damage and/or serious personal injury.
- Pinch hazard! Keep your fingers clear from moving components.
Product Diagram
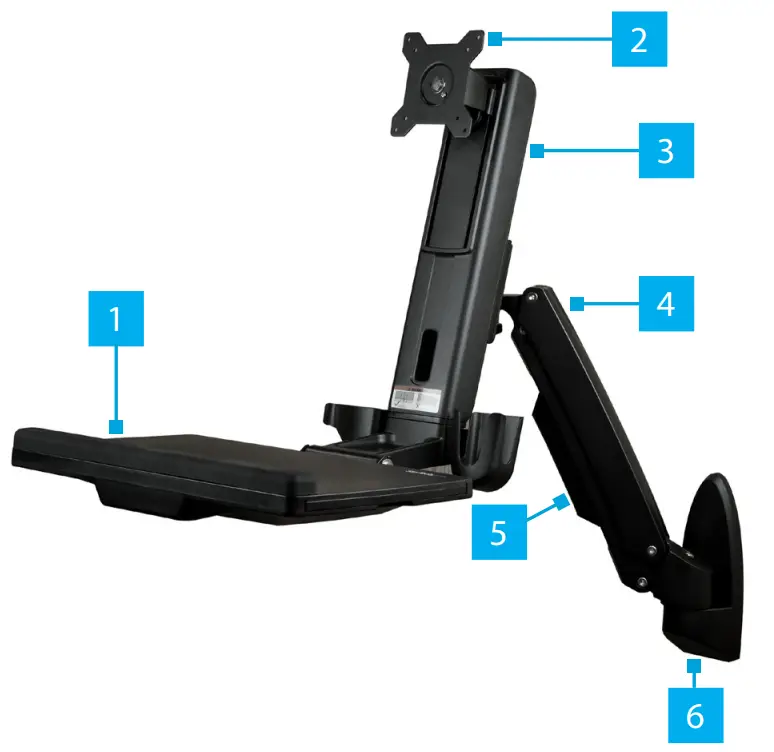
| 1 | Keyboard Tray |
| 2 | VESA Monitor Mount |
| 3 | Column |
| 4 | Monitor Arm |
| 5 | Cable Manager |
| 6 | Wall Plate |
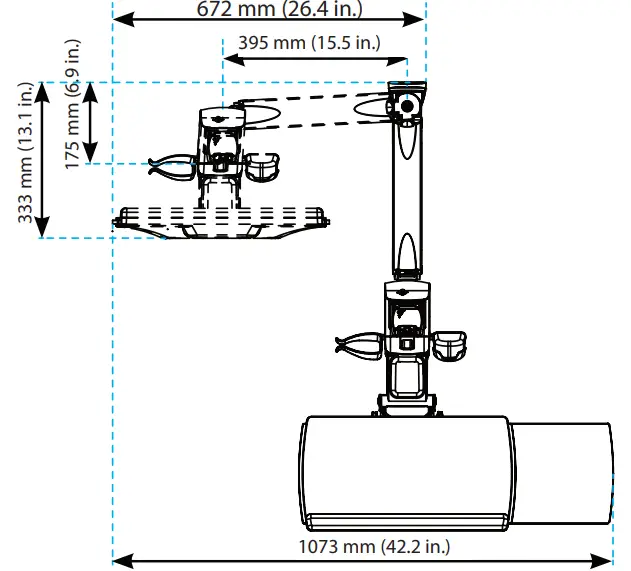
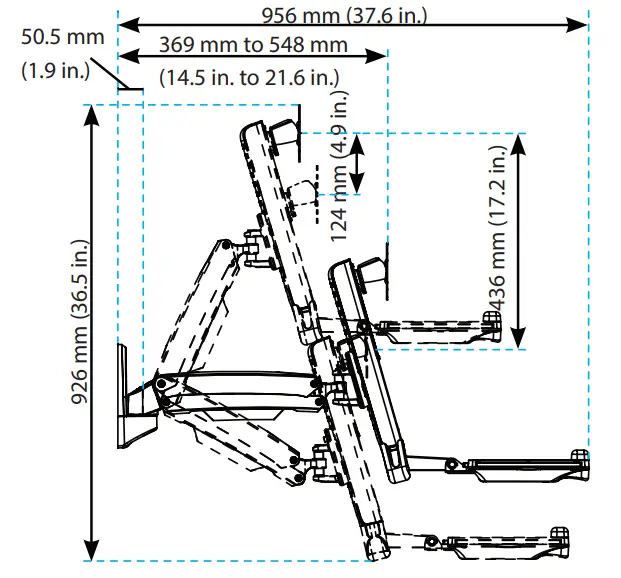
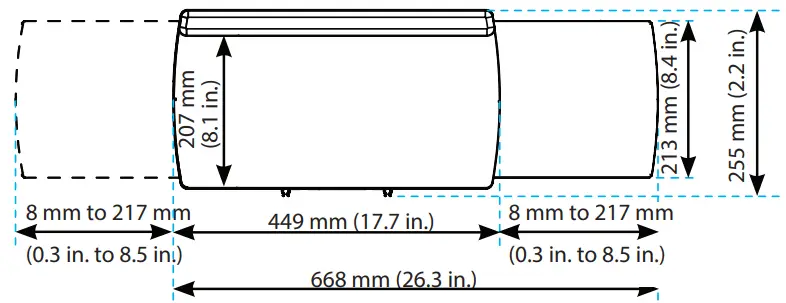
Product Dimensions
Top View
Wall Plate – Side and Rear View
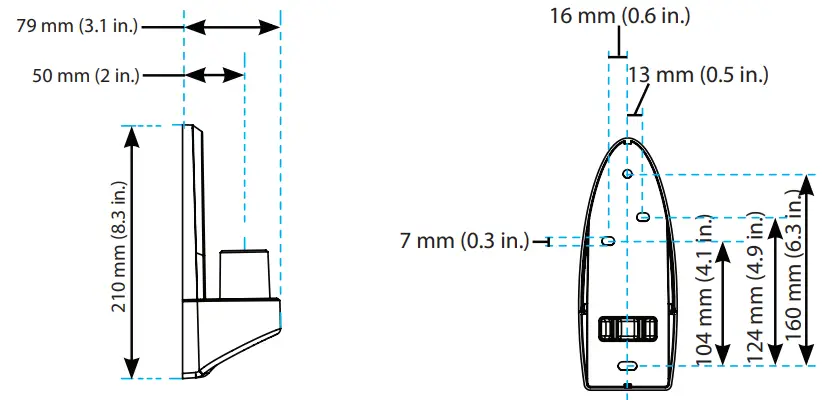
Side View
Keyboard Tray – Top View
Product Information
Requirements
For the latest product information, technical specifications, manuals, and Declarations of Conformance, please visit: www.StarTech.com/WALLSTS1
www.StarTech.com/WALL-WORKSTATION-S
Monitor
- VESA Mounting Hole Pattern
- 75 x 75 or 100 x 100 mm
Tools
- Pencil
- Phillips Head Screwdriver x 1
- Ratchet
- ¹/₄ inch Drive
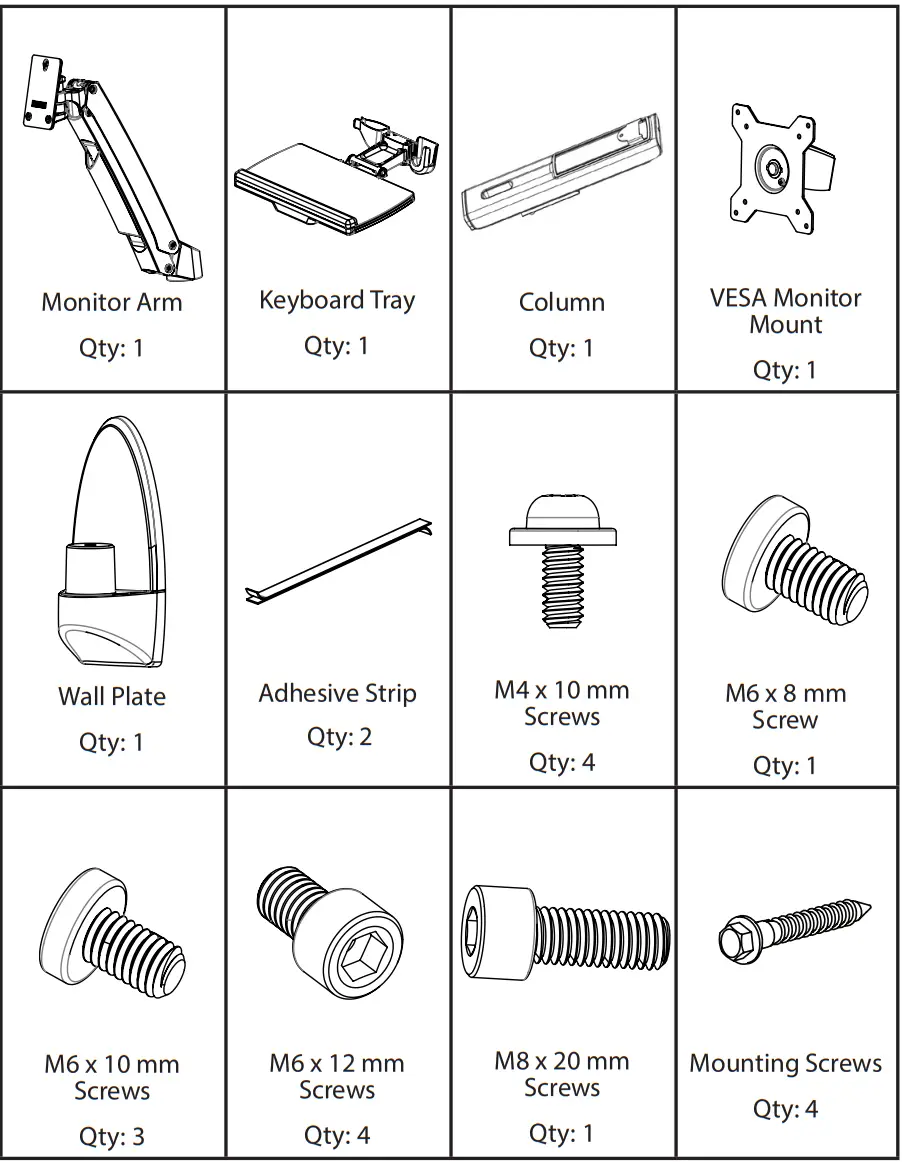
Package Contents

Installation
Attach the Wall Plate to a Wall
Warning! Wall structures vary. Ensure the type of structure and mounting hardware will properly support the mounted equipment. Failure to do so may result in personal injury
and/or equipment damage. The wall should be capable of supporting at least four times the weight of the mounted equipment.
Warning! The mounting hardware included with this product might not be adequate for some wall structures. If the installer lacks the necessary expertise to attach this product, contact a construction professional to install the wall mount or to provide specific mounting instructions for the wall.
Caution! Attaching the wall plate to the wall requires two people.
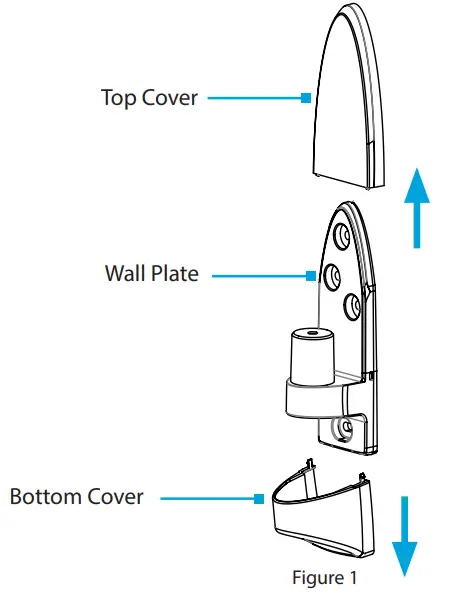
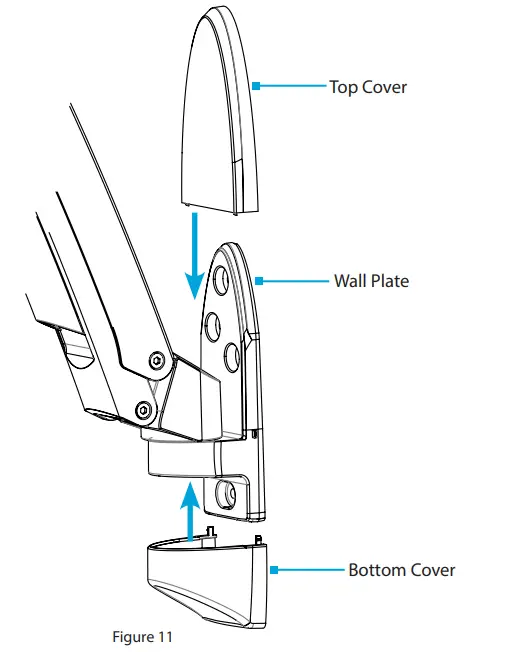
- Remove the Top Cover and the Bottom Cover by pinching the sides and sliding each piece away from the Wall Plate. (Figure 1)
- Place the Wall Plate onto the intended mounting location.
- Mark the location of the Screw Holes (x 4), using a Pencil.
- Remove the Wall Plate and drill appropriately sized Pilot Holes (x 4) into the Wall, using an Electric Drill.
- Align the Wall Plate with the Pilot Holes, located in the Wall.
- (Optional – for mounting into concrete) Insert the Concrete Anchors ( x 4) into the Screw Holes ( x 4).
- Insert the Mounting Screws (x 4) through the Wall Plate and into the Wall and tighten, using a Ratchet and 8 mm Socket.
Attach the Monitor Arm to the Wall Plate
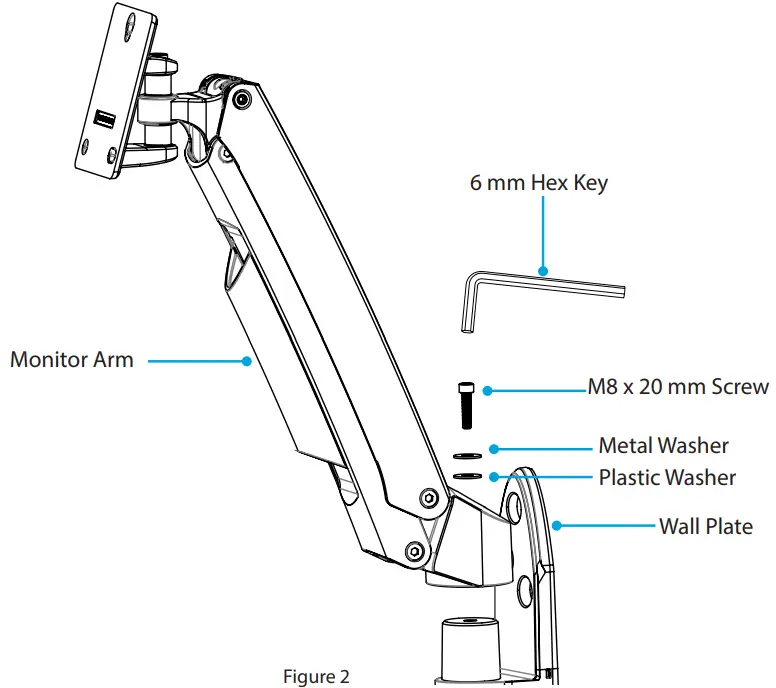
- Attach the Monitor Arm onto the Mounting Peg, located on the Wall Plate.
- Place the Plastic Washer into the Joint of the Monitor Arm.
- Place the Metal Washer into the Joint of the Monitor Arm.
- Insert the M8 x 20 mm Screw through the Washers and into the Mounting Peg, located on the Wall Plate, and tighten, using the 6 mm Hex Key. (Figure 2)
Attach the Column to the Keyboard Tray
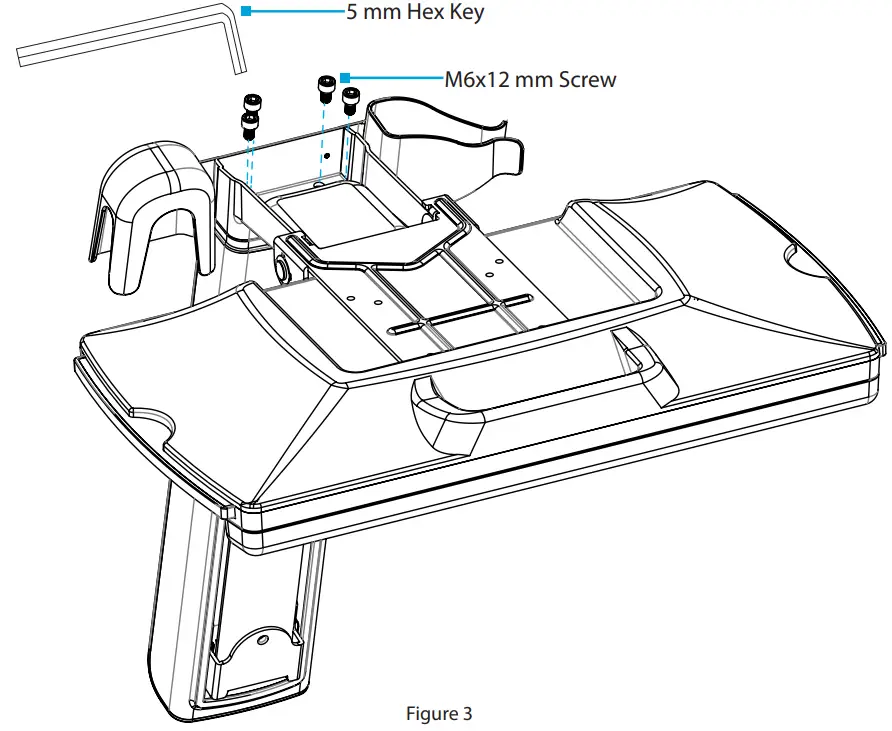
- Flip the Column and the Keyboard Tray upside-down. (Figure 3)
- Align the Assembly Holes, located on the bottom of the Column, with the Assembly Holes, located between the Holders on the Keyboard Tray. (Figure 11)
- Insert the M6 x 12 mm Screws through the Assembly Holes, located in the Keyboard Tray, and into the Column and tighten, using the 5 mm Hex Key. (Figure 12)
Attach the Column to the Monitor Arm
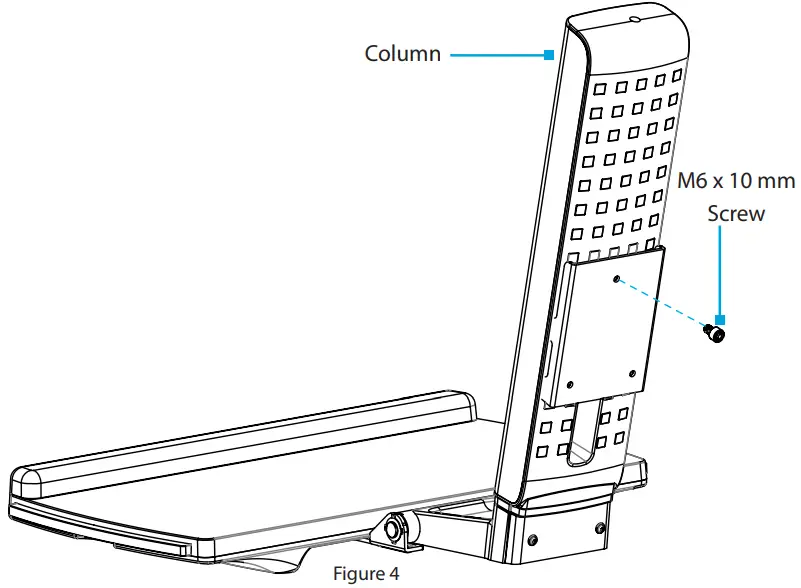
- Thread an M6 x 10 mm Screw into the Mounting Hole, located in the top of the Plate found on the back of the Column. (Figure 4)
Note: Do not tighten the M6 x 10 mm Screw and ensure 4 to 5 mm of space is left between the Plate and the Screw.
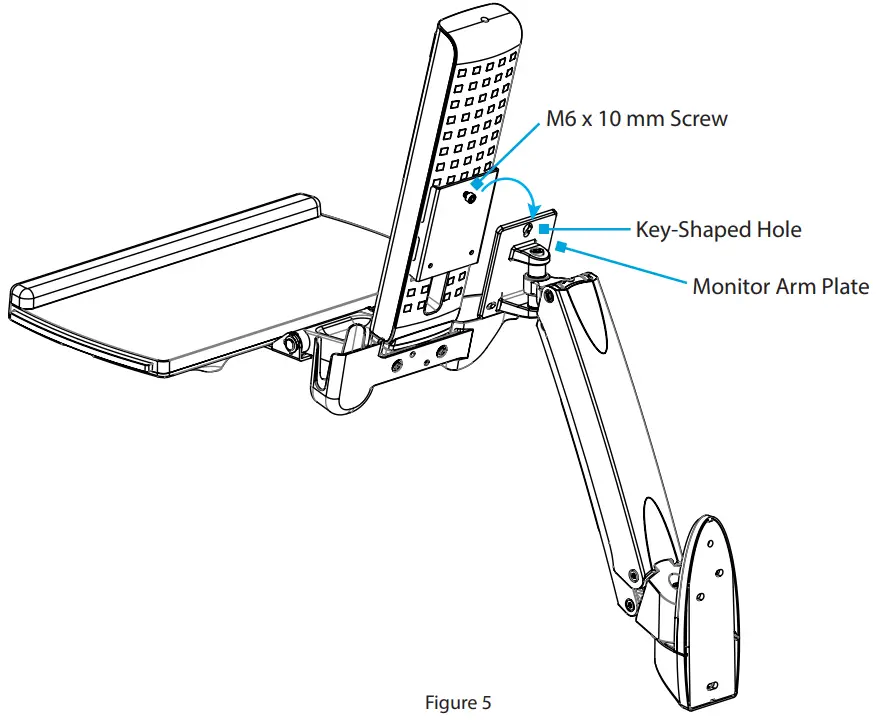
- Hook the M6 x 10 mm Screw, attached to the Column, into the Key-Shaped Hole, located at the top of the Plate on the Monitor Arm. (Figure 5)

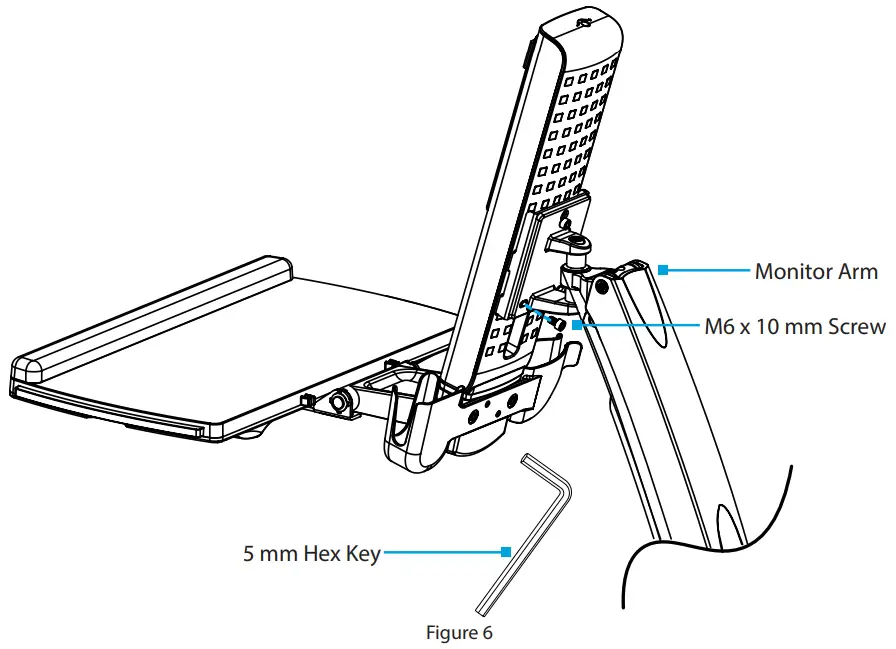
- Insert the second and third M6 x 10 mm Screws into the holes, located on the Plate on the Monitor Arm and tighten, using the 5 mm Hex Key. (Figure 6)
Attach the VESA Monitor Mount to a Monitor
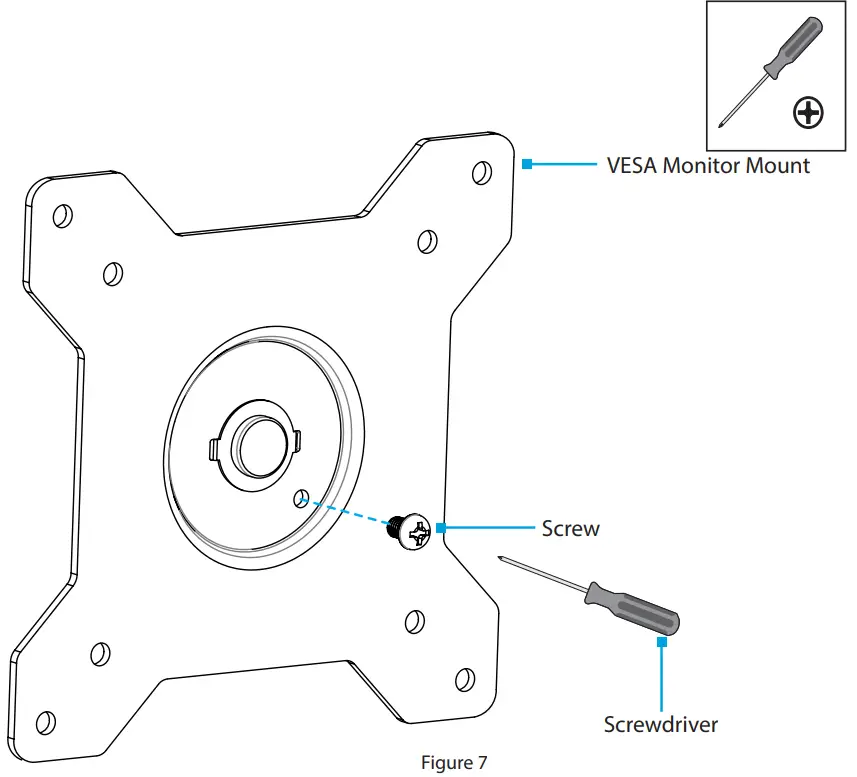
- To enable 360 degree rotation of the Monitor, remove the Screw, located in the VESA Monitor Mount, using a Phillips Head Screwdriver. (Figure 7)

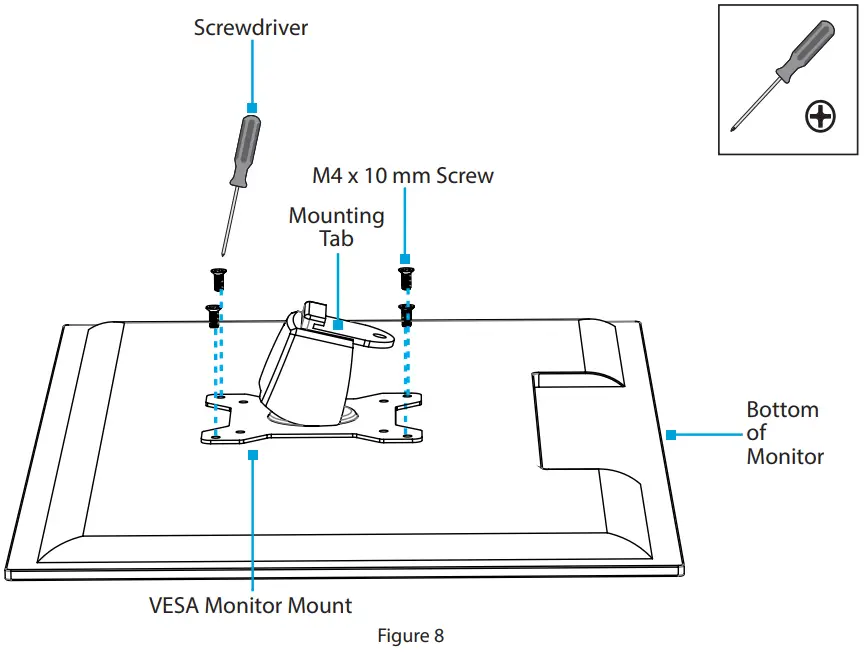
- Position the VESA Monitor Mount so the Mounting Tab, located on the back of the VESA Monitor Mount, is pointing towards the bottom of the Monitor.
- Align the VESA Monitor Mount with the Mounting Holes, located on the back of the Monitor.
- Insert the M4 x 10 mm Screws (x 4) through the VESA Monitor Mount and into the Monitor and tighten, using a Phillips Head Screwdriver. (Figure 8)
Warning! Do not over-tighten the Screws. If resistance is experienced while tightening the Screws, stop tightening.
Attach the Monitor to the Column
Note: Two people are required to complete these steps safely. The second person should hold the Monitor Arm to ensure it does not drop unexpectedly due to weight of the added equipment.
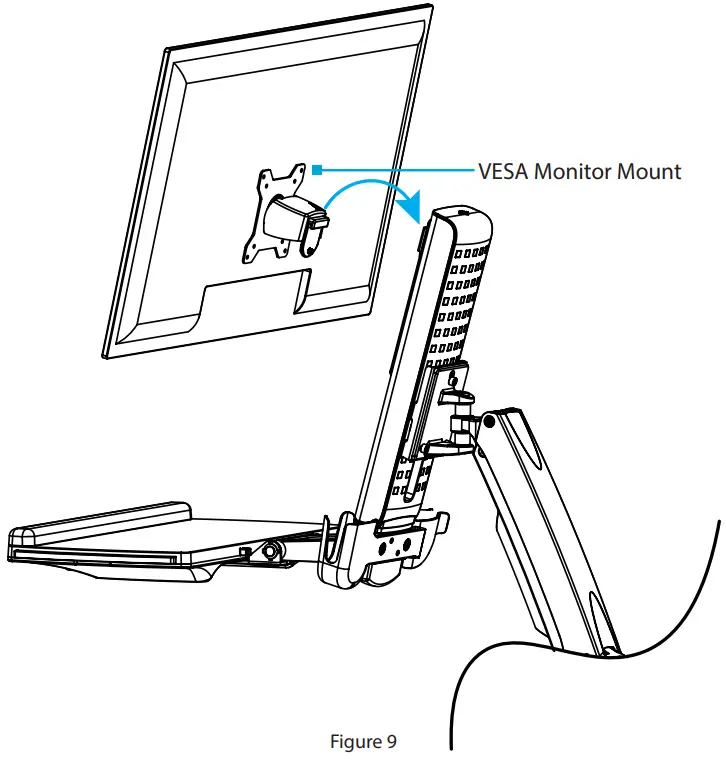
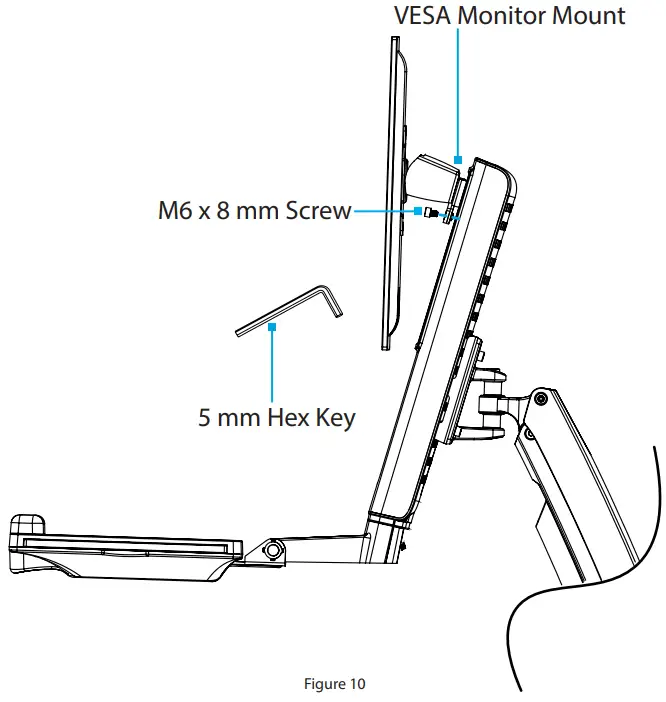
- Hook the back of the VESA Monitor Mount onto the Plate, located on the Column. (Figure 9)

- Insert the M6 x 8 mm Screw through the Mounting Tab, located on the back of the VESA Monitor Mount, and into the Plate, located on the Column, and tighten, using the 5 mm Hex Key. (Figure 20)

- Slide the Top Cover and the Bottom Cover onto the Wall Plate, until each one clicks into place. (Figure 11)
Attach the Adhesive Strip to the Keyboard
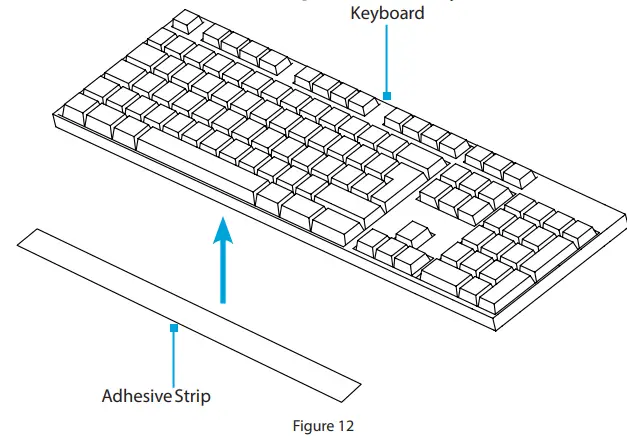
- Cut the Adhesive Strip to fit the length of your Keyboard.
- Separate the two sides of the Adhesive Strip.
- Remove the Plastic Backing from the Adhesive Strip and stick it to the back of a Keyboard.
- Remove the Plastic Backing from the second Adhesive Strip and stick it to the surface of the Keyboard Tray so that it is aligned with the strip located on the Keyboard.
(Figure 12)
Route the Cables
- Route the Cables along the Column and through the Slot, located at the base of the Column.
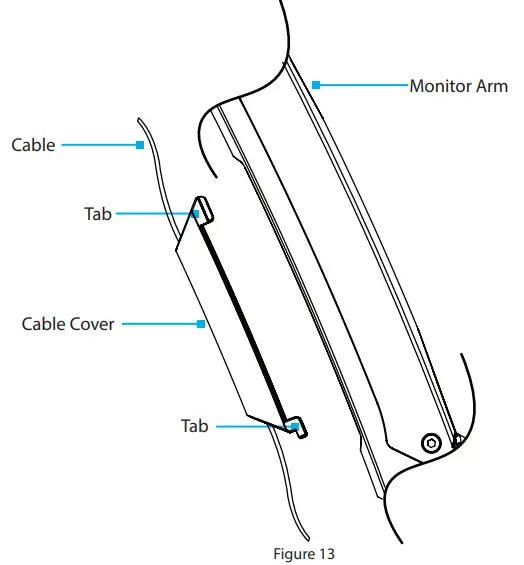
- Squeeze the tabs, located at the top of the Cable Cover, and gently slide up and pull the Cable Cover off of the Monitor Arm.
Caution! Be careful not to snap the tabs off the Cable Cover during removal. - Route the Cables along the inside of the Cable Cover.
(Figure 13) - Squeeze the tabs, located at the top of the Cable Cover, and gently slide down and push the Cable Cover into the Monitor Arm.
Operation
Remove the Monitor
Stored Energy Hazard! This product contains a spring mechanism that can cause the assembly and/or mounted equipment to move forcibly, and quickly, upwards. Always exercise caution when handling, or in close proximity to, the spring arm(s). Do not remove the mounted equipment unless the spring arm is moved to the highest position or (if possible) the spring force is adequately lowered to remove any danger posed. Failure to do so may result in property dam- age and/or serious personal injury.
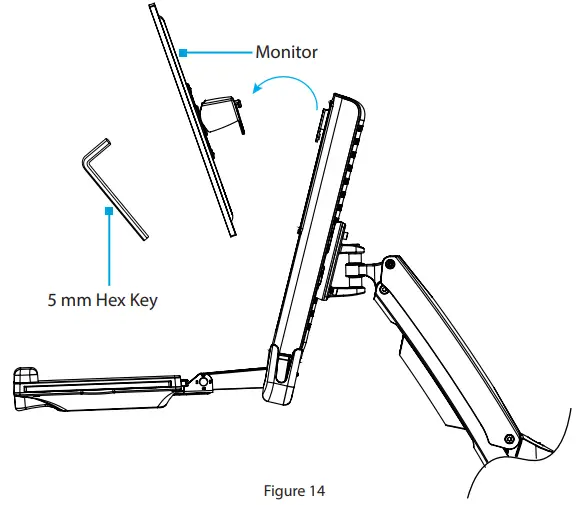
- Disconnect all Cables attached to the Monitor.
- Remove the M6 x 8 mm Screw, using the 5 mm Hex Key.
- Lift the VESA Monitor Mount off the Plate, located on the Column. (Figure 14)
Adjust the Tilt Angle of the Monitor
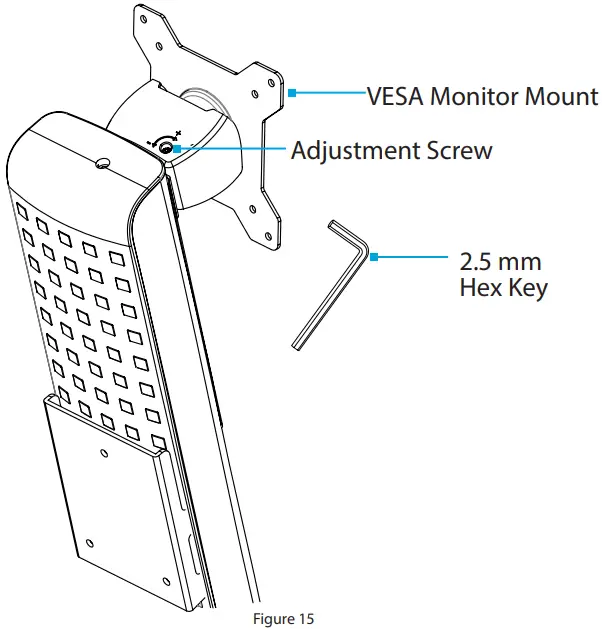
- Adjust the Screw, located in the top of the VESA Monitor Mount, to increase or decrease the tilt angle of the Monitor.
(Figure 15)
Adjust the Tilt Angle of Keyboard Tray
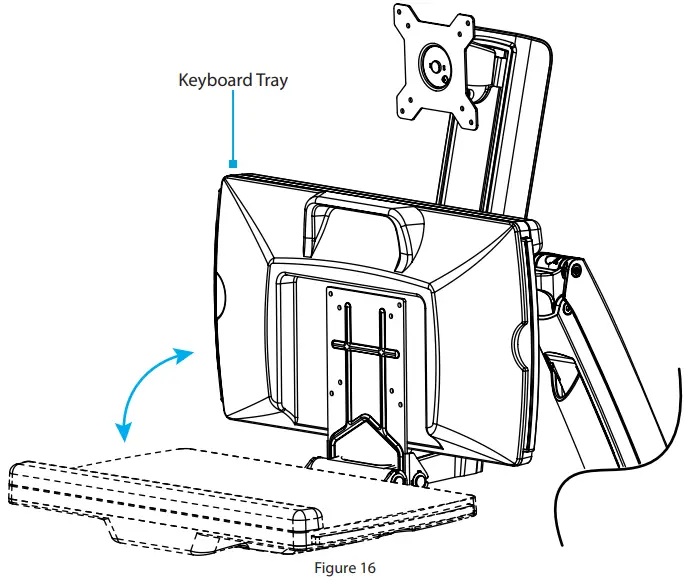
- Pull up or push down on the Keyboard Tray to adjust the angle between 0° to 90°. (Figure 16)
Counterbalance the Weight of the Monitor
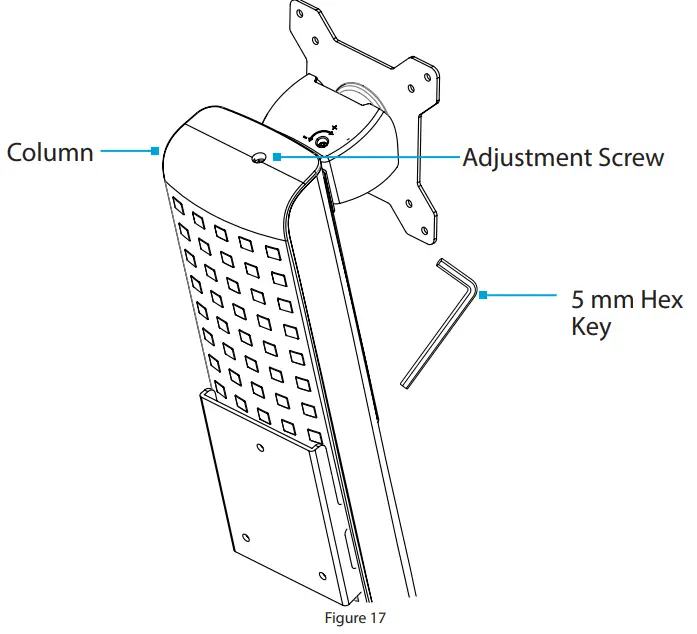
To use the one-touch height adjustment feature, the weight of the Monitor must be counterbalanced with the tension of the One-Touch Height Adjustment Spring.
- If the Monitor doesn’t remain in the set position, or it’s difficult to raise or lower, use the 5 mm Hex Key to turn the Screw in the top of the Column to adjust the tension of the One-Touch Height Adjustment Spring. (Figure 17)
Counterbalance the Weight of the Workstation
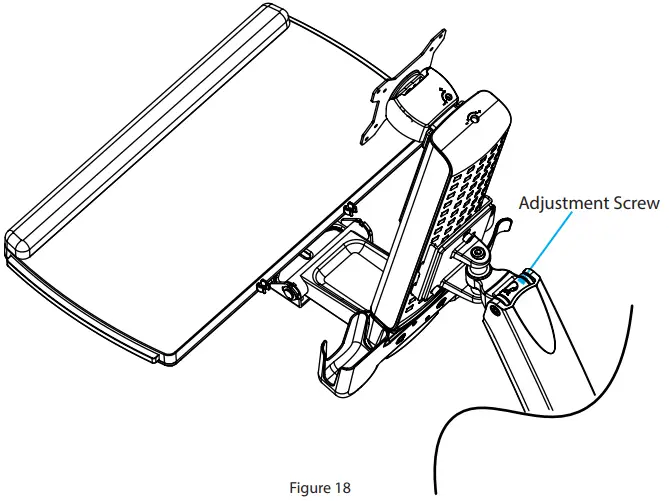
To use the one-touch height adjustment feature, the weight of the Workstation must be counterbalanced with the tension of the One-Touch Height Adjustment Spring.
- If the Workstation doesn’t remain in the set position, or it’s difficult to raise or lower, use a Ratchet with the 8 mm Socket to turn the Screw in the hinge of the Monitor Arm to adjust the tension of the One-Touch Height Adjustment Spring. (Figure 18)
Adjust the Monitor Swivel Tension
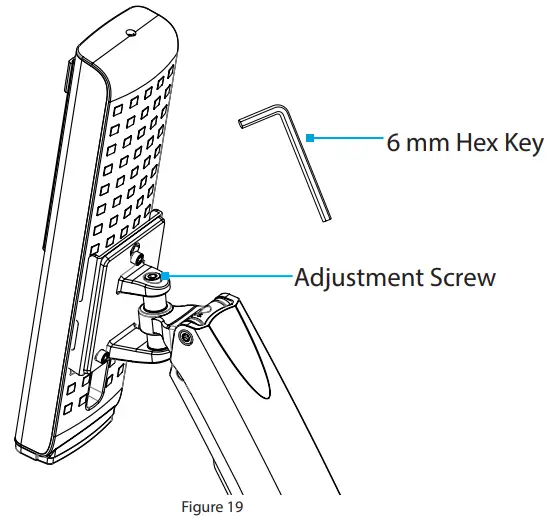
- Adjust the Adjustment Screw, located on the base of the Monitor Arm, to increase or decrease the swivel effort.
(Figure 19)
Extend the Keyboard Tray
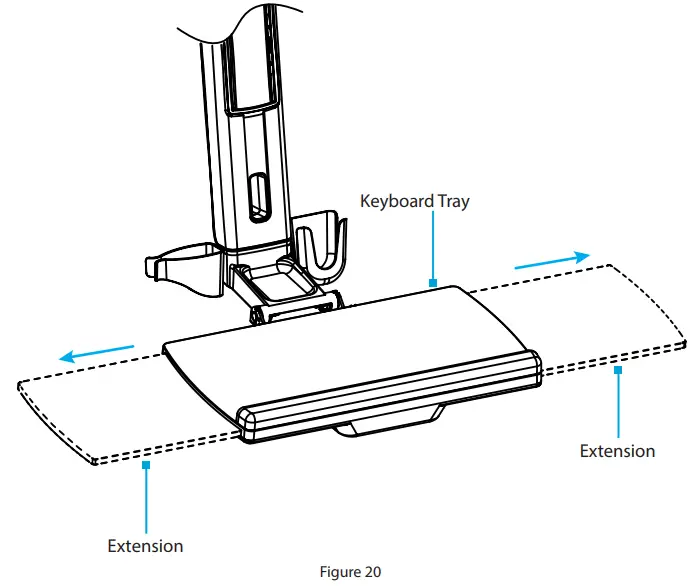
- Pull to extend the Extensions to the left or right of the Keyboard Tray. (Figure 20)
Clean the Keyboard Tray Components
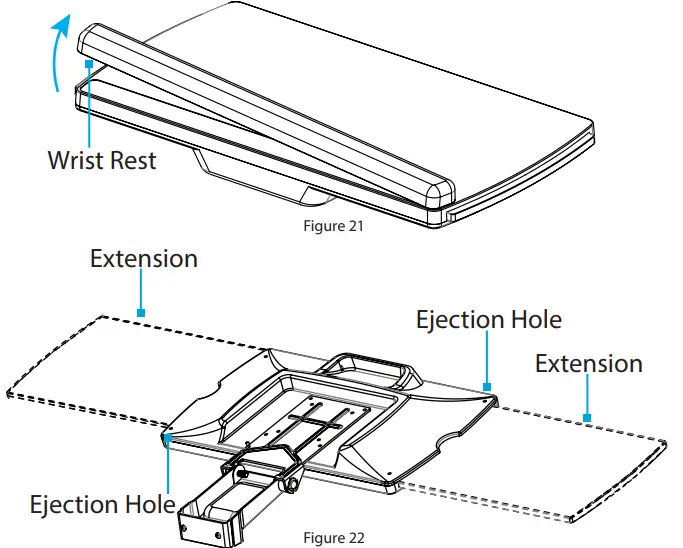
- Carefully peel the Plastic Wrist Rest off the Keyboard Tray.
(Figure 21) - Pull to extend the Extensions, located on both sides of the Keyboard Tray.
- Insert a Pin into one of the two Ejection Holes, located on the underside of the Keyboard Tray, and pull the corresponding Extension off the Keyboard Tray. (Figure 22)
- Clean the Plastic Wrist Rest and Extensions in Warm Water mixed with a Non-abrasive Plastic-safe Cleaner.
Warranty Information
This product is backed by a two-year warranty.
For further information on product warranty terms and conditions, please refer to www.startech.com/warranty.
Limitation of Liability
In no event shall the liability of StarTech.com Ltd. and StarTech.com USA LLP (or their officers, directors, employees or agents) for any damages (whether direct or indirect, special, punitive, incidental, consequential, or otherwise), loss of profits, loss of business, or any pecuniary loss, arising out of or related to the use of the product exceed the actual price paid for the product. Some states do not allow the exclusion or limitation of incidental or consequential damages. If such laws apply, the limitations or exclusions contained in this statement may not apply to you.
Hard-to-find made easy. At StarTech.com, that isn’t a slogan.
It’s a promise.
StarTech.com is your one-stop source for every connectivity part you need. From the latest technology to legacy products — and all the parts that bridge the old and new — we can help you find the parts that connect your solutions.
We make it easy to locate the parts, and we quickly deliver them wherever they need to go. Just talk to one of our tech advisors or visit our website. You’ll be connected to the products you need in no time.
Visit www.startech.com for complete information on all StarTech.com products and to access exclusive resources and time-saving tools.
StarTech.com is an ISO 9001 Registered manufacturer of connectivity and technology parts. StarTech.com was founded in 1985 and has operations in the United States, Canada, the United Kingdom, and Taiwan servicing a worldwide market.
Reviews
Share your experiences using StarTech.com products, including product applications and setup, what you love about the products, and areas for improvement.
| StarTech.com Ltd. 45 Artisans Crescent London, Ontario N5V 5E9 Canada | StarTech.com LLP 4490 South Hamilton Road Groveport, Ohio 43125 U.S.A. | StarTech.com Ltd. Unit B, Pinnacle 15 Gowerton Road Brackmills, Northampton NN4 7BW United Kingdom | StarTech.com Ltd. Siriusdreef 17-27 2132 WT Hoofddorp The Netherlands |
To view manuals, videos, drivers, downloads,
technical drawings, and more
visit www.startech.com/support
References
 Unsere Produkte dienen IT- und A/V-Profis zum Verbinden, Konvertieren, Erweitern, Splitten und Switchen | Deutschland
-
StarTech.com conçoit et fabrique une vaste sélection de pièces d’ordinateur, de câbles, de commutateur KVM, de racks... | France
-
Pezzi per computer, cavi, switch KVM, server rack e soluzioni per reti | Italia
-
当社は、接続、変換、拡張、分離、切換えを行うIT & A / Vプロフェッショナルのためのパーツを製造しています | 日本
-
StarTech.com ontwerpt en produceert een enorme selectie computeronderdelen, kabels, KVM-switches, serverracks en... | Nederland
-
StarTech.com | IT Pro's Trusted Source for Connectivity Accessories
-
StarTech.com | IT Pro's Trusted Source for Connectivity Accessories
-
StarTech.com Support
-
Wall Mount Workstation - VESA Monitor - Sit-Stand Workstations | Display Mounting and Mobility
-
StarTech.com Warranty Policy


