SWIT BM-U 4K High Definition Monitor
 Preface
 Preface
- All internal technologies of this product are protected, including device, software, and trademark. Reproduction in whole or in part without written permission is prohibited.
- All brands and trademarks of SWIT Electronics Co., Ltd. are protected and other relative trademarks in this user manual are the property of their respective owners.
- Due to the constant effort of product development, SWIT reserves the right to make changes and improvements to the product described in this manual without prior notice.
- The warranty period of this product is 2 years, and does not cover the following:
- Physical damage to the surface of the products, including scratches, cracks, or other damage to the LCD screen or other externally exposed parts;
- The LCD dot defects are not over three;
- Any damage caused by using third-party power adaptors;
- Any damage or breakdown caused by use, maintenance, or storage is not according to the user manual.
- The product is disassembled by anyone other than an authorized service center.
- Any damage or breakdown not caused by the product design, workmanship, manufacturing quality, etc.
* Any sales personnel have no right to provide an additional warranty.
For any suggestions and requirements on this product, please contact us through phone, fax, Email, etc.
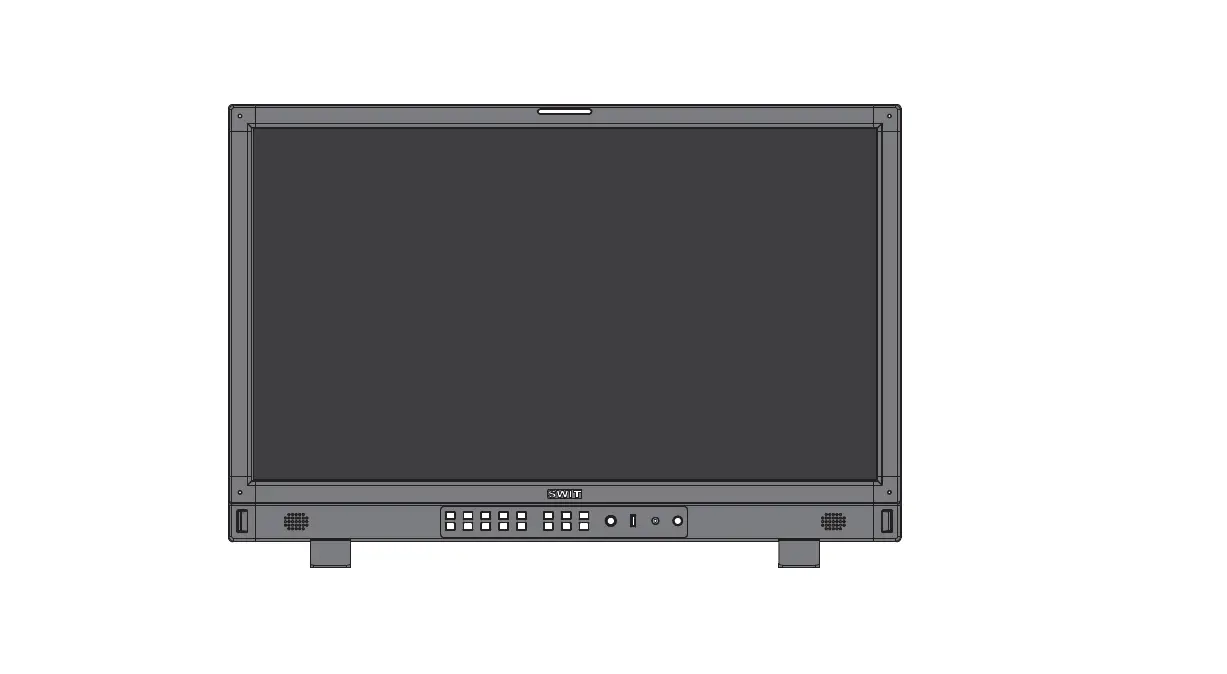
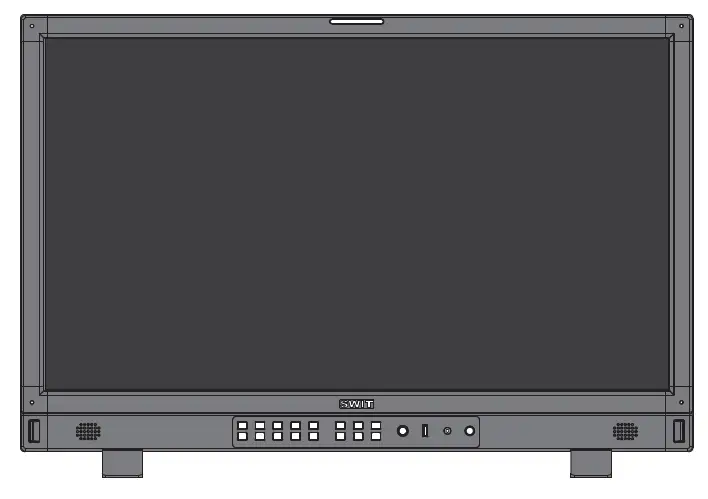
This manual is applicable to all models of BM-U (5 generations), and the schematic diagram is taken as the appearance diagram of BM-U245. Any specification, appearance, this manual will be additional text description.
SWIT Electronics Co., Ltd.
Address: 10 Hengtong Road, Nanjing Economic and Technological Development Zone,
Nanjing 210038, P.R.China
Phone: +86-25-85805753
Fax: +86-25-85805296
Email: [email protected]
http://www.swit.cc
Maintenance
Warning
- In order to reduce the risk of fire and electrical shock, do not lay this product in rain or damp places.
- Please keep away from the strong magnetic field; it may cause the noise of the video and audio signals.
The power
- Please use the power adapter provided or recommended by the manufacturer in order to avoid damage.
- For a third-party power adapter, please make sure the voltage range, supplied power, and polarity of power lead are fit.
- Please disconnect the power cable under the following situations:
(A). If you do not operate this monitor for a period of time;
(B). If the power cable or power adaptor is damaged;
(C). If the monitor housing is broken.
The monitor
- Please don’t touch the screen with your fingers, which would probably deface the screen.
- Please don’t press the screen; the LCD is extremely exquisite and flimsy.
- Please don’t lay this product in an unstable place.
Cleaning
- Please clean the screen with a dry and downy cloth or a special LCD cleanser.
- Please do not press hard when cleaning the screen.
- Please do not use water or another chemical cleaner to clean the screen. The chemical may damage the LCD.
Packing list
| No. | Standard package Monitor | Details X 1 |
| 1 | Monitor | X 1 |
| 2 | User manual | X 1 |
| 3 | Warranty card | X 1 |
| 4 | Battery plate(V-mount or Gold mount option ) | X 1 |
| 5 | Tabletop stand | X 2 |
| 6 | Power cord | X 1 |
Only BM-U175/BM-U245 are equipped with a battery gusset plate.
Introduction
This series of monitors adopt a TFT-LCD panel, the resolution is up to 3840×2160, H178° / V178° ultra-wide viewing angle, supports 2 channels of 12G/6G/3G/HD/ SD-SDI, 2 channels of 3G/HD/ SD-SDI, and 1 channel of HDMI 2.0, and has 2 channels of 12G/6G/3G/HD/ SD-SDI ring out, and 2 channels of 3G/HD/ SD-SDI ring out, with earphone and speaker output.
Features
- 3840X2160 Ultra HD
- 4K/UHD interface(2x12G-SDI&2x3G-SDI input,4xSDI output,1xHDMI 2.0 input)
- 16ch audio bar display, with any selected 2ch output
- Support waveform selection display Y/Cb/Cr/R/G/B /RGB and single-line selection mode
- Vector scope, R/G/B/Y histogram, bi-color focus assist
- 3DLUT(17 x 17 x 17) accurate color correction
- Dynamic UMD and TALLY(TSL3.1, 4.0) display
- Composition ratio auxiliary line:4:3/13:9/14:9/15:9/16:9/1.85:1/2.35:1/2:1/Custom
- Support USB firmware upgrade and import Log file.(USB file system supports FAT 32 format only) Eco-mode
Operation Instructions
Front panel 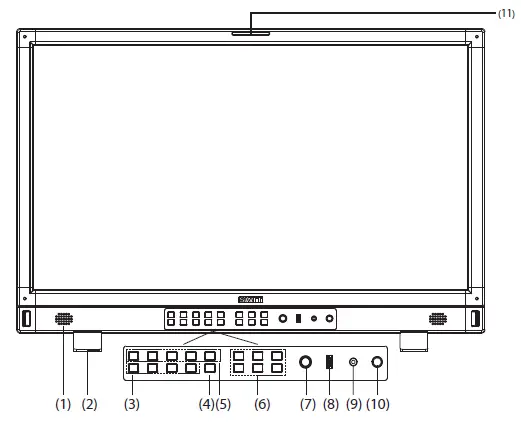
- Speaker: For SDI/HDMI embedded audio. (Will does not work if the earphone is plugged in)
- Desktop Stand Feet
- U1~U4: User shortcut key, which can be used to quickly enter the set user mode.
Long press to save user settings. Please see details in “9. System” - INFO: Display setting item. Press the “INFO” button to display or turn off relevant status information and audio and video analysis function graph. When opening the menu, press “INFO” to exit the menu with one click
- F1~F5 function keys: Customize shortcut function keys. Users can set the shortcut keys to different functions according to their own requirements.

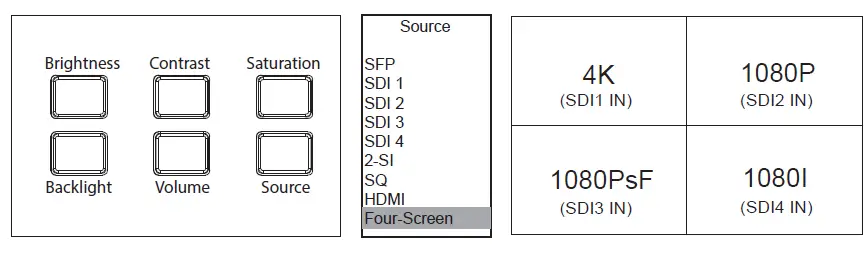
Brightness: Adjust the brightness. -100~100 adjustable, default value is 0.
Contrast: Adjust contrast. -100~100 adjustable, default value is 0.
Saturation: Adjust saturation. -100~100 adjustable, default value is 0.
Backlight: Adjust the backlight. 0~100 adjustable, default value is 16.
The default backlight value of BM-U245 is 35.
Press Brightness, Contrast, Saturation, Backlight, and Volume five shortcut keys confirm to select this option, and rotate Menu to adjust the corresponding item value directly. Press the button and automatically cancel the selection without operation within five seconds, and the button light will be off, long press to restore default values.
Volume: Adjust the volume.0~100 adjustable, the default value is 36. Long press the volume button to mute.
Source: Select the input source signal format. As shown in the figure above, when Four-screen is selected, the screen is divided into 4 frames, and 4 channels of SDI signals can be displayed simultaneously. When Four-screen is opened, some menu functions are turned off or displayed in grey. - Menu/Enter: When no Menu is displayed, press the button directly to open the Main Menu; Rotate the knob to select different settings or adjust parameter values, press the knob to set.
- LUT/Firmware: Update firmware or import LUT files.
- PHONE: 3.5mm headphone jack is used to monitor the embedded audio signals of SDI and HDMI.
- Power: Power switch.
- Tally lamp: You can select the color of the tally lamp from “Green”, “Red”, or “Yellow”
Rear panel 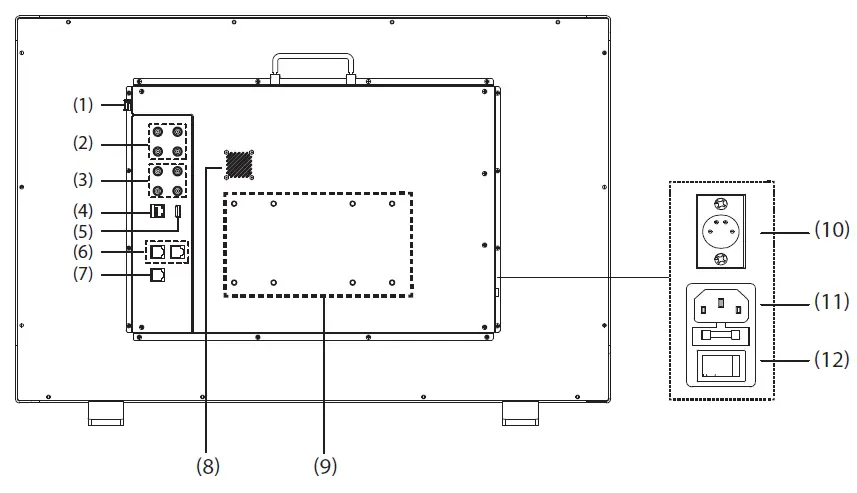
- SFP IN: Optical fiber interface
12G/6G/3G/HD/SD-SDI video signal fiber input interface- The fiber optic module is optional
- SDI OUT1/IN1, SDI OUT2/IN2:12G-SDI
- SDI OUT3/IN3, SDI OUT4/IN4:3G-SDI
- ETHERNET: Network interface
1000M high-speed RJ45 Ethernet port, for web server IP external control. - HDMI 2.0 IN
- Will not display HDCP-protected content.
- RS485: TSL UMD control port
- GPI: GPI control port
- Fan
- VESA bracket mounting area
- DC IN:12V~17V
- AC IN:100V~240V
- AC switch: Used to directly turn on or off AC power supply
- BM-U175/BM-U245 supported DC, AC, and battery-powered three types of power supply.
- BM-U275HDR AC power supply only.
OSD 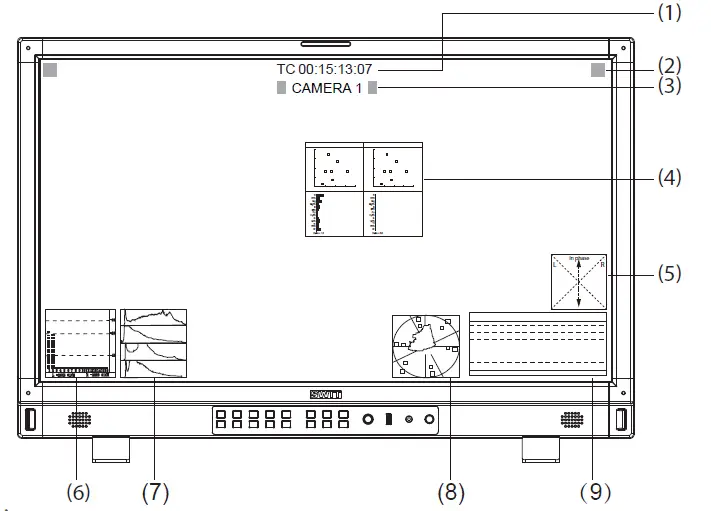
- Time Code(SDI)
Under SDI input, the monitor can display Time code information (LTC, VITC1&2). If no Time code info is detected, it will display “TC UNLOCKED”. Users can set function keys F1~F5 or GPI pins as “Time Code” to turn on or off this function. - On-screen TALLY
Display TALLY signal from GPI port. - Source ID/UMD
Display TSL 3.1/4.0 UMD or User input Source ID. - Color Checker
After auto-calibration, the color gamut and chromatic aberration (△E) before and after the color correction pop up. “Assist” -“Color Checker” and “Auto Calibration” -“Measure” pops up the gamut value and color difference value (△E) of the previous calibration and this measurement. - Lissajous
Lissajous diagram showing audio signal. Users can set the shortcut keys (F1~F5) or GPI pins on the front panel to the “Lissajous” function and turn it on/off. - Audio VU/PPM meters
Display meters of SDI/HDMI embedded audio or analog audio. The audio meter display channels, on-screen positions, markers, and background colors are adjustable. Users can set function keys F1~F5 or GPI pins as “Audio Bar” to turn on or off this function. - Histogram
Parallel display R/G/B/Y histogram for SDI and HDMI video. Users can set function keys F1~F5 or GPI pins as “Histogram” to turn on or off this function. - Vector
Display vector scope with 100% and 75% markers for SDI and HDMI video. The vector scope pattern display positions, colors, and background are adjustable. Users can set function keys F1~F5 or GPI pins as “Vector” to turn on or off this function. - Waveform
The displayed waveform can be selected from Y/Cb/Cr/R/G/B/RGB types, and single-line display mode is selectable. The waveform display positions, colors, and background are adjustable. Users can set function keys F1~F5 or GPI pins as “Waveform” to turn on or off this function.
Status display 
Press the “Menu/Enter” button, and the main menu will pop up from the left top of the screen. The main menu displays the current working status of the monitor.
- Format
A format for displaying the current input signal, if there is no currently identifiable signal input, display “No Signal”. When Four-screen is selected for the current channel, the input signal standard of SDI 1/2/3/4 channel is displayed in standard. - Channel
Displays the currently selected channel - Color Temp
Displays the currently set color temperature mode - Scanning
Displays the currently set scan mode - F1~F5
Displays the function value set by the current function key - Version
Displays the current software version number
Key configuration
Steps
- Press the “Menu/ Enter” button, the main menu will pop up from the left top of the screen. The selected main menu is highlighted in yellow.
- Revolve “Menu/ Enter” to select a submenu, the selected submenu is highlighted in yellow, press “Menu/Enter” to apply and enter into the selected submenu’s items.
- Revolve “Menu/ Enter” to select the item which needed to adjust, press “Menu/ Enter”, and the selected item and its parameters will be highlighted in yellow
- Revolve “Menu/ Enter” to change the selected item’s parameter, and press “Menu/ Enter” to apply and save the settings.
- Revolve “Menu/ Enter” to select “Exit”, and press “Menu/ Enter” to quit the submenu. Select “Exit & Status” under the Main Menu and press to quit Main Menu
Notice
- The items in gray cannot be set up
- If there is no operation under the set time, the menu will automatically save settings and quit.* If the key inhibit function is turned on, except the System menu, all other items are in gray. Please turn off the key inhibit function to adjust the items.
Menu Block Diagram

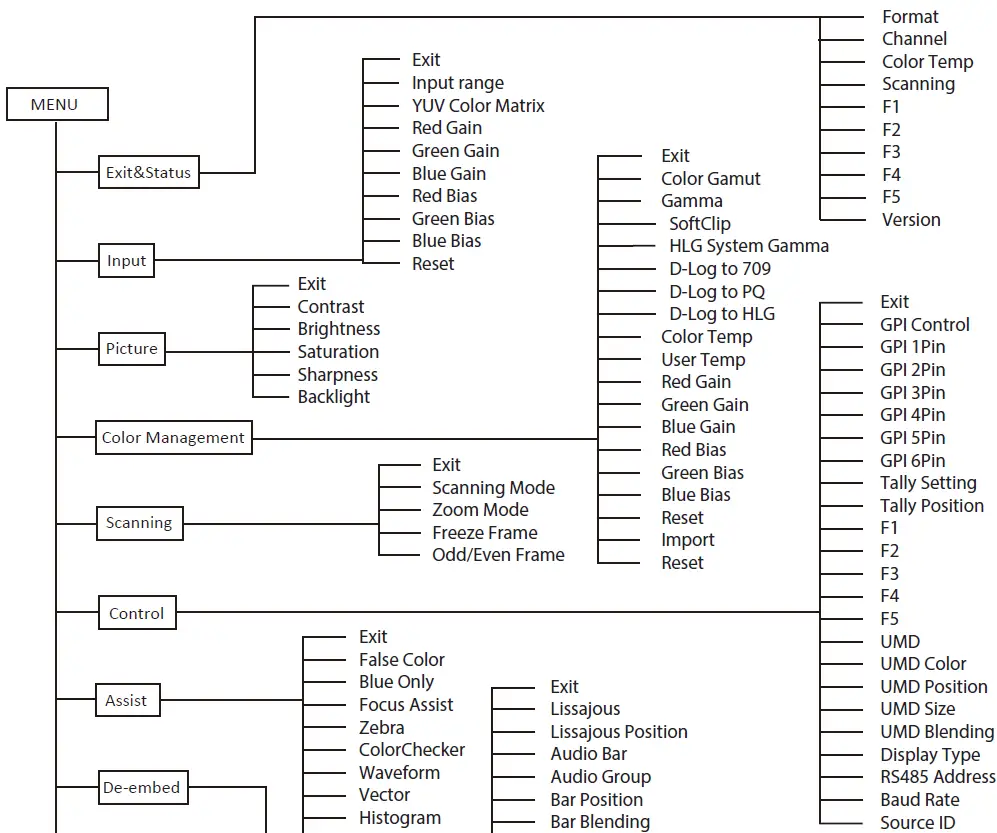
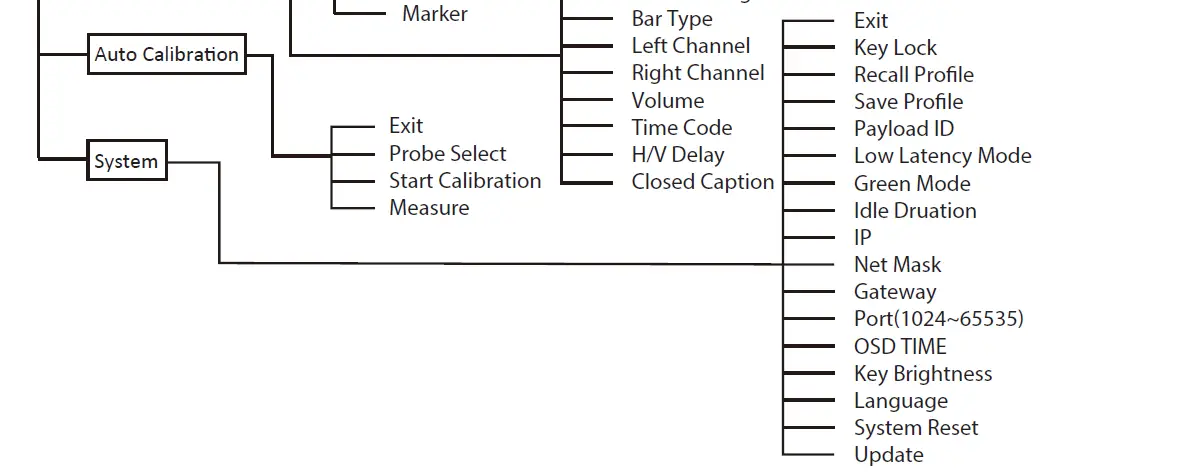
Menu configuration introduces the main menu and each sub-menu. Menu items marked * will give more detailed menu description or operation explanation after the list
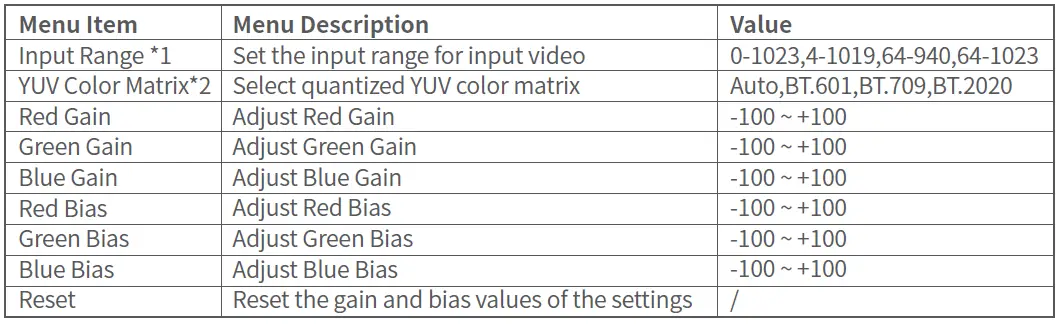
- Input ‒ Set the color of the input audio

- Input range
Set the video input range to fit the input video signal. The default video input range is 64-940 for broadcast applications. When Four-screen is selected, the input range of 4 channels SDI signal can be adjusted separately for display. - YUV color matrix
When Four-screen is selected, the color matrix of 4 channel SDI signal can be adjusted separately for display.
- Input range
- Image *1—Setting for the picture preference

- Image
Contrast, brightness, saturation, and backlight can be quickly adjusted by the front panel short-cut keys
- Image
- Color management—Settings about video colors

| D-Log to HLG | Camera table when gamut is set to Rec.2020 and gamma value is HLG1000 | OFF,ARRI_LogC_HLG,Canon_CLog2Cin_HLG Canon_CLog3Cin_HLG,Panasonic_VLog_HLG, RED_L3G10_HLG,Sony_SLog3_Cin_HLG, Sony_SLog3_SG3_HLG | |
| Color Temp | Soenttthheesccoreloerntemperature value displayed | 2000K~10000K,D55,D65,D75,D93,USER1,USER2 | |
| User Temp | tSheet tchoelourstemcopleorrateumrepmeroadtueries svealleucetewdhaesn “USER 1/USER2” | 2000K~10000K,D55,D65,D75,D93 | |
| Red Gain | Adjust user color temperature red gain | -100 ~ +100 | |
| Green Gain | Adjust user color temperature green gain | -100 ~ +100 | |
| Blue Gain | Adjust user color temperature blue gain | -100 ~ +100 | |
| Red bias | Adjust user color temperature red bias | -100 ~ +100 | |
| Green bias | Adjust user color temperature green bias | -100 ~ +100 | |
| Blue bias | Adjust user color temperature blue bias | -100 ~ +100 | |
| Reset | Reset user color temp gain and bias | / | |
| Import*6 | Select the cube file you want to import | None,3DLut.cube,User-Log.cube | |
| Reset | Stoefleactothryesaepttpinrogpsriate cube file to restore | NO,3DLut.cube | |
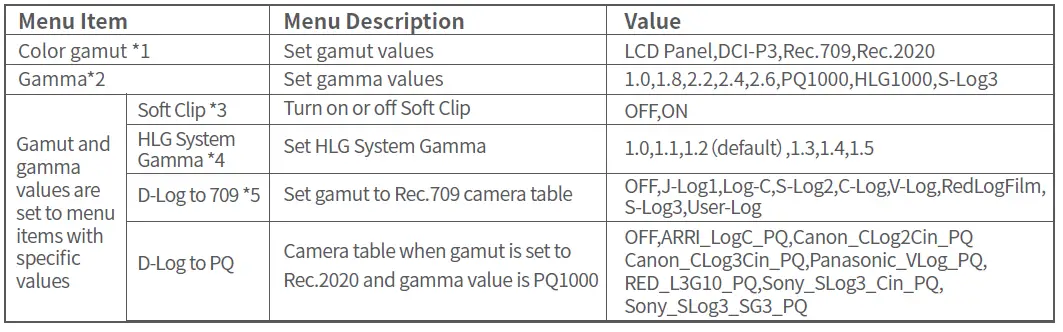
- Color gamut
Set the gamut to match the input audio. When Four-screen is selected, the color gamut value of the 4-channels SDI signal can be adjusted separately for display. - Gamma
When Four-screen is selected; the gamma of 4 channel SDI signal can be adjusted separately for display. - Soft Clip
Display tunable only when Gamma is set to PQ1000. ※BM-U275HDR does not have this menu. - HLG System Gamma
Display tunable only when Gamma is set to HLG1000 - D-Log to 709
Display tunable only when color gamut is set to Rec.709 mode and Gamma is set to a value.
| DJ-oLowg1nload address | DJVeCsJc-Lroipg1tiRoenc709 3DLUT cube |
| Log-C | ARRI Log-C to Rec709 3DLUT cube |
| S-Log2 | SONY S-Log2 to Rec709 3DLUT cube |
| S-Log3 | SONY S-Log3 to Rec709 3DLUT cube |
| C-Log | Canon C-Log to Rec709 3DLUT cube |
| V-Log | Panasonic V-Log to Rec709 3DLUT cube |
| Red Log Film | Red Log to Rec709 3DLUT cube |
| User-Log | User 3DLUT cube upload |
Import
Place the cube file that needs to import the monitor in the root directory of the u-disk, insert the u-disk into the USB interface on the front shell of the monitor, and choose to import the corresponding file.
Scanning—Setting for picture scan, zoom, etc.
| Menu Item | MSeet unpuaDsecasncnriinpgtmioonde that matches the audio to | Value |
| Scanning *1 | the screen | Pixel To Pixel, Panel Fit, Native |
| Zoom Mode*2 | Set a zoom mode | ORiffg,hTto, BpoLtetfotm, ToLepf,tT, oBpotRtoigmht,,BLoetftto, mCeRnitgehr,t |
| Freeze Frame | Select an image still mode | OFF, ON |
| Odd/Even Frame*3 | Set to open odd field or even field | OFF, Odd Frame, Even Frame |
- Scanning
Panel Fit: Turn on this feature to adapt the video to the entire screen. Native only displays the original model in the specified mode. - Zoom mode: Shown below, the image is divided into 9 regions and adjusted to display in sequence.
 When the zoom mode is turned on, a rectangle box pops up at the bottom left of the screen, showing the currently selected zoom image area.
 - Odd/Even Frame
Odd/Even Frame is only displayed in I mode. Open Low Latency Mode and the Odd/Even Frame function are turned off.
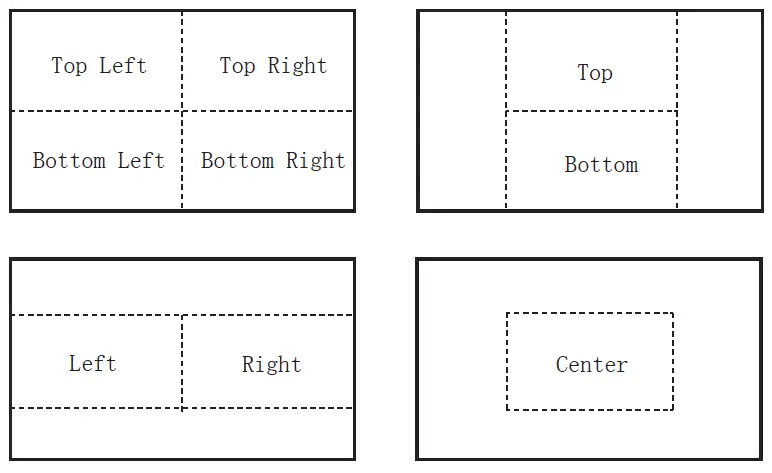 When the zoom mode is turned on, a rectangle box pops up at the bottom left of the screen, showing the currently selected zoom image area.
Control—Setting for TALLY, UMD, IP control to the monitor
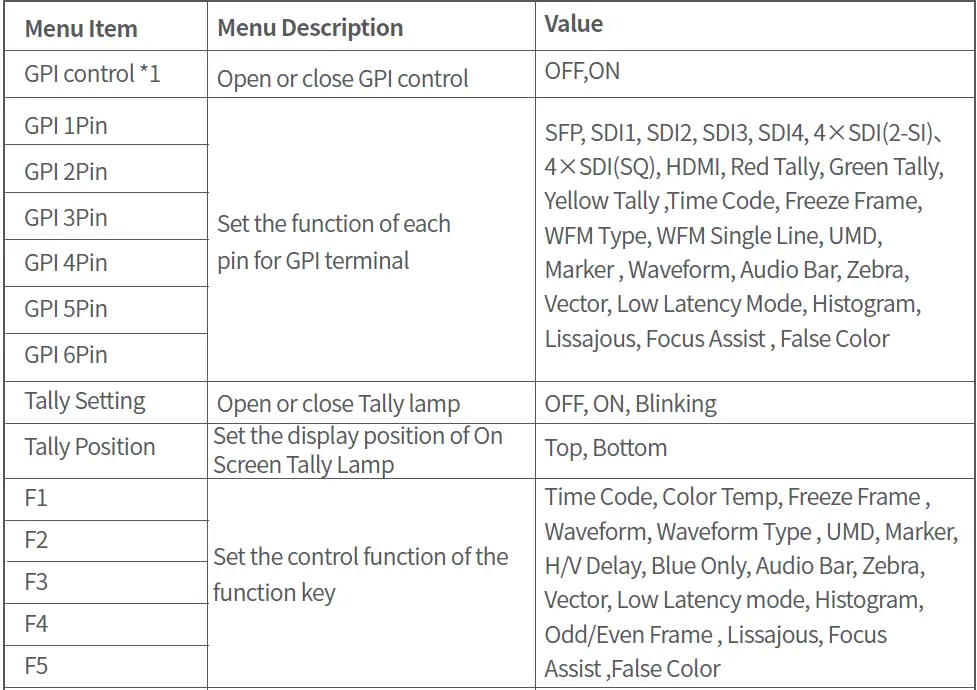
GPI control
Connect the GPI remote control terminal through the GPI interface on the rear panel of the monitor, turn on “GPI control” and set the function of GPI 1-6 buttons. 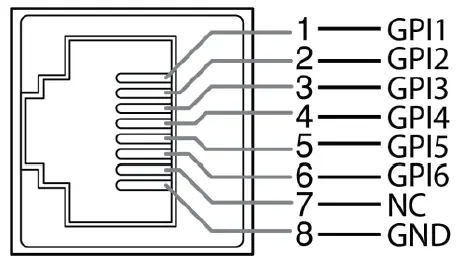
The GPI control allows you to control both the Tally light and the on-screen TALLY light at the same time: 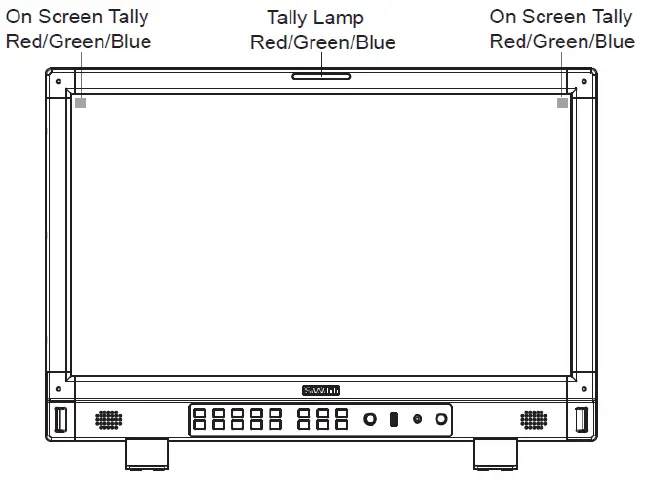 UMD
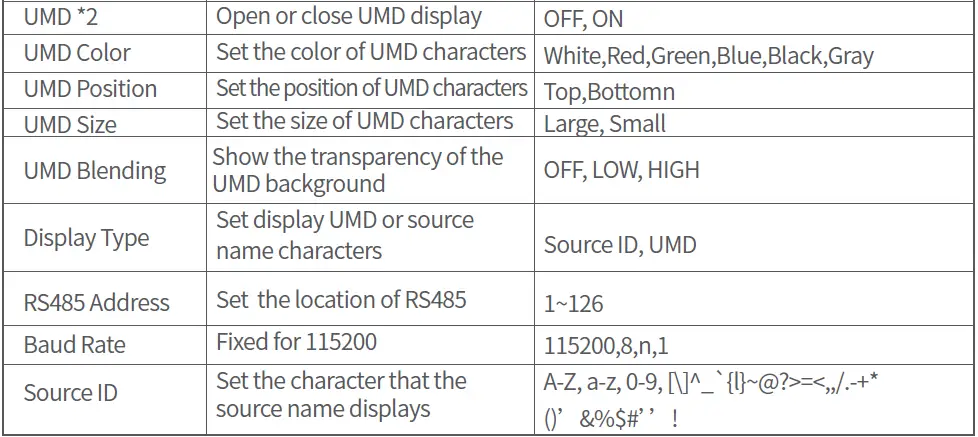
UMD
Select the display type as “UMD”, which can be controlled with TSL UMD. 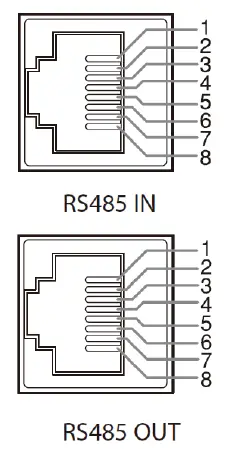
 Cascade:
Assist— Setting for Vector scope and Histogram patterns.
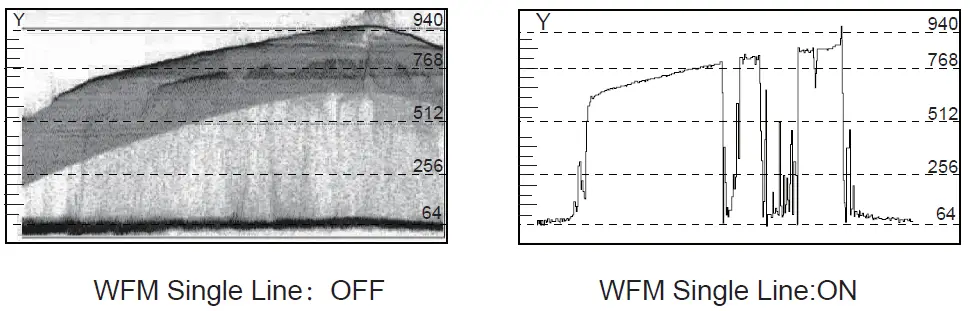
- WFM Single Line
In open waveform single-line mode, the monitor shows only one line of the audio waveform. Rotate the Menu/Enter knob to select the number of lines of the audio signal to display the waveform. (The selection range of the number of lines in a waveform depends on the current signal standard)
- Horizontal/Vertical
When the picture scale item value is set to the user, the Custom can adjust the horizontal and vertical value of the marked line according to their own needs, and the coordinate value can be adjusted in the range of 50%~99%
De-embed— Setting for video/audio analysis functions.
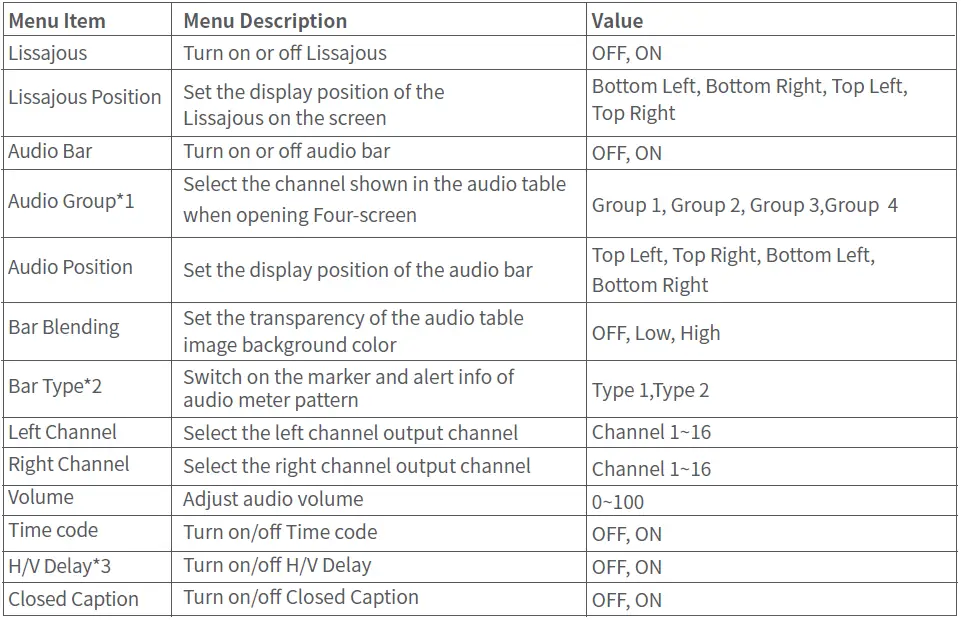
- Audio Group
When opening a four-screen, the audio bar only displays four channels of the sound channel is used to select the sound channel shown in the audio bar. - Bar Type
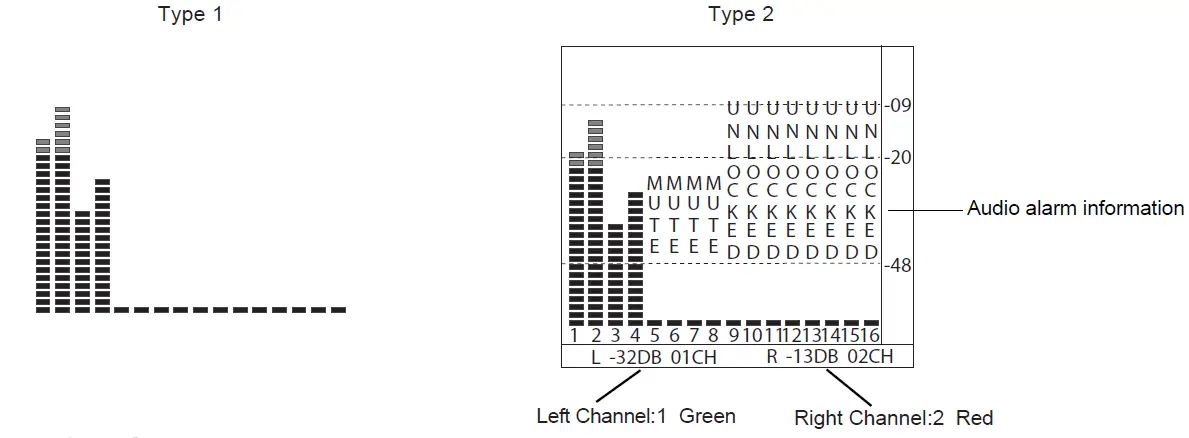
Audio table display, display 16 channel audio table
Type1: Only the audio table is displayed
Type2: Display audio decibels, audio alarm signal, and left and right channel options
- H/V Delay
H/V Delay is not displayed on the HDMI channel.
Auto Calibration*1
| Menu Item | Menu Description | Value |
| Probe Select *2 | Select a probe to use | X-rite I1 Pro OEM, Jeti Specbos 1211 |
| Start Calibration*3 | Select whether to start calibration | No/Yes |
| Measure*4 | Test current color | No/Yes |
- Auto Calibration
The monitor has 3D LUT calibration software built in and supports the following color sensor probe to directly plug into the front USB port. When starting calibration, the monitor will generate standard colors and the color sensor will read the colors one by one and upload the result to the monitor by USB connection. The monitor will compare the generated colors and sensor read colors, to work out the 3D LUT cube and calibrate itself automatically. - Probe Select
This monitor supports the following probes models:BRAND MODE X-rite I1 Pro OEM JETI Specbos 1211 - Start Calibration
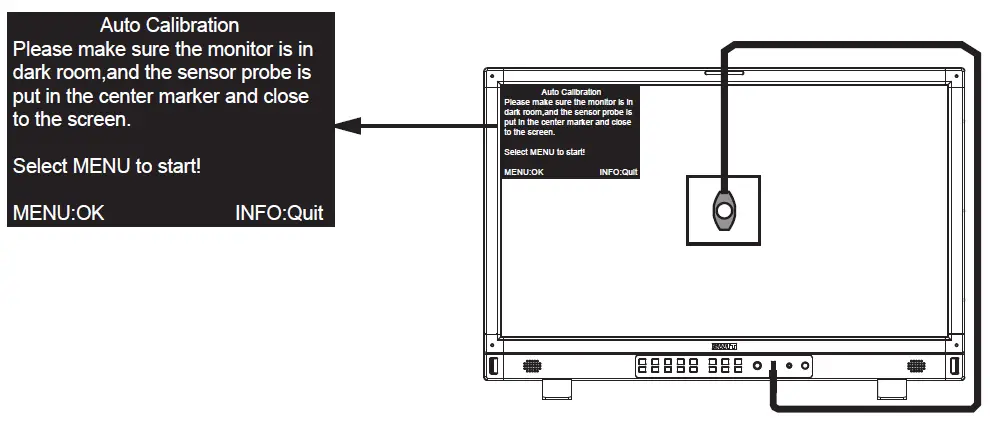
Steps:- Put the monitor into a dark room. Switch on the monitor.
- Connect the calibration instrument (compatible with x-rite and JETI color measuring instruments) and monitor via USB. Before calibration, ensure that the monitor and the color calibration instrument are in good condition and that the monitor aging time reaches 30 minutes.
- Enter the “Probe Select” and select the currently used calibration probe.
- Enter the “Start Calibration” and select “yes” to start calibration. The monitor will display the prompt message and the color position prompt box. Put the sensitive part of the device in the color position prompt box correctly. Note that when placing the calibration instrument; do not squeeze the monitor’s LCD screen.

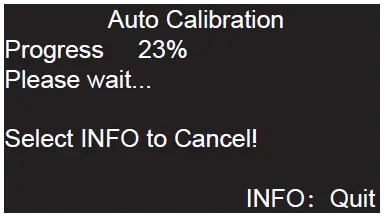
- Select “yes” to begin auto-calibration. The color calibration instrument will automatically measure the color of the screen and correct the color of the screen. During this process, it is necessary to observe the color calibration progress bar in the color correction prompt box.

- Press “INFO” to terminate the color correction process at any time. When the prompt color calibration progress reaches 100%, the whole automatic color calibration is completed. After automatic color correction, press the “INFO” button to exit the menu and let the monitor enter the normal display mode.
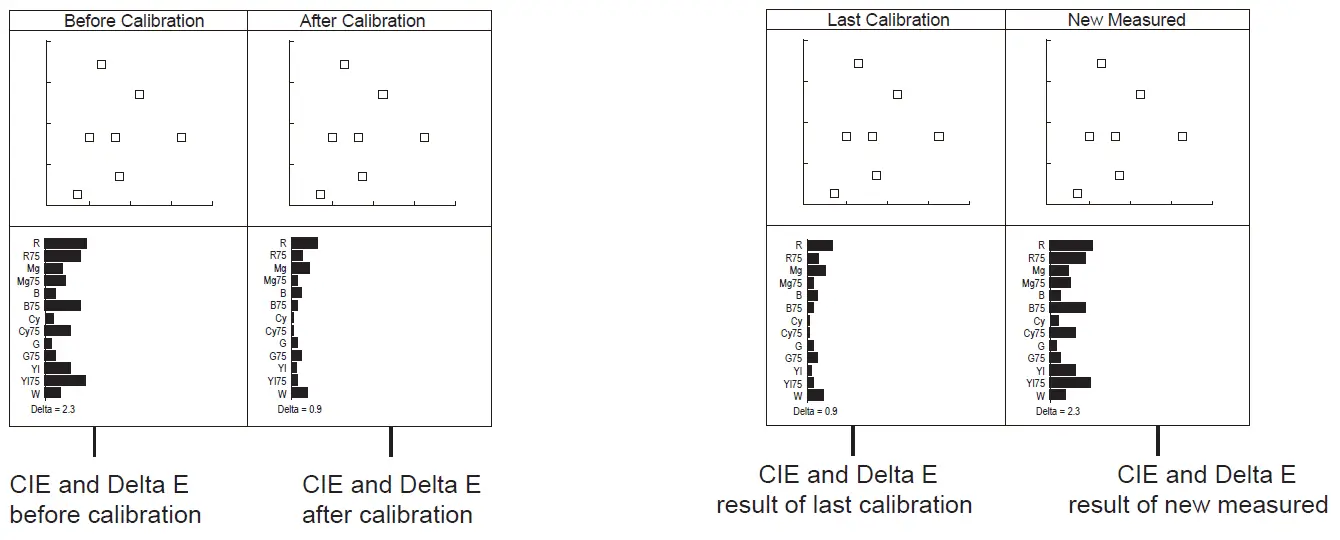
- After the automatic color correction, the display screen pops up “Before Calibration” and “After Calibration”.
- Measure
The monitor has been calibrated in the factory. And may need to be re-calibrated after a period of time. Before re-calibrated, the measure function can check the current color to compare it with the last time-calibrated color, to decide if the monitor needs to be re-calibrated.
Connect with the sensor probe and place the sensor probe in the right position like the calibration step. Enter “Auto Calibration” ‒ “Measure”.
The monitor will generate several colors and finish measures within 30 seconds. And display the result as:
System— User profile saving, firmware update
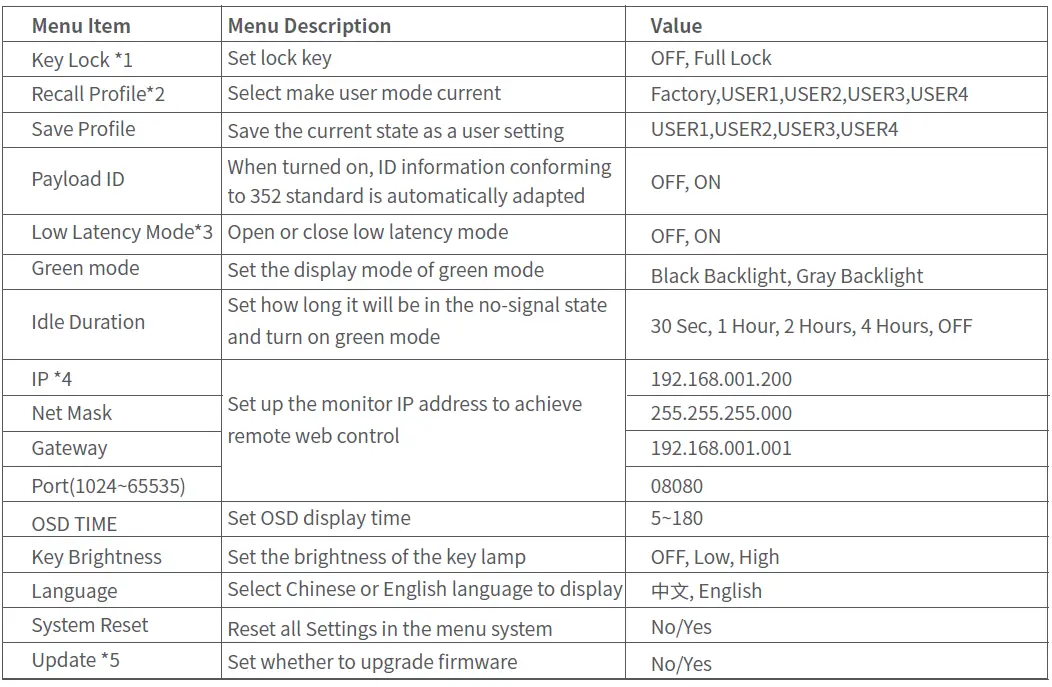
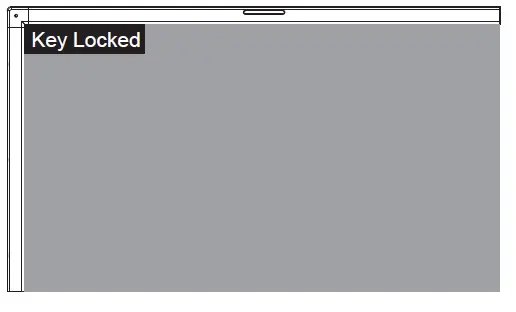
- Key Lock

The “Menu/Enter” button can be operated when the button is locked. “Key Locked” will be displayed on the screen when you press the Locked button or knob.
- Recall Profile/ Save Profile
User Settings provide 4 menu Settings, that is, users can save the current monitor menu Settings as one user Settings (USER1~USER4) according to usage habits. Then, when switching menu Settings, just select the corresponding “USER1~USER4” through the “Recall Profile” item to display the corresponding menu Settings.
Example: By adjusting the parameters of the color temperature of 2200K, open the necessary auxiliary functions (such as: histogram), set the function key to the desired menu (such as F1 is set to “Blue Only”), and so on, the monitor Menu Settings can be “USER Settings” save as “USER” 1, rotating the “Menu/Enter” choose to load the USER Settings “set to the current” USER 1
“mode, the monitor Menu item value will show” USER 1 “mode to save Menu. - Low Latency Mode
Low Latency Mode is a special image processing mode for lip-sync monitoring.
For progressive (p) formats, the monitor is low latency itself, whether low latency mode is on or off. For interlace (I) or progressive segmented Frame (psd) formats, turn on Low Latency Mode will get the lower latency.
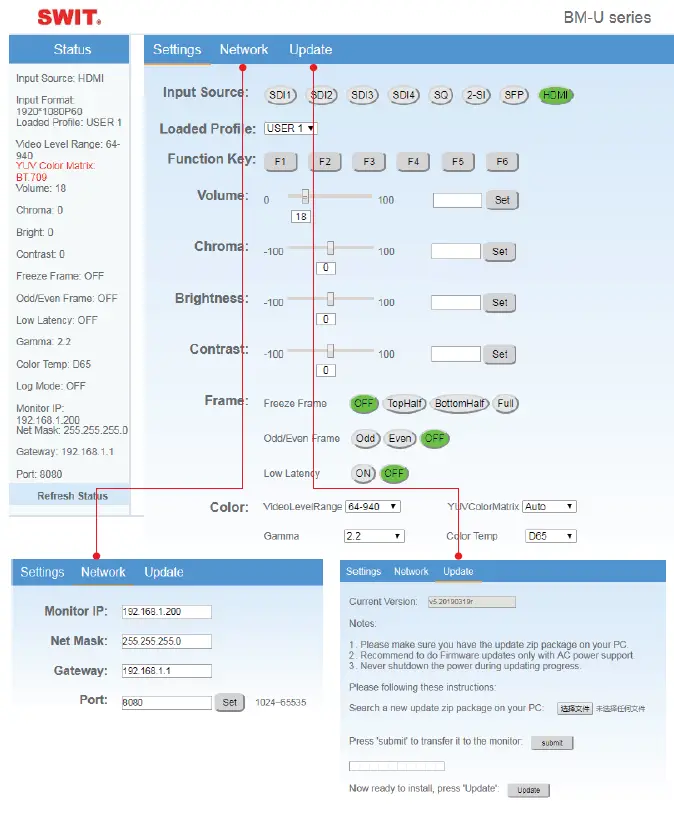
- IP control
Connect the monitor to the LAN through an ETHERNET interface, and the Monitor can be controlled by web page.
Enter Menu- System ‒ IP/Net Mask/Gateway/Port to set the monitor address. Set the computer Ether-net IP addresses at the same LAN environment as the Monitor.
Launch any web browser on the computer, and enter URL: Monitor IP+ Port (Example: 192.168.1.99.8080). The web server control page will be displayed.
- Used crossed wired cable for computer-monitor directly connection.
- Use straight-through wired cable for Router connections.
- Please seek help from your webmaster for any network connections.
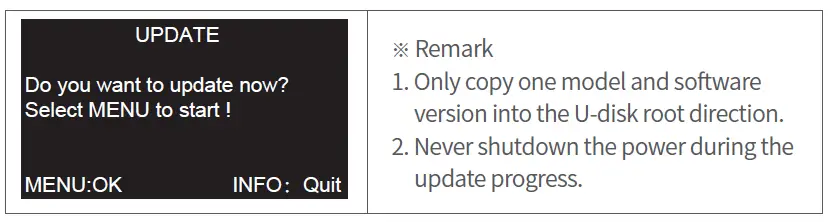
- Upgrade
System software can update by USB interface, and steps are as follows:- Download the latest software package into the U-disk root direction.
- Open the monitor and plug U-disk into USB into the port.
- Follow the step “Menu-System“, the monitor will update automatically. 4.When update finishes, press “Power” button, close and reboot the monitor.


Webserver page control interface 
Size
Monitor(unit: mm) 
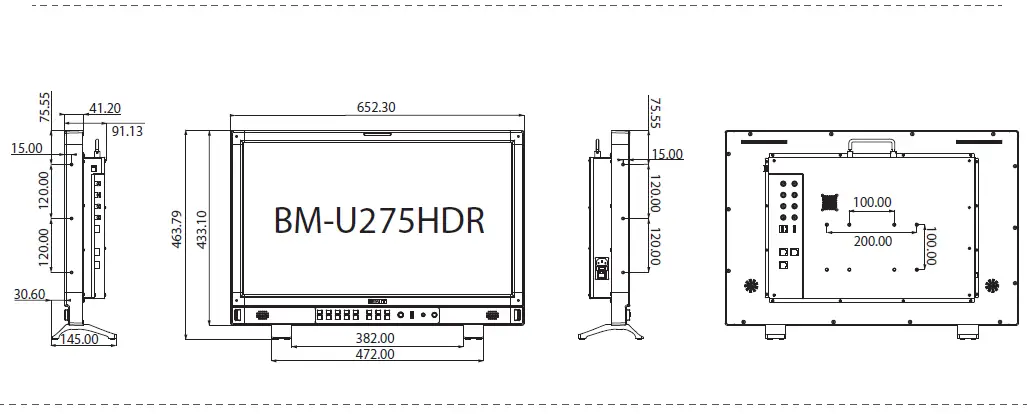
- BM-U175 and BM-U245 have a battery plate in the back, which supports battery powering.
- BM-U175 and BM-U245 can install 100*100 pitch-row VISA brackets.
- BM-U275HDR can install 100*100 or100*200 pitch-row VISA bracket.
Specification
| LCD Performance | ||||
| Model | BM-U175 | BM-U245 | BM-U275HDR | |
| Size | 17.3 | 23.8 | 27 | |
| Display area | 381.88×214.82mm | 527.04×296.46mm | 596.74×335.66mm | |
| Resolution | 3840*2160 | 3840*2160 | 3840*2160 | |
| Display Color | 16.7M | 1.07G | 1.07G | |
| Display ratio | 16:9 | 16:9 | 16:9 | |
| Brightness | 300 | 300 | 1000 | |
| Contract | 800:1 | 1500:1 | 1400:1 | |
| Viewing Angle | Horizontal/ Vertical: 178°/ 178° | Horizontal/Vertical: 178°/ 178° | Horizontal/Vertical: 178°/ 178° | |
| Input /Output | ||||
| Input | BNC×2 | 12G/6G/3G/HD/SD-SDI×2 | ||
| BNC×2 | 3G/HD/SD-SDI×2 | |||
| HDMI×1 | HDMI input | |||
| RS-485×2 | GPI×1.UMD×1 | |||
| USB×1 | ||||
| ETHERNET | ||||
| Output Other spec | BNC×2 | 12G/6G/3G/HD/SD-SDI×2 | ||
| BNC×2 | 3G/HD/SD-SDI×2 | |||
| RS-485×1 ification | UMD×1 | |||
| Other specification | ||||
| Working voltage | AC:100V~240V | AC:100V~240V | ||
| DC Battery:12V~17V | ||||
| Power consumption | 60W | 70W | 130W | |
| Working temperature | 0℃~+50℃ | |||
| Working humidity Storage temperature | 10%~90% | |||
| Storage humidity | ﹣15℃~﹢60℃ | |||
| Dimensions | 10%~90% | |||
| 436.02×310.84×88.80mm | 580.90×392.30×88.80mm | 652.30×433.10×88.80mm | ||
| Net weigh(t w/o stand) | 5.90KG | 8.87KG | 11.0KG | |
Supported Format:Signals below can display on the monitor
| No. | Format | Input terminal | Signal format shown in the Status Display as | ||||
| SDI1/2 &SFP | SDI 3/4 | Quadlink SDI | HDMI — | SDI&SFP | HDMI | ||
| 1 | 720×480/60I | √ | √ | — | 720*480I60 | 720*480I60 | |
| 2 | 720×480/60P | — | — | — | √ — | 720*480P60 | 720*480P60 |
| 3 | 720×576/50I | √ | √ | — | 720*576I50 | 720*576I50 | |
| 4 | 720×576/50P | — | — | — | √ | 720*576P50 | 720*576I50 |
| 5 | 1280×720/23.98P | √ | √ | — | √ | 1280*720P23.98 | 1280*720P24 |
| 6 | 1280×720/24P | √ | √ | — | √ | 1280*720P24 | 1280*720P24 |
| 7 | 1280×720/25P | √ | √ | — | √ | 1280*720P25 | 1280*720P25 |
| 8 | 1280×720/29.97P | √ | √ | — | √ | 1280*720P29.97 | 1280*720P30 |
| 9 | 1280×720/30P | √ | √ | — | √ | 1280*720P30 | 1280*720P30 |
| 10 | 1280×720/50P | √ | √ | — | √ | 1280*720P50 | 1280*720P50 |
| 11 | 1280×720/59.94P | √ | √ | — | √ | 1280*720P59.94 | 1280*720P60 |
| 12 | 1280×720/60P | √ | √ | — | √ | 1280*720P60 | 1280*720P60 |
| 13 | 1920×1080/50I | √ | √ | — | √ | 1920*1080I50 | 1920*1080I50 |
| 14 | 1920×1080/59.94I | √ | √ | — | √ | 1920*1080I59.94 | 1920*1080I60 |
| 15 | 1920×1080/60I | √ | √ | — | √ | 1920*1080I60 | 1920*1080I60 |
| 16 | 1920×1080/23.98PSF | √ | √ | — | √ | 1920*1080PSF23.98 | 1920*1080PSF24 |
| 17 | 1920×1080/24PSF | √ | √ | — | √ | 1920*1080PSF24 | 1920*1080PSF24 |
| 18 | 1920×1080/23.98P | √ | √ | — | √ | 1920*1080P23.98 | 1920*1080P24 |
| 19 | 1920×1080/24P | √ | √ | — | √ | 1920*1080P24 | 1920*1080P24 |
| 20 | 1920×1080/25P | √ | √ | — | √ | 1920*1080P25 | 1920*1080P25 |
| 21 | 1920×1080/29.97P | √ | √ | — | √ | 1920*1080P29.97 | 1920*1080P30 |
| 22 | 1920×1080/30P | √ | √ | — | √ | 1920*1080P30 | 1920*1080P30 |
| 23 | 1920×1080/48P | √ | √ | — | √ | 1920*1080P48 | 1920*1080P48 |
| 24 | 1920×1080/50P | √ | √ | — | √ | 1920*1080P50 | 1920*1080P50 |
| 25 | 1920×1080/59.94P | √ | √ | — | √ | 1920*1080P59.94 | 1920*1080P60 |
| 26 | 1920×1080/60P | √ | √ | — | √ | 1920*1080P60 | 1920*1080P60 |
| 27 | 2048×1080/23.98PSF | √ | √ | — | √ | 2048*1080PSF23.98 | 2048*1080PSF24 |
| 28 | 2048×1080/24PSF | √ | √ | — | √ | 2048*1080PSF24 | 2048*1080PSF24 |
| 29 | 2048×1080/25PSF | √ | √ | — | √ | 2048*1080PSF25 | 2048*1080PSF25 |
| 30 | 2048×1080/29.97PSF | √ | √ | — | √ | 2048*1080PSF29.97 | 2048*1080PSF30 |
| 31 | 2048×1080/30PSF | √ | √ | — | √ | 2048*1080PSF30 | 2048*1080PSF30 |
| 32 | 2048×1080/23.98P | √ | √ | — | √ | 2048*1080P23.98 | 2048*1080P24 |
| 33 | 2048×1080/24P | √ | √ | — | √ | 2048*1080P24 | 2048*1080P24 |
| 34 | 2048×1080/25P | √ | √ | — | √ | 2048*1080P25 | 2048*1080P25 |
| 35 | 2048×1080/29.97P | √ | √ | — | √ | 2048*1080P29.97 | 2048*1080P30 |
| 36 | 2048×1080/30P | √ | √ | — | √ | 2048*1080P30 | 2048*1080P30 |
| 37 | 2048×1080/47.94P | √ | √ | — | √ | 2048*1080P47.94 | 2048*1080P50 |
| 38 | 2048×1080/48P | √ | √ | — | √ | 2048*1080P48 | 2048*1080P48 |
| 39 | 2048×1080/50P | √ | √ | — | √ | 2048*1080P50 | 2048*1080P50 |
| No. | Format | Input terminal | Signal format shown in the Status Display as | ||||
| SDI1/2 &SFP | SDI 3/4 | QuaSdDlIink | HDMI | SDI&SFP | HDMI | ||
| 40 | 2048×1080/59.94P | √ | √ | — | √ | 2048*1080P59.94 | 2048*1080P60 |
| 41 | 2048×1080/60P | √ | √ | — | √ | 2048*1080P60 | 2048*1080P60 |
| 42 | 3840×2160/23.98P | √ | — | √ | √ | 3840*2160P23.98 | 3840*2160P24 |
| 43 | 3840×2160/24P | √ | — | √ | √ | 3840*2160P24 | 3840*2160P24 |
| 44 | 3840×2160/25P | √ | — | √ | √ | 3840*2160p25 | 3840*2160p25 |
| 45 | 3840×2160/29.97P | √ | — | √ | √ | 3840*2160P29.97 | 3840*2160P30 |
| 46 | 3840×2160/30P | √ | — | √ | √ | 3840*2160P30 | 3840*2160P30 |
| 47 | 3840×2160/47.94P | √ | — | √ | √ | 3840*2160P47.94 | 3840*2160P50 |
| 48 | 3840×2160/48P | √ | — | √ | √ | 3840*2160P48 | 3840*2160P48 |
| 49 | 3840×2160/50P | √ | — | √ | √ | 3840*2160P50 | 3840*2160P50 |
| 50 | 3840×2160/59.94P | √ | — | √ | √ | 3840*2160P59.94 | 3840*2160P60 |
| 51 | 3840×2160/60P | √ | — | √ | √ | 3840*2160P60 | 3840*2160P60 |
| 52 | 4096×2160/23.98P | √ | — | √ | √ | 4096*2160P23.98 | 4096*2160P24 |
| 53 | 4096×2160/24P | √ | — | √ | √ | 4096*2160P24 | 4096*2160P24 |
| 54 | 4096×2160/25P | √ | — | √ | √ | 4096*2160P25 | 4096*2160P25 |
| 55 | 4096×2160/29.97P | √ | — | √ | √ | 4096*2160P29.97 | 4096*2160P30 |
| 56 | 4096×2160/30P | √ | — | √ | √ | 4096*2160P30 | 4096*2160P30 |
| 57 | 4096×2160/47.94P | √ | — | √ | √ | 4096*2160P47.94 | 4096*2160P48 |
| 58 | 4096×2160/48P | √ | — | √ | √ | 4096*2160P48 | 4096*2160P48 |
| 59 | 4096×2160/50P | √ | — | √ | √ | 4096*2160P50 | 4096*2160P50 |
| 60 | 4096×2160/59.94P | √ | — | √ | √ | 4096*2160P59.94 | 4096*2160P60 |
| 61 | 4096×2160/60P | √ | — | √ | √ | 4096*2160P60 | 4096*2160P60 |
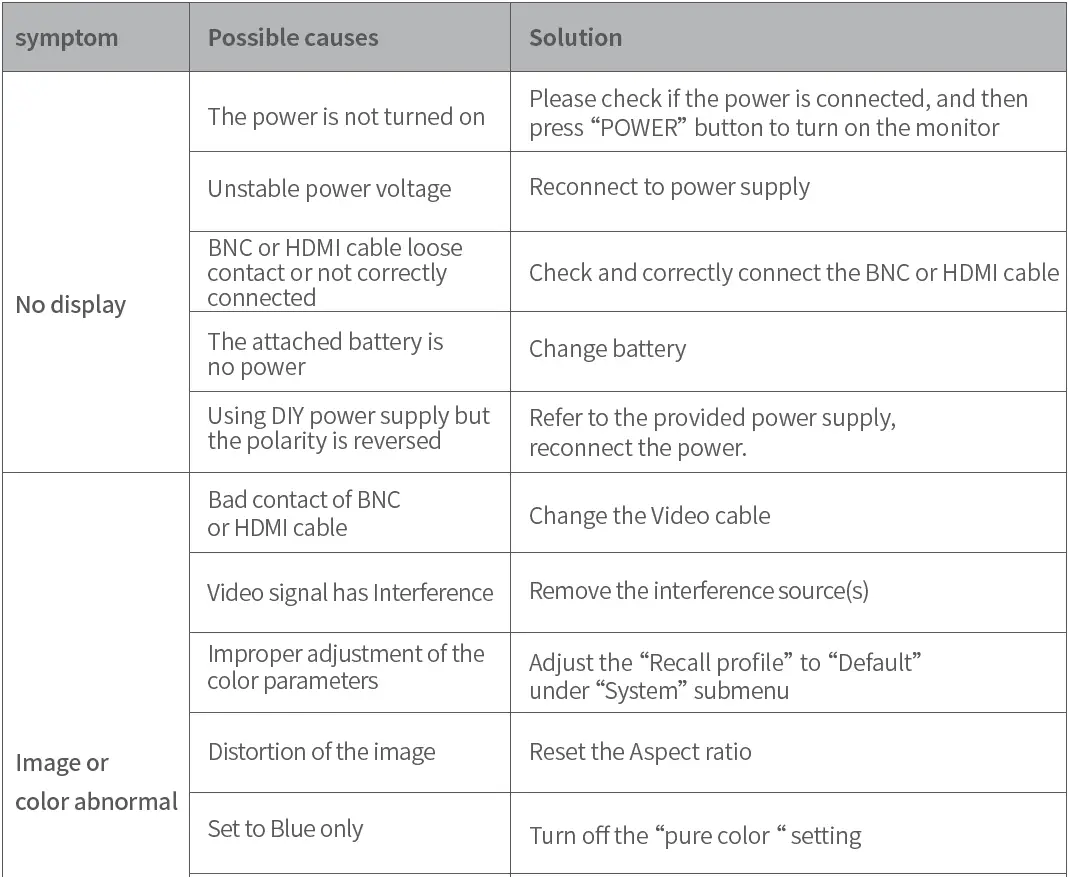
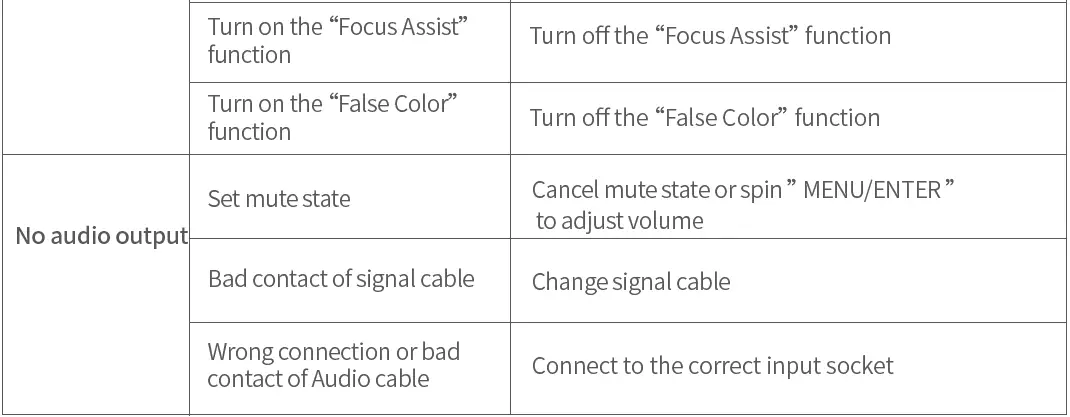
Trouble-shooting
SWIT Electronics Co., Ltd.
Add: 10 Hengtong Road, Xin’gang, Nanjing Economic and Technological Development Zone, Nanjing 210038, P.R.China
Tel: +86-25-85805753
Email: [email protected]
SWIT Electronics Europe GmbH
Add: Hochstr. 17, 47228 Duisburg, Germany
Tel: +49(0)20659799339
Email: [email protected]
SWIT Electronics America, Inc
Add: 3350 Scott Boulevard 61-02, Santa Clara, CA 95054, USA
Tel: (408)260-8258, 1-866-986-SWIT(7948)
Email: [email protected]


