![]()
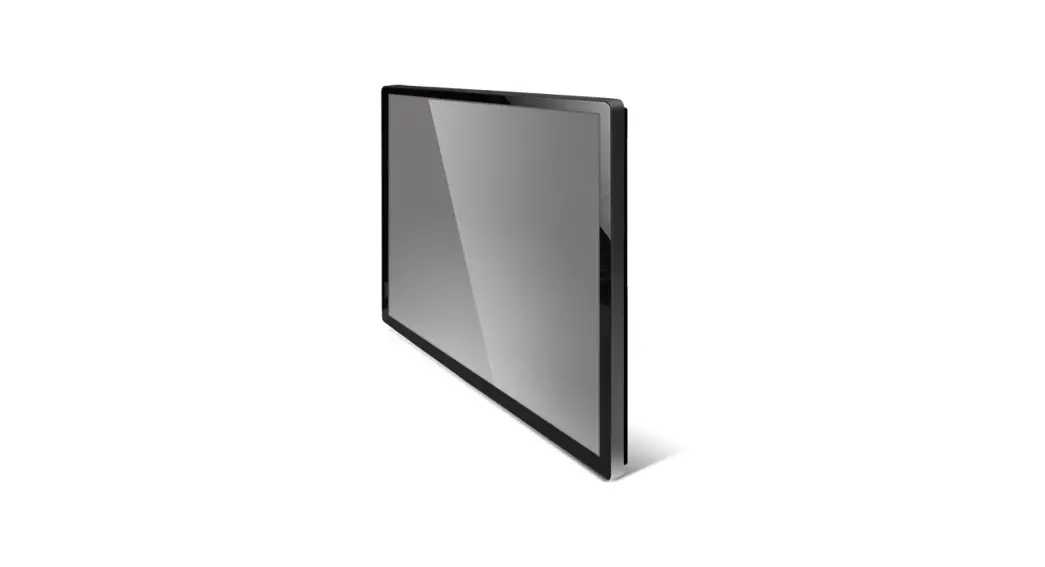
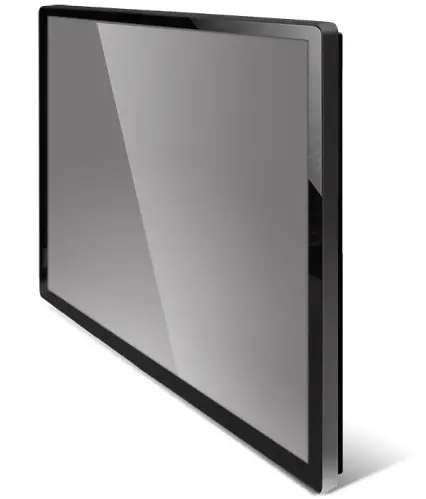
32” Wide 4K Ultra HD Touch Monitor
LM-3237-26-4K
USER’S MANUAL
General Description
Overview
This zero-bezel monitor is designed for commercial and industrial applications, such as kiosks, digital signage, military, security, industrial equipment, and instrumentation equipment. This product can provide high brightness/contrast to achieve better viewing effect and good reliability at wide environments conditions.
Features
- 1mm ultra-thin bezel thickness.
- LED backlight.
- 350 Nits sunlight readable display.
- 4K Ultra HD (3840 x RGB x 2160 pixels) resolution.
- VA mode with wide viewing angle.
- PCAP 10-point touch
- RoHS Compliance.
- 5 keys OSD controls.
- USB Type-B Connector.
- DP / DVI / HDMI Video Input and auto-detection video system.
Application
Industrial Applications, especially for kiosk and public signage display.
Specifications
The following items are characteristic summary on the table at 25°C condition
| Item | Specification | Unit | Note | |
| LCD Panel | Active Screen Size | 698.40(H) x 392.85(V) (31.5 inches diagonal) | mm | |
| Resolution | 3840(H) x 2160W) | pixels | ||
| Pixel Pitch | 0.181(H) x 0.181(V) | mm | ||
| Pixel Arrangement | RGB Vertical Stripe | |||
| Display Mode | VA Mode, Normally Black | |||
| Display Colors | 1.073G | colors | ||
| Brightness | 350 | nits | ||
| Contrast Ratio | 3000:1 | |||
| Response Time | 9.5ms (on/off) | |||
| Aspect Ratio | 16:09 | |||
| Touch Screen | Technique | PCAP 10-point touch | ||
| Material | Ultra-Thin Tempered glass Light transmittance over 87% | |||
| Working Life | Over 60 million times click touch | |||
| Touching Tool | Finger or Stylus | |||
| Response Time | 8ms | |||
| Graphic | Input Connector | DP, DV], HOMI | ||
| Power | Power Input | DC 12V (Adapter) | VAC | |
| Power Consumption | Operation Mode | 60 (Max) | W | |
| Saving Mode | 2.5 (Max) | W | ||
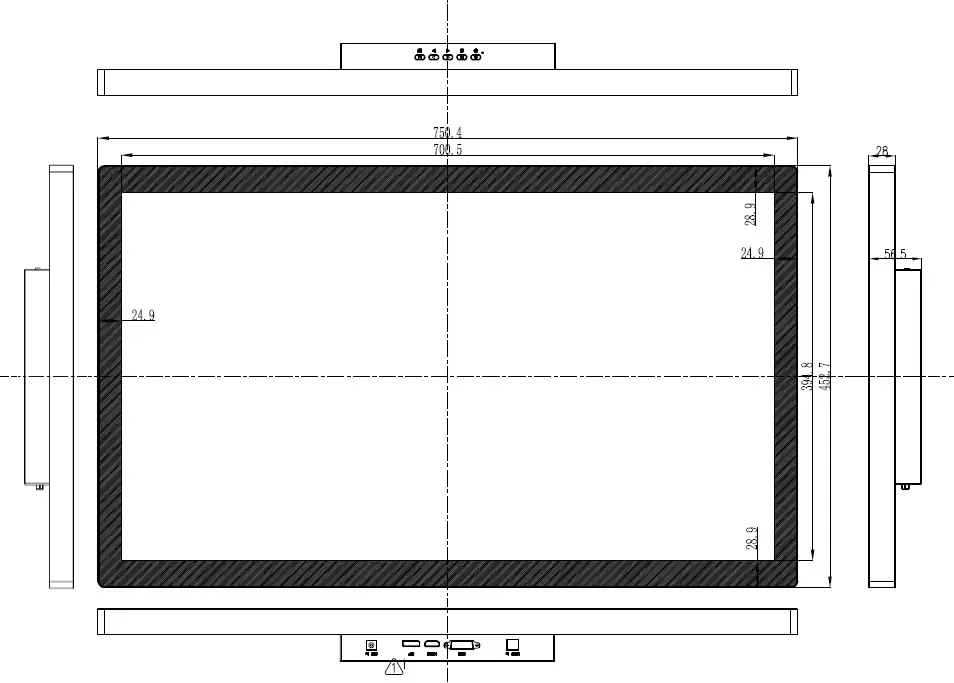
| Physical | Dimension | 750.4(W)*452.7(H)*56.5(0) | mm | |
| Weight | Approx. 11 | KG | ||
| Environment | Operating Temp. | -10 — 50 | °C | 1 |
| Storage Temp. | -20 –60 | C | ||
| Reliability | Backlight MTBF | 30,000 | Hours | |
| Warranty | 12 | month | ||
| ON/OFF Cycle | 36,000 | cycle | ||
| DCC | Plug & Play | DDC 28 Compliance | ||
| Function | OW Key | S keys (Power, Exit, | ||
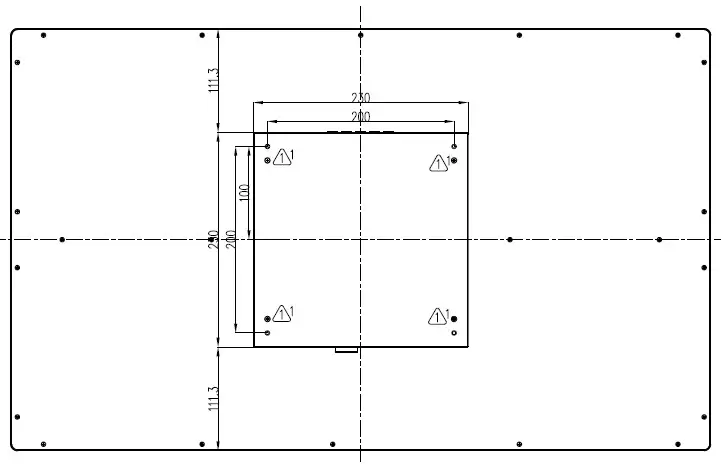
| Wall Mount | VESA standard 200 x 200 | mm |
Note 1: The unit should not be exposed to corrosive chemicals.
Optical Characteristics
The relative measurement methods of optical characteristics are shown below.
| Item | Sym | Condition | Min. | Typ. | Max. | Unit | Note | |
| Center Luminance of White | Lc | Normal Direction | 250 | 350 | CD/m2 | |||
| Center Color Chromaticity or White | Red | Rx | Typ 0.03 | 0.685 | Typ + 0.003 | |||
| Ry | 0.310 | |||||||
| Green | Gx | 0.260 | ||||||
| Gy | 0.685 | |||||||
| Blue | Bx | 0.150 | ||||||
| By | 0.060 | |||||||
| White | Wx | 0.313 | ||||||
| Wy | 0.329 | |||||||
| Uniformity | 5 points | 6W | 65 | 75 | ||||
| Contrast Ratio | CR | 2000 | 3000 | |||||
| View Angle | Horizontal | ex+ | CR a. 10 | 80 | 89 | Deg. | ||
| ex- | 80 | 89 | ||||||
| Vertical | 8x+ | 80 | 89 | |||||
| ex- | 80 | 89 | ||||||
| Response Time | TR | Normal Direction | 10. | 20 | ms | |||
| Tr | ||||||||
| Crosstalk (in 60Hz) | 2. | % | ||||||
Measurement Setup: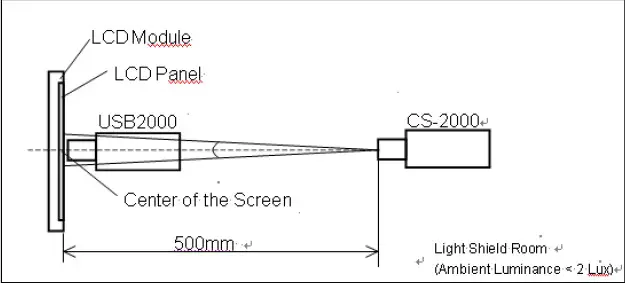
The LCD module should be stabilized at a given temperature for 40min. to avoid abrupt temperature change during the measuring.
OSD Functions
OSD Key Instruction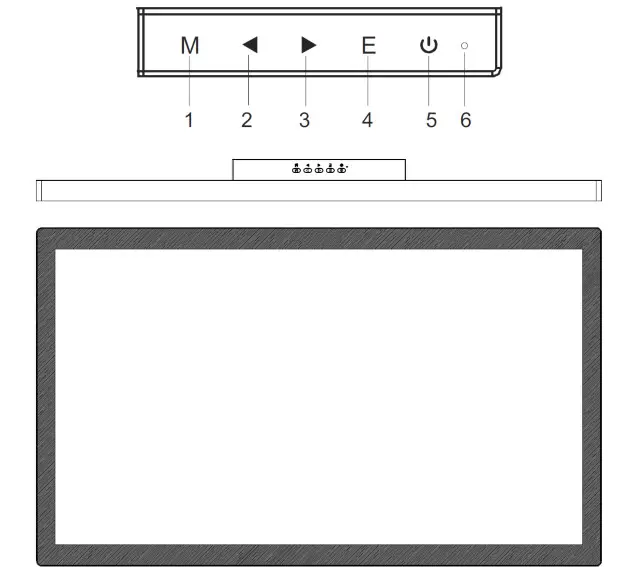
Description of Key Function
| 1 | M | Pops up the menu/Backs to the previous menu (in case of main menu exits from the whole menu). |
| 2 | When the menu is activated, used as the left function selection key, and decreases progressively the value of the progress bar; when the menu is inactivated, used as the specified shortcut mode hotkey. | |
| 3 | When the menu is activated, used as the right function selection key, and increases progressively the value of the progress bar; when the menu is inactivated, used as the specified shortcut mode hotkey. | |
| 4 | E | If the menu is activated, choose the corresponding function. |
| 5 | Power switch: Powers on/off the monitor. | |
| 6 | LED Power Indicator | Blue: in the normal switch-on state; flickering in blue: in a power-saving state. |
Note: The physical keys of the specific model shall govern.
Operation Menu (OSD) Function Descriptions
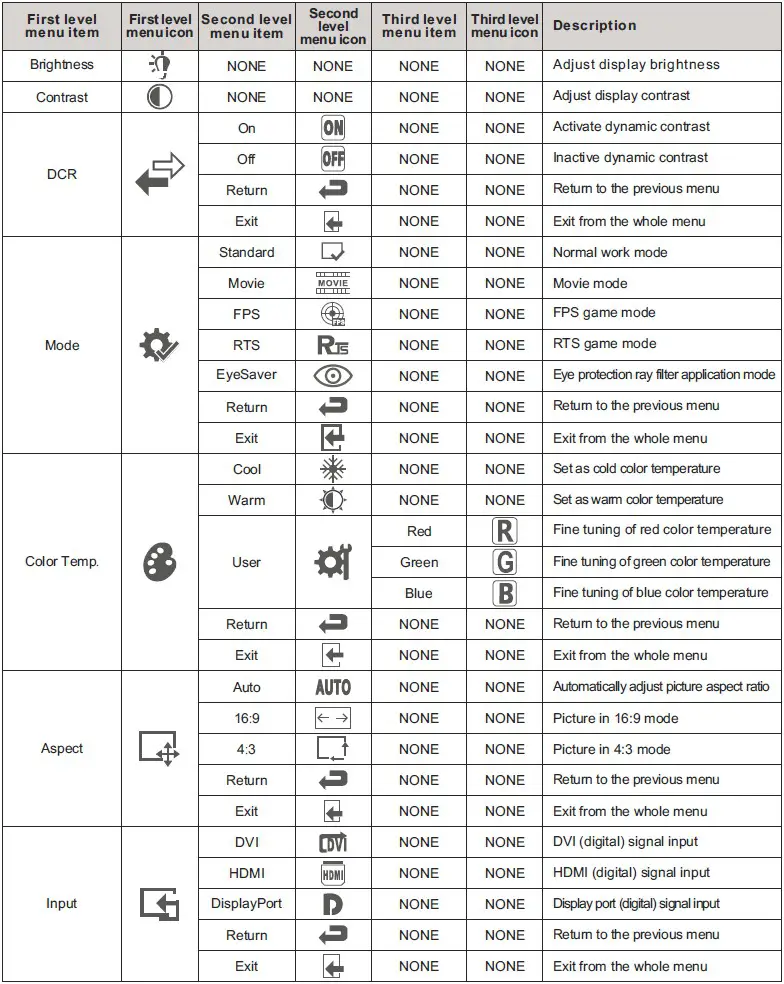
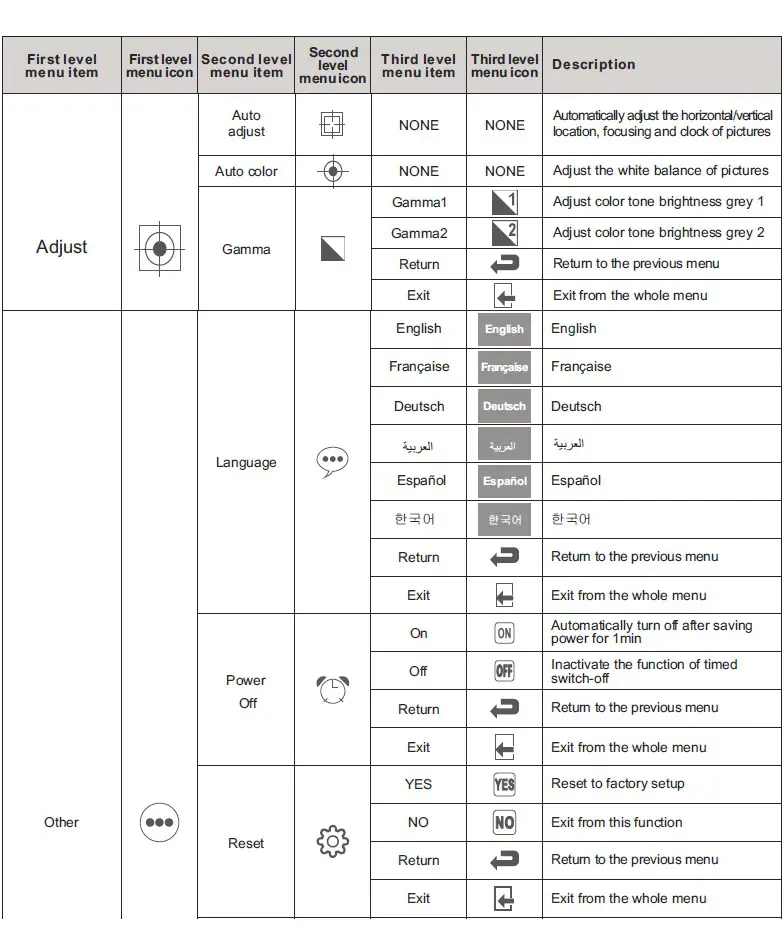
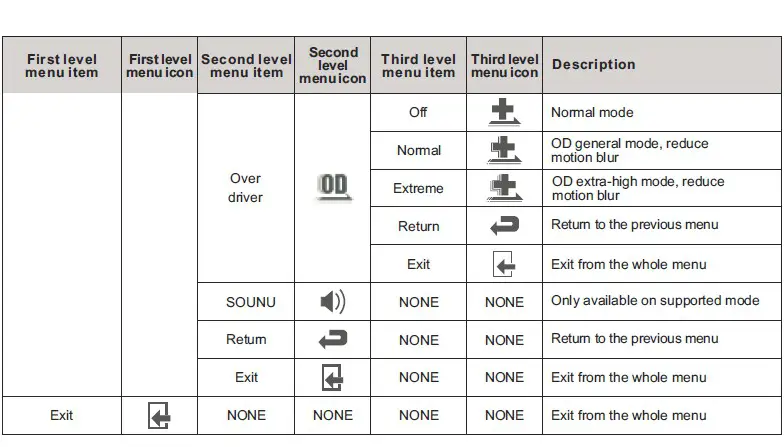
Note: The functions may be adjusted due to a specific model or the upgrade of the software version. The physical model shall govern.
Installing the Monitor
Customer ports and instructions as below: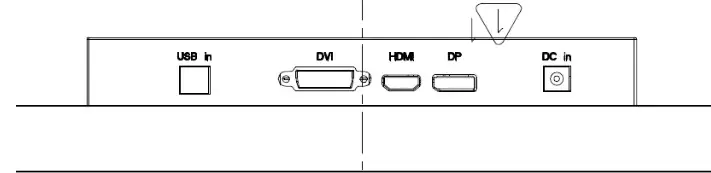
If the computer is turned on, you must turn it off before continuing.
Do not plug in or turn on the power to the monitor until instructed to do so.
- Attach the monitor base (Bypass)
- Connect the PC video cable.
- Connect the power cable to the monitor.
- Route the cables via the cable clip.
- Connect to and turn on the power.
Special Note:
- If the video card does not support the current resolution, please adjust the resolution to 16:9 format (1366 X 768 or 1920 X 1080 and so on).
- When the monitor is operating continuously, the chassis will be “warm”.
Trouble Shooting
If experiencing trouble with the monitor, or it fails to operate correctly, please refer to the following instructions before calling for repairs.
| Trouble | Suggestion |
| 1. The picture does not appear |
|
| 2. The screen is not synchronized |
|
| 3. The position of the screen is not in the center |
|
| 4. The screen is too bright (too dark) |
|
| 5. The screen is shaking or waving |
|
If you are unable to correct the fault by using this chart, stop using your monitor and contact us.
Appendix 1: Mechanical Drawing (Preliminary)


 Monitor User Manual")


