
SWIT BM-215NDI BM-NDI 4K Studio LCD Monitor
Attention
Warning
- Do not put the monitor in rainy or wet environment to avoid the dangerous of fire or electric shock;
- Do not put the monitor close to any device with high-intensity magnetic.
Warning of power connection
- Please using original power adaptor to avoid damage;
- When using other DC power ,make sure the range of voltage,output power and polarity of it meet requirements;
- Please cut off the power including AC power cable or battery under below conditions:
(A)If the monitor will not be used for a long time.
(B)If the power cable or power socket is damaged.。
(C)If the housing of the monitor is broken by out-force or falling.
Warning of using
- Do not touch the surface of screen directly to avoid damage,also the fingerprint on the screen will be hard to clean.
- Do not put pressure on the LCD screen because LCD screen is fragile;
- Do not put the monitor on anywhere unstable to avoid falling.
Maintenance and cleaning
- Use soft dry cloth and LCD screen clean liquid to clean the dust and stain on the screen.
- Do not put pressure on LCD screen when doing cleaning.
- Do not clean the LCD screen by water or other chemical liquid to avoid damage.
Packing list
| No. | Standard accessories Monitor | Quantities X 1 |
| 1 | Monitor | X 1 |
| 2 | Battery plate(V-mount or Gold-mount) | X1 |
| 3 | Monitor stand | X 2 |
| 4 | Power cable | X 1 |
Overview
The resolution of BM-NDI series LCD monitor is up to 1920*1080, H178°/ V178° super wide angle of view, support 2* 3G/HD/SD-SDI input , 1* HDMI 2.0 input and 1* NDI input, 1* 3G/HD/SD-SDI loop out, 1* NDI to SDI loop out, 1* 3.5mm jack input and speaker.
Features
- 1920×1080 HD resolution
- Support NDI signal input, multi signal source input
- Support 16 channel embedded audio bar, any of two channel can be chosen to output
- Waveform Y/Cb/Cr/R/G/B/RGB, support single line waveform
- Support vector scope, R/G/B/Y histogram, red/blue focus assist
- Support 3DLUT(17x17x17)Auto self-calibration
- Support TSL UMD and text TALLY(TSL 3.1/4.0)
- Safety Marker:4:3/13:9/14:9/15:9/16:9/1.85:1/2.35:1/2.39:1/2:1/User 1/User 2
- Support USB firmware update and LOG file uploading (The format of USB driver should be FAT 32)
- Support Green mode.
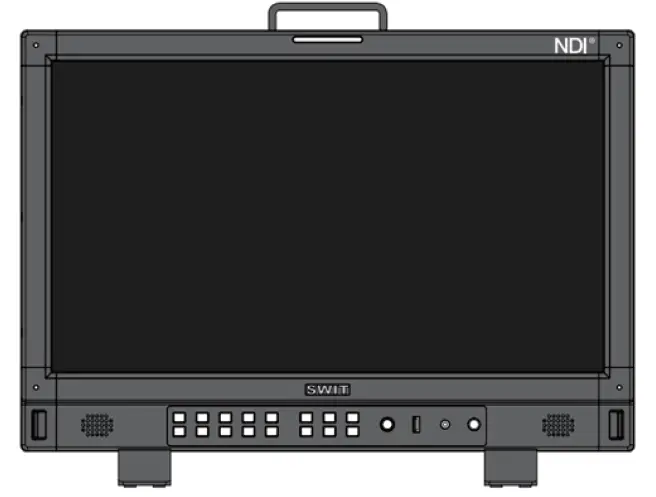
Instruction
Front panel view
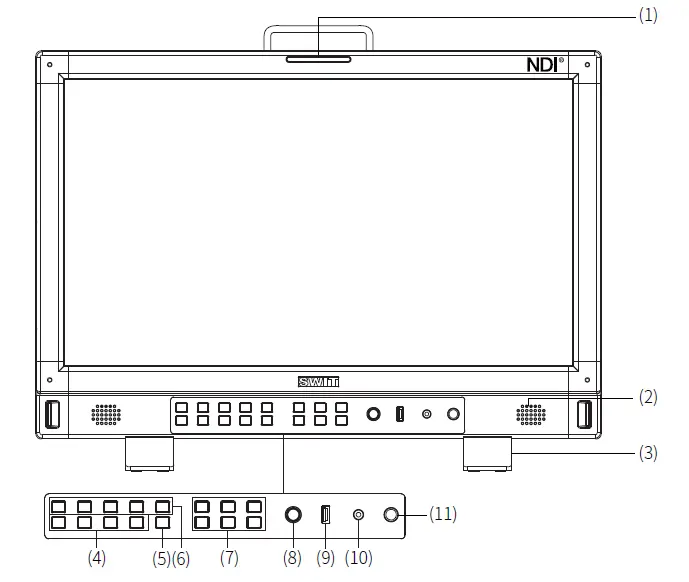
- Tally light: Can be set to red, green and yellow
- Speaker: Can play embedded audio of HDMI, SDI and NDI(. Speaker will not work when earphone is connecting)
- Desktop stand feet
- User1~User4:In order to quickly enter in the mode which was preset already .Hold the shortcut button to save current user setting.Specific please see“ The menu content-Ⅷ. System”
- INFO:Press ”INFO” to remove or recover all current function in display like status information and A/V analyzed pattern;Press“ INFO” to exit menu when the menu is on
- F1~F5 Function key:User can set these function key to different function according to their requirement


- Menu/Enter:When menu is off,press the button directly to open the Main Menu;rotate “ MENU” to choose different setting selection or adjust the value;press the knob to confirm the setting;
- LUT/Firmware:Firmware update or LUT file upload;
- PHONE:3.5mm jack input,monitor embedded SDI and HDMI audio signal;
- Power:power switch.
Back side view
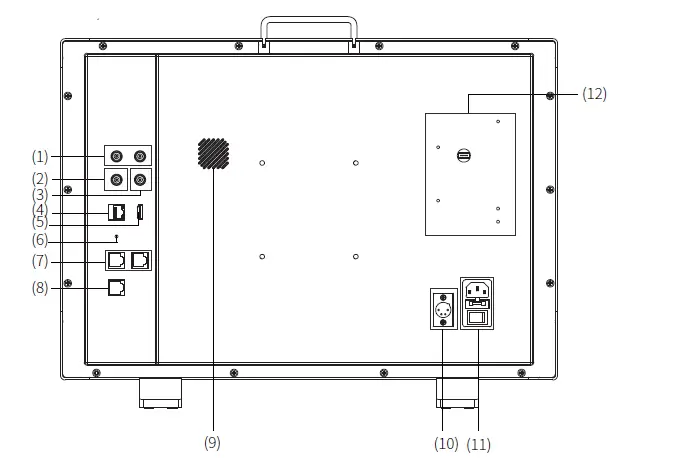
- SDI IN1/2: 3G-SDI
- NDI-SDI loop out:3G-SDI
- SDI loop out:3G-SDI
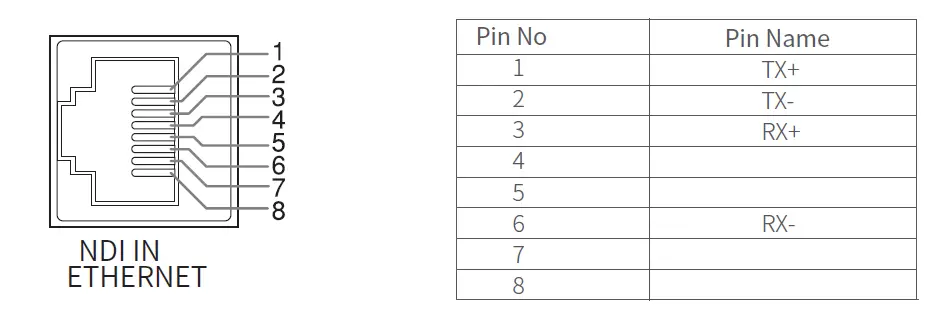
- NDI IN:12G /3G-SDI
- HDMI 2.0 IN:The DHCP protected content is not displayed
- Reset: Formatting button
Instruction(Do not do this without SWIT permission)- Switch off monitor;
- Touch and keep pressing the small button with suitable tool (Do not release it when switch on monitor)
- Switch on monitor with“ POWER” button,Tally light will show red light (release the reset button after tally light shows red light)
- Wait for 5~10s,Tally light shows green
- Reboot monitor to finish resetting.
- RS485 #:TSL UMD control port
- GPI #:GPI control port
- Fan
- DC IN:12V~17V
- AC IN:100V~240V
- Battery plate:Support V-mount battery or Gold-mount battery
OSD
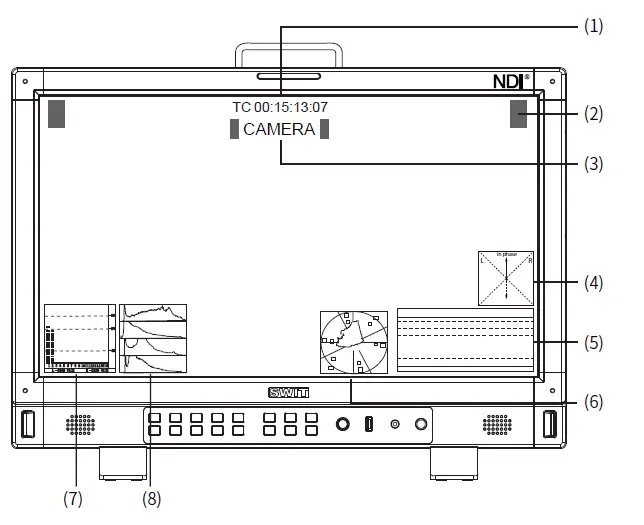
- Time code(SDI)
Display the information of time code which is embedded in SDI signa(l LTC,VITC1&2),monitor will show“ TC:UNLOCKED” if no time code information is detected.User can set shortcut key (F1~F5) or GPI pin to“ time code” function,in order to quickly switch on/off this function. - On screen TALLY
The tally signal is controlled by GPI. - Source ID/UMD
Display/UMD(TSL3.1/4.0),user can set in the UMD menu. - Lissajous pattern
Lissajous pattern will show audio signal,user can set shortcut key(F1~F5) or GPI pin to “Lissajous pattern” function,in order to quickly switch on/off this function. - Waveform
User can switch on/off“ Waveform” function or choose different type of waveform by setting shortcut key(F1~F5) or GPI pin to“ Waveform” function on the front panel.The parameters such as on-screen-position,transparency and color of“ waveform” can be set in MENU. - Vector scope
User can switch on/off“ Vector scope” function by setting shortcut key(F1~F5) or GPI pin to “Vector scope” on the front panel.The parameters such as on-screen-position, transparency and color of“ Vector scope” can be set in MENU. - Audio meter
In order to monitor audio signal,User can switch on/off“ Audio meter” function by setting shortcut key(F1~F5) or GPI pin to“ Audio meter” function on the front panel. The parameters such as on-screen position, transparency and numbers of audio channel o“f Audio meter” can be set in MENU. - Histogram
User can switch on/off“ Histogram” function by setting shortcut key(F1~F5) or GPI pin to “Histogram” function on the front panel.
Status
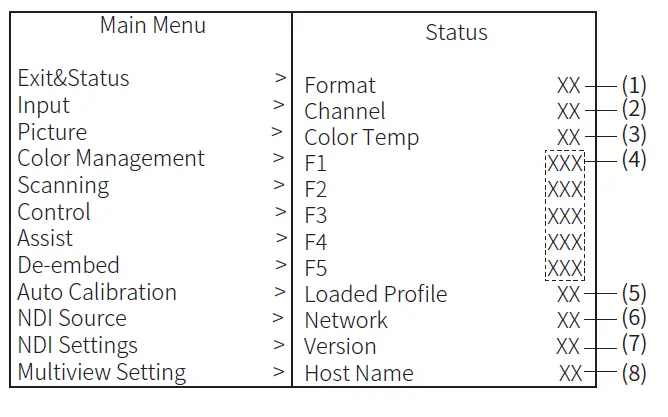
Press“ Menu/Enter”,the menu will show in the top left corner of screen,“Exit & status” will show current working status of monitor.
- Format
Show current input signal format;Will show“ NO SIGNAL” when there is no recognizable input signal”.Will show the format of current SDI source when the input source is SDI. - Channel
Show current chosen input source. - Color temp
Show current color temperature. - Function Key F1~F5
Show the function of Key F1~F5. - Loaded Profile
Show current user mode. - Network
Show the connection status of Internet. - Version
Show version of current firmware . - Host name
Show the model of this monitor
Operation
Steps
- Press“ Menu/Enter” knob,the menu will show on top left corner of screen.
- Turn“ Menu/Enter” left and right to choose different sub-menu,the chosen one will show yellow backlight, press“Menu/Enter” knob to set the corresponding parameter.
- Turn“ Menu/Enter” knob left and right to set corresponding parameter,press“ Menu/Enter”knob, the chosen one will show yellow backlight.
- Turn“ Menu/Enter” knob left and right to set corresponding parameter,press“ Menu/Enter” knob to save the setting after finish adjustment.
- Turn“ Menu/Enter” knob to choose“ EXIT”,press“ Menu/Enter” knob,exit the sub menu, choose “ EXIT & STATUS” in the main menu,press“ Menu/Enter” knob to exit main menu.
Attention
- The options which shown grey can not be set.
- The menu will save and exit automatically when no operation is performed within a period of time.
The menu content
“The menu content” will introduce the specific contents of setting in menu and sub-menu,the menu option which is noted with“ * ” will be explained in detail under the list.
Input—Set the color of input video
| Menu option Input range *1 | Instruction Set the input range of video | The range of value 0-1023,4-1019,64-940,64-1023 |
| YUV Color Matrix | Choose YUV Color Matrix | Auto,BT.601,BT.709,BT.2020 |
| Red Gain | Adjust the value of Red Gain | -100 ~ +100 |
| Green Gain | Adjust the value of Blue Gain | -100 ~ +100 |
| Blue Gain | Adjust the value of Red Bias | -100 ~ +100 |
| Red Bias | Adjust the value of Green Bias | -100 ~ +100 |
| Green Bias | Adjust the value of Blue Bias | -100 ~ +100 |
| Blue Bias | Reset the value of Gain and Bias | -100 ~ +100 |
| Reset | Reset the value of Gain and Bias | / |
Input range
Set the input range to compatible with input video signal,the default input range is 64-940 which is compatible with broadcast application program.
Picture *1—Set the display of input video
| Menu option Contrast | Instruction Adjust the contrast of video | The range of value -100 ~ +100 |
| Brightness | Adjust the brightness of video | -100 ~ +100 |
| Saturation | Adjust the saturation of video | -100 ~ +100 |
| Sharpness | Adjust the sharpness of video | 0 ~ +100 |
| Backlight | Adjust the backlight of video | 0 ~ +100 |
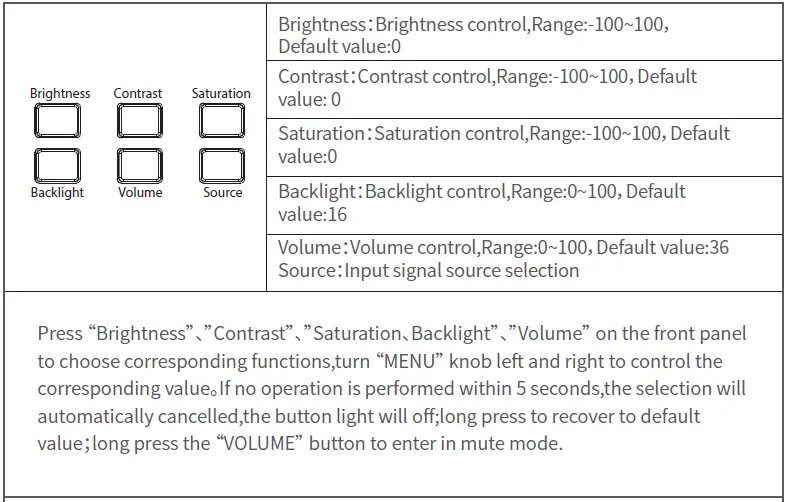
The value of“ Contrast”“, Brightness”“, Saturation”,“Sharpness” and“ Backlight” can be quickly adjusted by the shortcut key on the front panel.
Color management—Set the color of input video
| Menu option | Instruction | The range of value | |
| Color Gamut *1 Gamma | Set the Color Gamut | LCD Panel,DCI-P3,Rec.709,Rec.2020 | |
| HLG System | Set the value of Gamma | 1.0,1.8,2.2,2.4,2.6,PQ1000,HLG1000,S-Log3 | |
| Tohpetisoen wilolwonulynder tohfespveacluifiec CanodloGr aGmamat | Gamma *2 | Set HLG System Gamma | 1.0,1.1,1.2(default),1.3,1.4,1.5 |
| D*3-Log to 709 | Set the camera LUT when Color Gamut is Rec 709. | OFF,J-Log1,Log-C,S-Log2,C-Log,V-Log, RedLogFilm,S-Log3,User-Log OFF,ARRI_Log PQ,Cano _CLog2Cin_PQ | |
| D-Log to PQ | Set the camera LUT when Color Gamut is Rec.2020,Gamma is PQ1000 | CREanDo_nL3_GCL1o0_gP3CQi,nS_oPnQy,_PSaLnoags3o_nCicin__VPLQog, _PQ, SOony_SLog3o_SG3_LPGQ,Canon_CLog2Cin_HLG FF,ARRI_L g _H | |
| D-Log to HLG | Set the camera LUT when Color HaLGm1u0t0i0s Rec.2020,Gamma is | CREanDo_nL3_GCL1o0_gH3CLiGn,_HSLoGn,y_PSaLnoags3o_nCicin__VHLLoGg_, HLG, Sony_SLog3_SG3_HLG | |
| Color temp | Set the value of color temperature et the value of color temperature | 2000K~10000K, D55,D65,D75,D93,USER1,USER2 | |
| Color temp(USER) | (USER) | 2000K~10000K,D55,D65,D75,D93 | |
| Red Gain | Adjust the value of Red Gain(USER) | -100 ~ +100 | |
| Green Gain | Adjust the value of Green Gain(USER) | -100 ~ +100 | |
| Blue Gain | Adjust the value of Blue Gain(USER) | -100 ~ +100 | |
| Red Bias | Adjust the value of Red Bias(USER) | -100 ~ +100 | |
| Green Bias | Adjust the value of Green Bias(USER) | -100 ~ +100 | |
| Blue Bias | Adjust the value of Blue Bias(USER) Choose th cube file which need to | -100 ~ +100 | |
| Import*4 | be imported | None,3DLut.cube | |
- *1 Color Gamut
Set the Color Gamut to match with input video. - *2 HLG System Gamma
Only adjustable when Gamma is HLG1000 - *3 D-Log to 709:Only adjustable when Color Gamut is Rec.709 and Gamma is between 1.0, 1.8, 2.2,2.4,2.6
- *4 Import
Put the cube file in the root of USB driver,connect USB driver with the monitor via USB interface on the front panel,choose and import corresponding file in the menu.
Control
| Ⅳ、Control Menu option F1*1 | Instruction | Selection |
| F2 | Set the function of shortcut key | TimveefCoormdet,yCpoel,orinTgelme plin,Weawveafvoerfmor,m, MHiasrkoegrr,aBmlu,eOodndl/yE,AveundiForaBmare,Z,Leibssra,jVoeucstor, pattern,Focus assist,False color ,H/V delay |
| F3 | ||
| F4 | ||
| F5 | ||
| *1F1~F5 |
*1F1~F5
Now only support“ Waveform,Vector,Audio Bar,Blue only,Marker”
Assist
| Ⅴ、MAesnsuisotption False color | ISnwsittcrhuocnt/iooffnfalse color function | SOFeFl,eOcNtion | |
| Blue only | Switch on/off Blue only function | OFF,ON | |
| Focus assist | Schwoitocsheothne/ocffoFloorcoufsita.ssist function and | OFF,Blue,Red | |
| Zebra Waveform | Switch on/off Zebra function | OFF,ON | |
| WSeatvtienfgorm | WFM Type | Switch on/off waveform function | OFF,ON |
| WFM Position | Set the tdyipspelaoyf Wpoasvietifonrmof Waveform pattern | Y, Cb, Cr, R,G,B, RGB | |
| Set the transparency of the background of | Bottom left,Bottom right,Top left,Top right | ||
| WFM Blending WFM Color | Waveform pattern Set the color of the Waveform | OFF,LOW,HIGH | |
| WFM Single Line*1 | Switch on/off Single line Waveform function | White,Green,Color | |
| WFM Line Count | Adjust to show Waveform of specific lines | OFF,ON | |
| Vector | Switch on/off Vector function | 1-2160 | |
| VSetttionrg | CIE | Swtich on/off color gamut pattern | OFF,ON |
| Vector Position | Set the display position of Vector pattern. | OFF,ON | |
| Bottom left,Bottom right,Top left,Top right | |||
| Vector Blending Vector color | SVect ttohreptarattnesrpna.rency of the background of Set the color of Vector pattern | OFF,LOW,HIGH | |
| Histogram | Switch on/off Histogram pattern | White,Green,Color | |
| Hseistttionggram | OFF,ON | ||
| Histogram Blending Marker | SHeistttohgeratrmanpsaptaterern c. y of the background of Switch on/off Marker function | OFF,LOW,HIGH | |
| Mseattriknegr | OFF,ON | ||
| Marker Select Horizontal*2 | Set the ratio of Marker Set the X value of Marker function | 1.8:95,:11,5U:9S,E1R4:19,,U1S3E:9R,42:3,2.39:1,2.35:1,2:1 | |
| Vertical | Set the Y value of Marker function | 50%~99%(0~1920) | |
| Safety area | Set the ratio of Safety area | 50%~99%(0~1080) | |
| Fit Marker | Switch on/off Fit Marker function | 80%~99% | |
| Center Marker | Switch on/off Center Marker function | OFF,ON | |
| Marker Color | Set the color of Marker | OFF,ON | |
| Set the type of Marker | White,Red,Green,Blue,Black,Grey | ||
| Marker Type | Switch on/off Marker Outside function and | Type 1,Type 2 | |
| Marker Outside | change the color. | OFF,Black,Grey 12 | |
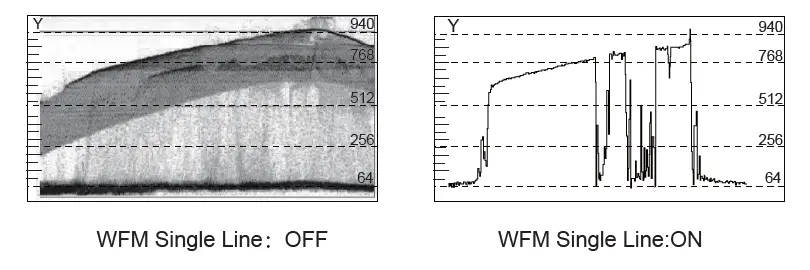
- *1 WFM Single line
Switch on“ WFM Single line” function,Monitor only show one line waveform of video. Turn “Menu/Enter” knob left and right to choose the number of waveform lines.。(The selected range of waveform lines depends on the current signal format.)
- *2 Horizontal/Vertical
When the“ Marker Select” is“ USER 1” or“ USER 2”,User can adjust X value and Y value of Marker according to their requirement,the value is adjustable between 50%~99%(0~1920 and 0~1080)
De-embed
| Menu option Lissajous | Instruction Switch on/off Lissajous pattern | Selection |
| OFF,ON | ||
| Lissajous Position | Set the display position of Lissajous Pattern | BToopttorimghlteft,Bottom right,Top left, |
| Audio Bar | Switch on/off Audio Bar function | OFF,ON left,Bottom right,Top left, ottom |
| Bar Position | Set the display position of Audio Bar Set the transparency of the background | Top right |
| Bar blending | of Audio Bar . | OFF,LOW,HIGH |
| Bar type*1 | Set the type of Audio Bar | Type 1,Type 2 |
| Left Channel | Select left input audio channel | Channel 1~16 |
| Right Channel | Select Right input audio channel | Channel 1~16 |
| Volume | Adjust the volume of audio signal | 0~100 |
| H/V delay*2 | Switch on/off H/V delay function | ON,OFF |
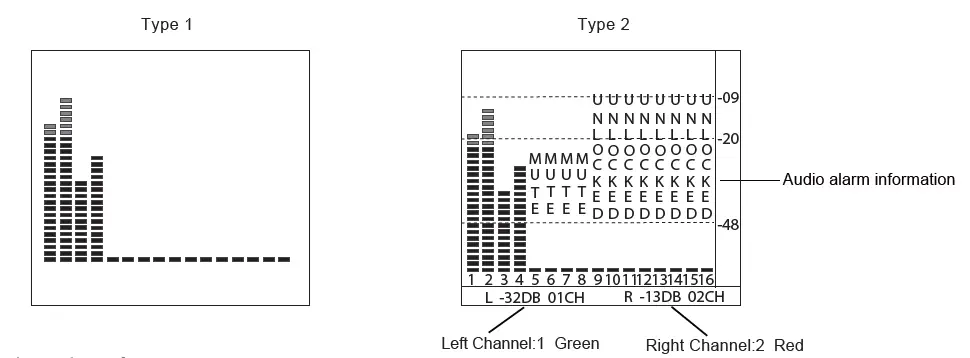
- *1 Bar type:Audio bar show 16 channel
Type 1:Audio bar only
Type 2:Show db value of audio signal,audio warning signal and right/left channel information
H/V Delay
H/V Delay is not displayed on HDMI channel.
Auto Calibration
| Menu option | Instruction | Selection |
| Probe Select*2 | Select the calibrator | X-rite l1 Pro OEM,Jeti Specbos 1211 |
| Start Calibration*3 | Start to calibrate or not | NO/YES |
| Measurement*4 | Test current color | NO/YES |
- *1 Auto Calibration
Monitor internally installed 3DLUT Calibrate software,support to directly connect with below calibrator via USB interface on the front panel.
When start to calibrate, calibrate probe will read the standard color created by monitor and upload the result to monitor via USB interface.
Monitor will compare the color which created by calibrate probe with standard color and create a 3D LUT file and finish calibrating automatically. - *2 Probe Select
This monitor support below kinds of calibrate prob
| BRAND | MODE |
| X-rite | I1 Pro OEM |
| JETI | Specbos 1211 |
Start Calibration
Steps:
- Switch on monitor.
- Connect Calibrator with monitor via USB interface on the front pane(l Compatible with X-rite and JETI).Make sure monitor and calibrator is in good condition and the aging time of monitor is over 30 minutes.
- Select“ MENU”“- AUTO CALIBRATION”“- Probe Select” to select current calibrate probe.
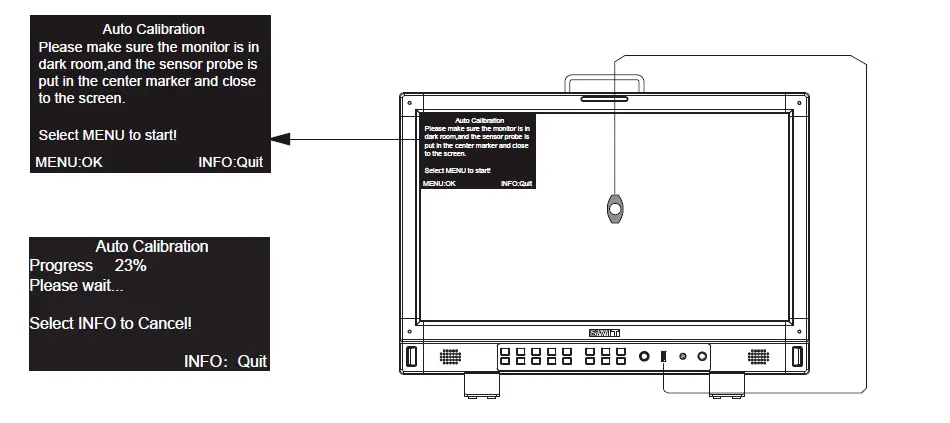
- Select“ Start Calibration”“- YES” to start calibrating.Monitor will show info box and calibrate position hint box,make sure the lens of calibrator is forward to the calibrate position hint box.Do not push the LCD screen when setting the calibrator.

- Select“ OK” to do auto-calibratio.Calibrator will measure the color of screen and calibrate the screen automatically,please pay attention to the progress bar.
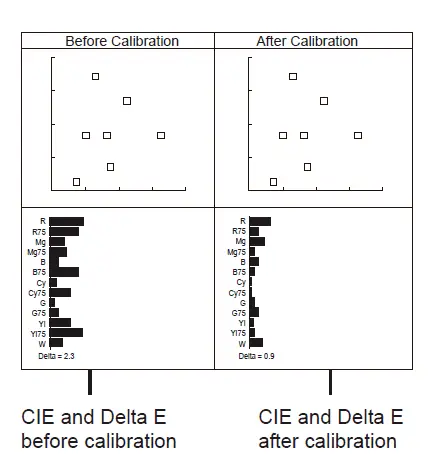
- Press“ INFO” to stop calibration.When the progress bar reach to 100%,auto calibration finished. Press“ INFO”to exit menu after auto-calibration,monitor will recover to normal.
- The screen will show the Delta value before and after calibration,shown as below
Measurement
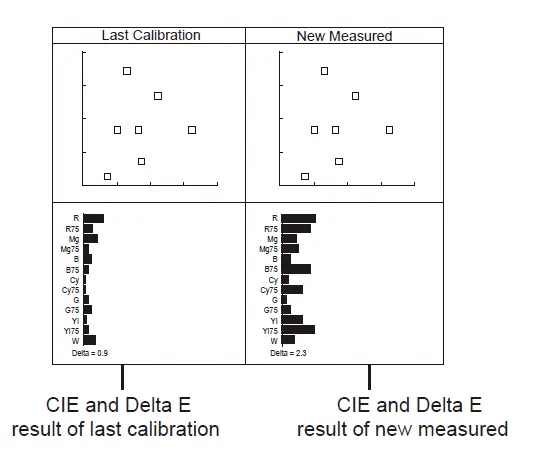
Monitor have calibrated in factory already but also need to re-calibrate after a period of time using.Before re-calibrating“, Measurement” function will show Delta value of last time calibration, user can decide to calibrate or not from comparing the Delta value.
Connect calibrate probe with monitor and put it on the right position,Select“ Auto Calibration”“- Measurement”,Monitor will create part of color and finish testing within 30 seconds.Testing result shown as below
System
| Menu option | Instruction | Selection |
| Key Lock *1 Recall Profile *2 | Set key lock function Select current Mode | Off, Lock, All, Rotary Knobs, Lock Key Buttons, Factory,USER1~USER4 |
| Save Profile | Save current setting to one of USER setting | USER1~USER4 |
| Green Mode | Set the display mode of Green Mode | Black Bcklight,Grey Backlight |
| Idle Duration | Set the stand-by time before switch on Green Mode | 30s,1hour,2hour,4hour,OFF |
| DHCP*3 | Switch on/off DHCP Mode | ON,OFF |
| IP *4 | Show current network information of monitor | 192.168.001.200 |
| Net mask | 255.255.255.000 192.168.001.001 | |
| Gateway | ||
| OSD TIME | Set the lasting time of OSD | 5~180s |
| Language | Select the operation language of monitor | 中文(Chinese),English |
| System Reset | Reset all setting in the menu | NO/YES |
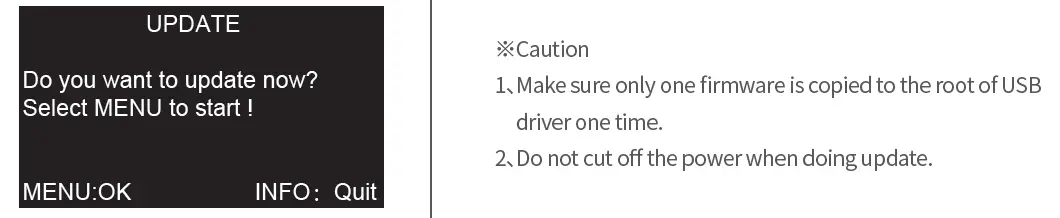
| Update *5 | To do update for monitor | NO/YES |
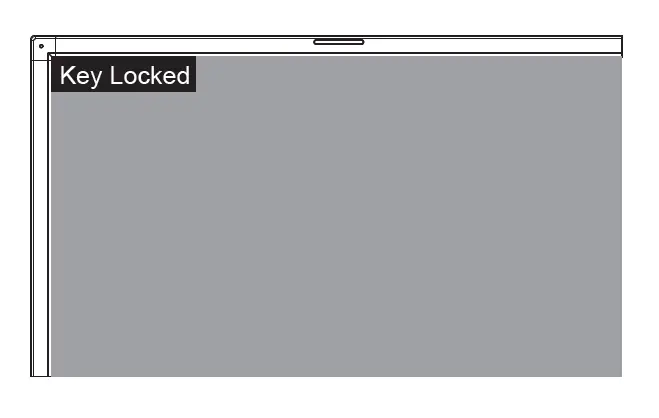
Key Lock
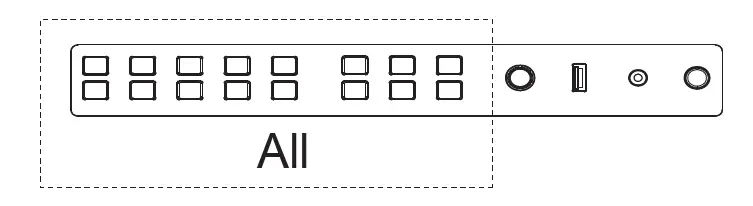
When“ Key Lock” function is“ ON”,part of menu will be hidden,only“ Menu” button is available, other button will be locked. Screen will show“ Key Locked” when the locking button is pressed,shown as below:
Recall Profile/Save Profile
Monitor supply 4 User setting,User can save current setting according to demand and habit to (USER1~USER4).After that,user only need to select“ USER1~USER4” to show corresponding menu setting.
For example: Adjust“ Color Temp” to 2200K,switch on assist function such as“ Histogram”,set function key such as F1 to“ Only Blue” ,now save all these setting to“ USER 1”,turn“ Menu/Enter” to select“ Recall Profile”“- USER 1”,monitor will change all setting to the setting which saved in“ USER 1”.
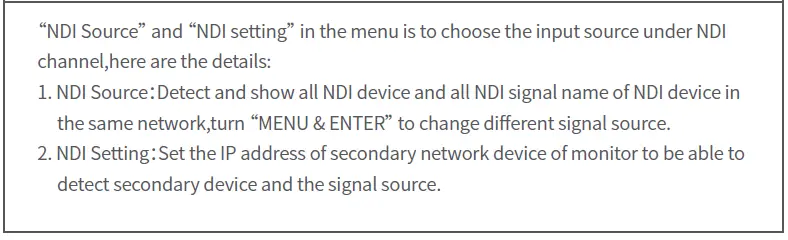
DHCP
The IP address will be assigned by router or switch automatically when“ DHCP” function is“ ON”; User can set IP/Net mask/Gateway manually to match their own Network segment when“ DHCP” function is“ OFF” in order to detect the NDI signal source in system.
IP
Connect monitor to the LAN with NDI IN/ETHERNET port in order to control monitor by website.
Website loading:Open browser and enter the IP address to load the monitor web page.
- Make sure the network cable which used to connect monitor with computer directly is cross line cable.
- Make sure the network cable which used to connect monitor with router is straight-through cable.
- If you have any problem with your network connection,please ask your network administrator for help.
Update
Firmware can be updated via USB port,update steps as below:
- Update the latest firmware to the root of USB driver
- Switch on monitor,connect your USB driver with monitor
- Select“ MENU”“- SYSTEM”“- Update”,the monitor will update automatically.
- Press“ Power” button to switch off and reboot monitor after successfully updating.
Multiview Setting
| Menu option | Instruction | Selection |
| Multiview Type*1 | Set the type of Multiview function | PBP,PIP |
| PIC 1 *2 | Set the signal channel of Multiview function | SDI1,SDI2, HDMI,NDI |
| PIC 2 | ||
| PIP Window Position | Set the Position of PIP on screen | Bottom left,Bottom right,Top left,Top right, Center |
| Border | Set the border of PIP function | ON,OFF |
- *1 Multiview Type
“ Multiview Setting” is available when signal channel is Multiview,otherwise“ Multiview setting” will show grey and unavailable. The“ Input range”“, Color gamut”“, Gamma”“, UMD” and“ Payload ID” of each video can be set separately when signal channel is“ Multiview”
Part of menu function will be disabled when signal channel is Multiview. - *2 PIC 1、PIC 2
When signal channel is“ Multiview”,“PIC 1” and“ PIC 2” can select to display any signal channel
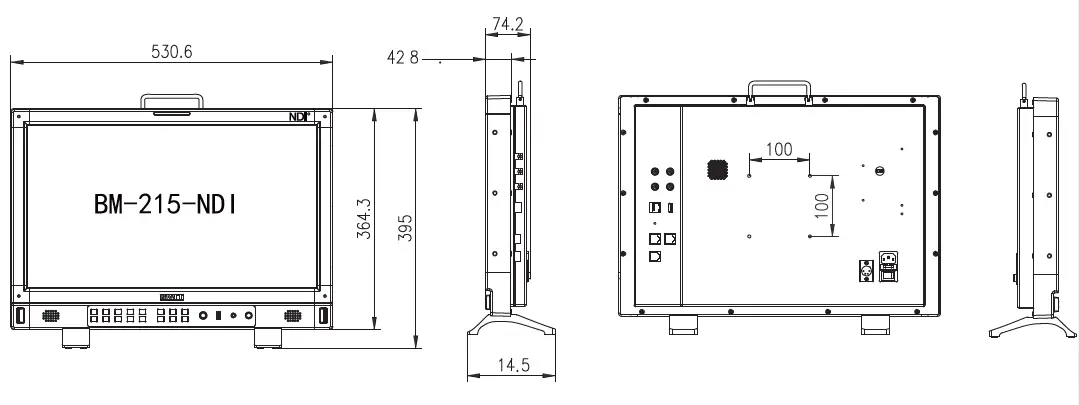
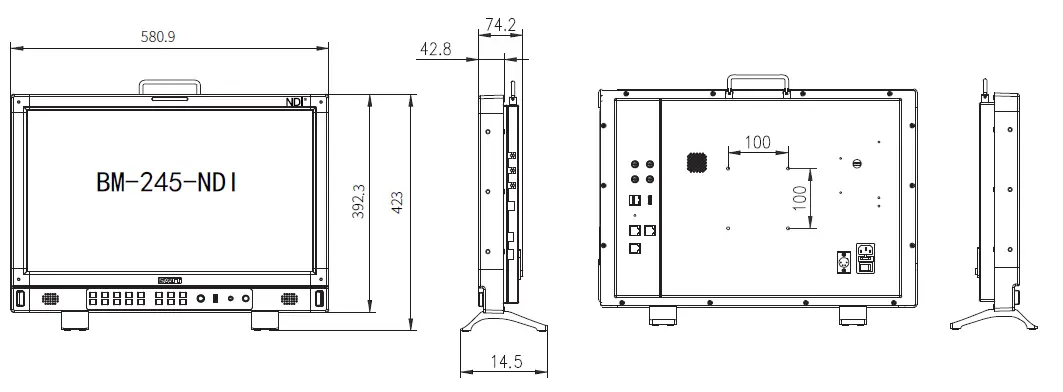
Overall Dimension
Specification
| LCD Performance | ||
| Model | BM-215-NDI | BM-245-NDI |
| Size | 21.5 | 23.8 |
| Display area | 495.6×292.2mm | 543.0×316.72mm |
| Resolution | 1920*1080 | 1920*1080 |
| Display color | 16.7M | 16.7M |
| Display ratio | 16:9 | 16:9 |
| Brightness | 400 | 400 |
| Contrast | 3000:1 | 3000:1 |
| Viewing angle Input /Output | H/ V:178°/ 178° | H/ V:178°/ 178° |
| Input | BNC×2 | 3G/HD/SD-SDI×2 |
| HDMI×1 | HDMI Input | |
| RS-485×2 | UMD×1 | |
| GPI×1 | ||
| USB×1 | ||
| ETHERNRT/NDI | 12G/6G/3G/HD/SD | |
| Output | BNC×1 | 3G/HD/SD-SDI×1 |
| BNC to NDI×1 | 3G/HD/SD-NDI×1 | |
| RS-485×1 | UMD×1 | |
| Other specification | ||
| Wvooltrakgineg | AC:100V~240V | |
| DC/Battery:12V~17V | ||
| Power consumption | 45W | |
| Working Temperature | 0℃~+50℃ | |
| Working Humidity | 10%~90% | |
| Storage Temp | ﹣15℃~﹢60℃ | |
| Storage Humidity | 10%~90% | |
| Overall Dimension Net weight | 530.6×364.3×74.2mm | 580.9×392.3×74.2mm |
| (Only monitor body) | 5.90KG | 8.87KG |
Supported format: Below signal format can be displayed on the monitor
| No. | Format | Input terminal | Signal format shown in the Status Display as | ||||
| SDI1/2 | NDI | HDMI | SDI | HDMI | NDI | ||
| 1 | 720×480/60I | √ | — | — | 720*480I60 | — | — |
| 2 | 720×480/60P | √ | — | √ | 720×480/60P | 720*480P60 | — |
| 3 | 720×576/50I | √ | — | — | 720×576/50I | — | — |
| 4 | 720×576/50P | √ | — | √ | 720×576/50P | 720*576I50 | — |
| 5 | 1280×720/23.98P | √ | — | √ | 1280×720/23.98P | 1280*720P24 | — |
| 6 | 1280×720/24P | √ | — | √ | 1280×720/24P | 1280*720P24 | — |
| 7 | 1280×720/25P | √ | — | √ | 1280×720/25P | 1280*720P25 | — |
| 8 | 1280×720/29.97P | √ | — | √ | 1280×720/29.97P | 1280*720P30 | — |
| 9 | 1280×720/30P | √ | — | √ | 1280×720/30P | 1280*720P30 | — |
| 10 | 1280×720/50P | √ | √ | √ | 1280*720P50 | 1280*720P50 | 1280*720P50 |
| 11 | 1280×720/59.94P | √ | √ | √ | 1280*720P59.94 | 1280*720P60 | 1280*720P59.94 |
| 12 | 1280×720/60P | √ | √ | √ | 1280*720P60 | 1280*720P60 | 1280*720P60 |
| 13 | 1920×1080/50I | √ | √ | √ | 1920*1080I50 | 1920*1080I50 | 1920*1080I50 |
| 14 | 1920×1080/59.94I | √ | √ | √ | 1920*1080I59.94 | 1920*1080I60 | 1920*1080I60 |
| 15 | 1920×1080/60I | √ | √ | √ | 1920*1080I59.94 | 1920*1080I60 | 1920*1080I60 |
| 16 | 1920×1080/23.98PSF | √ | — | √ | 1920×1080/23.98PSF | 1920*1080PSF24 | — |
| 17 | 1920×1080/24PSF | √ | — | √ | 1920×1080/24PSF | 1920*1080PSF24 | — |
| 18 | 1920×1080/23.98P | √ | √ | √ | 1920×1080/23.98P | 1920*1080P24 | 1920*1080P24 |
| 19 | 1920×1080/24P | √ | √ | √ | 1920*1080P23.98 | 1920*1080P24 | 1920*1080P24 |
| 20 | 1920×1080/25P | √ | √ | √ | 1920*1080P25 | 1920*1080P25 | 1920*1080P25 |
| 21 | 1920×1080/29.97P | √ | √ | √ | 1920*1080P29.97 | 1920*1080P30 | 1920*1080P30 |
| 22 | 1920×1080/30P | √ | √ | √ | 1920*1080P29.97 | 1920*1080P30 | 1920*1080P30 |
| 23 | 1920×1080/48P | √ | — | √ | 1920×1080/48P | 1920*1080P48 | — |
| 24 | 1920×1080/50P | √ | √ | √ | 1920*1080P50 | 1920*1080P50 | 1920*1080P50 |
| 25 | 1920×1080/59.94P | √ | √ | √ | 1920*1080P59.94 | 1920*1080P60 | 1920*1080P59.94 |
| 26 | 1920×1080/60P | √ | √ | √ | 1920*1080P59.94 | 1920*1080P60 | 1920*1080P60 |
| 27 | 2048×1080/23.98PSF | √ | — | √ | 2048×1080/23.98PSF | 2048*1080PSF24 | — |
| 28 | 2048×1080/24PSF | √ | — | √ | 2048×1080/24PSF | 2048*1080PSF24 | — |
| 29 | 2048×1080/25PSF | √ | — | √ | 2048×1080/25PSF | 2048*1080PSF25 | — |
| 30 | 2048×1080/29.97PSF | √ | — | √ | 2048×1080/29.97PSF | 2048*1080PSF30 | — |
| 31 | 2048×1080/30PSF | √ | — | √ | 2048×1080/30PSF | 2048*1080PSF30 | — |
| 32 | 2048×1080/23.98P | √ | — | √ | 2048×1080/23.98P | 2048*1080P24 | — |
| 33 | 2048×1080/24P | √ | — | √ | 2048×1080/24P | 2048*1080P24 | — |
| 34 | 2048×1080/25P | √ | — | √ | 2048×1080/25P | 2048*1080P25 | — |
| 35 | 2048×1080/29.97P | √ | — | √ | 2048×1080/29.97P | 2048*1080P30 | — |
| 36 | 2048×1080/30P | √ | — | √ | 2048×1080/30P | 2048*1080P30 | — |
| 37 | 2048×1080/47.94P | √ | — | √ | 2048×1080/47.94P | 2048*1080P50 | — |
| 38 | 2048×1080/48P | √ | — | √ | 2048×1080/48P | 2048*1080P48 | — |
| 39 | 2048×1080/50P | √ | — | √ | 2048×1080/50P | 2048*1080P50 | — |
| No. | Format | Input terminal | Signal format shown in the Status Display as | ||||
| SDI1/2 | NDI | HDMI | SDI | HDMI | NDI | ||
| 40 | 2048×1080/59.94P | √ | — | √ | 2048×1080/59.94P | 2048*1080P60 | — |
| 41 | 2048×1080/60P | √ | — | √ | 2048×1080/60P | 2048*1080P60 | — |
| 42 | 3840×2160/23.98P | — | √ | √ | — | 3840*2160P24 | 3840*2160P23.98 |
| 43 | 3840×2160/24P | — | √ | √ | — | 3840*2160P24 | 3840*2160P24 |
| 44 | 3840×2160/25P | — | √ | √ | — | 3840*2160p25 | 3840*2160p25 |
| 45 | 3840×2160/29.97P | — | √ | √ | — | 3840*2160P30 | 3840*2160P29.97 |
| 46 | 3840×2160/30P | — | √ | √ | — | 3840*2160P30 | 3840*2160P30 |
| 47 | 3840×2160/47.94P | — | — | √ | — | 3840*2160P50 | — |
| 48 | 3840×2160/48P | — | — | √ | — | 3840*2160P48 | — |
| 49 | 3840×2160/50P | — | — | √ | — | 3840*2160P50 | — |
| 50 | 3840×2160/59.94P | — | — | √ | — | 3840*2160P60 | — |
| 51 | 3840×2160/60P | — | — | √ | — | 3840*2160P60 | — |
| 52 | 4096×2160/23.98P | — | — | √ | — | 4096*2160P24 | — |
| 53 | 4096×2160/24P | — | — | √ | — | 4096*2160P24 | — |
| 54 | 4096×2160/25P | — | — | √ | — | 4096*2160P25 | — |
| 55 | 4096×2160/29.97P | — | — | √ | — | 4096*2160P30 | — |
| 56 | 4096×2160/30P | — | — | √ | — | 4096*2160P30 | — |
| 57 | 4096×2160/47.94P | — | — | √ | — | 4096*2160P48 | — |
| 58 | 4096×2160/48P | — | — | √ | — | 4096*2160P48 | — |
| 59 | 4096×2160/50P | — | — | √ | — | 4096*2160P50 | — |
| 60 | 4096×2160/59.94P | — | — | √ | — | 4096*2160P60 | — |
| 61 | 4096×2160/60P | — | — | √ | — | 4096*2160P60 | — |
Troubleshooting
| Problem | Possible fault reasons | Solution Check the power connection of monitor,press“POWER” |
|
No video | Monitor have not switched on Wrong input source is selected. | button on the front panel. |
| Press“Source”button to change the input source | ||
| No NDI signal source is selected | Select NDI signal in“NDI source” | |
| Input voltage is not stable | Reconnect the power | |
| Scoignnnaelcctaiobnle loose/wrong | Ccohnenckecstiigonnailscraigbhlet,make sure the signal cable | |
| Tphoewberatwtehreynppoowweerriesdoubtyobfattery | Change a new battery | |
| The polarity is reversed when using DIY power supply | Reconnect the cable refer to standard power supply. | |
| The Network segment of monitor and NDI source is not same. | 12. MSwakitechsuorne“thDeHsCePg”mfuenct toiof nmtoonaitsosriganntdhNe DIPI saodudrrceessis same; automatically | |
| Image or color abnormal | Signal cable is in poor contact | Change a new signal cable |
| Video signal interference | Remove interference sources | |
| Parameters of color is over adjust | Upload User mode to“Factory” | |
| Video is distorted | Reset the aspect ratio | |
| Video show all blue | Switch off“Blue only”function | |
| The“focus assist”function is“ON” | Switch off“Focus assist”function | |
| The“False Color”function is“ON” | Switch off“False Color”function | |
| No audio output | Monitor is set to mute mode | Turn“MENU/ENTER”knob left and right to adjust volume |
| Audio cable is in poor contact | Change audio cable | |
| Audio cable is disconnected or connect wrong. | Check and reconnect the audio cable |
Company Statement
Any internal technology (including hardware equipment, software design and product trademark) of the product shall be protected by law, and any infringement of intellectual property rights of the product shall be investigated for legal liability.
All the brand and trademark in this product are protected by law,all other company’s brand and trademark in this product are protected by their owner’s law.
In order to better service majority users, SWIT products will keep improving and developing, SWIT keep the right to revise and improve this user manual without previous notice.
The warranty period of this product are two years,the following condition are not covered by the warranty:
- The appearance and the LCD panel are damaged by man-made out force;
- The amount of defective pixels are under three;
- The product is damaged by using incompatible power adaptor;
- The product is damaged by failure to use, maintain or storage according to the user manual.;
- The product is disassembled by user in the process of using;
- ther faults or damages not caused by design ,technology,manufacture and quality.
*Any sales person have no right to provide extra warranty beyond these terms.
Please feel free to contact with us by phone, fax or email when you have any question or need any help in the process of using.
- This user manual applies to all BM-NDI model monitor, all the illustration take BM-215-NDI for example, any difference of specification or appearance, this manual will be attached text explanation;
- The function with mark ”#” in this user manual have not been realized yet.


