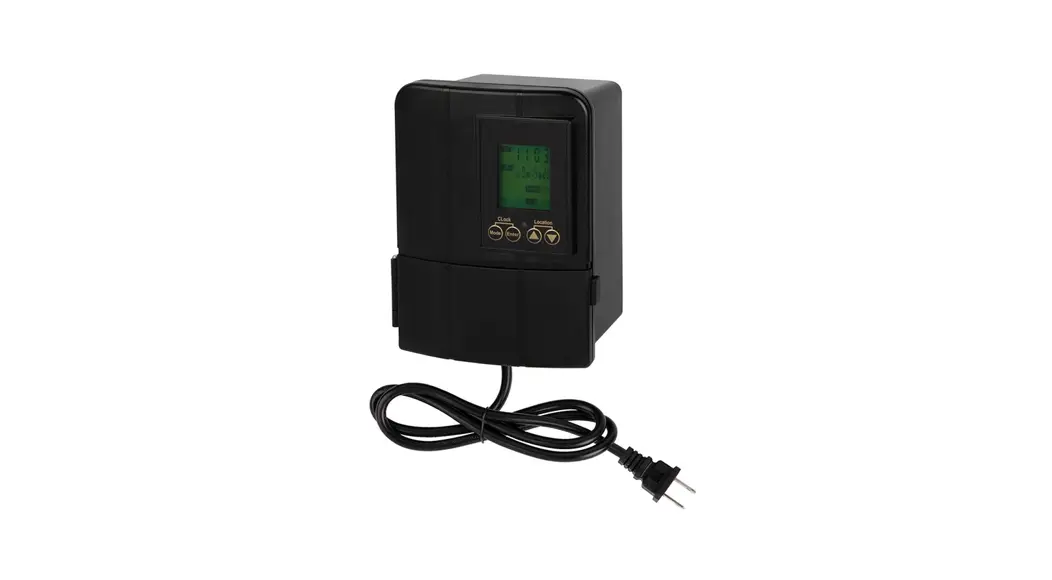
![]() LVT-50WA-12VAC Low Voltage Transformer
LVT-50WA-12VAC Low Voltage Transformer
User Manual 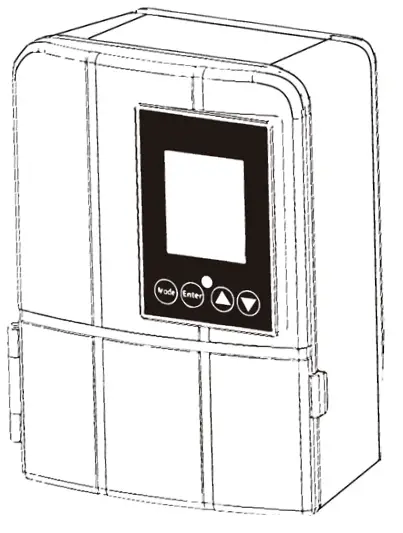 Low Voltage Transformer
LVT-50WA-12VAC![]()
LVT-50WA-12VAC Low Voltage Transformer
Read all instructions before assembly. Failure to do so may result in incorrect assembly or possible injury.
IMPORTANT SAFETY INFORMATION PERTAINING TO RISK OF FIRE OR INJURY TO PERSONS.
- Do not install within 10 ft (3 m) of a pool, spa, or fountain.
- For use with 12 volt low voltage outdoor landscape lighting system only.
- Not for use with submersible lights or pool/spa equipment.
- There are no serviceable parts inside the power supply unit.
General Setup
- CLOCK TIME SETTING (Press “Mode + Enter” = Clock) Set your local time by press ▲ and ▼ with (Enter) button
- ASTRO TIMER SETTING (▲+▼= Location) Press “▲+▼” button and the “Location” icon will flash, then press ▲ or ▼ button to choose your state/area/city code (refer to table) and press (Enter) for confirm the setting.
- Default working mode is that lights will be on at local sunset time, turn off at 11:00 PM, turn on again at 3:00 AM, and switch off at sunrise. To activate, press “Mode” button or 3 seconds. The “Location” icon will flash 3 times which means default mode is selected.
Operation buttons
- “Mode” — chooses mode
- “Enter” — confirms setting
- ▲ :up selection button (hold down for quick selecting)
- ▼ :down selection button (hold down for quick selecting)
- “Mode” + “Enter” = “Clock” — local clock time set buttons
- ▲+▼ = “Location” — City/area code set buttons (refer to code table)
DO NOT DISASSEMBLE
- Do not submerge transformer.
- Do not connect two or more transformers in parallel.
- Do not use with a dimmer.
- Plug the power supply unit directly into a GFCI outlet that is marked “wet location”.
- Do not use an extension cord.
- The maximum output of this transformer is 50 watts. Do not overload the transformer. Be sure that the total cumulative wattage of all fixtures connected to the transformer
is equal to or less than rated wattage.
PLEASE NOTE: This garden light system must be installed in accordance with all local codes and ordinances. If you are experiencing problems, contact a qualified electrician.
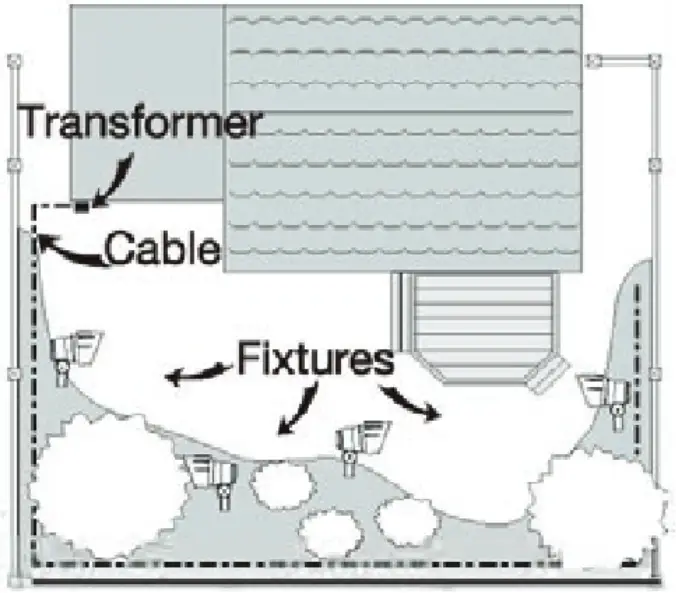
Mount the Transformer
Thanks to the built in Astronomic timer system, we strongly recommend you install this transformer indoor such as in basement, garage, tool house to prolong the life time of this transformer.
Outdoor use, weatherproof. Carefully remove the plastic film covering the LCD display panel.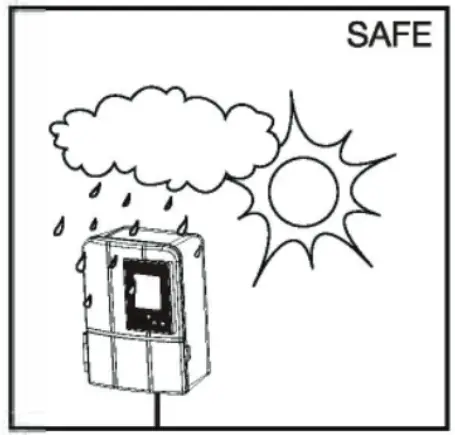 Install the transformer at a level where the controls are visible and accessible.
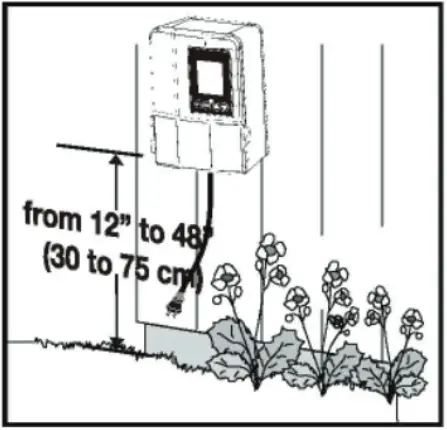 Only applies in AUTO mode. Do not install behind shrubs. It will affect photocell for auto dusk-to-dawn mode.
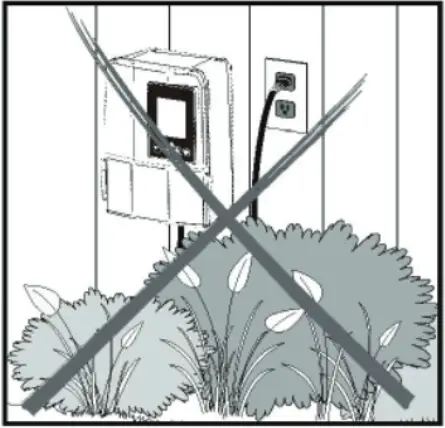 Only applies in AUTO mode. Photocell will not operate properly if installed too close to a nighttime light source.
 Mount the Transformer
Option 1 :Standard Wall Mounting
Insert the two (2) included support screws 3.5” (9 cm) apart in a wall near an electrical outlet and mount the transformer.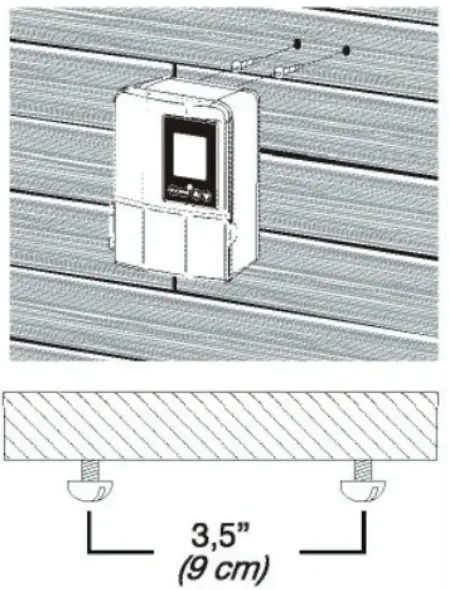 Option 2:Brick or Cement Wall Mounting
Drill two (2) holes of 5/16” (8 mm), 3.5” (9 cm) apart from each other, in a wall near an electrical outlet and install the two (2) included plastic anchors. Insert the two (2) support screws in the anchors until they have about 1/4” (6 mm) of space left to mount the transformer.
Connect Cable to Transformer
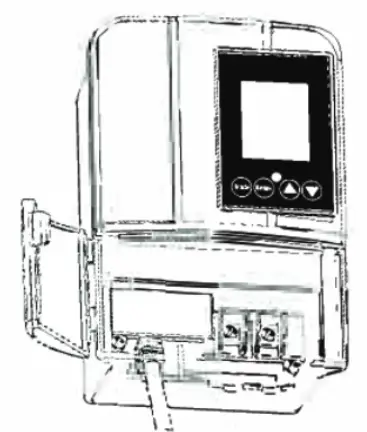
Remove the wire insulation 1/2” from both wires and twist ends. Open the front panel by pulling the right side below the screen.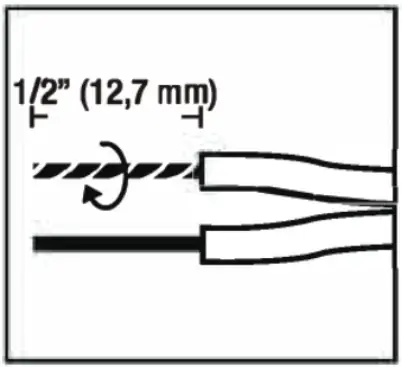 Remove the bottom plate by pulling on it for more space during installation. Insert wires under each terminal plate and tighten screws.
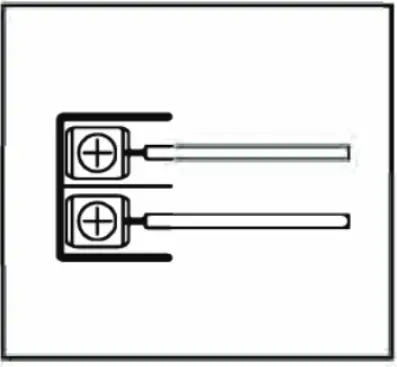 Gently pull on the landscape wire to verify if the connection is strong.
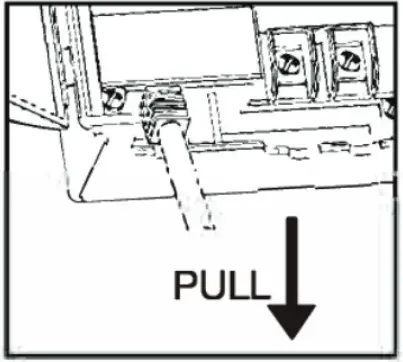 Verify that there are no loose cable strands. Replace the bottom plate and close the front panel.
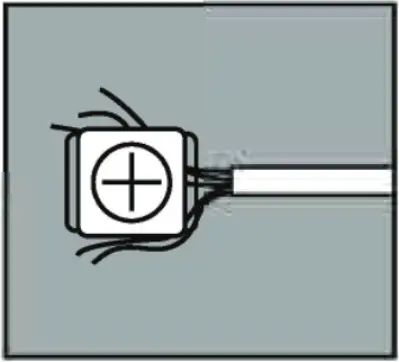 Run Landscape Wire (Not Included)
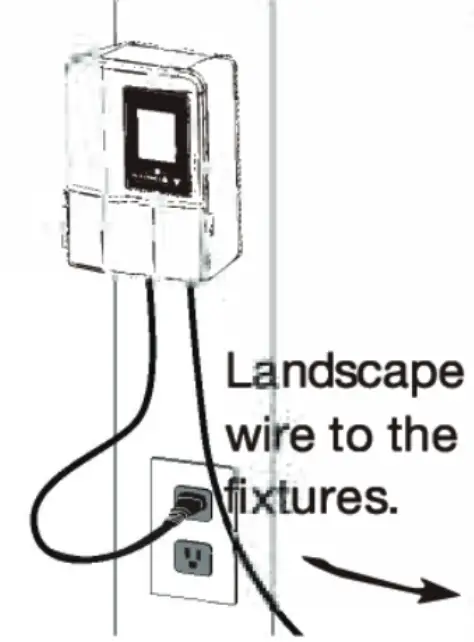
- The landscape wire should run from the transformer to each light without being cut. Do not run the landscape wire within 10 ft (3 m) of a pool, spa, or fountain. If the landscape wire is too long, cut it with a cable cutter and terminate the end of the run.
- The landscape wire should be protected by routing it close to proximity of the light fixture or next to a building, deck or fence. Only use cable suitable for low voltage landscape lighting.
- See chart below for recommended cable gauges.
| Combined Wattage of all light fixtures on line (Watts) | Wire Gauge (0–75’) | Wire Gauge (75–150’) | Wire Gauge (150–250’) |
| 0–60 | 16 | 16 | 14 |
| 60–120 | 16 | 14 | 12 |
| 120–180 | 14 | 12 | 12 |
| 180–240 | 12 | 12 | Not recommended |
| 240–300 | 12 | Not recommended | Not recommended |
Power the Transformer
- Plug the transformer directly into a GFCI electrical receptacle. Do not use an extension cord.
- To test the fixtures, change the mode to “ON”.
Product info
- Durable fire resistant polycarbonate housing
- Built-in photocell (auto mode/dusk to down)
- Built-in timer (timer mode for any time setting)
- Built-in astronomic timer (“astro” on and off time for local sun set and rise accordingly)–For LCD timer only
- Built-in overload and short circuit cutoff protection: overloaded over 100% reduce load
- This transformer is built with automatic DST, no need to adjust for it.
- The Astronomic sunrise/set time of 85 areas in the US and 20 areas in Canada are programmed in to provide precision dusk to dawn working periods in your location.
- Thanks to the astro timer, this transformer can be installed indoor, prolonging the lifetime.
- Transformer is built with temporary ON/OFF/Photo sensor mode set, which helps checking function and troubleshooting.
LCD Astro Timer
Quick Setup Option
(Installing this transformer/timer indoor is highly advised)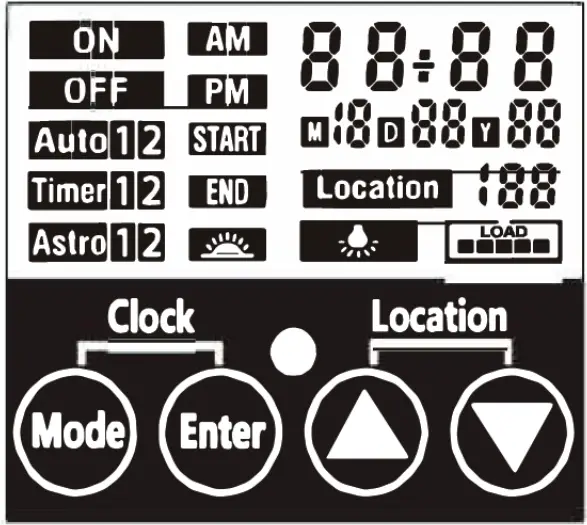
- Check the clock time is set to your local time. If not, refer to CLOCK TIME SETTING.
- Press “▲ + ▼ = Location ”, choose your city code (refer to the table)
- Press “Mode” button for 3 seconds. The “Location” icon will flash 3 times indicating default working mode set; Lights will be on at local sunset time, turn off at 11:00 PM, turn on again at 3:00 AM, and switch off at sunrise.
Mode Setting in Detail
- Press (Mode) button to select working mode. Press (Enter) for confirm the mode setting.
- ON: Always on mode
- OFF: Always off mode
- Auto: Photo sensor mode
A: Auto1: With “Auto 1/2” icon blinking, press (Enter) to confirm. The lights will turn off by sensor as default, so the END time can be set manually with Auto 1 mode. With Auto 1 and END icons blinking, use ▲ and ▼ to choose the clock setting and press (Enter).
B: Auto2: Setting will go to Auto 2 automatically after Auto 1 time is entered. The lights will turn on by sensor as default, so the START time can be set manually with Auto 2 mode. With Auto 2 and START icons blinking, use ▲ and ▼ to choose the clock setting and press (Enter).
Timer Mode (set ON and OFF at any time for testing or temporary use)
A: Timer1: Press “mode”, then use ▲ and ▼ to choose Timer1 mode, then press (Enter), With the “Timer1” and “Start” icon blinking, set the ON time by using ▲ and ▼ then press (Enter) to confirm. Next, with the “End” icon blinking, set the OFF time using ▲ and ▼ then press (Enter) to confirm.
B: Timer2: After setting Timer1, the “Timer2” and “Start” icon will be blinking, meaning Timer2 is ready to set. Set the ON time by using ▲ and ▼ then press (Enter) to confirm.
Next, with the “End” icon blinking, set the OFF time using ▲ and ▼ then press (Enter) to confirm.
Note: When Timer1 and Timer2 settings are set to the same time, Timer2 will be ignored.
Astro Mode (automatically sets the sunset/sunrise time by selecting your area/city code)
A: Astro1: Press “Mode” then press ▲ or ▼ button to choose “Astro1/2”. With the “Astro1”and ”Start” icons blinking, press▲ or▼ to choose ±10, ±20, ±30, ±40, or ±50 minutes before or after the local sunset time to turn ON the lights. Press “Enter” to confirm the setting.
Next, set the “End” time using the same method.
B: Astro2: When “Astro2” and “Start” icons are blinking, you can choose the 2nd period ON time [AM00:00-AM05:59 (DST AM01 :00-AM06:59)]. The settings are set the same way as Astro1 mode.
Note: In Astro1, when the “End” time is set at sunrise time, Asrto2 will show “OFF”, because this can’t be set in Astro2 mode with Astro1 set this way.
Note: When Astro2 can’t be set, the “Astro2” icon will not show on the screen.
Transformer Load
- When LED is ON it means the transformer is working.
- Icon on screen indicates the load status.
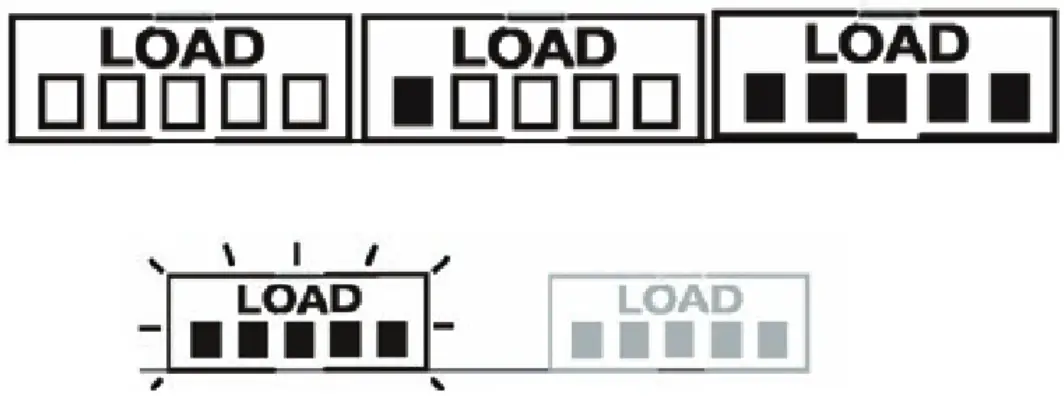
When one bar is shown, 20% of the transformer capacity is being used. So at full load, all bars will be lit. When the transformer is overloaded, the bar icon will blink, and when the load over 120% or short circuited, the output will shut off.
Checking your load and reduce the number of lights and check for a short then press any button to turn the transformer back on and reset to your working mode.
Troubleshooting
All of the lights fail to work:
- If the LOAD icon is flashing, make sure you have no more than 50 watts connected and there are no shorts.
- Check that the transformer power is on and the current mode is not set to «OFF».
- Check if there is a loose connection at the transformer screw terminal. The Lights are “ON” during the day:
- The transformer is in a dark/shaded area if operated using photocell dependent mode. The lights do not switch “ON” at dusk:
- The transformer is in an area where there is too much light at night if operated using photocell dependent mode.
United States of America
| Code | State (Area) | Code | State (Area) | Code | State (Area) | Code | State (Area) |
| 1 | Alabama (North) | 23 | Illinois (South) | 45 | Missouri (South) | 67 | Pennsylvania (West) |
| 2 | Alabama (South) | 24 | Indiana (Eastern Time Zone) | 46 | Montana (East) | 68 | Rhode Island |
| 3 | Alaska | 25 | Indiana Southern (Central Time Zone) | 47 | Montana (West) | 69 | South Carolina |
| 4 | Arizona (no DST) | 26 | Iowa (East) | 48 | Nebraska (East) | 70 | South Dakota (East) |
| 5 | Arkansas (North) | 27 | Iowa (West) | 49 | Nebraska (West) | 71 | South Dakota (West) |
| 6 | Arkansas (South) | 28 | Kansas (East) | 50 | Nevada (North) | 72 | Tennessee (West) |
| 7 | California (Central) | 29 | Kansas (West) | 51 | Nevada (South) | 73 | Tennessee (East) |
| 8 | California (North) | 30 | Kentucky (East) | 52 | New Hampshire | 74 | Texas (East) |
| 9 | California (South) | 31 | Kentucky (West) | 53 | New Jersey | 75 | Texas (North) |
| 10 | Colorado (North) | 32 | Louisiana (North) | 54 | New Mexico (North) | 76 | Texas (South) |
| 11 | Colorado (South) | 33 | Louisiana (South) | 55 | New Mexico (South) | 77 | Texas (West) |
| 12 | Connecticut | 34 | Maine | 56 | New York (South) | 78 | Utah |
| 13 | Delaware | 35 | Maryland (East) | 57 | New York (Upstate) | 79 | Vermont |
| 14 | Florida (North) | 36 | Maryland (West) | 58 | North Carolina (East) | 80 | Virginia (East) |
| 15 | Florida (South) | 37 | Massachusetts | 59 | North Carolina(West) | 81 | Virginia (West) |
| 16 | Florida (West) | 38 | Michigan (North) | 60 | North Dakota (East) | 82 | Washington |
| 17 | Georgia (North) | 39 | Michigan (South) | 61 | North Dakota (West) | 83 | West Virginia |
| 18 | Georgia (South) | 40 | Minnesota (North) | 62 | Ohio | 84 | Wisconsin |
| 19 | Hawaii | 41 | Minnesota (South) | 63 | Oklahoma | 85 | Wyoming |
| 20 | Idaho (North) | 42 | Mississippi (North) | 64 | Oregon (East) | ||
| 21 | Idaho (South) | 43 | Mississippi (South) | 65 | Oregon (West) | ||
| 22 | Illinois (North) | 44 | Missouri (North) | 66 | Pennsylvania (East) |
Canada
| Code | Area/City | Code | Area/City | Code | Area/City | Code | Area/City |
| 101 | Whitehorse, Yukon | 102 | Montreal, Quebec | 103 | Quebec | 104 | Charlottetown, Prince Edward Island |
| 105 | Ottawa, Ontario | 106 | Toronto | 107 | Barrie, Ontario | 108 | lqaluit, Nunavut |
| 109 | North Sydney, Nova Scotia | 110 | Halifax, Nova Scotia | 111 | Calgary | 112 / 113 | Vancouver |
| 114 | Surrey | 115 | Winnipeg | 116 | Brandon | 117 | Moncton |
| 118 | Saint John | 119 | St. John’s | 120 | Yellowknife |
![]() 4400 Earth City Expy
4400 Earth City Expy
St. Louis, MO 63045
866-590-3533
superbrightleds.com


