![]()
![]()

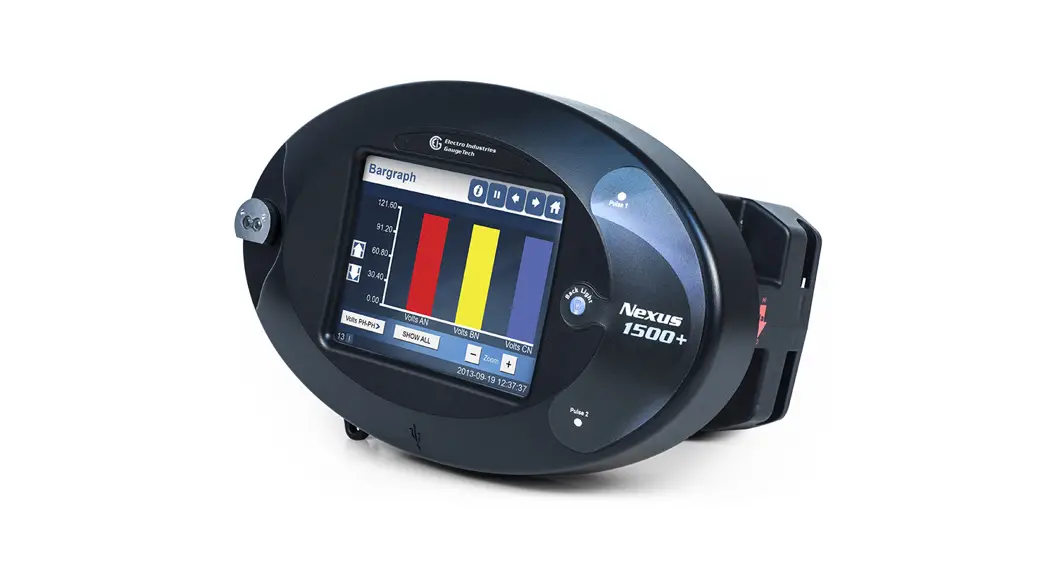
Nexus® 1500+ Meter Quickstart Guide
![]() CAUTION! Installation of the Nexus® 1500+ meter must be performed only by qualified personnel who follow standard safety precautions during all procedures. That personnel should have appropriate training and experience with high voltage devices. Appropriate safety gloves, safety glasses, and protective clothing are recommended.
CAUTION! Installation of the Nexus® 1500+ meter must be performed only by qualified personnel who follow standard safety precautions during all procedures. That personnel should have appropriate training and experience with high voltage devices. Appropriate safety gloves, safety glasses, and protective clothing are recommended.
During normal operation of the Nexus® meter, dangerous voltages flow through many parts of the unit, including Terminals and any connected CTs (Current Transformers) and PTs (Potential Transformers), all I/O Modules and their circuits. All Primary and Secondary circuits can, at times, produce lethal voltages and currents. Avoid contact with any current-carrying surfaces. Do not use the meter or any I/O device for primary protection or in an energy-limiting capacity. The meter can only be used as secondary protection.
IMPORTANT! Refer to your meter’s Installation and Operation Manual for additional safety warnings before performing installation, wiring, or maintenance of your meter. See the link to the manual, below.
NOTE: This Quickstart Guide gives basic installation, wiring, and programming instructions. For additional meter operation and programming information, refer to your meter’s Installation and Operation Manual and the Communicator PQA TM, MeterManagerPQA TM, and EnergyPQA.com Software User manual on EIG’s website:
User Manual:
https://www.electroind.com/products/nexus-1500-power-quality-meter-with-phasor-measurement-unit/ From the webpage, click Technical Documents>User Manual.
Software Manual:
https://www.electroind.com/products/communicatorpqa-power-monitoring-software/ From the webpage, click Technical Documents>User Manual.
CommunicatorPQA TM Setup Software:
https://www.electroind.com/products/communicatorpqa-power-monitoring-software/
From the webpage, click Download Compaq Pro. To get a Professional license for the software, email [email protected] or call 516-334-0870.
All EIG’s metering and software products’ literature can be accessed from: https://www.electroind.com/power-metering-products/
For software and metering integration, EIG’s Technical Support Engineers are available on an hourly or daily basis to
help with typical commissioning assistance, which includes:
- Verifying meter installation and wiring.
- Verifying proper system integration.
- Working with 3rd parties to ensure cross-compatibility.
- Advising users on best practices for optimal implementation.
You can reach Technical Support from 8 a.m. to 8 p.m. EST, Monday-Friday, at 516-334-0870.
Mechanical Installation
1. Slide the meter into the panel’s cut-out. (See the diagram shown below. You can use either an octagonal or a rectangular cut-out.)
NOTE: You can also mount the meter vertically.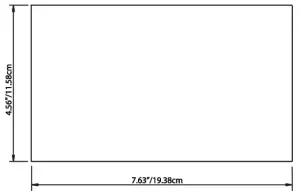
2. From the back of the panel, slide the 4 Mounting Brackets into the grooves on the top and bottom of the meter housing – 2 fit on the top, and 2 fit on the bottom.
3. Snap the Mounting Brackets into place.
4. Secure the meter to the panel with a lock washer and a #8 screw in each of the 4 mounting brackets.
5. Tighten the screws with a #2 Philips screwdriver. Do not over-tighten – maximum torque is 3.5 Lb-In.
Cut-out Dimensions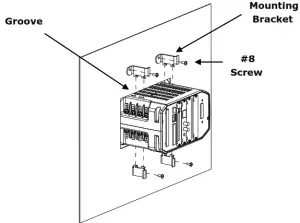
Electrical Installation (See the meter’s Installation and Operation Manual for additional wiring configurations.)
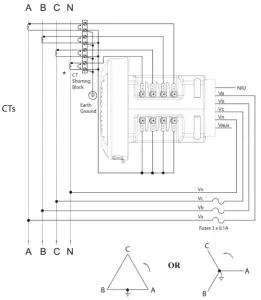
WYE or DELTA Direct 3 Phase, 4-wire * Optional CT for Current Measurement Only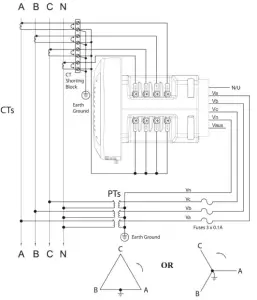
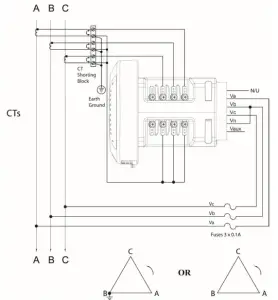
DELTA Direct 3 Phase, 3-wire
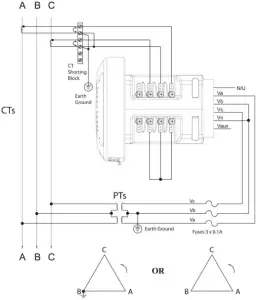
DELTA Direct 3 Phase, 3-wire DELTA with PTs, 3 Phase, 3-wire
Power Supply Connections
Wire gauge: 12-18 AWG for either solid or stranded wire Torque: 3.5 Lb-In
The branch circuit protection size should be 15 A. The Nexus® 1500+ meter requires a separate power source. There are three control power options: 115AC, D2 high-voltage, and D low-voltage. CAUTION! The power supply voltage and connections vary depending on the power supply Option being used. CAREFULLY follow the instructions and drawings for proper wiring.
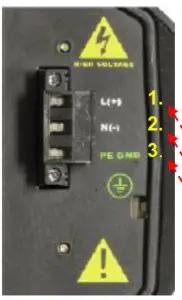
115AC/D2 Power Supply Connection
For all three power supply options, add a properly voltage-rated, 4 A, time-delayed (slow blow) fuse in the power supply feed, for example, UL approved Littelfuse® part number FLQ4. For the 115AC and D2 Option power supplies:
- Connect the line supply wire to the L+ terminal.
- Connect the neutral supply wire to the N(-) terminal.
- Connect earth ground to the PE GND terminal.

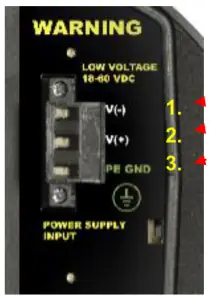
For the D Option power supply:
- Connect the negative voltage to the V(-) terminal.
- Connect the positive voltage to the V(+) terminal.
- Connect earth ground to the PE GND terminal.
Programming the Nexus® 1500+ Meter Using the USB Virtual Com Port Connecting your PC to the Meter
1. Attach a USB cable from your PC’s USB port to the meter’s front panel USB port. The meter’s USB port uses a USB Type B plug.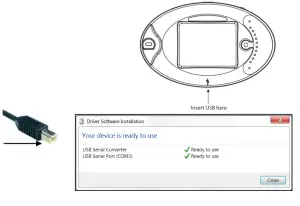 2. Windows® 7 and above operating systems install the USB driver and display the screen shown on the right. Make note of the Com port being used.
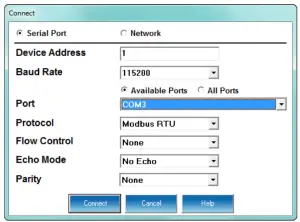
Connecting to the Meter via Software
- Open CommunicatorPQA™ software (see page QS-1 for download instructions).
- Click the Connect icon on the Tool Bar. You will see the connect screen.
- Click Serial Port.
- Select Baud rate of 115200.
- Select the Port that is the USB Virtual Com port.
- Click Connect. You will see the Device Status screen.
- Click OK. You will see the Main CommunicatorPQA™ software screen.
Configuring the Meter via Software
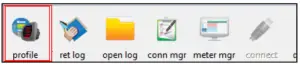
Click the Profile icon on the Icon Bar. You will see the Device Profile screen.
NOTE: Instructions for a few basic settings are given in this Quickstart Guide. For more information, download the manual from EIG’s website (see page QS-1) or click elp>Contents from the Title Bar of the CommunicatorPQA™ application’s Main screen, to view the CommunicatorPQA™, MeterManagerPQA™, and EnergyPQA.com™ Software User Manual.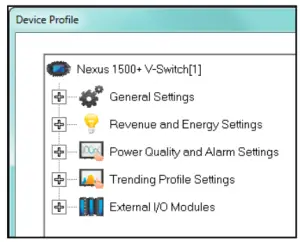
CT, PT Ratios and System Hookup
From the Device Profile screen, double-click General Settings>CT, PT Ratiosand System Hookup. The current settings are shown on the screen.
- Double-click one of the settings to open the CT and PT Ratios screen, shown below.
- You can enter CT and PT Ratios and select Hookup from the pull-down menu. Click Help to view instructions for configuring these settings.
- Click OK to close the screen. Click Update Device from the Device Profile screen to save your settings.
Example CT Settings:
200/5 Amps: set the Primary Current value as 200.00; set the Secondary Current value as 5.00.
Example PT Settings:
14400/120 Volts: set the Primary Voltage value as 14400.00; set the Secondary Voltage as 120.00.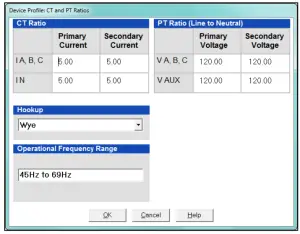
Communication Settings
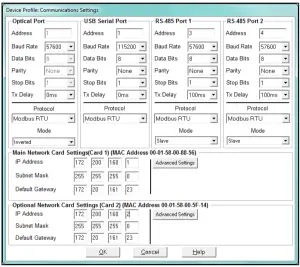
- From the Device Profile screen, double-click General Settings>Communications. The current settings for the meter’s Ports are shown on the screen.
- Double-click one of the Port settings to open the Communications screen, shown above.
- You can configure the settings for all four Communication Ports, as well as the two Network Cards. Click Help to view instructions for configuring these settings.
- Click OK to close the screen. Click Update Device from the Device Profile screen to save your settings.
NOTE: You can also use the standard or optional Ethernet ports, the optional RS485 ports, or the ANSI optical port to connect to and configure the Nexus® 1500+ meter. See the meter’s manual (see page QS-1), and the software manual (click Help>Contents from the CommunicatorPQA™ application’s Main screen).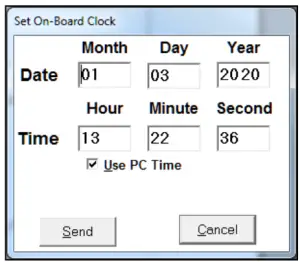
Program Meter Time
The meter is preset to the United States Eastern time. To change the meter time:
1. From the Main screen’s Title bar, click Tools>Set Device Time.
2. You can either enter the time in the Time fields or click Use PC Time to match the meter time with the PC time.
3. Click Send.
Program Meter Name
The meter’s name is used in database files and report titles. To give the meter a unique name: 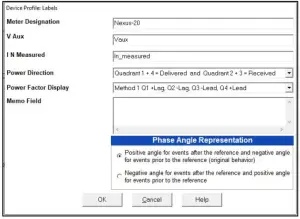
1. From the meter’s Device Profile screen, click General Settings>Labels, and then double-click on one of the lines underneath to open the Labels screen.
2. Enter a name for the meter in the Meter Designation field.
3. Click OK.
IMPORTANT! When you have made changes to the meter’s Device Profile, click Update Device at the bottom of the Device Profile screen, to send the new settings to the meter. The meter will reboot and then you can reconnect to it.
Nexus® is a registered trademark of Electro Industries/GaugeTech. The distinctive shape, style, and overall appearance of the Nexus® 1500+ meter is a trademark of Electro Industries/GaugeTech. CommunicatorPQA TM , MeterManagerPQA TM , and EnergyPQA.com are trademarks of Electro Industries/GaugeTech. Windows® is a registered trademark of Microsoft Corporation in the United States and/or other countries. Littelfuse® is a registered trademark of Littelfuse, Inc. https://electroind.com/


