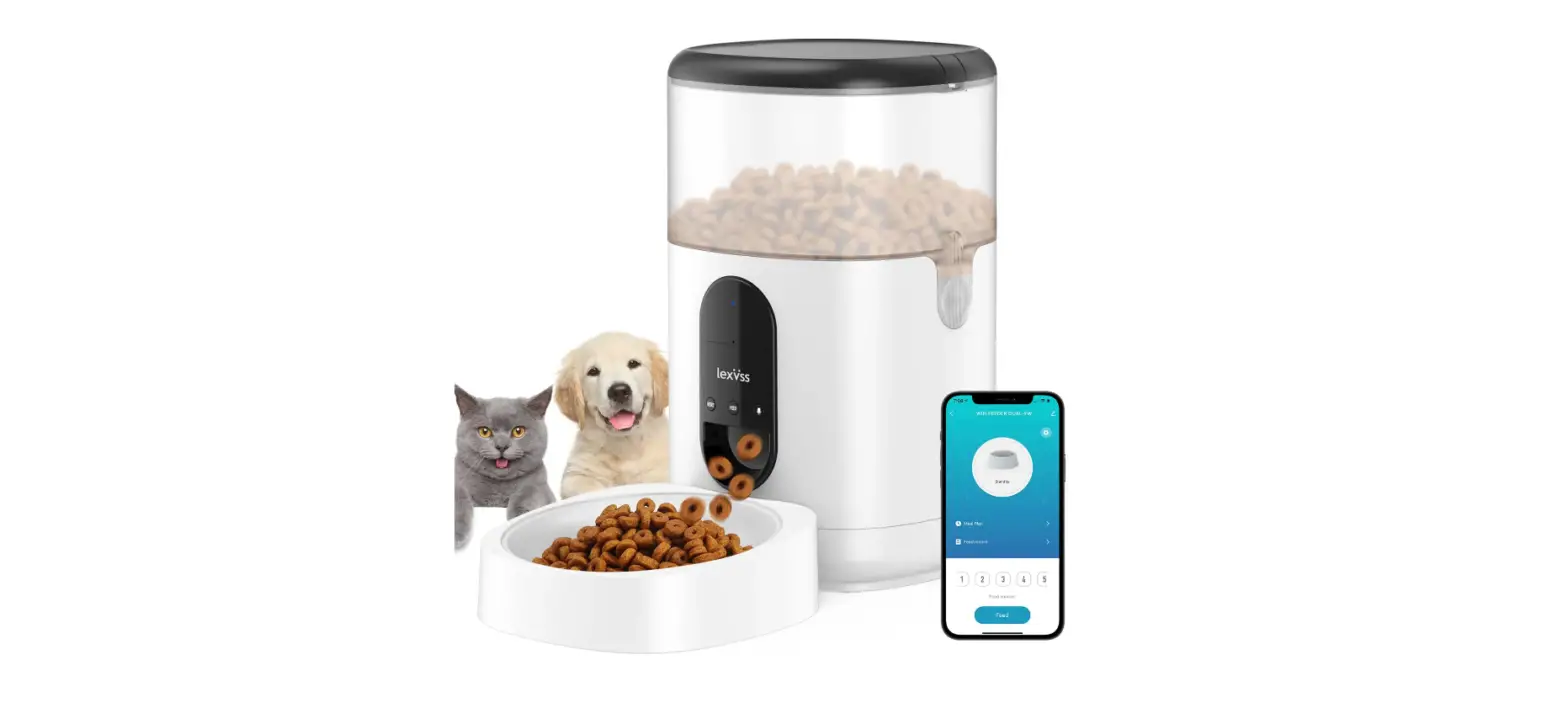
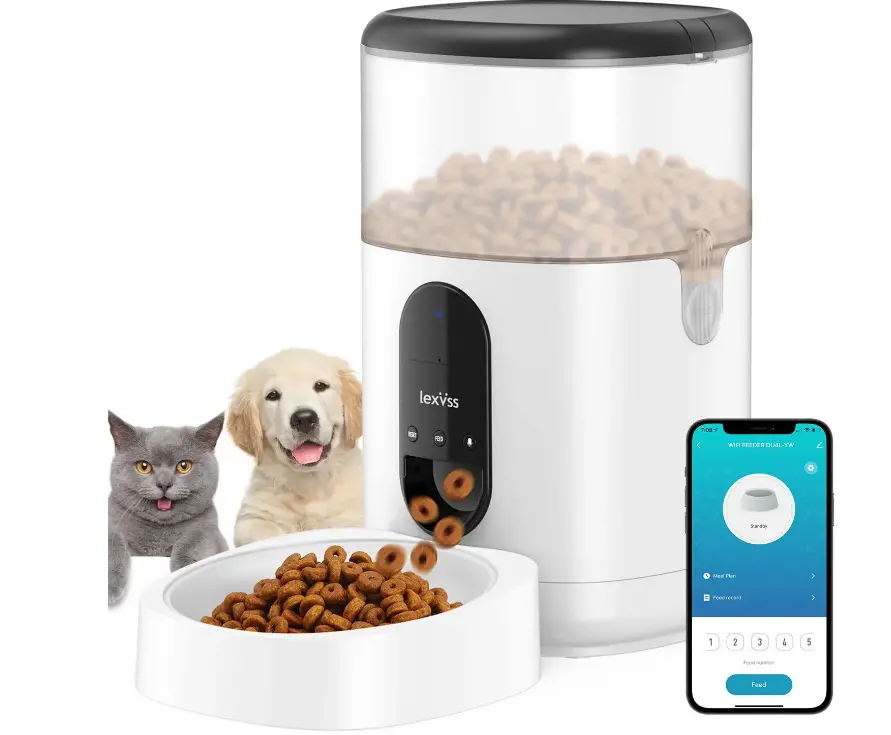
Lexvss
Lexvss DU4L-YW Automatic Cat-Dog Feeder Dispenser
SAFETY PRECAUTIONS
WARNING
- Dispose of all packaging materials properly. Some items may be packed in polybags; these bags could cause suffocation; keep away from children and pets.
- Do NOT allow small children to play with, in, or around the pet feeder. To reduce the risk of injury, please keep close supervision when the feeder is used near children.
- Do NOT use the feeder with pets not able to reach the food tray or with any physical disability.
- Do NOT immerse the base part in water at any time as it may damage electronic components like the control panel.
- Do NOT place any foreign object in the pet feeder.
- Do NOT use outdoors. Check operation frequently to be sure the unit is dispensing properly
- Do NOT use wet, canned, or moist food.
- Do NOT disassemble the unit other than as instructed in this User Guide.
- Do NOT use the feeder for anything other than its intended use.
- Only use the parts recommended or sold by the manufacturer. The use of parts not recommended or sold by the manufacturer may cause an unsafe condition.
- Do not modify the pet feeder by yourSelf.
- Do not operate any appliance if the unit is malfunctioning or has been damaged.
- Do take the feeder apart and attempt it by yourself. Please contact our customer service immediately for further instructions. Always unplug when not in use or before cleaning.
- Never pull on the electrical power cord to remove the plug from the wall outlet. if the plug of this device gets wet, turn off the electricity of the wall outlet.
- Do not attempt to unplug Examine the feeder after installation.
- Do not plug in if there is water on the power cord or plug.
- To avoid tripping, always position the power cord out of the way of foot traffic.
CAUTION
- Do NOT allow pets to chew on or swallow any parts.
- If an extension cord is necessary, one unit with a proper rating should be used.
- Do NOT install or store the pet feeder where it will be exposed to weather or temperatures below – 20C/-4•R.
- Use alkaline D batteries to power, Do NOT use rechargeable batteries.
- Check the batteries regularly. Before leaving for extended time, always replace batteries with new ones.
- Do NOT lift the pet feeder by Lid, food tank, or food tray. Lift and carry it by both hands from the botton of base, while keeping the unit in an upright position.
- Suitable for dry food ONLY, with kibble size ranging from 2-10mm / 0.07-0.4in in diameter. Larger kibble may get stuck at the food outlet.
- Read and observe all important notices that are listed on the pet feeder and in the packaging.
- When using the adapter and batteries at the same time, the adapter power supply is in priority.
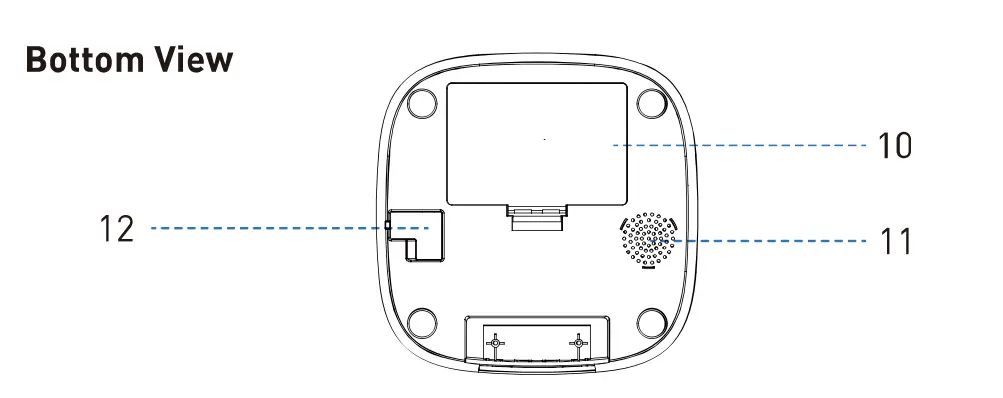
PRODUCT DIAGRAM
Front View 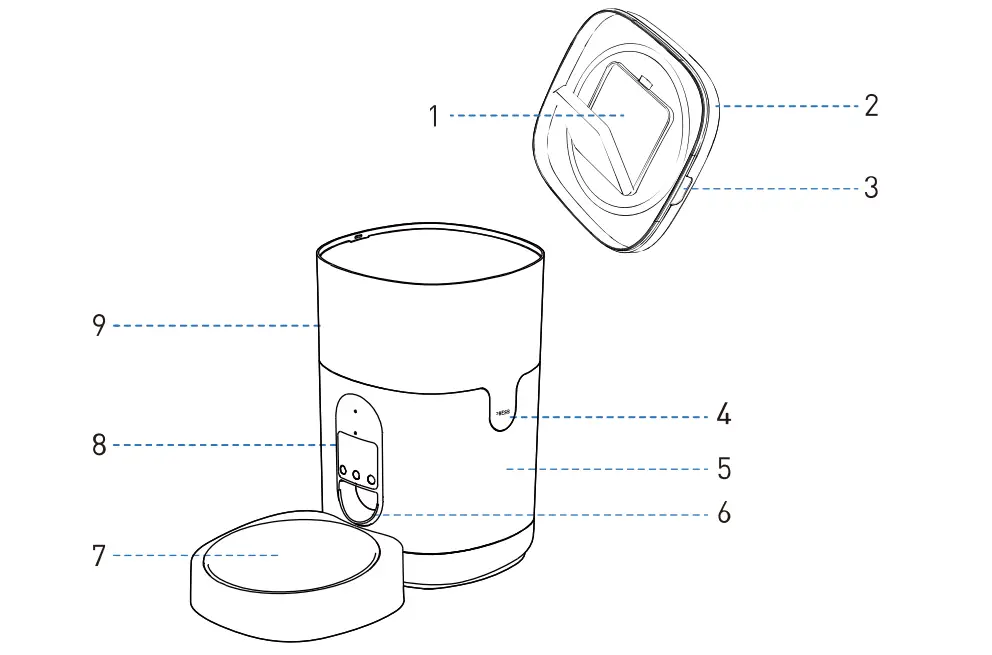
- Desiccant Carrier
- Ud
- Lid Grip
- Food Tank Buckle
- Base
- Food Outlet
- Food Tray
- Control Panel
- Food Container
- Battery Compartment
- Speaker
- Power Socket
LED Indicators
|
Blue | Rapidly flash every 0.Ss
Slowly blink Stay solid | The Feeder is in WiFi mode, ready to be connected with App. The Feeder is in AP Mode, ready to connect with App. Connected to WIFI and fully operational |
| Staysolid 6s | ResettingWIFI connection | |
|
Red | Off | Normal |
| Slowly blink
Rapid ly flash | Food dispensing system error • Press and hold the Reset Button for 6sto reset Lock or Unlock | |
| Stay solid 6s | Resetting WIFI connection |
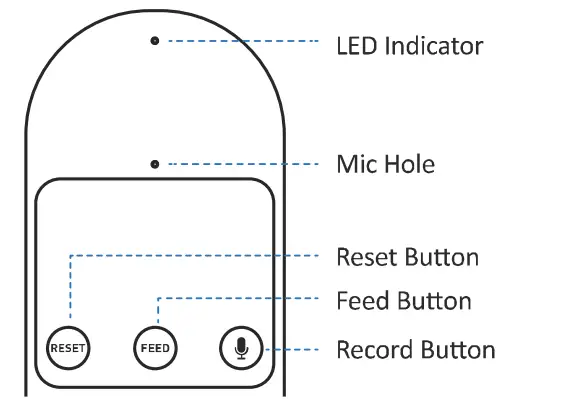
Record Button
- Press and hold the “RECORD” button, and start recording after a beep is heard.
- Record your voice for Less than 10s. Release the button 2 beeps will be heard indicating it’s saved.
Reset Button
- Press and hold the “RESIT’ button for 6s to reset the device.
- Press and hold the Reset Button for 6s to switch AP Mode.
Feed Button
- Press the “FEED” For manual feed a portion (appr 2 1/2 tsp/ 12. Sm L)
- Press and hold the “FEED” for 6s, the indicator will flash twice meaning the control panel is Locked. Repeat to unlock.
CONTROLLING VIA APP
- System Requirements
- iPhone on iOS 9.0 or later; smartphone on Android 4.4 or later
- Wireless router 2.4GHz (802.11 b/g/n)
- High-speed internet connection
- Before the Configuration
- Please use indoors only to avoid direct exposure to the sunlight.
- Please connect the Feeder via 2.4GHz only. If your WIFI is 5GHz only, set it to be compatible with 2.4GHz mode.
- The WIFI password is composed of no more than 12 digits and letters. Special symbols are not supported.
- In order to optimize the equipment performance, please keep the feeder, WiFi transmitting router, and phone distance within 10m, and in battier-free environments.
- If the configuration fails, please power off and restart the feeder (Press and hold the Reset button for 6s), then wait for about 2mins to re-configuration.
- How the System Works
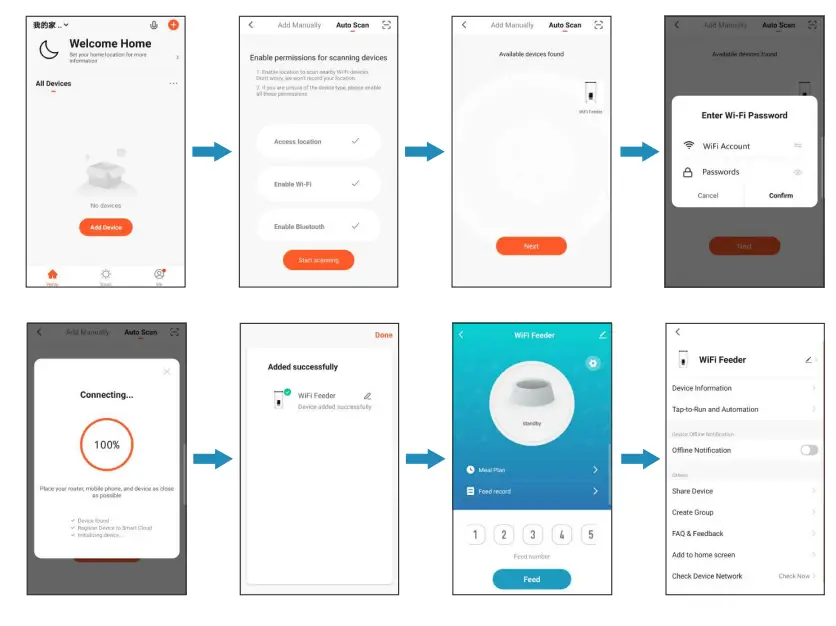
The pet feeder connects to your home’s wireless router and allows you to program your pet’s meals by phone at anywhere and anytime. Use the ”Tuya Smart• app to schedule your pet’s meal times and portion sizes, view the last 7 days of feeder activity, and even dispense a meal remotely. - Download the App & Log In
Scan the OR code and download the “Tuya Smart” APP, sign-up or Log in to your account.
Notes:- App language is adapted according to mobile phone language, EN/SP/JP are included
- Support Android and iOS systems
- This App ”Tuya Smart” can be searched and downloaded on the “APP Store “or “Google Play” as well.

- Three Ways to Connect Your Feeder with APP
- Configuring via II Auto Scan” Mode
- Click “+” on the right top to the “Auto Scan” Interlace Showed “Access location”, and “Enable Wi-Fi”, then click “Enable Bluetooth”, Click “Start scanning” .
- When found the feeder, CIJck”Next” and enter your Wifi account and password in the pop-up screen.
- Feeder Connected, start to set the mealtimes and portion sizes.
- Configuring via Manual Mode
- Click “+” on the right top to the “Add Manually” interface, then click “Small Home Appliances”, selecting the “Pet Feeder(WiFi)”
- Configuring via AP Mode(lf above configuring Is not successful)

- Note: Please make sure the Bluetooth is turned off on your mobile before starting the AP mode connection.
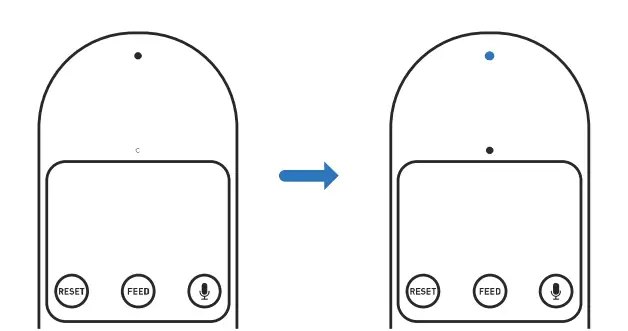
- When under the configuring mode, the Blue LED indicator rapidly flashes, press and hold the RET button for 7s until 3 beeps are heard. The LED indicator will turn to flash slowly. Now the feeder is under AP mode.
- Open the app on your mobile,Click “+”on the right top to the “Add Manually” interface, then click “Small Home Appliances”, selecting the “Pet Feeder(WiFi)”, Clip the icon at the top right corner and select Configure WIFI via AP mode. Enter your WIFI name and password and go to the WIFI connection interface on your mobile, find the device ”
Notes: - Device name: WIFI Feeder
- Connect the Feeder via 2.4GHz only, if your WIFI is 5GHz, please set it to 2.4GHz before the connection.
- If it still fails connecting, please contact our Support Team.
- Configuring via II Auto Scan” Mode
- Reset Feeder on Ap
- Enter Setting on Control Center, Select Factory Reset.
- 3 beeps will be heard, wait for about 1 minute until the blue light starts to flash slowly and your device is ready for re-connection.

- Share Your Feeder
Enter Setting, select Share Device, Click II Add Sharing” and enter ffJuya Smart” Account. - Control Center on APP


SET UP THE FEEDER
Warning: Please use the original SV power supply.
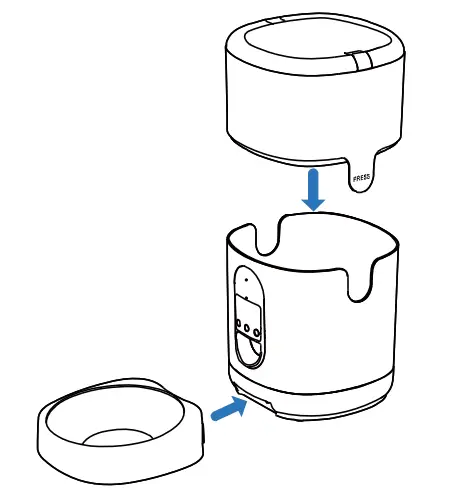
- Assembling Food Tray

- Place the feeder in the desired location. Check the food tank is in place.
- Align the bulging of the food tray and holes in the base, and push upward to connect the feeder base.
Note:
Before moving the feeder, please empty the tray, Hold the top of the feed and push back, then pull back the tray from the base.
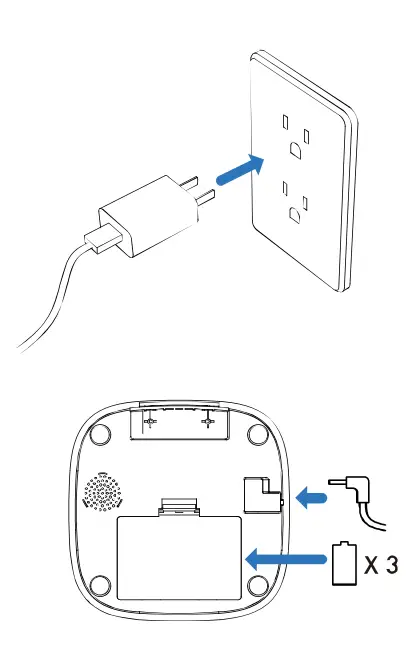
- Connecting Power

- Insert the SV power adapter into a wall socket. Plug in the power socket of the feeder.
- Open the battery compartment at the batten of the unit, and install 3 alkaline D batteries (not included) in case of an outage.
- The LCD display will light up automatically indicating the feeder is on now.
Notes:- Battery NOT included.
- Before connecting to power, make sure all parts are clean and completely dry.
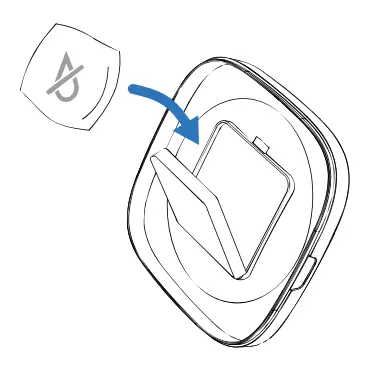
- Placing Desiccant bag

Open the Lid, and place the desiccant bag (1 included) into the desiccant carrier underneath.
Notes:- It’s recommended to use a desiccant bag and change them frequently in case of mold.
- Please remove the desiccant bag before cleaning the Lid.
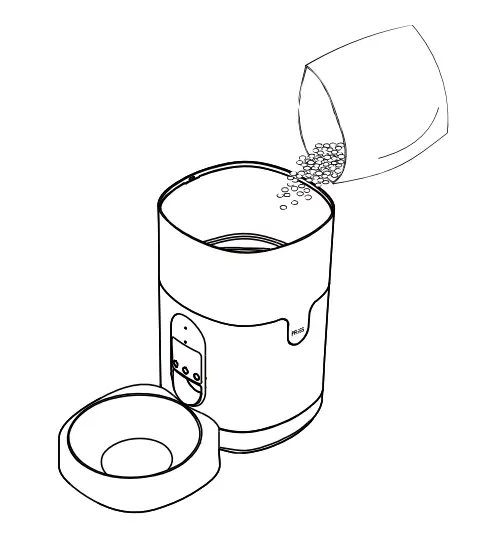
- Filling Food Container

- Press the two Unlocked buttons to open the lip.
- Fill the food tank with dry pet food. Close and lock the lid.
Note:- Do NOT use canned, wet or moist pet food.
- Recommend kibble size ranging from 2-lOmm / 0.07-0.4in in diameter.
- recording a Meal Call
- Press and hold the”RECORD” button, and start recording after a beep is heard.
- Record your voice for less than 10s. Release the button, 2 beeps will be heard indicating it’s saved.
Note:
When feeding time is up, the recording will be played when food is dispensed.
- Manually Feeding Your Pet
Press the Feed button and one portion (2 1/2 tsp /12.Sml) will be fed each time.
Note:
The normal schedules and portions will not be affected.
CLEANING & Maintenance
- It’s recommended to clean the feeder regularly for the health of your pet.
- The washable parts of the feeder are as follows: food container, food tray, and lid [without desiccant bag]; they can be submerged in water Clean by hand-washing using cool or warm soapy water.
DISSEMBLING THE FOOD CONTAINER
- If you have food inside the container or chute, press the “Unlocked” button and Feed button for a few times to empty first.
- Press the food container buckles with your thumbs, push the it upward to disassemble.
DISSEMBLING THE FOOD TRAY
Before moving the feeder, please empty the tray, Hold the top of the feede and push back ,then pull back the tray from the base. Rinse and let all parts air dry completely before assembling.
Note:
Be careful not to hurt your fingers when disassembling the food container by great strength
WARRANTY
We provide a 1-year warranty for this feeder.
PACKING CONTENTS
- 1 x WiFi Automatic Pet Feeder
- 1 x SV Power Adapter with cable
- 1 x Desiccant Bag
- 1 x User Guide
SPECIFICATIONS
| Food Contaier Capacity: | 4 Liters |
| Power Battery Supply: | DC SV power adapter; 3 x alkaline D batteries (Not included) |
| App Name APP: | Tuya Smart |
| Power Adapter; | AC100-240V Input, DC SV output |
| Working Current: | Avg. BOmA |
| Operating Temperature: | -20X-85X: /-4oF- 185°F |
| Power Socket: | 3.5mm |
| WiFiStandards: | 802.11 b/g/n |
| Wireless Frequency: | 2.4GHz (channel 1-14) |
| Encryption: | WPA/WPA2 |
| Radiation Power: | +20dBm |
| System Supported : | Android & iOS |
| Net Weight: | 2.15kg/4.74Lbs |
| Dimensions: | 19x19x30cm/7.5×7.5xl2in |
TROUBLESHOOTING
| Problem | Solution |
| The food won’t come out | 1) Please be sure to fill in with dry food; kibble size should range from 2-lOmm / 0.07-0.4in in diameter. |
| 2) Check whether any foreign objects are placed – disassemble the food container and check the chute. Also check the food outlet. | |
| 3) Check whether it’s low battery level – whether the power adapter is connected or there is any outage when no battery is installed. | |
| Can’t disassemble the food container | Please follow steps in Clean &Maintain |
| Can’t hear any voice recordings when feeding | Make sure you’ve recorded successfully – unlock the control panel, press the Feed button to check. If no sound is heard, you may need to record again and save |
| Food volume for each portion is not the same | The first few portions may vary, and it doesn’t mean faulty equipment. After about 6 feedings it should be almost even |
| Can’t configure the feeder on my mobile. | 1) Incorrect account and password format – Use only number and letter for username and password, 12 digits at most. |
| 2) SG not supported – Please use 2.4G wireless network. | |
| 3) Application problem – Some program conflicts may happen. Please restart your mobile | |
| Feeder appears disconnected from WiFi. | Weak disconnection – Please check that the distance between your feeder and router is no more than 10m/33ft, and no concrete walls or too many obstacles between them. Otherwise the WIFI network can be weak and cause unstable connection. |
FAQS
Does this have a bark detector to let me know when my dog bark?
There is a sound/motion detection feature that reacts to loud sounds and substantial motion. So, if your dog is barking not far away, it will detect it.
My dog chewed the anti-chewable cable… how do I get a new one?
Throw a fit and ask the company for a new one. This product isn’t as resilient as it says it is. I convinced many people to buy one after my first week of having it; now, I would never recommend it because it doesn’t do what it promised.
Does this work with Apple Watch, for the motion / barking notifications (not the video feed, just the notifications)?
It works with iPhones, iPods, and iPods – I’m not sure if those can be set up to sync and send notifications to your Apple Watch, but perhaps can help you.
Do you have to pay for an app to use this if you don’t have Alexa?
The app is free for android and iPhone from the app store or Google play
Do you have to be on a wifi network or be in a certain range for the audio to work? If I am not in the house, the audio sounds like screeching.
We got audio to work easily on WiFi. Someone logged in (100 miles away) and I had a conversation with them.
Is there a way to have this device modified to dispense medications for my elderly parents?
Depending on the size of the pill. There would have to be only one kind of pill and it can be flung anywhere in the room and your patient would have to crawl around looking for it. Plus any animal or child could have access to it. Then you would have no idea whether they took the pill or not. It would be an inhumane and inexact way to dispense medication. I hope this is a joke. If I hired you for a caregiver that would not be acceptable to me. I think there might be some other time-sensitive medication dispensers on the market.
Can the camera be controlled remotely or is it fixed?
The positioning of the camera is fixed.
Does this work if you’re crate-training your dog?
Not sure.. the treats might not reach or go too far for the dog to get them..
Does it take photos?
Yes, you can take photos with it from the app.
Can i use in my country Thailand, the outlet 220v?
You can use it with 220V outlet, just make sure to use a 5.0V – 2.0A power adapter with a suitable plug for your socket.


