![]()
![]()
TR-909 Software Rhythm Composer
Owner’s Manual
Copyright © 2018 ROLAND CORPORATION
Introduction
For details on the settings for the DAW software that you’re using, refer to the DAW’s help or manuals.
About Trademarks
- VST is a trademark and software of Steinberg Media Technologies GmbH.
- Roland is a registered trademark or trademark of Roland Corporation in the United States and/or other countries.
- Company names and product names appearing in this document are registered trademarks or trademarks of their respective owners.
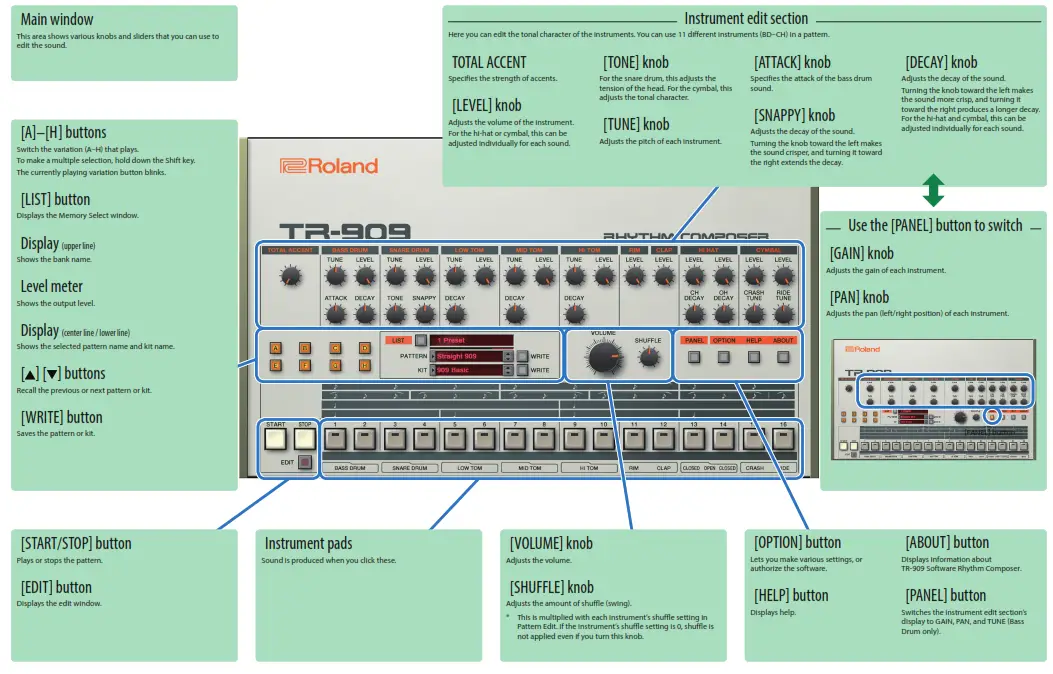
Screen Structure
Sound Engine Structure
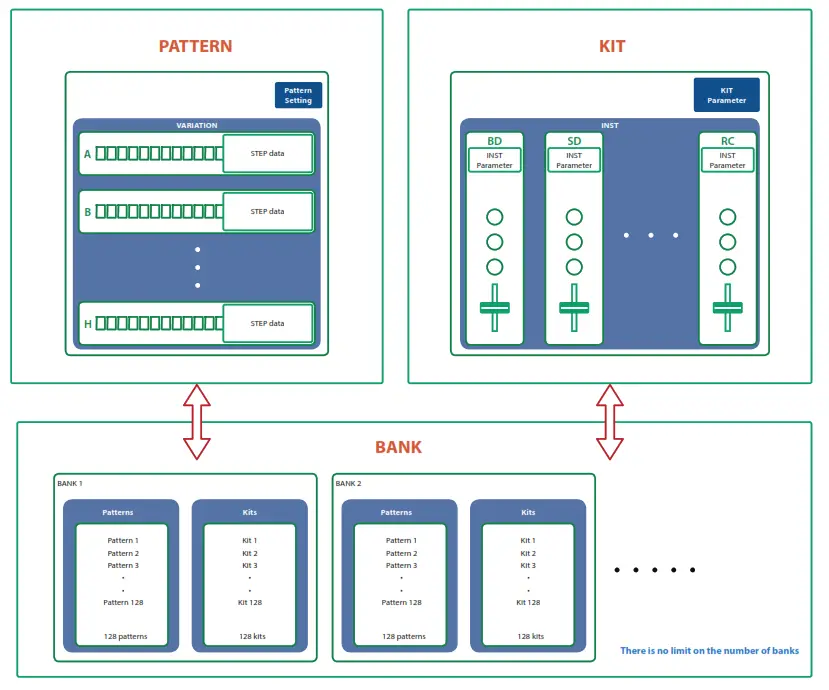
What Is a “PATTERN”?
The performance data that you record is called a “pattern.”
Each pattern can have eight variations (A–H).
You can use the [A]–[H] buttons of the main window and MIDI messages (p. 8) to switch variations while a pattern plays.
What Is a “KIT”?
The 11 instruments are collectively called a “kit.”
The pattern plays the instruments of the currently selected kit.
What Is a “Bank”?
A “bank” is a set of 128 patterns and kits.
By switching banks, you can recall a large number of patterns and kits.
You can save a bank as a file (p. 9).
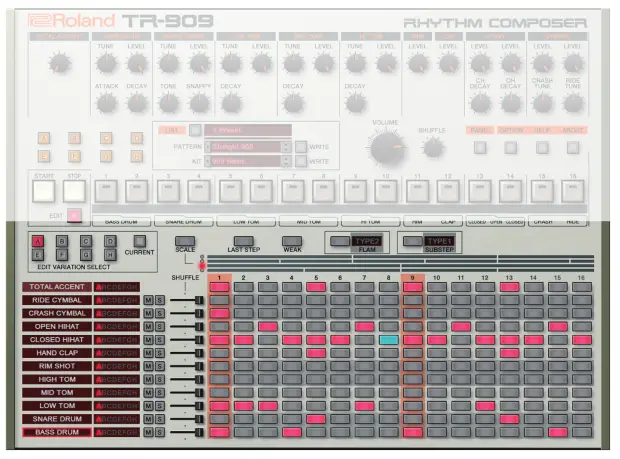
Edit Window
| Parameter | Value/Explanation |
| Parameter EDIT VARIATION SELECT buttons | Value/Explanation A-H: Select the variation that you want to edit. CURRENT: Select the currently playing variation. |
| [SCALE] button | Selects the scale. The scale changes each time you press the button. The vertical stripes that are the background of the step buttons are spaced at quarter-note intervals. |
| [LAST STEP] button | Specifies the length of the pattern. You can set this individually for each instrument. |
| [WEAK] button | Turn this on to enter weak beats. |
| [FLAM] button | Turn this on to enter a flam. |
| FLAM TYPE | Sets the flam interval for each pattern. Click the text”TYPE!’ TYPE1: 0 msec TYPE2-9: Specify a spacing of 20-48 msec in 4 msec units. |
| [SUB STEP] button | Turn this on to enter sub steps. By entering sub steps, you can divide a step into repeated beats. |
| SUB STEP TYPE | Sets the type of the sub step to input. Click the text “TYPE” * You can input different types of sub steps for each step button. TYPE1: Duplets TYPE2: Triplets TYPE3: Ouadruplets |
| TOTAL ACCENT-BASS DRUM | The total accents and instrument names are shown. When the pattern length (LAST STEP) differs depending on the instrument, an instrument name is outlined in red and that instrument’s accents will match the TOTAL ACCENT’s accented steps during playback. The instrument outlined in red can be switched by clicking other instrument. |
| Variation indicator | This indicates the variation A–H that is playing for each instrument. Even if different instruments have a different LAST STEP setting, and the variations being played do not match, this shows the currently playing variation for each instrument. |
| [M] (mute) / [S] (solo) button | Specify mute/solo settings for each instrument (solo has priority). |
| [SHUFFLE] slider | Specifies the amount of shuffle (rhythmic bounce) for each instrument. If the shuffle setting in the main window is set to “0,” this has no effect. |
| Step buttons | These buttons set how the sounds play for each step. These buttons light up white as the respective instruments play during playback. TOTAL ACCENT Sets whether the instrument plays or not. RIDE CYMBAL–BASS DRUM When the step buttons are lit, the instrument plays. |
Specifying the Pattern Length (LAST STEP)
- Click the [LAST STEP] button
The [LAST STEP] button blinks purple.
The default is 16 steps. - For each instrument, press the button that you want to specify as the last step; the button blinks.
Inputting Steps
- For each instrument, input steps by making the step buttons lit or unlit.
Lit steps produce sound; unlit steps are silent.
Inputting the Total Accent (TOTAL ACCENT)
The top row of step buttons are for inputting the total accent.
- Make the button light for each step at which you want to apply an accent.
An accented note is heard for all instruments that sound at a step whose total accent button is lit.
MEMO
The strength of the accent is specified by the [TOTAL ACCENT] knob in the main window. (Accents apply to the same step of all instruments.)
Inputting Weak Beats
- Click the [WEAK] button.
The [WEAK] button is lit white, allowing you to input weak beats. - Turn on the steps that you want to play as weak beats.
The steps for which you input a weak beat are lit dimly.
MEMO
Even without making the [WEAK] button lit, you can input a weak beat by clicking a step while holding down the Shift key.
Specifying a Flam
- Click the [FLAM] button.
The [FLAM] button is lit yellow, allowing you to enter flams.
Click “FLAM TYPE” to select the flam spacing. - Turn on the steps at which you want to play a flam.
You can enter flams in combination with weak beats.
MEMO
You can right-click to switch between flams and sub steps, without making the [FLAM] button light.
Inputting Sub Steps
- Click the [SUB STEP] button.
The [SUB STEP] button is lit, allowing you to enter sub steps.
Click “SUB STEP TYPE” to select the sub step type.
Depending on the sub step type, this is lit light blue (duplets), green (triplets), or dark blue (quadruplets). - Turn on the steps at which you want to play a sub step.
You can enter sub steps in combination with weak beats.
MEMO
You can right-click to switch between flams and sub steps, without making the [SUB STEP] button light.
Editing a Variation
Right-click the EDIT VARIATION SELECT button to use the following functions.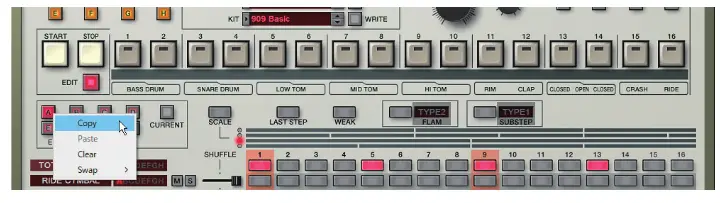
| Function | Explanation |
| Copy | Copies the patterns of all instruments in the selected variation. |
| Paste | Pastes the copied variation to the selected variation. The variation is overwritten. |
| Clear | Erases the selected variation. |
| Swap | Swaps the selected variation with another variation you specify. |
Editing an Instrument
Right-click an instrument name at the left side of the edit window to use the following functions.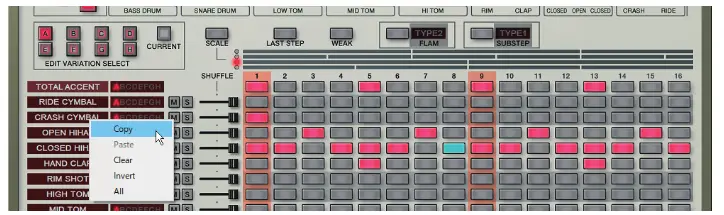
| Function | Explanation |
| Copy | Copies the pattern of the selected instrument. |
| Paste | Pastes the copied pattern to the selected instrument. The instrument is overwritten. |
| Clear | Erases the pattern of the selected instrument. |
| Invert | Exchanges the steps that sound the selected instrument with the steps that are silent. |
| All | Turns on all steps of the selected instrument so that they all sound. |
Placing a Pattern in a DAW Track
Performance data from the variation [A]–[H ] buttons can be placed in a track of your DAW, either as MIDI or audio data.
Use the [OPTION] button to choose whether you’re placing MIDI data or audio data.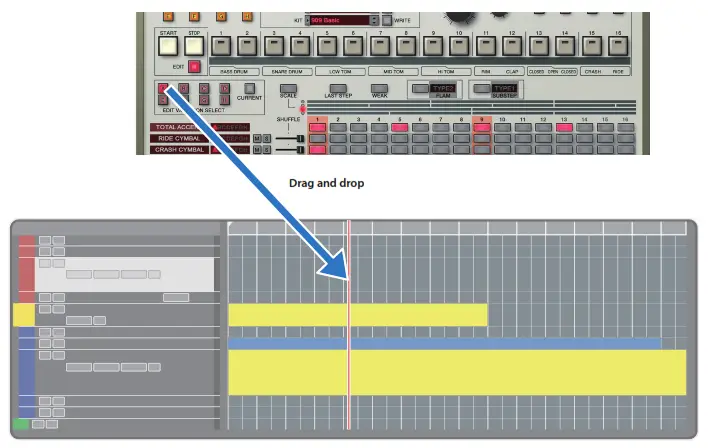
DAW Multi-Out Support
If you’re using this plug-in with a host application that supports multiple output, you can use a different output for each instrument.
The output assignment for each instrument is as follows.
| Output | Instrument |
| Main out | Mix |
| Sub out 1 | Bass Drum |
| Sub out 2 | Snare Drum |
| Sub out 3 | Low Tom |
| Sub out 4 | Mid Tom |
| Sub out 5 | High Tom |
| Sub out 6 | Rim Shot |
| Sub out 7 | Hand Clap |
| Sub out 8 | Closed Hihat |
| Sub out 9 | Open Hihat |
| Sub out 10 | Crash Cymbal |
| Sub out 11 | Ride Cymbal |
- For more about multi-output settings in your host application, refer to the help or owner’s manual of your host application.
How Note Numbers Select Sounds or Variations
Note numbers received by TR-909 Software Rhythm Composer select the following sounds or variations.
| Note number | Sound/Function |
| 24–31 | Variation Select A–H |
| 32 | Start step sequencer |
| 33 | Stop step sequencer |
| 35, 36 | Bass Drum |
| 37 | Rim shot |
| 38, 40 | Snare Drum |
| 39 | HandClap |
| 42, 44 | Closed HiHat |
| 41, 43 | LoTom |
| 46 | Open HiHat |
| 45, 47 | MidTom |
| 49 | Crash Cymbal |
| 48, 50 | HiTom |
| 51 | Ride Cymbal |
- When switching variations using note numbers, the variation switches right away without waiting for the next measure to start.
- Also, when switching variations using note numbers, you can’t use the [VARIATION] button to change the variation until playback is stopped.
About CC (Control Change)
TR-909 Software Rhythm Composer receives the following CC messages.
| CC# | Parameter |
| 7 | VOLUME |
| 9 | SHUFFLE |
| 20 | BD TUNE |
| 21 | BD ATTACK |
| 23 | BD DECAY |
| 24 | BD LEVEL |
| 25 | SD TUNE |
| 26 | SD SNAPPY |
| 28 | SD TONE |
| 29 | SD LEVEL |
| 46 | LT TUNE |
| 47 | LT DECAY |
| 48 | LT LEVEL |
| 49 | MT TUNE |
| 50 | MT DECAY |
| 51 | MT LEVEL |
| 52 | HT TUNE |
| 53 | HT DECAY |
| 54 | HT LEVEL |
| 57 | RS LEVEL |
| 60 | CP LEVEL |
| 62 | CH DECAY |
| 63 | CH LEVEL |
| 71 | TOTAL ACCENT |
| 81 | OH DECAY |
| 82 | OH LEVEL |
| 83 | CC TUNE |
| 85 | CC LEVEL |
| 86 | RC TUNE |
| 88 | RC LEVEL |
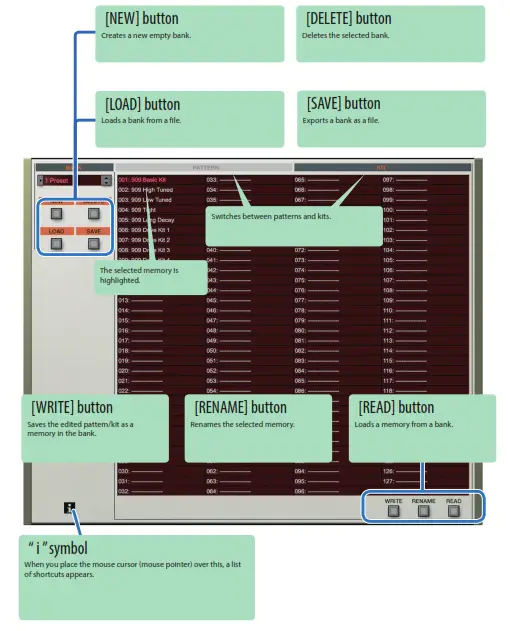
Patterns/Kits and Banks
- Click the [LIST] button.
The Memory Select window opens.
Bank
A “bank” contains 128 patterns and 128 kits. By switching banks, you can access a large number of patterns or kits. A bank can be saved as a file.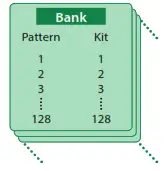
Changing to Other Bank
- Click the Bank field.
The bank list window opens. - Click the bank that you want to recall.
By pressing the [ ] [
] [ ] buttons located at the right of the bank field, you can switch to the next or previous bank.
Exporting the Bank
Here’s how to export a bank as a file.
- Click the [SAVE] button.
The file name input window opens. - Enter a file name and save.
The file is exported.
Importing a Bank
- Click the [LOAD] button.
The file selection window opens. - Select a file and load it.
The bank is loaded.
Creating/Deleting a Bank
Creating a bank
Click the [NEW] button to create a new empty bank.
Deleting a bank
Here’s how to delete the selected bank.
- Select a bank as described in “Changing to Other Bank” (p. 9).
- Click the [DELETE] button.
A confirmation message appears. - Click [OK] to delete the bank.
Renaming a Bank
- Select a bank as described in “Changing to Other Bank” (p. 9).
- At the left of the bank field, click [
 ] button.
 - Edit the name and press the Return (Enter) key.
Patterns and Kits
TR-909 Software Rhythm Composer manages 128 patterns and kits as one bank.
Loading a Pattern or Kit
Here’s how to load a pattern or kit that’s saved in a bank. When you load a pattern or kit, its settings are shown in the edit area, allowing you to edit the settings.
- Click the number of the memory that you want to load.
- Click the [READ] button. Or press the Return (Enter) key.
The pattern or kit is loaded.
* You can also load a pattern or kit by double-clicking the pattern or kit number.
Saving a Pattern or Kit
Here’s how an edited pattern or kit can be saved to a bank.
- Click the number of the memory in which you want to save the sound.
- Click the [WRITE] button.
The pattern or kit are saved in the bank.
Renaming a Pattern or Kit
- Click the number of the memory that you want to rename.
- Click the [RENAME] button.
- Change the memory name. (Up to 16 letters)
MIDI Learn Function
Here’s how to associate a MIDI control change with a sound parameter, so that the parameter can be controlled by that MIDI message.
Procedure
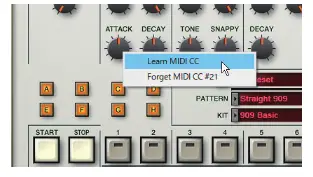
- Right-click the sound parameter controller (knob or slider).
- Choose “Learn MIDI CC.”
- Operate your external MIDI device to transmit a control change message.
NOTE
You can’t associate more than one MIDI control change with a single controller. Only the most recent setting is used.
Cancelling
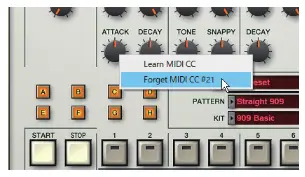
- Right-click the sound parameter controller (knob or slider).
- Choose “Forget MIDI CC.”
Setting
Option
- Click the [OPTION] button.
- Select items.
A is shown for the selected item.
| Item | Explanation |
| Layout | Original: This is the conventional screen layout. Compact:This condenses the space for other than knobs and buttons, using less screen area. |
| Zoom | You can change the size (zoom factor) of the main window using the mouse. |
| Initialize MIDI Control Mapping | Returns the MIDI control change mapping to its default state.→ “About CC (Control Change)” (p. 8) |
| Clear MIDI Control Mapping | Clears all MIDI control change mapping. |
| Position Lock to DAW | Specifies whether TR-909’s pattern playback is synchronized to the DAW’s transport (play, stop, playback position). If this is on, TR-909’s pattern plays/stops in synchronization with the DAW’s play/stop operation. Turn this off if you are playing TR-909 from a track of the DAW. |
| Drag & Drop Pattern as MIDI | When you place variation performance data in your DAW, it is placed as MIDI data. |
| Drag & Drop Pattern as Audio | When you place variation performance data in your DAW, it is placed as audio data. |
| Optimize for Lower CPU Usage | Turn this ON if CPU usage is high, and clicks or pops occur. |
| Sub Output… | Specifies how each instrument is output from individual sub outputs rather than from the main output (stereo). |
| Send Pattern to TR-8S | Sends pattern data to the TR-85. |
| Get Pattern from TR-8S | Receives pattern data from the TR-8S. |
| Setu p… | Specifies MIDI settings used when sending or receiving data to or from the TR-8S. When the Setup screen appears, set MIDI CTRL Input:TR-8S CTRL MIDI CTRL Output: TR-8S CTRL |
| Flip Scroll Direction: Inverts the direction of rotation when using the mouse wheel to edit a value (Only on Mac). The direction is inverted if Flip Scroll Direction is set to ON. | |
| Roland Cloud… | Displays the Roland Cloud site. |
| Authentication… | Performs user authentication for the TR-909 Software Rhythm Composer. |


