
Roland JUNO-60 Plug Out Software Synthesizer
Introduction
When using the JUNO-60 for the first time, you must specify the MIDI Input/Output setting in the Setting window (p. 10).
For details on the settings for the DAW software that you’re using, refer to the DAW’s help or manuals.
About Trademarks
- VST is a trademark and software of Steinberg Media Technologies GmbH.
- Roland, PLUG-OUT, AIRA are either registered trademarks or trademarks of Roland Corporation in the United States and/or other countries.
- Company names and product names appearing in this document are registered trademarks or trademarks of their respective owners.
Screen Structure
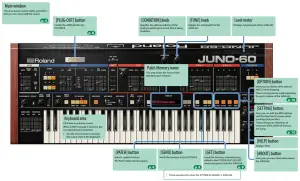
Main Window
Memory and Bank
- Click the [PATCH] button.
The Patch Select window opens.

Bank
A set of 64 memories is called a “bank.” By switching banks you can access a large number of memories. A bank of memories can be saved as a file.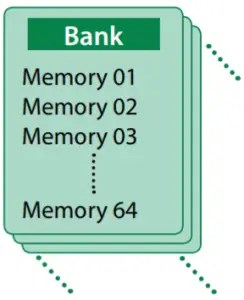
Changing to Other Bank
- Click the Bank field.
The bank list window opens. - Click the bank that you want to recall.
By pressing the [ ] [] buttons located at the right of the bank field, you can switch to the next or previous bank.
Exporting the Bank
Here’s how to export a bank as a file.
- Click the [SAVE] button.
The file name input window opens. - Enter a file name and save.
The file is exported.
Importing a Bank
- Click the [LOAD] button.
The file selection window opens. - Select a file and load it.
The bank is loaded.
Creating/Deleting a Bank
Creating a bank
Click the [NEW] button to create a new empty bank.
Deleting a bank
Here’s how to delete the selected bank.
- Select a bank as described in “Changing to Other Bank” (p. 6).
- Click the [DELETE] button.
A confirmation screen appears. - Click [OK] to delete the bank.
Renaming a Bank
- Select a bank as described in “Changing to Other Bank” (p. 6).
- Click ▶ located at the left of the bank field.
- Edit the name and press the [Return (Enter)] key.
Memory
The JUNO-60 manages 64 memories as one bank.
Loading a Memory
Here’s how to load a memory from a bank. When you load a memory, its settings appear in the edit area and can be edited.
- Click the number of the memory that you want to load.
- Click the [READ] button. Or press the [Return (Enter)] key.
The memory is loaded.
* You can also load a memory by double-clicking a memory number.
Saving the Memory
Here’s how to save an edited sound as a memory in the bank.
- Click the number of the memory in which you want to save the sound.
- Click the [WRITE] button.
The memory is saved in the bank.
Renaming the Memory
- Click the number of the memory that you want to rename.
- Click the [RENAME] button.
- Change the memory name. (Up to 16 letters)
Changing the Order of the Memories
Drag the memory number to change the order of memories.
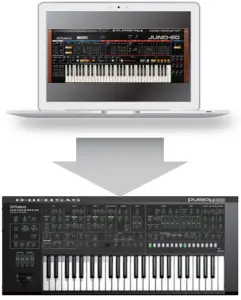
Playing with the SYSTEM-8
By connecting the SYSTEM-8 to your computer (Mac/Windows), you can use the JUNO-60 in conjunction with the SYSTEM-8.
The “SYSTEM-8 CTRL” shown as a MIDI port is the port used by the JUNO-60. Do not use this port from your DAW.
Plug-Out
What is a “Plug-out”?
“Plug-out” is technology that allows a software synthesizer such as JUNO-60 to be installed and used in the SYSTEM-8.
- You can play the JUNO-60 on the SYSTEM-8 by itself, without using a computer.
- You can send the settings of the selected bank to the SYSTEM-8.
- You can use the knobs and sliders of the SYSTEM-8 to edit the sound.

Plug-Out Procedure
- Click the [PLUG-OUT] button.
- Select a plug-out destination (PLUG-OUT1PLUG-OUT3) that corresponds to the desired MODEL button of the SYSTEM-8.
A confirmation message appears. - Click the [OK] button.
A progress bar appears, and plug-out processing begins. This takes approximately one minute.
* If the JUNO-60 is already plugged-out to one of the plug-out destinations (PLUG-OUT1 PLUG-OUT3), you can’t plug-out a new instance.
* If another software synthesizer is already plugged-out on the SYSTEM-8, a confirmation message appears. Click the [OK] button to continue.
If an error message appears, check the following items.
- Is the MIDI port specified correctly? (p. 10)
- Is the SYSTEM-8 connected to your computer?
Send/Get Memories

- Connect the SYSTEM-8 to your computer.
- Turn on the SYSTEM-8’s MODEL [PLUGOUT 13] button to which you plugged-out the JUNO-60.
* In order to send or get a memory, you must first plug-out (p. 8).
Sending the Memory
You can send the current JUNO-60 memory to the SYSTEM-8 and play it on the SYSTEM-8. The sound is output from the SYSTEM-8’s OUTPUT jacks. - Click the [SEND] button of the JUNO-60.
The memory is transmitted.
Getting the Memory
If you’ve used the SYSTEM-8 to edit a memory of the plugged-out JUNO-60, here’s how to load that memory into the JUNO-60. - Click the [GET] button of the JUNO-60.
The memory is loaded.
If an error message appears, check the following items.
- Is the MIDI port specified correctly? (p. 10)
- Is the SYSTEM-8 connected to your computer?
- Is the MIDI port specified correctly? (p. 10)
- Is the SYSTEM-8 connected to your computer?
- Is the SYSTEM-8’s MODEL [PLUG-OUT 13] button turned on?
- Is the JUNO-60 plugged-out on the SYSTEM-8? (p. 8)
MIDI Learn Function
Here’s how to associate a MIDI control change with a sound parameter, so that the parameter can be controlled by that MIDI message.
Procedure
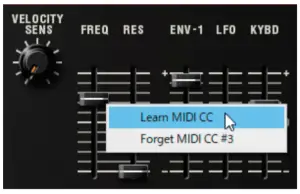
- Right-click the sound parameter controller (knob or slider).
- Choose “Learn MIDI CC.”
- Operate your external MIDI device to transmit a control change message.
NOTE
You can’t associate more than one MIDI control change with a single controller. Only the most recent setting is used.
Cancelling
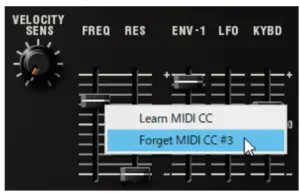
- Right-click the sound parameter controller (knob or slider).
- Choose “Forget MIDI CC.”
Settings
Option
- Click the [OPTION] button.

- Select items.
A ✓ ( is shown for the selected item.
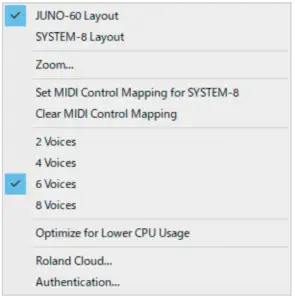
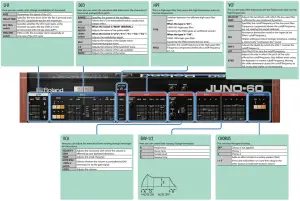
| Item | Explanation |
| JUNO-60 Layout SYSTEM-8 Layout | Changes the layout of the controllers in the main window. JUNO-60 Layout: The controllers are laid out as they are on the JUNO-60 (original). SYSTEM-8 Layout: The controllers are laid out as they are on the SYSTEM-8. |
| Zoom | You can change the size (zoom factor) of the main window with the mouse |
| Set MIDI Control Mapping for SYSTEM-8 | Check this item if you want to use the SYSTEM-8 as a control surface for the JUNO-60. Here you can make MIDI mapping settings for the buttons and sliders. |
| Clear MIDI Control Mapping | Clears all MIDI control change mapping |
| 2–8 Voices | Specifies the maximum simultaneous polyphony. You can reduce the load on the CPU by lowering the polyphony. |
| Optimize for Lower CPU Usage T | Turn this ON if CPU usage is high, and clicks or pops occur. |
| Roland Cloud… | Displays the Roland Cloud site |
| Authentication… | Performs user authentication for the JUNO-60. |
Setting
- Click the [SETTING] button.
The Setting window opens.
* Flip Scroll Direction is only on Mac.
- Edit the parameters.

| Parameter | Explanation |
| MIDI CTRL Input | Choose “SYSTEM-8 CTR |
| MIDI CTRL Output | |
| Flip Scroll Direction (Only on Mac) | inverts the direction of rotation when using the mouse wheel to edit a value |
* If multiple instances of the JUNO-60 are running, these settings apply to all instances.
Others
If you want to use the SYSTEM-8 to play the JUNO-60 (plug-in) in your DAW, set the SYSTEM-8’s menu item “SYSTEM” → “SOUND” → “Local Sw” to “SURFACE.”
The internal sound engine of the SYSTEM-8 no longer produces sound; only the JUNO-60 can produce sound.
For details, refer to SYSTEM-8 Reference Manual.


