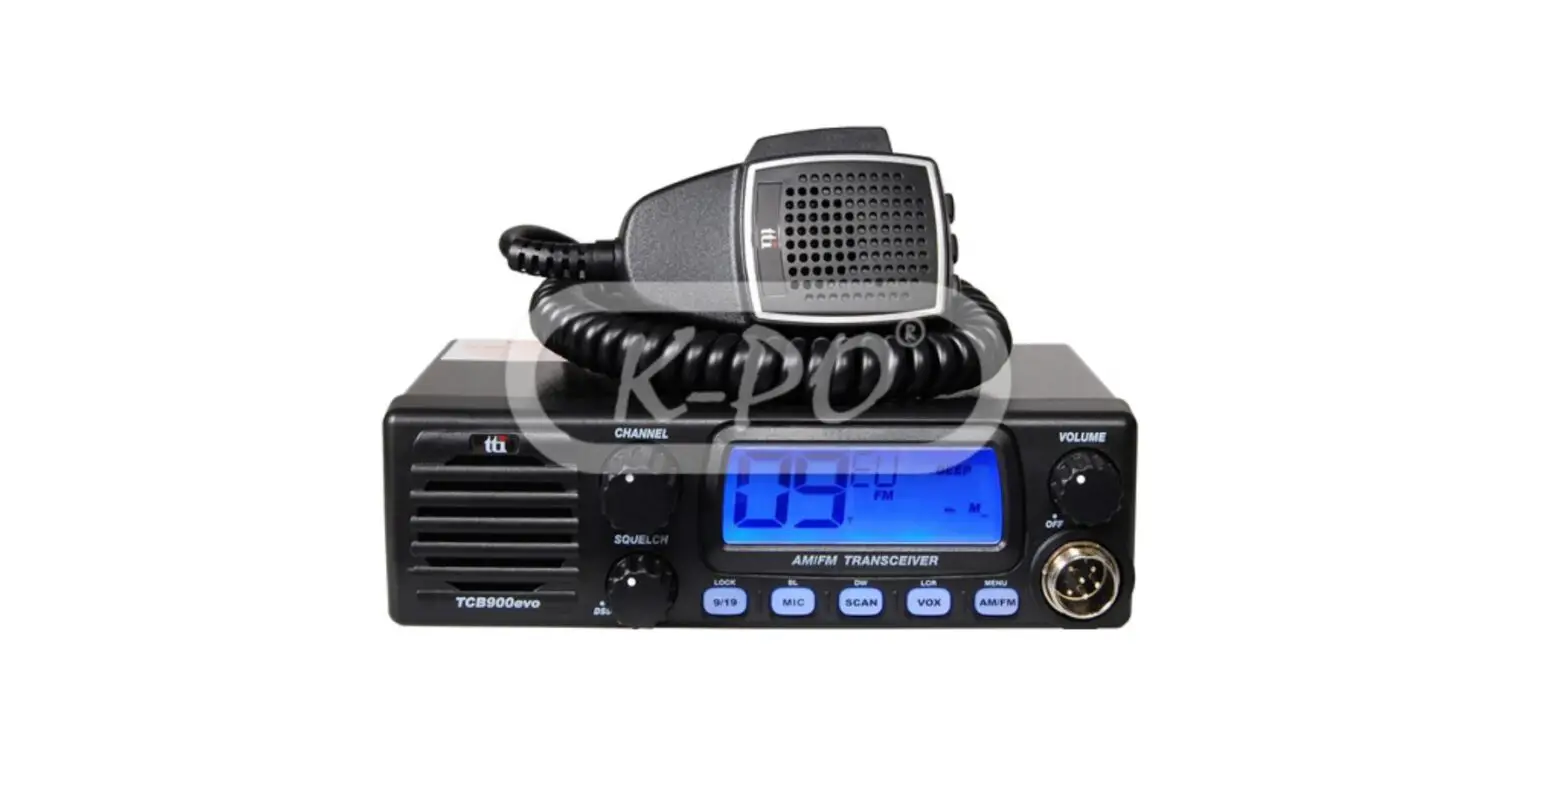
tti TCB-900evo 4W Mobile CB Transceiver Instruction Manual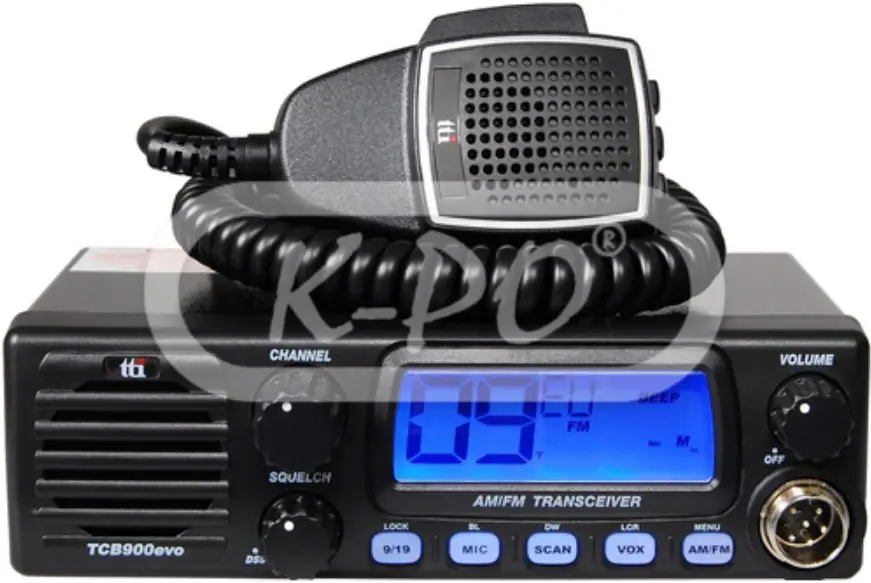
Supplied Accessories
Your transceiver is supplied with a full range of accessories to help you get started and virtually benefit from all the features straight away.
- TCB-900evo Transceiver: 1 unit
- Microphone with cord: 1 unit
- Power cable: 1 unit
- Radio mounting bracket: 1 unit
- Radio mounting thumb screw with rubber washer: 2 pieces
- Mounting screw with washer (for transceiver bracket): 3 pieces
- Mounting screw with washer (for microphone bracket): 2 pieces
- Microphone mounting bracket: 1 unit
Installation
Normal Installation using Mounting Bracket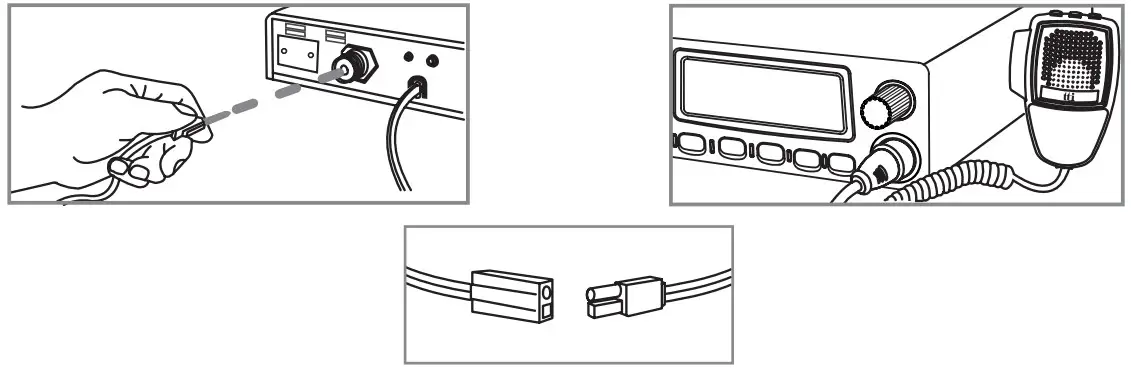
- Put the mounting bracket on the proper location where you are going to install.
- Drill holes and fix mounting bracket on the location.
- Connect the antenna cable plug to the standard receptacle on the transceiver, which is marked “ANT”.
- Connect the power cable directly to the vehicle battery or fuse box of the car. Be careful to make sure of the polarity of the battery first and connect the cable.
(Red: Positive Pole(+), Black: Negative Pole(-). The same colors are shown on the battery and in the fuse box of the car.) - Connect the power cable to the transceiver cable.
- Mount the microphone bracket on one side of the transceiver, or near it using two screws included.
- Connect the microphone to the transceiver’s microphone receptacle. Now youare ready to operate the transceiver.
Installing into Audio Compartment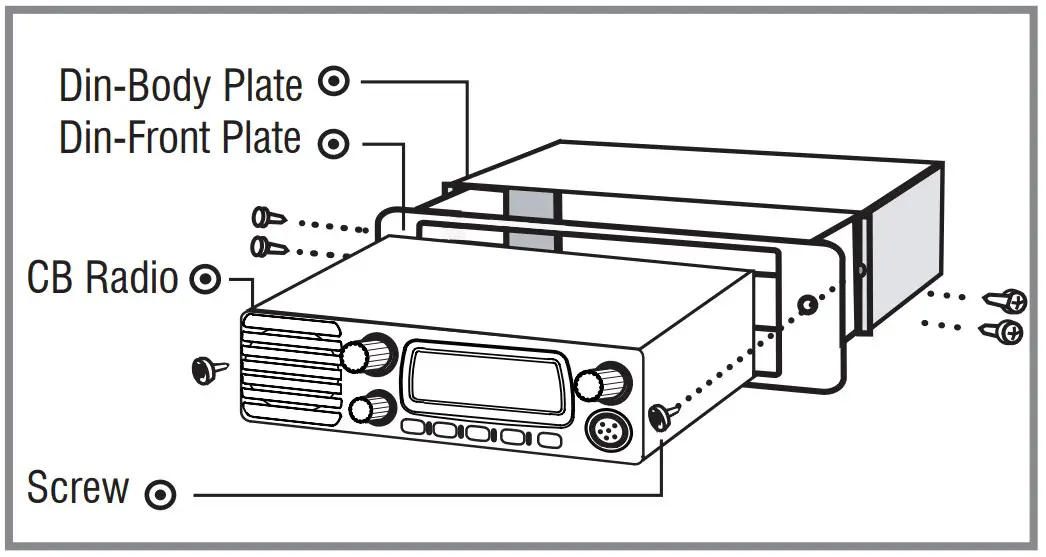
- Install the Din-Body plate into the audio compartment (center fascia) of your vehicle. (Use the ready made locking flaps.)
- Set the transceiver in the Din-Front plate, and insert the transceiver in the Din Body plate.
- Fix the screws through the transceiver, Din-Front plate and Din-Body plate.
Installing an Antenna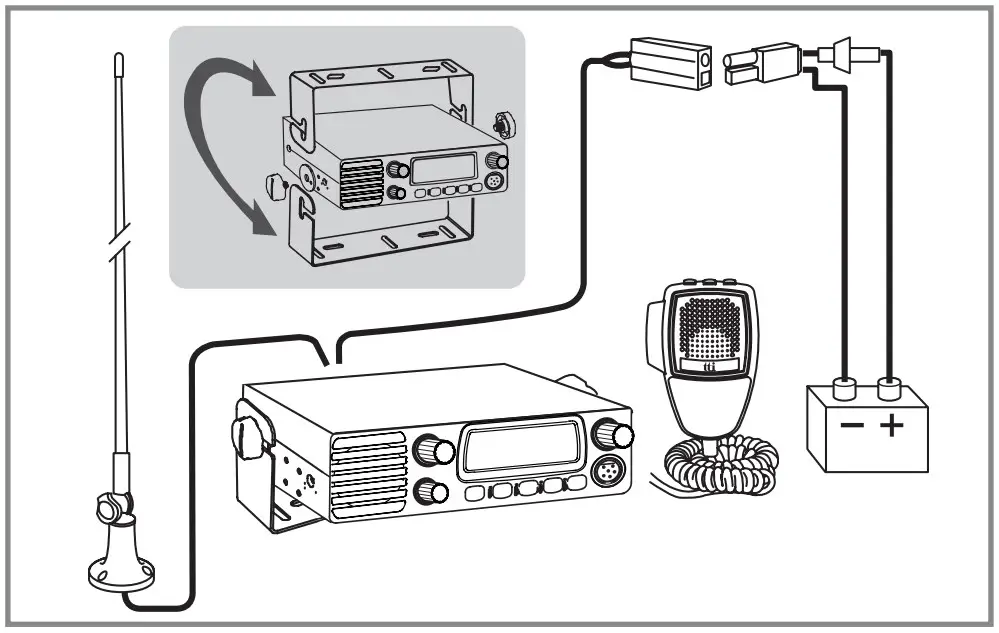
- Place the antenna as high as possible.
- The longer the antenna is, normally the better is the performance of the transceiver.
- Try to mount the antenna in the centre of the surface that you select.
- Make sure that you have a solid metal-to-metal ground connection.
- Be careful not to damage the cable during the installation.
Warning : Never try the operation of your transceiver before connecting a proper antenna in order not to cause any damage.
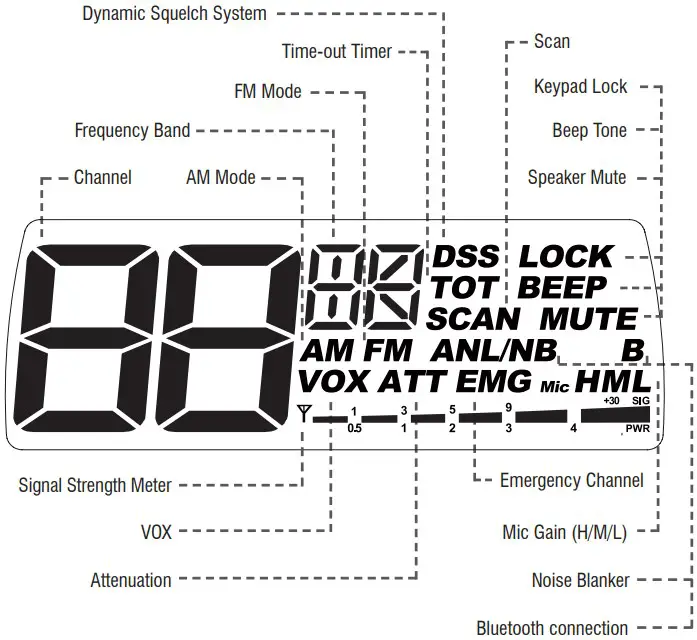
LCD Display
Transceiver Controls and Functions
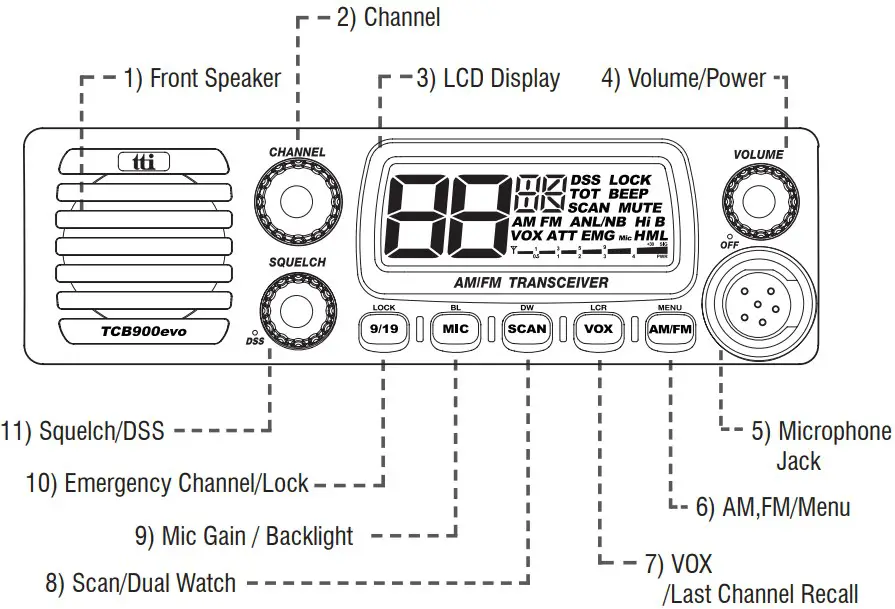
- Front Speaker
- Channel Selector Turn right or left, and this allows you to select the channel one by one.
- LCD Display
- Volume / Power Knob
- Microphone Jack
- AM.FM / Menu Button Short press to change AM / FM.
Long press to access Menu mode. Use the Channel knob to select the setting. On the Microphone, press center key (VOX button) to access Menu mode. Use Up/Down key to select the setting.
<MENU>
| Display | Functions | Settings |
| Band Selection | See next band chart | |
| Bluetooth Selection | On, Off | |
| Noise Blanker | On, Off | |
| Beep Tone | On, Off | |
| Time-out Timer | 1-99 sec., Off | |
| Attenuation | On, Off |
<BAND Chart>
| Setting | Display Settings |
| EC | |
| EU | |
| D | |
| I2 | |
| I | |
| UE(EU/UK) | |
| UK | |
| PL | |
| F | |
| E |
- VOX / LCR Button Short press to activate the VOX. Using the Mic gain the sensitivity can be adjusted. Long press to go to the Last Channel you have used.
- Scan / Dual Watch Button Short press to activate Scan function. Long press to activate Dual Watch function. The current channel is the home channel and the secondary channel can be selected by the channel selection knob.
- Mic Gain / Backlight Short press to change the Mic Gain level to high (H), mid (M) and low (L) with the display indication. Long press to change backlight color.
- 9/19 / Lock Button Short press to go to the emergency channel (9 or 19). Long press to lock keypad. The volume, squelch and 9/19 buttons are still working.
- Squelch / DSS Knob
Manual Adjustment : Turn this knob counter-clockwise until you hear the background noise and then turn the knob a little clockwise until the noise disappears. In this way, you get the best receive sensitivity.
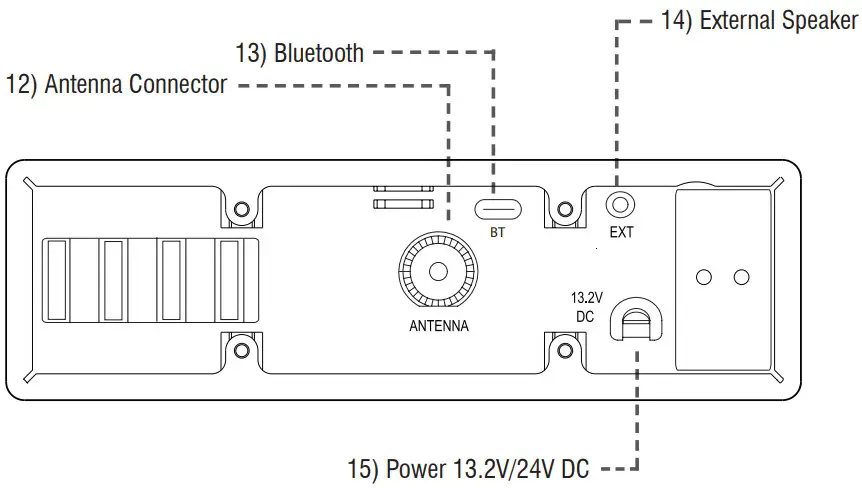
DSS : In FM mode turn the knob counter-clockwise until you hear the click. The squelch level of your transceiver is dynamically adjusted. - Antenna Connector
- Bluetooth Dongle Connection
- External Speaker Jack
- Power 13.2V / 24V DC
Microphone
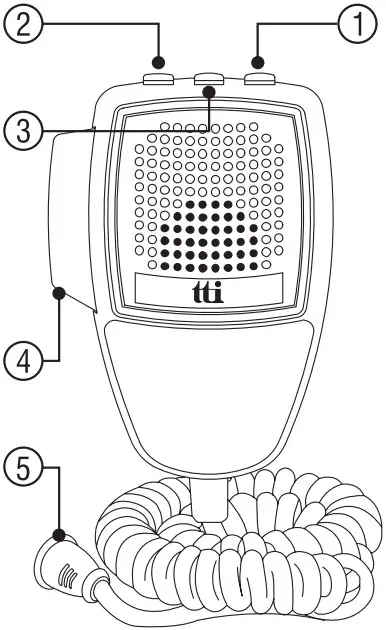
- Up Button
- Down Button
- Mute / VOX Button Mute :
Momentary press the button to make mute the speaker. VOX :
Press long then VOX will be activated. - PTT Button
- 6 Pin Microphone Connector
6. How to operate the Transceiver
- Make sure the microphone is connected to the microphone jack.
- Make sure the power cable is connected properly.
- Make sure the antenna is connected to the antenna receptacle.
- It is better to put the squelch control knob turned fully counter-clockwise.
- Turn on the transceiver and control the volume level.
- Adjust the squelch control knob to the optimum level.
- Select your desired channel.
- To transmit, press the PTT button and speak to the microphone.
- Release the PTT button to receive
Trouble shooting
If you experience problems with your TCB-900evo transceiver, first check the power supply source. Poor connection of the power supply source can cause problems such as no transmission, no reception or poor reception, and weak or no sound. Ensure that the microphone and antenna are also well connected.
If this does not solve the problem, reset your transceiver as follows.
- Switch off the transceiver.
- Pressing “9/19” button and turn on the transceiver.
This will reset the transceiver, so all the memories are erased and the parameters return to the initial factory setting. This should fix most problems.
In case of further difficulty, please consult your dealer or visit our website.
CE Declaration

CE versions of the TCB-900evo which display the CE symbol on the product label, Comply with the essential requirements of the Radio Equipment Directive (RED) 2014/53/EU.
This warning symbol indicates that this equipment operates in nonharmonized frequency bands and/or maybe subject to licensing conditions in the country of use.
Be sure to check that you have the correct version of this radio or the correct programming of this radio, to comply with your national licensing requirements.
This unit can be used without license and charges in; Austria, Belgium, Bulgaria, Cyprus, Czech, Denmark, Estonia, Finland, France, Germany, Greece, Hungary, Iceland, Ireland, Italy, Latvia, Lithuania, Luxembourg, Malta, Netherlands, Norway, Poland, Portugal, Romania, Slovakia, Slovenia, Spain, Sweden, Switzerland, and U.K.
Safety Requirement
The power cable is for 13.2 / 24V DC only. Be sure the transceiver is off before connection the leads of the power cable to the power supply. It is important to observe the polarity even if the unit is protected against the accidental inversion :
- Red : Positive pole (+)
- Black : Negative pole (-)
The same colors are present on the battery and in the fuse box of the car.
The unit must be wired for the negative ground only. To avoid damage, do not operate your CB radio without connecting a proper antenna
Specifications
| G E N E R A L | Channel | 40 (See the frequency band chart) |
| Frequency Range | 26.965 – 27.405 MHz | |
| Operating mode | F3E (FM), A3E (AM) | |
| Frequency Control | PLL Synthersizer | |
| Frequency Tolerance | 0.002% | |
| Operating Temperature Range | -10 to +55℃ | |
| Microphone | Plug-in Type | |
| Input Voltage | 13.2 / 24V DC ± 15% | |
| Size | 171 (W) x 95.6 (L) x 51 (H) without back heatsink | |
| Weight | 664 g | |
| Antenna Connector | SO-239 type | |
| T R A N S M I T T E R | Power Output | Duty cycle 10% 4 Watts @ 13.8V DC |
| Modulation | AM: from 85% to 95% FM: 1.8KHz ± 0.2KHz | |
| Frequency Response | 300Hz to 3000Hz | |
| Output Impedance | 50ohms, Unbalanced | |
| Harmonic Suppression | Less than -36dBm | |
| Current Drain | AM Full Mod. 1.6A Max. | |
| R E C E I V E R | Receiving System | Dual conversion superhterodyne |
| IF Frequencies | Double conversion 1st 10.695MHz/2nd 455KHz | |
| Sensitivity | 0.7㎶ for 10dB(S+N)/N in AM Mode 0.7㎶ for 20dB SINAD in FM Mode | |
| Audio Output Power | 2W @ 8ohm | |
| Audio Distortion | Less than 8% @ 1KHz | |
| Image Rejection | More than 60dB | |
| Adjacent Channel Rejection | More than 60dB | |
| Conducted Spurious | Less than -57dBm | |
| Frequency Response | 300Hz to 2500Hz | |
| Built-in Speaker | 8ohms, Round | |
| Squelch | Adjustable; Threshold less than 1㎶DSS; Less than 2㎶ |
* Specification is subject to change without prior notice.
Restrictions on the use
| Country | Band | Use restrictions and other comments | ||||
| BELGIUM SWITZERLAND | EU | F | EC | 40 Ch – 4W FM – Individual licence is required | ||
| 40 Ch – 4W AM – Individual licence is required | ||||||
| DENMARK,NORWAY LUXEMBOURG,CZECH | EC | 40 Ch – 4W FM – Free use | ||||
| FINLAND,PORTUGAL FRANCE,NETHERLANDS | EU | F | EC | 40 Ch – 4W FM – Free use | ||
| 40 Ch – 4W AM – Free use | ||||||
| GERMANY | D D2 | EU | 80 Ch – 4W FM – Individual licence is required | |||
| 40 Ch – 4W AM – Individual licence is required | ||||||
| 40 Ch – 4W AM – Use ch 4-15 only | ||||||
| EC | 40 Ch – 4W FM – Free use | |||||
| 12 Ch – 4W AM – Individual licence is required | ||||||
| fx Allowed: from 26.960 to 27.410 MHz “BAPT 222 ZV 104” | ||||||
| GREECE | E | EU | F | I | EC | 40 Ch – 4W FM – Free use |
| 40 Ch – 4W AM – Free use | ||||||
| T/R 20-02 | ||||||
| IRELAND | E | EU | F | I | EC | 40 Ch – 4W FM – Free use |
| 40 Ch – 4W AM – Free use | ||||||
| S.I. No 436 of 1998. WIRELESS TELEGRAPHY ACT, 1926 (SECTIONS) (EXEMPTION OF CITIZENS’ BAND (CB) RADIOS) ORDER, 1998 | ||||||
| ITALY | E | EU | F | I | EC | 40 Ch – 4W FM – General authorization is required |
| 40 Ch – 4W AM – General authorization is required | ||||||
| I2 | 34 Ch – 4W FM | |||||
| 34 Ch – 4W AM(ERP) *AM mode allowed on ch1-23 only | ||||||
| PNF issued on DM 08.07.02 NOTES 49 A-B-C-D-E-G | ||||||
| SPAIN | E | EU | F | EC | 40 Ch – 4W FM – Individual licence is required | |
| 40 Ch – 4W FM – Individual licence is required | ||||||
| Art. 57 – Law 11/1998 dated 24th April | ||||||
| SWEDEN | EU | F | EC | 40 Ch – 4W FM – Free use | ||
| 40 Ch – 4W AM – Individual licence is required | ||||||
| UK | UK | EU | EC | 40 Ch – 4W FM – Free use | ||
| 40 Ch – 4W AM – Free use | ||||||
| POLAND | PL | EU | EC | 40 Ch – 4W FM / AM – Free use | ||
Declaration of Conformity
We, TTI Tech Co., Ltd. (#1312 361 Simindaero Dongan-gu Anyang-si Gyeonggi-do Korea) declare on our sole responsibility that this equipment complies with the essential requirements of the Radio Equipment Directive (RED) 2014/53/EU, and that any applicable Essential Test Suite measurements have been performed.
Kind of equipment : MOBILE CB TRANSCEIVER
Type-designation : TCB-900evo
Version (where applicable) :
This complicance is based on conformity with the following standards, specifications or documents :
EN 62311:2008
EN 50665:2017
EN 62368-1:2014+A11:2017
EN 301 489-1 V2.2.3:2019-11
EN 301 489-13 V1.2.1:2002-08
EN 300 433 V2.1.1 (2016-05)
N. Y. Kim Director Korea, Jan. 2022
Signature: