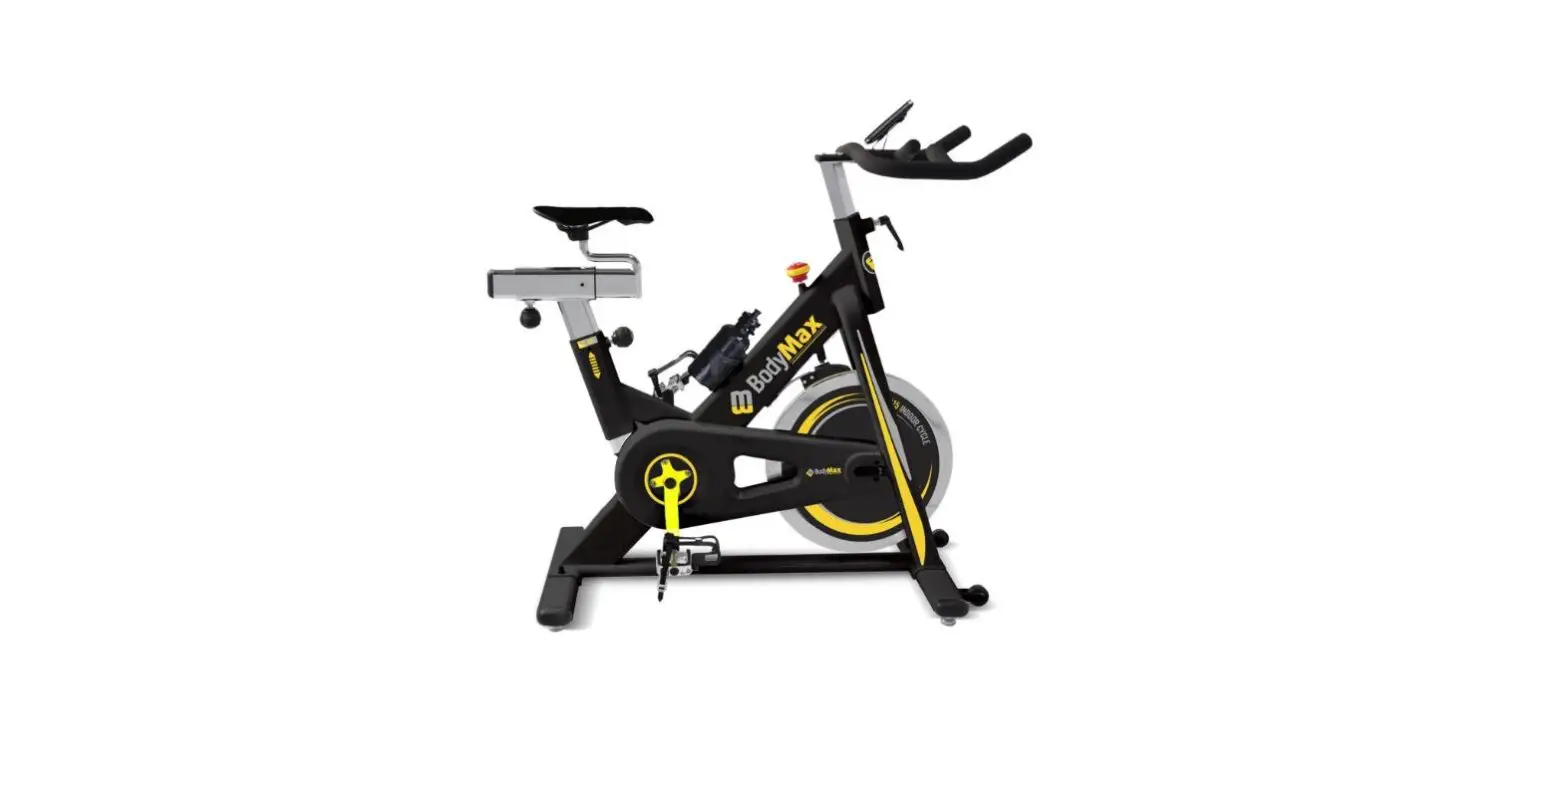
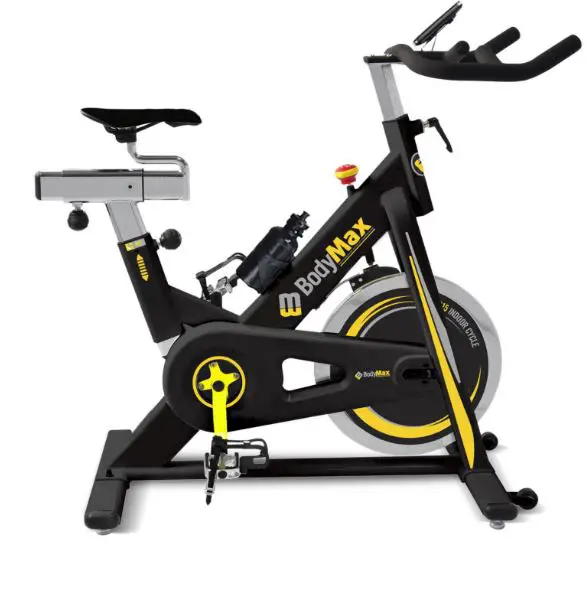
BodyMax B15 Spinning Bike
Before You Start
Thank you for purchasing this Product! For your safety and benefit, read this manual carefully before using the machine. Prior to assembly, remove components from the box and verify that all the listed parts were supplied. Assembly instructions are described in the following steps and illustrations.
SAFETY & MAINTENANCE INSTRUCTION
- Once fully assembled, please check that all hardware parts such as bolts, nuts and washers are positioned and secured firmly.
- Please check regularly that the safety chain guard that protects the moving parts of the machine is secured and in good order.
- Please always check the seat post, seat slider; pedals and handlebar are secured firmly before getting on the bike.
- To lubricate all moving parts annually is recommended.
- Do not wear loose clothing to avoid entangling in any moving parts.
- Do not remove feet from the pedals while they are in motion.
- Always wear shoes when using the machine.
- Dry the bike after each use to remove sweat and moisture. Wipe the machine with a damp cloth, water and mild soap. Do not use a petroleum-based solvent to clean the machine in order not to damage the finish.
- Please keep children away from the bike while it is in use. Do not allow children to use the bike. This bike is designed for adults, not children.
- Do not dismount the bike until the pedals have stopped completely.
- Stop exercise immediately in case of nausea, shortness of breath, faint, headache, pain, tightness in your chest or any discomfort.
- Do not place fingers or any other objects into the moving parts of the bike.
- Prior to any exercise, consult with your physician first to establish the exercise frequency, time and intensity appropriate for your particular age and condition.
- After exercising, please pull down the tension controller to increase resistance so that the pedals will not rotate freely and possibly hurt someone.
- The maximum user’s weight is 130kg.
EXPLODE DIAGRAM
EXPLODE DIAGRAM A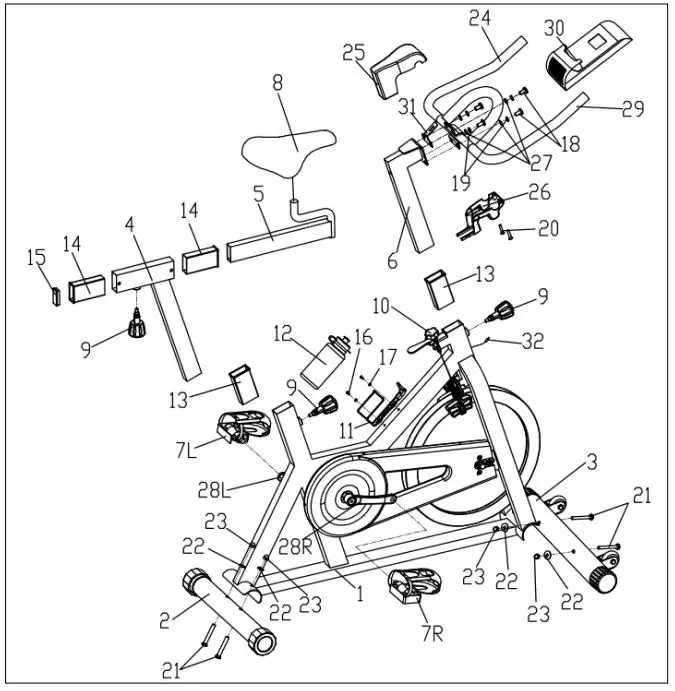
EXPLODE DIAGRAM B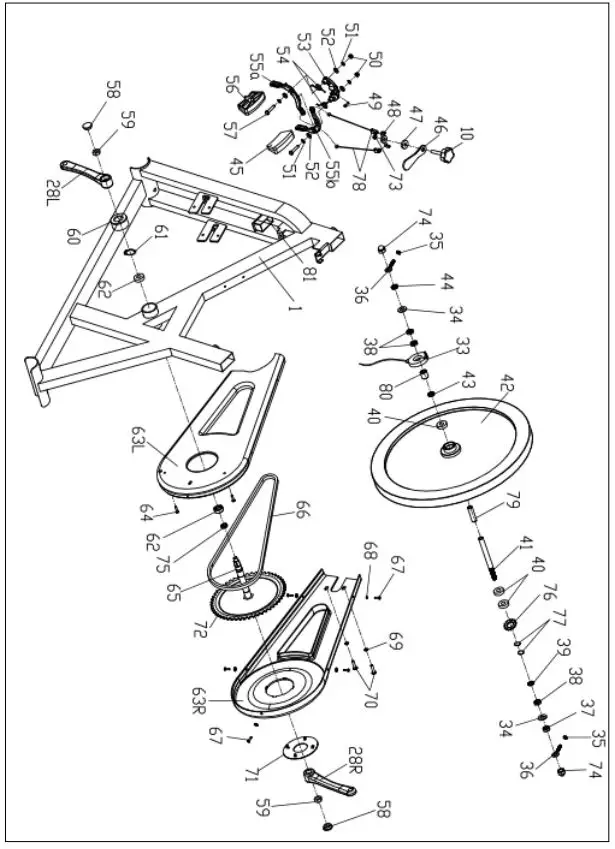
PARTS LIST
| Part No. | Description | Qty | Part No. | Description | Qty | |
| 1 | Main frame | 1 | 17 | Flat Washer d4 | 2 | |
| 2 | Rear Stabilizer | 1 | 18 | Allen Bolt M8X15 | 4 | |
| 3 | Front Stabilizer | 1 | 19 | Spring washer d8 | 4 | |
| 4 | Saddle Post | 1 | 20 | Cross Tapping Screw ST5X15 | 2 | |
| 5 | Saddle Slider | 1 | 21 | Carriage bolt M8X73 | 4 | |
| 6 | Handlebar post | 1 | 22 | Arc washer φ8.2X2Xφ19XR30 | 4 | |
| 7 L/R | Pedal | 1pr. | 23 | Acorn nut M8 | 4 | |
| 8 | Saddle | 1 | 24 | Handlebar | 1 | |
| 9 | Pop Pin Knob M16X1.5 | 3 | 25 | Handlebar upper shield | 1 | |
| 10 | Tension control bolt M8X41 | 1 | 26 | Handlebar lower shield | 1 | |
| 11 | Bottle Cage | 1 | 27 | Flat washer d8.5 | 4 | |
| 12 | Water Bottle | 1 | 28 L/R | Crank | 1pr. | |
| 13 | Plastic Bushing | 2 | 29 | Foam grip | 2 | |
| 14 | Plastic Bushing | 2 | 30 | Meter | 1 | |
| 15 | Square End Cap | 1 | 31 | Meter Bracket | 1 | |
| 16 | Cross Tapping Screw ST4X12 | 2 | 32 | Sensor wire | 1 | |
| 33 | Sensor | 1 | 58 | Crank sealing | 2 | |
| 34 | Flat washer φ12 | 2 | 59 | Flange nut M10X1.25 | 2 | |
| 35 | Hex nut M6 | 2 | 60 | Drum cover | 1 | |
| 36 | Adjusting bolt M6X60 | 2 | 61 | C-Clip washer φ17 | 1 | |
| 37 | Spacer φ12.2Xφ18X6 | 1 | 62 | Bearing 6203-2RS | 2 | |
| 38 | Hex thin nut M12X1 | 4 | 63L/R | Chain cover | 1pr. | |
| 39 | Spacer φ12.2Xφ17X3 | 1 | 64 | Cross Tapping Screw ST4.8X15 | 2 | |
| 40 | Flywheel Bearing 6001Z | 3 | 65 | Mid-axle | 1 | |
| 41 | Flywheel axle M12X1-150 | 1 | 66 | Chain | 1 | |
| 42 | Flywheel φ460X28 | 1 | 67 | Cross Tapping Screw ST4X10 | 5 | |
| 43 | Spacer φ12.2Xφ18X9 | 1 | 68 | Flat washer φ4 | 5 | |
| 44 | Spacer φ12.2Xφ20X4 | 1 | 69 | Flat washer φ6Xφ16X1.2 | 2 | |
| 45 | Felt pad | 2 | 70 | Phillips screw M6X10 | 2 | |
| 46 | Brake handle | 1 | 71 | Sealing Cover | 1 | |
| 47 | Rubber pad φ8.5Xφ25X5 | 1 | 72 | Chain ring | 1 | |
| 48 | Linkage | 1 | 73 | Nylon nut M8 | 1 | |
| 49 | Hex socket bolt M6X12 | 1 | 74 | Acorn nut M12X1 | 2 | |
| 50 | Nylon nut M6 | 2 | 75 | Spacer | 1 | |
| 51 | Flat washer φ6 | 4 | 76 | Flywheel | 1 | |
| 52 | Plastic flat washer Φ6Xφ15X1.5 | 4 | 77 | Tighten Nut | 2 | |
| 53 | Brake locking bracket | 1 | 78 | Brake cable | 2 | |
| 54 | Torsional spring | 2 | 79 | Spacer | 1 | |
| 55a/b | Brake linkage | 1pr. | 80 | Spacer | 1 | |
| 56 | Brake block | 2 | 81 | Square end cap 60X30X1.5 | 1 | |
| 57 | Hex bolt M6X34 | 2 | ||||
NOTE: Most of the listed assembly hardware has been packaged separately, but some hardware items have been preinstalled in the identified assembly parts. In these instances, simply remove and reinstall the hardware as assembly is required.
Please reference the individual assembly steps and make note of all preinstalled hardware.
PREPARATION: Before assembling, make sure that you will have enough space around the item; Use the present tooling for assembling; before assembling please check whether all needed parts are available. It is strongly recommended this machine to be assembled by two or more people to avoid possible injury.
ASSEMBLY INSTRUCTIONS
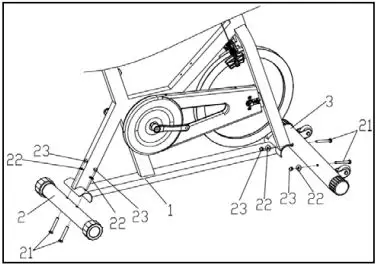
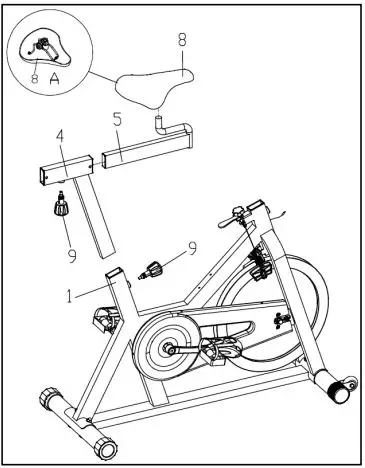
- Step A:
Fix the Front stabilizer (3) and Rear stabilizer (2) to Main frame (1) with Carriage bolt (21), Arc washer (22) and Acorn nut (23) as shown.
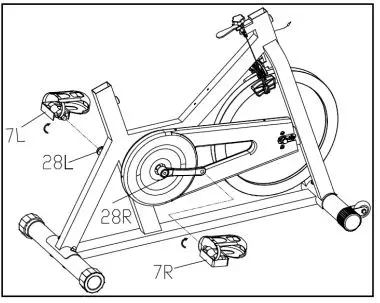
- Step B:
Attach the Pedals (7L/R) to the Cranks (28L/R) on the Main Frame (1).
Note: The marks “L “and “R” on the pedal are for left and right side of the crank. The Pedal (L) should be turned counter-clockwise to the Crank (L). On the contrary, the Pedal (R) should be turned clockwise to the Crank (R).
- Step C:
Insert the Saddle (8) into the Saddle slider (5) and then fasten with tools.
Insert the Saddle slider (5) in to the Saddle post (4) and then fix with Pop-pin knob (9) at a suitable position.
Insert the Saddle post (4) to the Main frame (1) to an appropriate height, fixing with the Pop-pin knob (9)
Note: You can just loosen couple thread and pull the knob instead of turning out knob (9) when you need to adjust the position of the saddle.
Make sure the Saddle (8) is tightened to the Saddle slider (5) before getting on the Bike.
- Step D:
Attach the Handlebar (24) and Meter bracket (31) to the Handlebar post (6) using the Allen bolts (18), Spring washers (19) and Flat washers (27);
Attach the Handlebar lower shield (26) to the Handlebar post (6) and then fix the Handlebar lower shield (26) and Handlebar upper shield (25) with Cross tapping screws (20);
Fix the Handlebar post (6) to the front post of Main frame (1) with the Pop-pin knob (9);
Fix the Bottle cage (11) on the Main frame (1) with Cross tapping screw (16) and Flat washer (17), and then insert the Bottle (12) to the Bottle cage (11) as shown;
Insert the Meter (30) onto the Meter bracket (31), and then insert the Sensor wire (32) into the hole on the back of Meter (30).
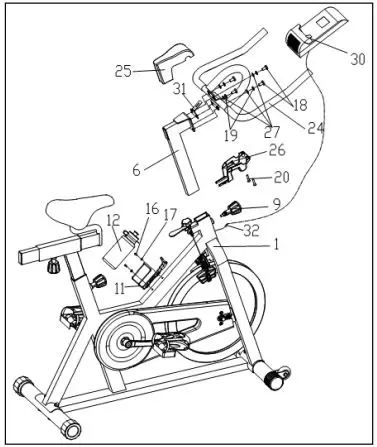
Note FULLY TIGHTEN all Bolts, Nuts and Fittings now, ensuring that your product in located on a clear flat surface before doing so. Your product will now be ready to use.
USING YOUR BIKE
Using your bike will provide you with several benefits. It will improve your physical fitness, tone your muscles and in conjunction with a calorie-controlled diet, help you lose weight.
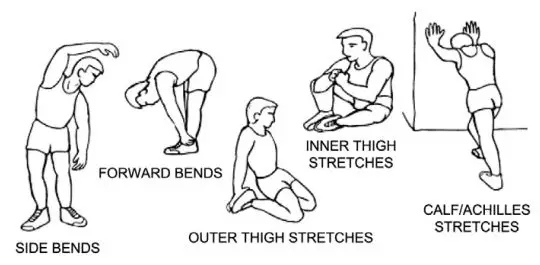
- WARM-UP PHASE
The purpose of warming up is to prepare your body for exercise and to minimize injuries. Warm up for two to five minutes before strength training or aerobic exercising. Perform activities that raise your heart rate and warm the working muscles. Activities may include brisk walking, jogging, jumping jacks, jump rope, and running in place. - STRETCHING
Stretching while your muscles are warm after a proper warm-up and again after your strength or aerobic training session is very important. Muscles stretch more easily at these times because of their elevated temperature, which greatly reduces the risk of injury. Stretches should be held for 15 to 30 seconds. - DO NOT BOUNCE.
Remember always to check with your physician before starting any exercise program.
- EXERCISE PHASE
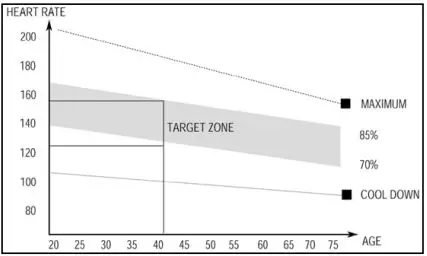
This is the stage where you put the effort in. After regular use, the muscles in your legs will become more flexible. Work at your own pace and be sure to maintain a steady tempo throughout. The rate of work should be sufficient to raise your heartbeat into the target zone shown on the graph below.
- COOL-DOWN PHASE
The purpose of cooling down is to return the body to its normal or near normal, resting state at the end of each exercise session. A proper cool-down slowly lowers your heart rate and allows blood to return to the heart.