PASCO ME-1240 Wireless Smart Cart
Introduction
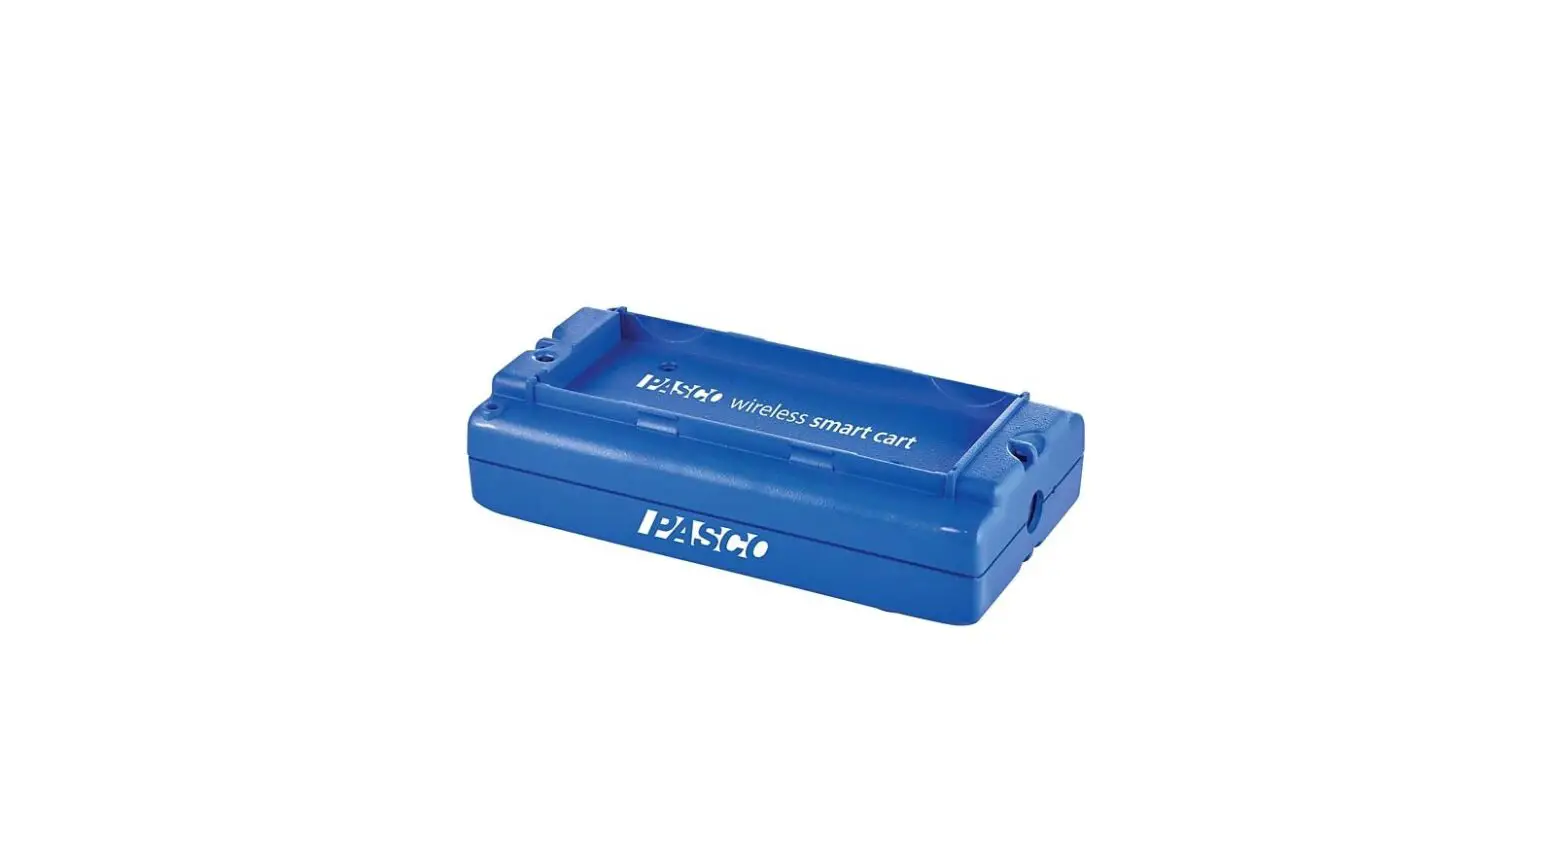
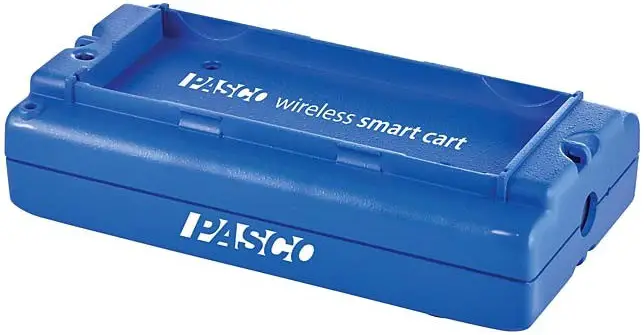
The Wireless Smart Cart is a combination wireless and USB device that connects to a computer or tablet through Bluetooth, or to a computer or USB charger through an included micro USB cable. The Smart Cart has a durable ABS body, a three-position plunger, and nearly frictionless wheels. It includes built-in sensors which measure acceleration in three dimensions, position, velocity, and force. The Smart Cart also includes a gyroscope-type sensing element that can measure rotational motion. The Smart Cart can make its measurements on or off a dynamics track and transmit them wirelessly. For easy identification, the Smart Cart is available in red or blue.
The accessory tray on the top of the Smart Cart can hold any accessory designed for a PASCO cart except the Spring Cart Launcher (ME-6843). The Smart Cart has the same dimensions as other PASCO carts and can be used with any PASCO track. The Smart Cart can be stacked with any PASCO cart and has a mass of approximately 0.250 kilograms (250 grams). It has attachment points on the top and bottom of both ends, as well as Velcro® tabs for inelastic collisions on one end. The magnetic bumper, bumper attachment, and hook attachment fit into the threaded hole in the end of the Smart Cart opposite to the tabs.
The built-in sensors measure force in the range between -100 newtons (N) and +100 N, acceleration in the range between -16 g and +16 g (where g = ±9.8 m/s2), and angular rotation rate up to ±145 degrees per second (dps). The cart measures force as a push or pull along its x-axis and measures acceleration in three dimensions (x, y, and z). PASCO Capstone or SPARKvue can also show the resultant acceleration. The encoder wheels on the Smart Cart measure velocity to a maximum of 3.0 meters per second; the wheels have a position resolution of 0.2 mm. The positive direction of motion is the same as the x-axis in the printed graphic representing the acceleration sensor’s position.
The Smart Cart is designed to optimize battery usage time and will turn off after about five minutes if not connected to the software. Since each Smart Cart has a unique device ID number, more than one can be connected to a computer or tablet at once.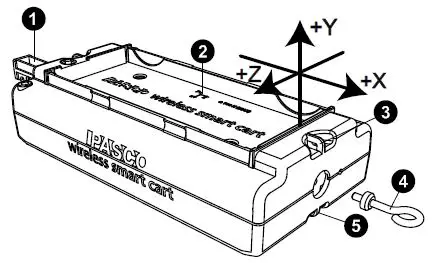
- Three-position plunger
- Acceleration and gyro sensor position
- Attachment point
- Hook attachment
- Attachment point
Equipment
Included equipment: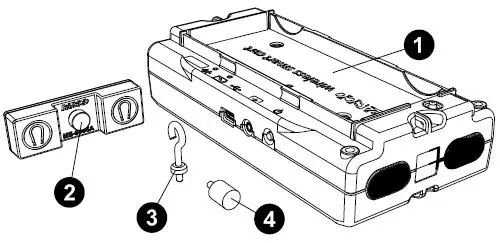
- Wireless Smart Cart (ME-1240 or ME-1241)
- Magnetic bumper
- Bumper attachment
- Hook attachment
- Micro USB cable (not pictured)
Features
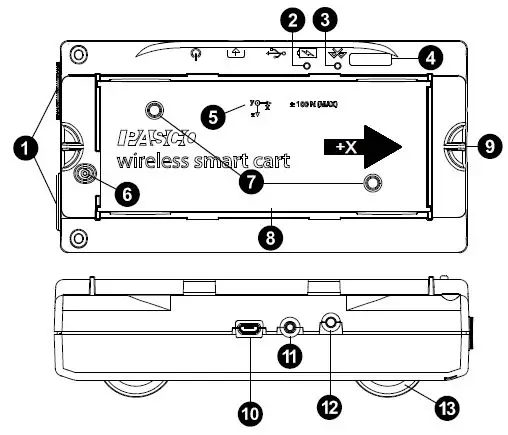
- Velcro tab
Allows two carts to attach to each other in an inelastic collision. - Battery Status LED
Indicates the charge level and status of the cart’s battery.Battery LED Status Red blink Low power Yellow ON Charging Green ON Fully charged - Bluetooth Status LED
Indicates the status of the cart’s Bluetooth connection.Bluetooth LED Status Red blink Ready to pair Green blink Connected NOTE: The Bluetooth LED will not light up if the sensor is connected to the software via a micro USB cable.
- Device ID
Use this to identify the cart when connecting via Bluetooth. - Accelerometer position
Indicates the position of the acceleration and gyro sensor within the cart, as well as the direction of the three dimensions of acceleration (the x-axis, y-axis, and z-axis). - Plunger release
Press to immediately release the plunger to its maximum extension. - Threaded holes (M5)
Use to secure accessories in place on top of the cart. - Accessory tray
Use to hold accessories mounted on the cart. - Attachment point
Use these points to tie a string to the cart for various experiments. - Micro USB port
Use the included micro USB cable to connect the cart to a USB charger. The port and cable can also be used to directly connect the cart to a computer without the use of Bluetooth. This connection method is not supported by iOS. - Accessory port
Use to connect various accessories to the Smart Cart, enable data collection from them, and control them. - ON/OFF button
Press to turn the cart on. Press and briefly hold to turn the cart off. - Built-in wheel encoder
Used to automatically record the position, velocity, and acceleration of the wheels during data collection.
Required equipment:
- Data collection software (PASCO Capstone or SPARKvue).
Initial step:
Charge the battery
Charge the battery by connecting the USB port to any standard USB charger. The Smart Cart Charging Garage (ME-1243) allows up to five Smart Carts to be charged simultaneously, while also serving as a storage option for the cart and bumpers. The battery status light is solid yellow while charging. When fully charged, the light changes to solid green.
Get the software
You can use the Smart Cart with SPARKvue or PASCO Capstone software. If you’re not sure which to use, visit pasco.com/products/guides/software-comparison.
SPARKvue is available as a free app for Chromebook, iOS, and Android devices. We offer a free trial of SPARKvue and Capstone for Windows and Mac. To get the software, go to pasco.com/downloads or search for SPARKvue in your device’s app store.
If you have installed the software previously, check that you have the latest update:
![]() SPARKvue
SPARKvue
Go to Main Menu![]() > Check for Updates
> Check for Updates
![]() PASCO Capstone
PASCO Capstone
Go to Help > Check for Updates.
The Wireless Smart Cart can also be used with the free PASCO program MatchGraph!, which can be downloaded at pasco.com/matchgraph.
Check for a firmware update
![]() SPARKvue
SPARKvue
- Press the power button until the lights turn on.
- Open SPARKvue.
- Select Sensor Data on the Welcome Screen.

- Select the sensor that matches your sensor’s device ID. A notification appears if a firmware update is available. Click Yes to update the firmware.
- Close SPARKvue.

![]() PASCO Capstone
PASCO Capstone
- Press and hold the power button until the lights turn on.
- Open PASCO Capstone.
- Click Hardware Setup.

- Select the sensor that matches your sensor’s device ID. A notification appears if a firmware update is available. Click Yes to update the firmware.
- Close Capstone.
Setting up the software
Collecting data from the Smart Cart requires PASCO Capstone, SPARKvue, or MatchGraph! software. The Smart Cart can be connected to any of these programs using either Bluetooth or a USB connection.
![]() SPARKvue
SPARKvue
To connect to SPARKvue using Bluetooth:
- Turn on the Smart Cart. Check to make sure that the Bluetooth LED is blinking red.
- Start SPARKvue, then select Sensor Data from the main menu.
- From the list of available wireless devices, select the Smart Cart which matches the device ID (XXX-XXX) printed on your Smart Cart to connect to the cart.
To connect to SPARKvue using the micro USB cable:
- Turn on the Smart Cart.
- Start SPARKvue, then select Sensor Data from the main menu.
- Connect the micro USB cable (included) from the micro USB port on the Smart Cart to a USB port on the computer, or into a powered USB hub connected to the computer. The cart will connect automatically.
Upon connecting to the Smart Cart, a list of available Smart Cart sensor measurements will automatically appear in the Select Measurements for Templates section.
To collect data with SPARKvue:
- From the Sensor Data menu, after connecting to the Smart Cart, enable the desired measurements by clicking the checkboxes next to those measurements.
- In the Templates section, select Graph to enter the Experiment Screen.
- The Graph template will automatically populate the axes with the measurements you selected on the y-axis (or y-axis if you selected multiple measurements) and time on the x-axis. To change the quantity measured on an axis, click the buttons displaying the current measurement, then select the appropriate quantity from the list.
- When you are ready, click Start
 to begin collecting data.
 PASCO Capstone
To connect to Capstone using Bluetooth:
- Turn on the Smart Cart.
- Start Capstone, then select Hardware Setup
 from the Tools palette.
 - From the list of Available Wireless Devices, select the Smart Cart which matches the device ID (XXX-XXX) printed on your Smart Cart to connect to the cart.
To connect to Capstone using the micro USB cable:
- Turn on the Smart Cart.
- Start Capstone. If desired, select Hardware Setup from the Tools palette to verify the connection status.
- Connect the micro USB cable (included) from the micro USB port on the Smart Cart to a USB port on the computer, or into a powered USB hub connected to the computer. The cart will connect automatically.
When connecting the Smart Cart to Capstone, the measurement of all sensors will be enabled by default. Any undesired measurements can be disabled through the Data Summary![]() menu in the Tools palette.
menu in the Tools palette.
To collect data from Capstone:
- Double-click the Graph icon in the Displays palette to create a new Graph display.
- On each axis, click <Select Measurement>, then choose the appropriate sensor measurement for your experiment from the list.
- When you are ready, click Record
 to begin recording data.
![]() MatchGraph!
MatchGraph!
To connect to MatchGraph! using Bluetooth:
- Turn on the Smart Cart. Check to make sure that the Bluetooth LED is blinking red.
- Start MatchGraph! The Sensor Not Found window will open automatically.
- Select Choose Wireless Interface from the bottom right corner of the Sensor Not Found window.
- From the Select Wireless Interface list, select the Smart Cart which matches the device ID (XXX-XXX) printed on your Smart Cart to connect to the cart.
To connect to MatchGraph! using the micro USB cable:
- Turn on the Smart Cart.
- Connect the micro USB cable (included) from the micro USB port on the Smart Cart to a USB port on the computer, or into a powered USB hub connected to the computer.
- Start MatchGraph! The cart will connect automatically.
Note that MatchGraph! is only capable of tracking position and velocity data from the Smart Cart. Data from the cart’s other measurements will not be collected.
To collect data from MatchGraph!:
- Select whether you want to track position or velocity data from the Smart Cart.
- Choose a profile to be displayed by clicking View All Profiles
 at the top of the screen and selecting a profile from the list.
 - When you are ready, click Record
 to begin tracking data.
Connecting bumper and hook attachments
Screw the bumper or hook attachment into the threaded hole on the front end of the Smart Cart, as shown below.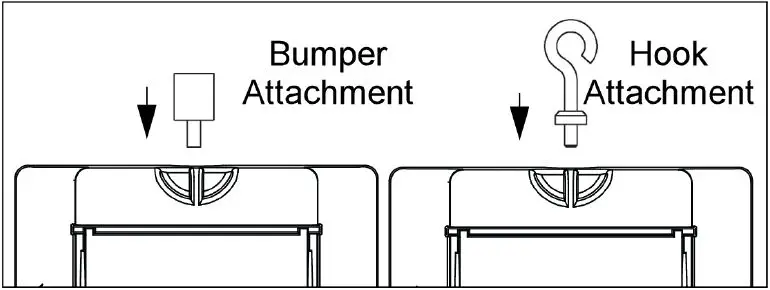
The magnetic bumper has a metal post that fits in the small hole to the side of the threaded hole on the front end of the Smart Cart, as shown below. The post ensures that the magnetic bumper is mounted in the correct orientation.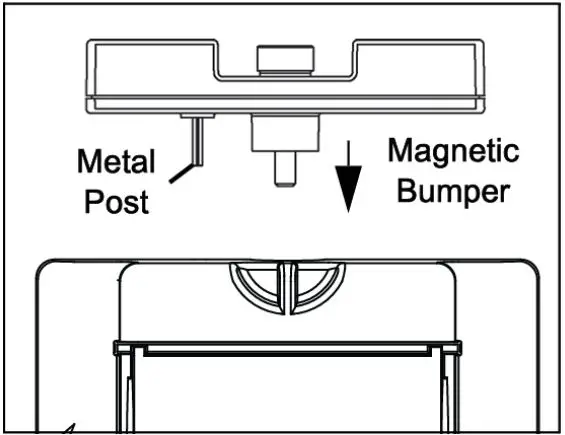
Screwing any of these attachments into the threaded hole on the front end of the Smart Cart connects them to the Smart Cart’s built-in Force Sensor, allowing measurements of the force on the cart to be collected.
IMPORTANT:
If using the Smart Cart for collisions, do NOT use the rubber bumper, as the force of impact on the bumper may damage the internal force sensor. Instead, any of the following components can be used as a bumper for collision experiments:
- Light Spring Bumper (ME-9275)
- Bumper Accessory Set (ME-9884)
- Magnetic Bumper Set (ME-9885A)
Direction Of Acceleration
The acceleration sensing unit inside the Smart Cart is oriented so that the acceleration axes are aligned with the x-y-z arrows indicating the direction of positive acceleration. In this orientation, the x-axis direction is ‘along’ the long axis of the Smart Cart; the y-axis direction is ‘perpendicular’ relative to the top of the Smart Cart; and the z-axis direction is ‘perpendicular’ to the long axis of the Smart Cart and parallel relative to the top of the cart.
Zero (tare) the sensors
At the beginning of an experiment, the measurement from the built-in force and acceleration sensors may not be zero when the force or acceleration is actually zero. This is normal behavior that is corrected when you zero (or tare) the sensor using PASCO Capstone or SPARKvue. For information on zeroing a sensor in these programs, see the Capstone or SPARKvue online help and search for “Zero sensors”.
Calibration
The Smart Cart is factory-calibrated, so calibration is not necessary, especially if you are measuring a change in measurement rather than absolute values. However, it is possible to calibrate the sensors if desired. For information on calibrating a Smart Cart, see the PASCO Capstone or SPARKvue online help.
NOTE:
Zeroing of the acceleration sensor should only be performed if you are measuring acceleration on only a single axis, as zeroing the sensor will cause the measurements of acceleration on the other two axes to no longer report accurate values.
Accessories
A number of accessories are available for the Wireless Smart Cart. Links to these products can be found on the product page. In particular, certain accessories are designed specifically to be used with the Wireless Smart Cart, including:
- Smart Fan Accessory (ME-1242)
- Smart Ballistic Cart Accessory (ME-1245)
- Smart Cart Vector Display (ME-1246)
- Smart Cart Motor (ME-1247)
For instructions on mounting these accessories to the Smart Cart, see the manual for the product in question.
Troubleshooting
- If the Wireless Smart Cart loses Bluetooth connection and will not reconnect, try cycling the ON button. Press and briefly hold the button until the status LEDs blink in sequence, then release the button. Start the Smart Cart in the usual way.
- If the Smart Cart stops communicating with the computer software or tablet application, try restarting the software or application. If the problem remains, press and hold the ON button for 10 seconds, then release it. Start the Smart Cart in the usual way.
- If the above problems do not solve the connection issue, turn Bluetooth off and back on for your computer, then retry.
About the battery
The Smart Cart’s battery is partially charged at the factory. If the battery status LED blinks red, use the micro USB cable to connect the sensor to a USB port or a USB charger.
Maximizing battery life
One of the factors that affect battery life is the storage temperature. Therefore, avoid storing the Smart Cart in very cold or very hot environments.
Battery troubleshooting
If the Smart Cart battery will not charge, it may need to be replaced. Contact Technical Support for information about battery replacement.
Software help
The SPARKvue and PASCO Capstone Help provide additional information on how to use this product with the software. You can access the help within the software or online.
![]() SPARKvue
SPARKvue
- Software: Main Menu
 > Help
 - Online: help.pasco.com/sparkvue
![]() PASCO Capstone
PASCO Capstone
- Software: Help > PASCO Capstone Help
- Online: help.pasco.com/capstone.
Specifications and accessories
Visit the product page at pasco.com/product/me-1240 or pasco.com/product/me-1241 to view the specifications and explore accessories. You can also download experiment files and support documents from the product page.
Experiment files
Download one of several student-ready activities from the PASCO Experiment Library. Experiments include editable student handouts and teacher notes. Visit pasco.com/freelabs/me-1240 or pasco.com/freelabs/me-1241.
Regulatory information
Limited warranty
For a description of the product warranty, see the Warranty and Returns page at www.pasco.com/legal.
Copyright
This document is copyrighted with all rights reserved. Permission is granted to non-profit educational institutions for the reproduction of any part of this manual, providing the reproductions are used only in their laboratories and classrooms, and are not sold for profit. Reproduction under any other circumstances, without the written consent of PASCO scientific, is prohibited.
Trademarks
PASCO and PASCO scientific are trademarks or registered trademarks of PASCO scientific, in the United States and in other countries. All other brands, products, or service names are or may be trademarks or service marks of, and are used to identify, products or services of, their respective owners. For more information visit www.pasco.com/legal.
Product end-of-life disposal
This electronic product is subject to disposal and recycling regulations that vary by country and region. It is your responsibility to recycle your electronic equipment per your local environmental laws and regulations to ensure that it will be recycled in a manner that protects human health and the environment.
To find out where you can drop off your waste equipment for recycling, please contact your local waste recycling or disposal service or the place where you purchased the product. The European Union WEEE (Waste Electronic and Electrical Equipment) symbol on the product or its packaging indicates that this product must not be disposed of in a standard waste container.
CE statement
This device has been tested and found to comply with the essential requirements and other relevant provisions of the applicable EU Directives.
FCC statement
This device complies with part 15 of the FCC Rules. Operation is subject to the following two conditions:
- This device may not cause harmful interference, and
- This device must accept any interference received, including interference that may cause undesired operation.
Battery disposal
Batteries contain chemicals that, if released, may affect the environment and human health. Batteries should be collected separately for recycling and recycled at a local hazardous material disposal location adhering to your country and local government regulations. To find out where you can drop off your waste battery for recycling, please contact your local waste disposal service or the product representative. The battery used in this product is marked with the European Union symbol for waste batteries to indicate the need for the separate collection and recycling of batteries.
Patents
- The Smart Cart (ME-1240 and ME-1241) is covered by U.S. Patent No. 10,481,173.
- The Smart Fan Accessory (ME-1242) is covered by U.S. Patent No. 10,482,789.
Technical support
Need more help?
Our knowledgeable and friendly Technical Support staff is ready to answer your questions or walk you through any issues.
- Chat pasco.com.
- Phone
- 1-800-772-8700 x1004 (USA)
- +1 916 462 8384 (outside USA)
- Email [email protected].
References
 PASCO Capstone Help
-
SPARKvue Help
 PASCO scientific | Science Lab Equipment and Teacher Resources
-
Popular Downloads | PASCO
-
Lab Experiment Library - Resources | PASCO
-
Lab Experiment Library - Resources | PASCO
-
MatchGraph! - Data Collection & Analysis Software | PASCO
-
Smart Cart (Red) - ME-1240 - Products | PASCO
-
Smart Cart (Blue) - ME-1241 - Products | PASCO
-
Software Comparison: SPARKvue or Capstone? | PASCO
-
Privacy Policies | PASCO
-
Lab Experiment Library - Resources | PASCO
-
MatchGraph! - Data Collection & Analysis Software | PASCO
-
Smart Cart (Red) - ME-1240 - Products | PASCO
-
Smart Cart (Blue) - ME-1241 - Products | PASCO
-
Privacy Policies | PASCO


