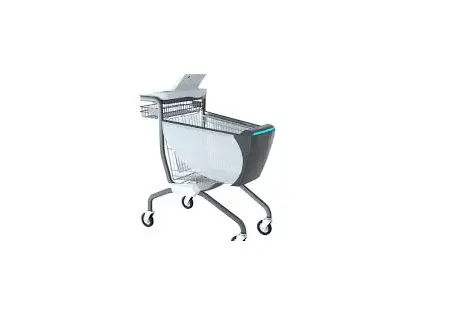
Sbot Technologies Caper-V011 Smart Shopping Cart Model User Manual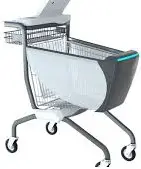
This manual may contain images or content different from the model you purchased. This manual is subject to revision by the manufacturer.
IMPORTANT SAFETY INSTRUCTIONS
READ ALL INSTRUCTIONS BEFORE USE
This symbol is displayed to indicate matters and opearations that can cause risk. Read the part with this symbol carefully and follow the instructions in order to avoid risk.
WARNING
This indicates that the failure to follow the instruction can casue serious injury or death.
CAUTION
This indicates that the failure to follow the instruction can cause the minor injury or damage to the product.
WARNING
To reduce the risk of explosion, fire, death, electric shock, injury or scalding to persons when using this product, follow basic precautions, including the following:
Technical Safety
- This product can be used by children aged from 12 years and above and persons with reduced physical, sensory or mental capabilities or lack of experience and knowledge if they have been given supervision or instructions concerning use of the device in a safe way and understand the hazards involved. Children shall not play with the device. Cleaning and user maintenance shall not be made by children even with supervision.
- Children of less than 3 years should be kept away unless continuously supervised.
- Don’t put children inside the cart’s basket.
- This product is intended to be operated in restricted areas. Which will be defined by business owners.
- Do not step on, or stand on top of this product.
- Do not use this product in extremely hot (above 60℃) or extremely cold (below -20℃) environments.
Operation Safety
- Never attempt to operate the device if it is damaged, malfunctioning, partially disassembled, or has missing or broken parts. Such devices should be inactive and taken offline immediately.
- Do not stack this product with other shopping cart models.
- Do not attempt to separate any panels or disassemble the appliance.
- Do not apply any sharp objects to the touch screen in order to operate the device.
- Do not put animals, such as pets into the device.
- If the cart’s battery is damaged, it must be replaced by the manufacturer, its service agent, authorized staff or similarly qualified person in order to avoid hazard.
- Do not leave this device outdoors for more than 45 mins.
Charging Safety
- Do not modify the power plug provided with the product. If it does not fit the outlet, please talkwith manufacturer and replace the defect power plug, or have a proper outlet installed by a qualified electrician.
- Do not use other power adapters to charge the device except the ones provided with the product.
- Do not try to move the device while charging. Make sure all charging cables are disconnected before anyone attempt to take the device out of its charging area.
- No customers are allowed to step into the device’s charging area.
- Keep the charging area (underneath, above and around the device) free of combustible materials such as lint, paper, rags, chemicals, etc.
- Keep the magnetic charging port free of dust, dirt, and magnetic debris.
- Keep the charging area free from water logging.
- Do not use flammable gas and combustible substances (benzene, gasoline, thinner, petroleum, alcohol, etc.) near the device and the charging area.
- Do not remove or insert the battery while the device is still charging.
- Do not operate the device’s controls, power plugs, magnetic connector and other charging accessories with wet hands.
- In case of flood, disconnect the power plug if its and move the device to high ground.
- Do not plug or unplug the charging cable while the device is powered on.
- Do not unplug the device by pulling on the power cable. Always grip the power cable firmly and pull straight out from the socket outlet.
Maintenance Safety
- Disconnect the device from the power supply (power cable and battery) before cleaning the device. Turn off the switch does not disconnect the device from power supply.
- Do not repair or replace any part of the device. All repairs and servicing must be performed by qualified service personnel unless specifically recommended in this User’s Manual.
- Use only authorized factory parts or tools for maintenance.
- Do not spray water inside or outside the device to clean it.
- Do not let customers to clean the device.
- All cleaning process should be conducted by employees following the cleaning SOP.
- Make sure there’s no dust, dirt, and magnetic debris inside the magnetic charging port before charging.
Disposal Safety
- Dispose of all packaging materials (such as plastic bags and Styrofoam) away from children. The packaging materials can cause suffocation.
SPECIFICATIONS & DIMENSIONS
- Appearance and specifications may change without notice to improve the quality of the product.
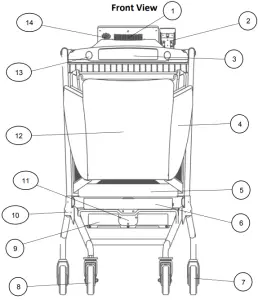
| 1 | Top unit heat sink | 6 | Bottom unit fence | 11 | Bottom unit cover |
| 2 | Payment terminal | 7 | 5-inch rear wheels | 12 | Front Cover |
| 3 | Top unit main LED light bar | 8 | 5-inch front wheels | 13 | Top unit CV camera |
| 4 | PC Side Panel | 9 | Battery housing | 14 | Speaker |
| 5 | Basket | 10 | Side cover | 15 |
Top Module
| 1 | Payment Terminal | 5 | Barcode Scanner | 9 | Top unit encasing |
| 2 | LCD touch screen | 6 | Personal Basket | 10 | Side LED indicator |
| 3 | Produce – Camera | 7 | Cup holder | 11 | IR sensor lens |
| 4 | Side LED Indicator | 8 | Handrail |
Top View Dimensions
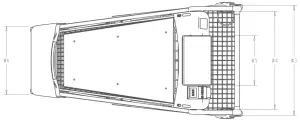
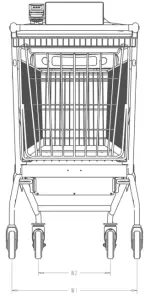
| W1 | 560 mm |
| W2 | 322.6 mm |
| W3 | 580 mm |
| W4 | 516 mm |
| W5 | 261.3 mm |
| W6 | 358.6 mm |
Side View Dimension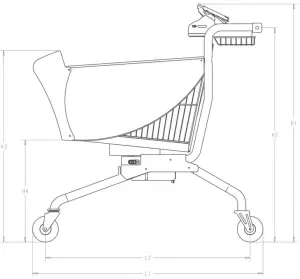
| H1 | 1156 mm |
| H2 | 1040 mm |
| H3 | 929 mm |
| H4 | 496 mm |
| L1 | 993 mm |
| L2 | 1118 mm |
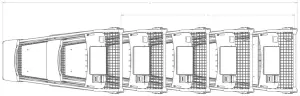
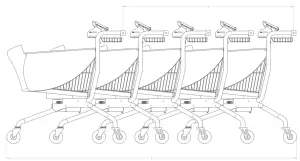
Five cart stacking dimensions
| A | 2718.36 mm |
| a | 1600 mm |
Specification
| CPU | AIOC3399 |
| Operating System | Android |
| Charger input voltage | AC100V∽240V |
| Charging condition | DC24V,6.25A |
| Battery output | 21-18V, 8A |
| Battery life | 24 hours (Stand by); 10 hours (normal usage) |
| Battery capacity | INR 18650 3200 mAH * 18 = 57600 mAh, 367.0*206.0*58.1mm, SBS1.1, Imax=8A |
| Charging time | Approx. 8 hours |
| Switch – bottom unit | Red Push-button |
| Switch – top unit | Red Push-button |
| Speaker | 2W, 108dB ±3dB SPL |
| Wheels | 5-inch rubber wheels |
| Indicators | CAP-CA02AL V1.0 |
| Main CV Camera | 5MP@35 fps |
| Produce Camera | 8MP |
| Wi-Fi standard | 802.11a/ b/g/n/ac |
| Wi-Fi distance | 30 – 50 m |
| Barcode | F21 Scanner, 64.8(W)×60.5(D)×32.7(H)mm |
| Barcode scanning angle | Elevation angle 45°, Inclination angle 45° |
| Barcode resolution | 640*480 |
| Display | 10.1 Inch TFT display, 1280*720, 600 nits |
| Weight scale | 50kg / 110 lbs. |
| Weight accuracy? | ±1g |
| Load Cell | L6E3-C3-100kg-3G |
| Operating Temperature | -20°C to 40°C |
| Operating Humidity | 10% to 90% |
| Debug Port | USB-A Port |
| Top Unit Shell | ABS/PC |
| Front Unit Shell | ABS/PC |
| Top Unit shell color | Matte white/grey |
| Front unit shell color | Matte white/grey |
| Frame material | Iron |
| Frame color | Glossy grey |
| Basket material | Iron tube |
| Basket color | Matte white |
| Side Panel Material | PC |
| Side Panel Color | 50% Translucent, single-sided matte |
| Bottom unit encasing material | ADC 12 Aluminum-Alloy |
| Bottom unit encasing color | Dark grey |
Extra Options and Function
This feature is only available if client choose to install specific accessories and services.
- OTA update
- Magnetic Charging
- Charging Station
- Silicone Waterproof P/T Cover
OPERATIONS
- Basic Shopping – Transaction Overview
- Shopper taps on “Start Shopping!” Button
- Shopper goes through Onboarding Tutorial by tapping “NEXT”
- At the end of tutorial, shopper taps “I’m Ready” to begin shopping.
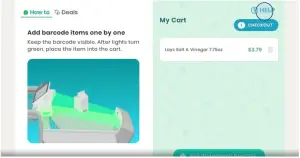
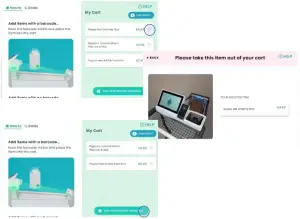
- Shopper takes any item and puts it in the cart. Barcode must be clearly visible to any of the cameras facing the inside of the cart
- Item is successfully added to the shopping list.
 If item was not successfully added, shopper will be prompted with “Did You Add Anything?” prompt and expected to follow the directions on the prompt to properly add the item in.
 - Shopper can continue adding additional demo items into the cart
- When shopper is done shopping, shopper taps “Checkout”
- Shopper is directed to make their way to checkout area.
- Shopper taps “Pay for Cart”
- Shopper confirms prices and taps “Pay $__.”
- Shopper instructed to insert or swipe credit card into card reader.
- Payment is successful when shopper sees “Payment Success” screen.
- Shopper is automatically led to Rating Screen and is allowed to give a rating or skip directly to the receipt.
- Shopper is then able to enter their email address or phone number to receive their receipt or they can choose to refuse one.
- Shopper is then directed to remove all items from the cart.
- When all items are removed, the transaction will end and the cart will return to the onboarding video.
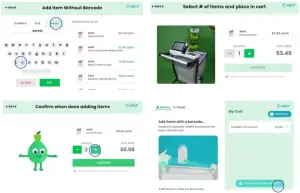
- Add Produce and PLU item
A. Adding by Quantity Steps- Shopper starts on Shopping Home screen
- Shopper taps on “Add Item Without Barcode”
- Shopper searches for item by PLU or Name
- Shopper puts produce into the cart
- Cart stabilizes and calculates weight of the produce
- Shopper confirms calculated price
- Item is added to shopping list
B. Adding by Weights Steps- Shopper starts on Shopping Home screen
- Shopper taps on “Add Item Without Barcode”
- Shopper searches for item by PLU or Name
- Shopper puts produce into the cart
- Cart stabilizes and calculates weight of the produce
- Shopper confirms calculated price
- Item is added to shopping list
- Removing Items from the Shopping List
A. Removing Items Directly from the Cart- Items can be removed directly from the cart. The cart uses computer
vision and weight logic to determine what has been taken out of the cart. - Item card will be automatically removed from the shopping list.*If the cart cannot confirm what was removed, shopper will be prompted with a “Multi-Match Removal” screen to manually choose what was removed from the cart. *
B. Removing by Tapping “Trash” Icon- Items can also be removed by first tapping on the trash can icon next to the item name on your shopping list.
- Shopper will be prompted to take item out of your cart.
- Item can be removed from the cart
- Cart will use its computer vision and weight logic to confirm removal of item.
- Item card will be automatically removed from the shopping list.

- Items can be removed directly from the cart. The cart uses computer
- Checking Out
- When shopper is done shopping, shopper taps “Checkout”
- Shopper is directed to make their way to checkout area.
- Shopper taps “Pay for Cart”
- Shopper confirms prices and taps “Pay $__.”
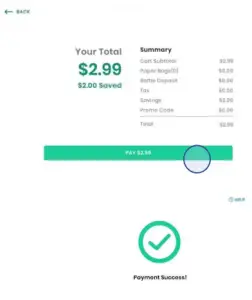
- Shopper instructed to insert or swipe credit card into card reader
- Payment is successful when shopper sees “Payment Success” screen.
- Shopper is automatically led to Rating Screen and is allowed to rate their experience or skip directly to the receipt.
- Shopper is then able to enter their email address or phone number to receive their receipt or they can choose to refuse a receipt.
- Shopper is directed to remove all items from the cart.
- When all items are removed, the transaction will end and the cart will return to the onboarding video.

- Staff Audit
- Store Admin reaches shopping home screen.
- Admin taps on “HELP” on the top right corner of the screen
- Admin taps on “Person” icon
- Admin logs in with following information
Username/Password: Please inquire Caper staff - Store Admin allowed to resolve any cart issues including: resolving auditrequired items, transferring to cashier, and starting over transaction.

MAINTENANCE
![]() WARNING
WARNING
- Unplug the device before cleaning to avoid the risk of electric shock. Failure to follow this warning may results in serious injury, fire, electric shock, or death.
- Never use harsh chemicals, abrasive cleaners, or solvents to clean the device. They may damage the finish.
- Cleaning the exterior
- Cleaning the basket
- Cleaning the bottom unit
- Cleaning the top unit
- Cleaning the battery housing
- Cleaning the front unit
TROUBLESHOOTING
Operation of the device can lead to errors and malfunctions. The following tables
contain possible causes and notes for resolving an error message or malfunction.
Before Calling for Service
As a trained staff, you can remedy most of the problems by yourself. NOT every trouble you encountered need to call Caper service center. The following table should assist you by troubleshooting.
Our smart shopping cart is equipped with an automatic error-monitoring system to detect and diagnose problems at an early stage. If the device does not function properly or does not function at all. Check the table below before calling Caper Service Cente
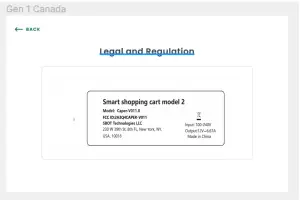
LEGAL AND REGULATION
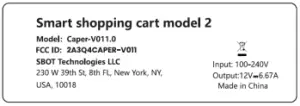
The E-label FCC Identifier will be displayed on the device’s built-in display.
Products with a built-in display, or that only operate in conjunction with another product that has an electronic display, have the option to display on the electronic display the FCC Identifier, any warning statements, or other information that the Commission’s rules would otherwise require to be shown on a physical label attached to the device (See 47 CFR § 2.935)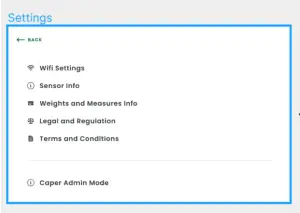
FCC STATEMENT
This device complies with part 15 of the FCC Rules. Operation is subject to the following two conditions:
- This device may not cause harmful interference, and
- this device must accept any interference received, including interference that may cause undesired operation.
Any Changes or modifications not expressly approved by the party responsible for compliance could void the user’s authority to operate the equipment.
Note: This equipment has been tested and found to comply with the limits for a Class B digital device, pursuant to part 15 of the FCC Rules. These limits are designed to provide reasonable protection against harmful interference in a residential installation. This equipment generates uses and can radiate radio frequency energy and, if not installed and used in accordance with the instructions, may cause harmful interference to radio communications. However, there is no guarantee that interference will not occur in a particular installation. If this equipment does cause harmful interference to radio or television reception, which can be determined by turning the equipment off and on, the user is encouraged to try to correct the interference by one or more of the following measures: -Reorient or relocate the receiving antenna. -Increase the separation between the equipment and receiver. -Connect the equipment into an outlet on a circuit different from that to which the receiver is connected. -Consult the dealer or an experienced radio/TV technician for help. This equipment complies with FCC radiation exposure limits set forth for an uncontrolled environment. This equipment should be installed and operated with minimum distance 20cm between the radiator & your body
INDUSTEY CANADA STATEMENT
This device complies with Industry Canada licence-exempt RSS standard(s). Operation is subject to the following two conditions:
- This device may not cause harmful interference, and
- this device must accept any interference received, including interference that may cause undesired operation of the device.
In additional, this device complies with ICES-003 of the Industry Canada (IC) Rules. Any Changes or modifications not expressly approved by the party responsible for compliance could void the user’s authority to operate the equipment. Note: This equipment has been tested and found to comply with the limits for a Class B digital device, pursuant to Industry Canada licence-exempt RSS standard(s). These limits are designed to provide reasonable protection against harmful interference in a residential installation. This equipment generates uses and can radiate radio frequency energy and, if not installed and used in accordance with the instructions, may cause harmful interference to radio communications. However, there is no guarantee that interference will not occur in a particular installation. If this equipment does cause harmful interference to radio or television reception, which can be determined by turning the equipment off and on, the user is encouraged to try to correct the interference by one or more of the following measures: -Reorient or relocate the receiving antenna. -Increase the separation between the equipment and receiver. -Connect the equipment into an outlet on a circuit different from that to which the receiver is connected. -Consult the dealer or an experienced radio/TV technician for help. This equipment complies with RSS-102 radiation exposure limits set forth for an uncontrolled environment. This equipment should be installed and operated with minimum distance 20cm between the radiator & your body.


