
![]()
Radiator Thermostat
ZWA021
Used in this guide.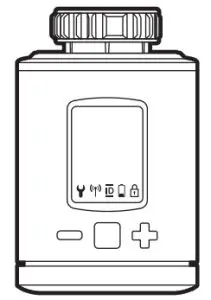
Action Button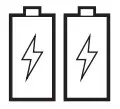
Batteries (x2)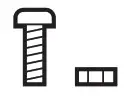
Screw for adapter
Bottom cover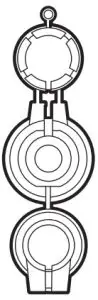
Adapters for Danfoss valves
Important safety information.
Please read this and the online guide(s) at support.aeotec.com/trv carefully. Failure to follow the recommendations set forth by Aeotec Limited may be dangerous or cause a violation of the law. The manufacturer, importer, distributor, and/or reseller will not be held responsible for any loss or damage resulting from not following any instructions in this guide or in other materials.
Radiator Thermostat is intended for indoor use in dry locations only. Do not use in damp, moist, and/or wet locations.
Quick start.
The following will step you through installing Radiator Thermostat and connecting it to your Z-Wave network.
- Decide on the installation location of the Radiator Thermostat.
- Insert the 2 pcs AA LR6 batteries, paying attention to the
polarity. Diagram 1; Battery installation.
 - Move Radiator Thermostat to the desired installation location.
- Set your Z-Wave gateway into its ‘add device’ mode. Refer to the gateway’s manual if you are unsure of how to perform this step.
- Press Radiator Thermostat’s Boost Button once. The screen will show [ICON] to indicate that inclusion is in progress. It will then show an ID number indicating that your thermostat has successfully connected to your gateway. Should ERR appear on the screen instead, your thermostat has been unable to join the network; press the Boost Button again to clear the error and then repeat the above steps. Please contact us for further support if needed.
- When it is connected to your Z-Wave gateway, physically install your thermostat upon the selected radiator. The screen will show INS indicating that physical installation can begin.
a. Ensure that no buttons are pressed during the following steps.
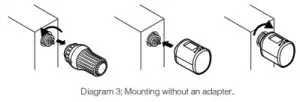
b. Remove any existing radiator thermostat. Follow that thermostat’s user guide for instructions. Install the thermostat by screwing the metal ring to the valve.
c. If your valve does not fit, use the supplied adapters to mount the thermostat.
 Diagram 1; Battery installation.
For the following valves no adapter is required:
Heimeier, Junkers Landy + Gyr, MNG, Honeywell, Braukmann, as these have a thread of M30 x 1.5mm.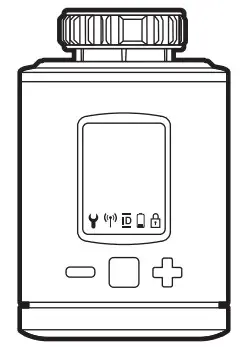
Spirit Z-Wave Plus
Diagram 2; Choose the right adapters.
The adapters for Danfoss RAV (pin must be plugged on the valve tappet) Danfoss RA and Danfoss RAVL are included.
For the following valves an adapter is required:
- Herz M28 x 1.5 mm, Comap M28 x 1.5 mm, Vaillant 30.5 mm, Oventrop M30 x 1.0 mm, Meges M38 x 1.5 mm,
- Modal M38 x 1.5 mm, Giacomini 22.6 mm, Rossweiner M33 x 2.0 mm, Markaryd M28 x 1.0 mm, Ista M32 x
- 1.0 mm, Vama M28 x 1.0 mm, Pettinaroli M28 x 1.5 mm, T+A M28 x 1.5 mm, Gampper 1/2/6.
Installation at the radiator without Adapter.
Installation at the radiator with Adapter.
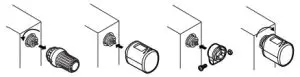
Diagram 4; Mounting with an adapter.
Installation.
Press the boost button to start the mechanical installation.
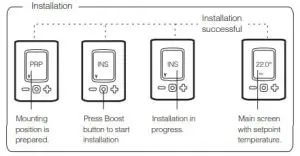
Diagram 5; Mechanical installation.
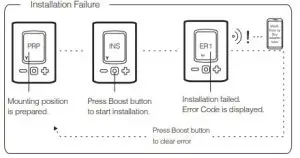
Diagram 6; Failure of mechanical installation.
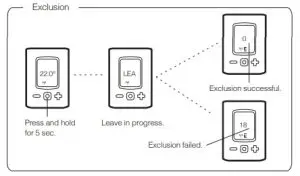
Exclusion.
- Start exclusion/unpair mode of your primary Z-Wave Controller. If you are unsure how to do this, please refer to your Z-Wave Controllers instruction manual.
- Now press and hold the boost button of the Radiator Thermostat for at least 5 seconds.

Diagram 7; Exclusion / unpair mode
- If successful, the Radiator Thermostat will display ‘0’. You can now re-pair this device to another Z-Wave Controller.
If unsuccessful, the Radiator Thermostat will display ‘18’, if this is the case, please repeat unpair steps from step 1.
If unsuccessful, the Radiator Thermostat will display ‘18’, if this is the case, please repeat unpair steps from step 1.
Get help & learn more.
Should you encounter any problem with Radiator Thermostat, visit support.aeotec.com/trv or contact our support team via aeotec.com/contact. You can also learn more about Radiator Thermostat features, configuration options, and technical specifications at the link.
Gateway compatibility.
To see if this device is known to be compatible with your Z-Wave gateway, please refer to aeotec.com/z-wave-gateways
Declaration of Conformity.
Aeotec Limited declares that ZWA021 is in compliance with the essential requirements and other relevant provisions of
RED 2014/53/EU, RoHS 2011/65/EU, IEC 62321:2008, EN 50581:2012 and ERP Directive 2009/125/EC, No 1275/2008 AMENDMENT 801/2013. The full
text of the declaration is available fromsupport.aeotec.com/trv/doc
Specifications.
Specifications. Z-Wave devices operate between 868.40 & 926.3 MHz depending on local restrictions. It uses up to -5.68dBm ERP of transmission power, enabling wireless connectivity. Full information on device specifications and certifications at support.aeotec.com/trv/specs
© & ™ Aeotec Limited. Version: 501002100001 – AA![]()
![]()
![]() [email protected]
[email protected]![]() www.aeotec.com
www.aeotec.com


