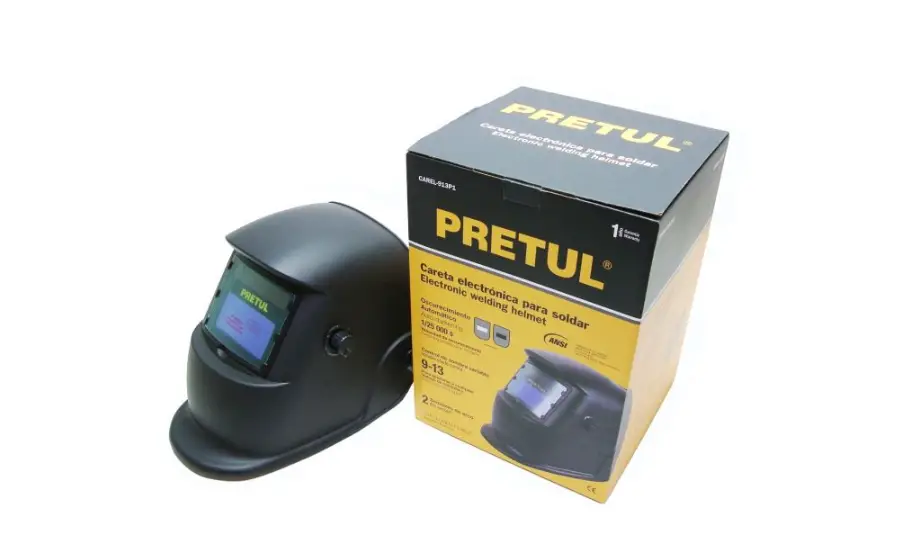
PRETUL 29978 Electronic Welding Helmet
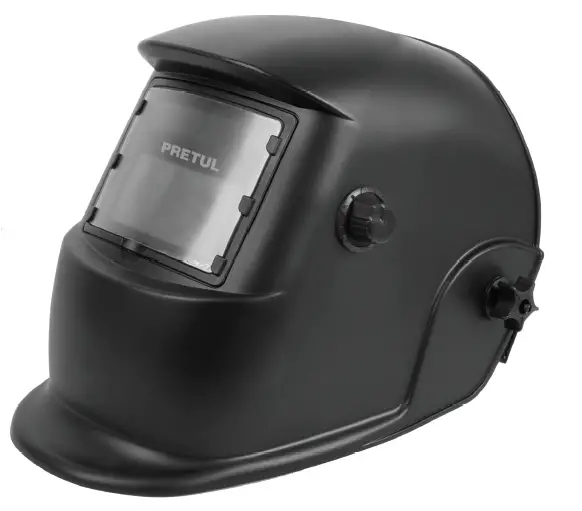
Product Features
- Durable design, housing materials high and low temperature and corrosion resistant housing materials; and flame retardant.
- Clear view of the work area, either before or during welding; this translates into better quality and higher efficiency.
- High protection against ultraviolet (UV) and infrared (IR) radiation. Equipped with two Li-Mn batteries and solar cells that help extend battery life.
WARNINGS
- The masks are NOT suitable for laser welding or laser cutting applications.
- The outside of the lens must be fitted with the protective plate to prevent potential irreparable damage.
- Replace the lens and protective plate if broken or scratched as soon as possible, as this decreases the protection and field of vision.
- Select the shade number before starting work, depending on the welding process.
- The operating temperature range is from -5 °C to 55 °C.
- When the ambient temperature is below the lower limit, the response speed of the lens will be slowed down a little, no other protection will be affected.
- Do not store near a heat source or high humidity.
- Do not clean the lens frame with alcohol, gasoline or diluted solvent, or immerse it in water.
- Change the sweatband frequently.
- Replace defective parts only with parts authorized by the supplier.
- Check the adjustment of the band before each use.
- Check that the lenses are clean and the sensors are free of dust.
- Inspect all parts before each use for deterioration or damage.
- Do not make any modifications to the facepiece or lenses that are not specified in these instructions. Do not use unspecified replacement parts. Doing so will void the warranty and expose you to risk of personal injury.
- Failure to follow these precautions may result in severe injury.
Specification
| Viewing Area | 9.2 cm x 4.2 cm |
| Cartridge Size | 11 cm x 9 cm x 1 cm |
| Arc Sensor | 2 |
| UV/IR Protection | UP to shade DIN 16 at all times |
| Light State | DIN 4 (Grind) |
| Dark State | External, weld (9-13) |
| Switch Time | 1/ 25 000 s from Light to Dark |
| Dimming speed | <0.06 ms |
| Delay Control | > 0.1 s, < 1.0 s from Dark to Light |
| Power Supply | 6 V DC (Uses two 3 V DC CR-2032 Li-Mn button cell batteries. each and solar cell included) Requires change of batteries |
| Operating Temperature | -5 °C to 55 °C |
| Other functions | ADF Auto Check and Low Voltage Indicator |
Operation
BEFORE FIRST USE
- Remove the protective label from the battery (see page 3).
- Remove the protective film from both sides of the lens.
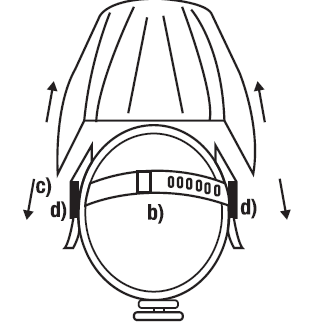
Adjusting the helmet
- Adjust the band diameter with the adjustment knob on the back of the head. Push the knob clockwise to tighten; or turn counterclockwise to loosen the band.
- Adjust the upper band to one of the preset positions for proper depth.
- To adjust the viewing angle, reposition the ratchet mechanism located on the side of the suspension to the desired elevation position. Once the desired angle is achieved, make sure the locking pins are secure. The hull should be able to be folded down, but should not deflect downward when in place for welding.
- To adjust the distance between the user and the ADF, the mask has 3 positions. Turn the knobs on the side of the suspension to loosen the clamping screws. Move the screw to the position that best suits your needs, make sure that the screw fits correctly in the notches of the suspension and tighten by turning the knob. This must be done one side at a time, and both sides must be in the same position for proper operation of the auto darkening filter.
Battery indicator
- lf the “LOW Battery” LED lights up, the batteries must be replaced (see page 3).
- Delay control
When welding is finished, the display window automatically changes from dark to light, but with a preset delay as compensation.
The delay time can be set from MIN (0.1 second) to MAX (1.0 second) by means of the infinite dial knob.
The minimum delay is suitable for spot or short welding. The maximum delay is suitable for heavy current welding and reduces arc eye fatigue. Selections between MIN and MAX are suitable for most indoor and outdoor welding operations.

- Sensitivity Control
The sensitivity can be set from LO (low) to HI (high) using the infinite dial knob. The LO setting is suitable for ambient light or in close proximity to another welding machine. The HI setting is suitable for low amperage welding and for welding in areas with low light conditions, especially with low amperage argon gas arc welding. Selections between LO and HI are suitable for most indoor and outdoor welding operations. - Shade Control
Turn the outer knob for shade control from 9 to 13 according to the welding process to be used (Refer to the recommended shade selection chart). GRIND shade 4 grinding mode prevents the filter lens from self-darkening for grinding applications.
Maintenance
- Wipe the lens with a clean, lint-free cloth with glass detergent. Do not immerse in water or other liquid. Never use solvents or oil to dilute the detergent.
- Use neutral detergent to clean the headband.
- Never strike the lens directly.
- Replace the front cover lens if it is damaged (cracked, scratched, chipped or damaged (cracked, scratched, pitted or dirty). To remove the front cover, place your finger or thumb in the recess and fold up the lens until it is free from the guides. Remove the protective film before installing a new one. Make sure all guides hold the new lens after installing the new lens.
- Replace the inner cover lens if damaged (cracked, scratched, pitted or dirty). Place your finger or thumb in the recess and bend up the inner cover lens until it releases from one edge, then remove any protective film before installing a new one ..
REMOVAL OF PROTECTIVE LABEL AND BATTERY REPLACEMENT
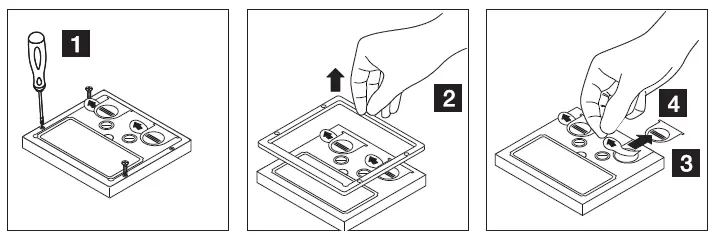
- Loosen the frame screws holding the cartridge to the hull until it is loose (1 ).
- Remove the frame (2).
- Remove the battery covers (3).
- Remove the protective label I remove the old battery (4).
- Insert new batteries.
- Replace the battery covers.
- Assemble and screw the frame that holds the cartridge.
- Replace the rear protective cap.
Danger of explosion if battery is not replaced correctly. Replace only with the same or equivalent type.
Troubleshooting
| PROBLEM{S) | POSIBLE{S) CAUSA{S) | SUGGESTED SOLUTION{S) |
| Filters do not darken or have flares | Protector is contaminated or damaged | Clean or replace |
| Arc sensors are not free | Clean the sensor surface | |
| Soldering current is to low | Adjust sensitivity to maximum | |
| Low battery | Replace battery | |
| Slow reaction | Ambient temperature is very low | Do not use under 5°C |
| Sensitivity configuration is very low | Configure sensitivity correctly | |
| Filter is not clear | Protection is stained | Clean or replace protection |
| Protection filter was nor removed | Remove the protection film | |
| Lens filters have stains | Clean both sides of the lens filter | |
| Ambient light is insufficient | Turn off the light in the work place | |
| Shadow number was not configurated properly | Adjust the helmet nuts |
Warning
You should stop using the product immediately and contact the distributor if the above questions cannot be resolved.
PARTS BREAKDOWN
Parts List – CAREL-913P1 ADF
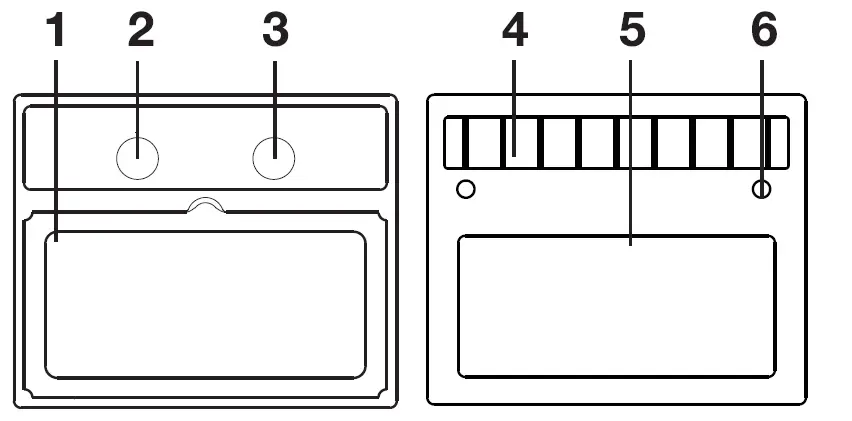
| Part# | Description |
| 1 | LCD |
| 2 | Control knob with sensitivity |
| 3 | Control knob with delay |
| 4 | Solar cell |
| 5 | UV/ IR filter |
| 6 | Arc sensor |
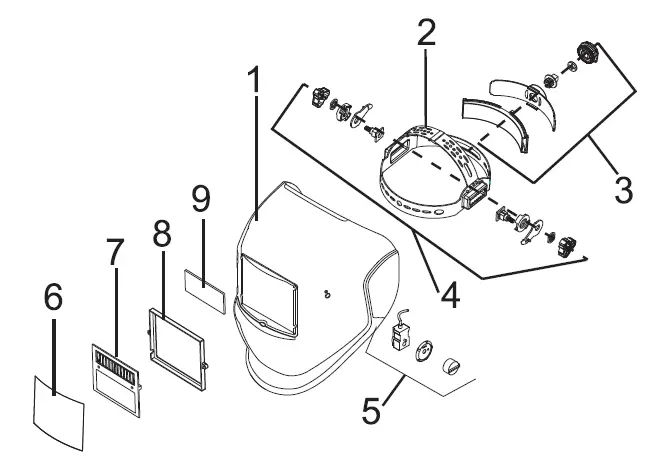
| Part# | Description |
| 1 | Helmet body |
| 2 | Suspension |
| 3 | Suspension adjustment knob |
| 4 | Suspension angle adjustment |
| 5 | Shadow number adjustment |
| 6 | Front cover lens |
| 7 | ADF filter |
| 8 | Pressure frame |
| 9 | Inner cover lens |
Warranty
Warranty. Duration: 1 year. Coverage: parts, components and workmanship against manufacturing or operating defects, except if used under conditions other than normal; when it was not operated in accordance with the instructive; was altered or repaired by personnel not authorized by Truper®. To make the warranty valid, present the product, stamped policy or invoice or receipt or voucher, in the establishment where you bought it or in Corregidora 22, Centro, Cuauhtemoc, CDMX, 06060, where you can also purchase parts, components, consumables and accessories. It includes the costs of transportation of the product that derive from its fulfillment of its service network .. Phone number 800-018-7873. Made in China. Imported by Truper, S.A. de C. V. Parque Industrial 1, Parque Industrial Jilotepec, Jilotepec, Edo. de Mex. C.P. 54257,
Phone number 761 782 9100.
Delivery date:
PRETUL
lmportado por Truper, S.A. de C.V. Parque Industrial 1, Parque Industrial Jilotepec, Jilotepec, Edo. de Mex. C.P. 54257 Made in/Hecho en China,
Tel.: 761782 9100.
www.truper.com
07-2022


