Weldclass Promax 180 Electronic Welding Helmets User Manual
BEFORE YOU START – IMPORTANT INFORMATION
Warning: Incorrect use of this product may cause serious injury.
- All users of this helmet should read & understand this manual before using the product
- Use this helmet only for the intended application as described in this manual
- Each time the helmet is used, it should be checked for correct operation: Use a cigarette lighter or strong light source to check that the lens is activating correctly.
- Stop welding immediately if the helmet filter/lens fails to darken when the arc is struck. Do not continue use until the malfunction has been rectified. Read this manual for further information and if in doubt, return the helmet to your Weldclass distributor for further inspection.
- This welding helmet does NOT provide unlimited protection. All appropriate PPE and safety-wear must be worn, and safe work practices must be followed at all times, in accordance with applicable industry OH&S regulations. Arc rays can burn eyes and skin. Fumes and Gases can be hazardous. Noise can damage hearing. Flying particles can cause impact injury or death.
- Never use the helmet without the outer & inner cover lenses correctly installed. Failure to do so will damage the Auto-darkening filter & void warranty. Always keep clear cover lenses clean and replace them regularly. Dirty or scratched cover lenses may cause the auto-darkening filter to malfunction.
SPECIFICATIONS
| Promax 180/200 | Promax 350 | Promax 500 | |
| Suitable Welding Processes | MIG & MMA (stick) | MIG, MMA (stick) & TIG | |
| TIG Suitability | n/a | 30 amps or more | 5 amps or more |
| Suitable Applications | Occasional welding | Light industrial & maintenance, Rural, etc | Professional |
| Optical Class | 1/1/1/2 | ||
| Switching Speed | Conforms to & exceeds the requirements of AS/NZS1338.1 & EN379 Standards. | ||
| Sensors | 2 | 4 | 4 |
| Power Supply | Solar powered. | 1 x CR2032 replaceable batteries (assisted by Solar panel) | 1 x CR2450 replaceable batteries (assisted by Solar panel) |
| On / Off | Ready to weld at any time – no switching required | ||
| Low Battery Indicator | Led light | ||
| Inactive Shade Level (Grind/Off) | 4 | 4 | 4 |
| Active Shade Level (Weld) | 9-13 | 5-8 / 9-13 | 5-8 / 9-13 |
| Sensitivity Adjustment | Low – High | ||
| Delay Adjustment | Min 0.1 sec – Max 1.0 sec | ||
| Grinding Mode | Switch On/Off (excludes Promax 180) | ||
| Operating Temperature | -5oc to +55oc | ||
| Storage Temperature | -25oc to +65oc | ||
| Weight | 460 g | 480 g | 560 g |
| Viewing Area | 96×39 mm | 100×53 mm | 98×87 mm |
| Outer Cover Lens Dimensions | 115×104 mm | 115×104 mm | 137×117 mm |
| Inner Cover Lens Dimensions | 102×43 mm | 116×59 mm | 115×92 mm |
| ADF/Cassette Dimensions | 110 x 90 x 10mm | 110 x 90 x 10mm | 133 x 114 x 10mm |
| Magnification Lens Holder | Internal – takes standard 108x51mm magnifications lenses | ||
| Standards Compliance – Shell | EN 175 | AS/NZS1337.1 High Impact EN 175 B, ANSI Z87.1, CSA Z94.3 | |
| Standards Compliance – Auto Darkening Filter/Lens | EN 379 | AS 1338.1, EN 379, ANSI Z87.1, CSA Z94.3 | |
AUTO-DARKENING FILTER/LENS (ADF) CONTROLS & FEATURES
Note: ADF = Auto-Darkening Filter/Lens
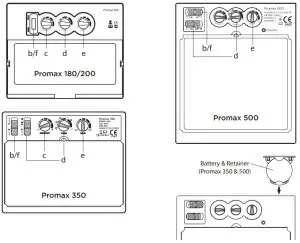
- POWER SUPPLY
Promax 180, 200: Solar powered with internal re-chargeable, non-replaceable battery Promax 350, 500: 1 replaceable battery, plus solar assistance via a solar panel on the front of the ADF which absorbs energy from the welding arc. The solar panel supports the battery to extend battery life whilst the helmet is activated, however it will not power the helmet alone. The batteries are not re chargeable – if the batteries are discharged, they must be replaced with new batteries. - ON / OFF
(Excludes Promax 180) When the switch is in the ‘WELD’ position, the ADF is ready to weld at any time.
IMPORTANT: For maximum battery life, switch the ADF to ‘GRIND’ position when the helmet is not in use. This will turn it off & prevent any nearby light sources from activating the ADF and discharging power. To conserve power, the ADF will automatically switch to ‘sleep mode’ if it does not detect an arc for a period of 10 minutes, and will automatically switch on as soon as an arc is detected. [Promax 350 & 500 only]. - SENSITIVITY CONTROL
This adjusts the sensitivity of the arc sensors to best suit the welding task & surrounding environment. Low sensitivity helps prevent the ADF reacting other nearby light sources. High sensitivity may be required if welding on low current &/or when TIG welding. Low to mid sensitivity is recommended for most welding applications. - SHADE ADJUSTMENT
The following chart shows recommended shade levels for different welding applications.Welding Application Arc Current in Amps Protective Shade No. Stick Electrode (MMA) Less than 40
40-80
80-175
175-300
300-5009
10
11
12
13MIG Less than 100
100-175
175-300
300-50010
11
12
13TIG Less than 50
50-100
100-200
200-4008-10
11
12
13Air Carbon Arc Gouging Less than 500 500-700
12
13Plasma Arc Cutting Less than 80
80-150
150-3508-9
10-11
12-13Gas Welding & Cutting – 5-6 - DELAY ADJUSTMENT
This adjust the time the ADF takes to switch from dark back to light when welding stops. Short delay time is best for tack welding and short welds. A longer delay may be required if welding heavier materials, where the weld pool emits bright light for a brief period. - WELD/GRIND SWITCH
(Excludes Promax 180) Switching to ‘Grind’ mode will ‘lock’ the ADF into the light shade mode so that it will not activate whilst the operator is grinding.
WARNING: Never use the helmet for welding whilst the ADF is switched to ‘Grind’.
WARNING: Always wear safety spectacles or goggles under the helmet when grinding.
REPLACING ACCESSORIES & MAKING ADJUSTMENTS
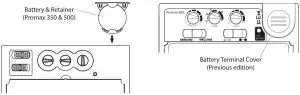
- REPLACING BATTERY [Promax 350 & 500 only]
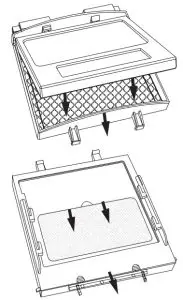
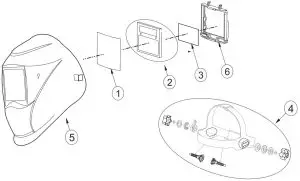
When the batteries have become discharged, the LED light will turn on indicate that the batteries should be replaced immediately. [Refer to diagram under section 5] Unfasten the plastic clip on the bottom of the lens retainer frame (6) & remove the ADF & frame (2+6). Remove the ADF (2) from the frame (6). Slide open the battery cover & replace the battery. As indicated on the battery cover, the battery should be placed with “+” side upwards (closest to the battery cover). Reverse these steps to re-assemble the helmet.
- REPLACING COVER LENSES
[Refer to parts diagram under section 5] Replacing Outer Cover Lens: Unfasten the plastic clip on the bottom of the lens retainer frame (6) & remove the ADF & frame (2+6). Remove the outer clear lens (1) & replace. Reverse these steps to re-assemble the helmet.
Replacing Inner Cover Lens: Unfasten the clip on the bottom of the lens retainer frame (6) & remove the ADF & frame (2+6). Remove the ADF (2) from the frame (6). Remove the inner cover lens (3). Fit new cover lens & reverse these steps to re-assemble the helmet.
IMPORTANT: Use only original Weldclass cover lenses to ensure correct fit and conformance to safety standards. - INSTALLING A MAGNIFICATION LENS
Any standard 108x51mm magnification lens can be fitted by insert it into the retaining tabs on the inside of the lens retainer frame (6), in front of the viewing window.
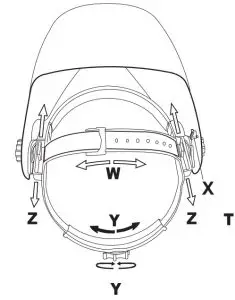
Note: To prevent fogging, place the flat side of the magnification lens towards the ADF (auto-darkening filter/lens). - HEADGEAR ADJUSTMENT
Tightening Knob (Y): Expands or contracts the main headband. Turn knob clockwise to tighten, and anti-clockwise to loosen.
Top Strap (W): Adjust the strap buckle according to personal preference & head size.
Tilt Angle (X): The locating pin on the right side of the helmet can be moved to different positions to adjust the tilt angle of the helmet when it is resting in the lowered position.
- Horizontal Position (Z): Adjusts the distance of the helmet from the operators face. Loosen the headgear retaining nut to change position (front, centre or rear). The same position should be selected on both sides.

SPARE PARTS
| ITEM | DESCRIPTION | PART NO |
| 1 | Outer Clear Cover Lens Promax 180/200/350 115x104mm Pkt 10 | WC-05323 |
| 1 | Outer Clear Cover Lens Promax 500 137x117mm Pkt 10 | WC-05324 |
| 2 | Auto-Darkening Filter Cassette (ADF) Promax 200 | WC-05327 |
| 2 | Auto-Darkening Filter Cassette (ADF) Promax 350 | WC-05328 |
| 2 | Auto-Darkening Filter Cassette (ADF) Promax 500 | WC-05329 |
| 3 | Inner Clear Cover Lens Promax 180/200 102x42mm Pkt 5 | WC-05320 |
| 3 | Inner Clear Cover Lens Promax 350 116x59mm Pkt 5 | WC-05321 |
| 3 | Inner Clear Cover Lens Promax 500 115x92mm Pkt 5 | WC-05322 |
| 6 | Lens Retainer Frame Promax 180/200/350 | WC-05330 |
| 6 | Lens Retainer Frame Promax 500 | WC-05331 |
| – | Lens Retainer Plastic Clip (Not pictured) | WC-05332 |
| – | Sweat Band Pkt 5 | WC-01630 |
| 4 | Headgear Assembly | WC-05325 |
| – | Battery Promax 350 (CR2032) (Not pictured) | WC-03987 |
| – | Battery Promax 500 (CR2450) (Not pictured) | WC-02640 |
| – | Magnification Lens 1.5x (Not pictured) | P7-ML15 |
| – | Magnification Lens 2.0x (Not pictured) | P7-ML20 |
| – | Magnification Lens 2.5x (Not pictured) | P7-ML25 |
MAINTENANCE
The helmet and ADF must be checked regularly. Defective equipment should not be used. Parts that are broken, missing, worn, distorted or contaminated, should be replaced immediately.
- Inspect lenses frequently. Immediately replace any scratched, cracked, or pitted lenses as they may impair visibility and reduce protection.
- Inspect Helmet Shell and Harness Assembly frequently. Replace any damaged or worn components immediately.
- Keep the Sensors and the Solar Panel clean at all times. When cleaning the Welding Helmet or Filter Lens do not use solvents or abrasive cleaning agents. Clean with a soft cloth after use.
TROUBLESHOOTING
| FAULT | POSSIBLE CAUSES | POSSIBLE REMEDY |
| The Filter Lens does not activate at all (fails to darken) | Weld/Grind switch is switched to ‘Grind’ | Switch to ‘Weld’ |
| Batteries are discharged | Replace Batteries | |
| Batteries are not fitted correctly | Check batteries (see section 4) | |
| Battery or terminals are dirty | Inspect & clean battery/terminals | |
| The Filter Lens flickers or intermittently fails to darken | Front Cover Lens is dirty or scratched & is obstructing the sensors | Replace cover lens |
| Sensors are dirty | Clean the Sensors with a soft cloth | |
| Sensitivity too low | Increase sensitivity level | |
| Momentary disruption to sensing of the arc | Increase delay time adjustment (will help compensate for momentary disruptions) | |
| Filter lens is dark when no arc is present or stays dark after the weld is extinguished | Ambient light level is too bright | Reduce the ambient light level in the area |
| Sensitivity too high | Reduce sensitivity level | |
| Batteries discharge very quickly | Lens is being activated by other light sources when not in use. | Switch to ‘Grind’ when not in use. |
WARRANTY
Warranty period;
Promax 180/200 Auto-Darkening Filter (ADF): 1 Year
Promax 350 & 500 Auto-Darkening Filter (ADF): 2 years
The WELDCLASS® Promax 180/200/350/500 Welding Helmets are warranted against faulty components and manufacturing defects in the auto-darkening filter (ADF) for the warranty periods shown above.
The warranty period begins on the date of purchase. It is the sole responsibility of the owner of the helmet to retain proof of purchase (i.e. a copy of the invoice made out by the distributor or reseller to the owner of the helmet clearly showing the purchase date). Proof of purchase must be provided in the event of any warranty claim.
- Warranty Includes and Covers:
- The ADF
- Manufacturing faults that do not allow the ADF to perform the functions for which it was designed.
- Warranty Excludes / Does Not Cover:
- Helmet parts other than the ADF, including: shell and headgear
- Warranty claims made without proof of purchase, or warranty claims made with proof of purchase that is deemed by Weldclass Welding Products to be false, misleading, incomplete or insufficient.
- Defects or damage resulting from: misuse, accidents, neglect, improper maintenance, alteration/ modification, use of the helmet contrary to the applications for which it was designed, or failure to heed any of the instructions, warnings or guidelines issued with the helmet, spare parts or accessories that are not genuine Weldclass.
- Filters that have been used without cover lenses or have spatter damage or are scratched or cracked.
- Damage incurred in transport
- Operator error, misunderstanding or use contrary to the intended purpose
- Warranty claims made where the owner/operator of the helmet is not willing or not able to provide any information required by Weldclass Welding Products to process the warranty claim.
- The cost of freight involved in transporting parts in the event of a warranty claim.
This is a repair and/or replacement warranty only and does not allow for a refund. Weldclass reserves the right to replace faulty units covered under warranty with alternative / equivalent units should the original unit become obsolete or unavailable. No other warranty is expressed or implied. This warranty is exclusive and in lieu of all others, including, but not limited to any warranty of merchantability or fitness for any particular purpose. Weldclass shall not under any circumstances be liable for special, indirect or consequential damages. No employee, agent, representative, distributor or agent of Weldclass is authorised to change this warranty in ay way or grant any other warranty. Notwithstanding the foregoing, in no event shall the warranty period extend more than the stated warranty period plus 6 months from the date Weldclass delivered the product to the authorised distributor. Warranty is always dated from original date of purchase – if warranty repairs are made or if warranty replacements are given this does not extend the warranty period.


