
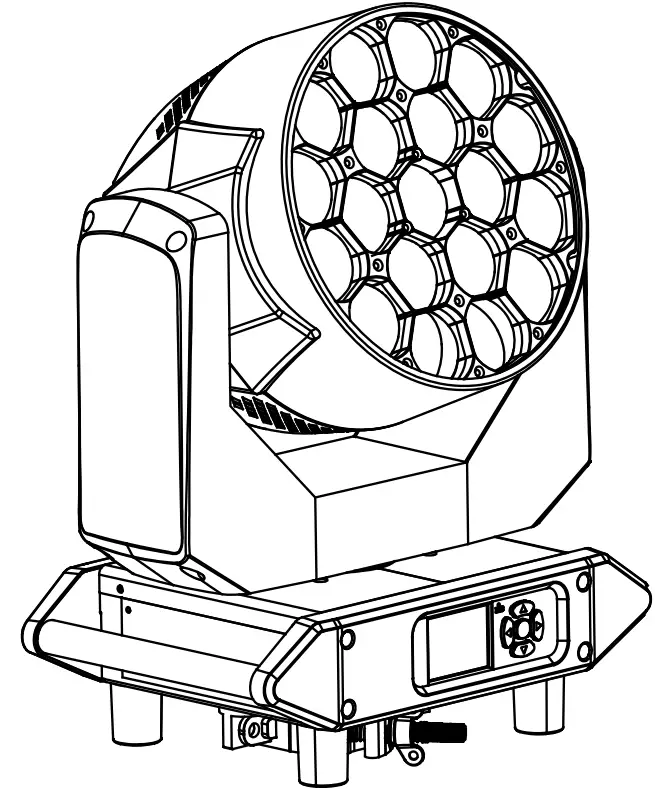
LIGHT SKY TX1920-HC Fly Dragon Lighting Equipment
SAFETY INFORMATION
- This lighting fixture is for professional use only – it is not for household use.
- Make sure all parts for fixing the projector are in a good state of repair.
- Make sure the point of anchorage is stable before positioning the projector.
- The safety chain must be properly hooked onto the fitting and secured to the framework.
- When suspending the fixture, ensure that the supporting structure and all hardware used can hold at least 10 times the weight of all the devices they support.
- Mounting surface and fire protection Please do not install the fixture onto the combustible surface.
- Keep all combustible materials at least 20 cm away from the fixture.
- Ensure a minimum clearance of 0.2m around the cooling fans and ventilation.
- Do not expose the front glass to sunlight or another strong light source from any angle.
- Lenses can focus the sun’s rays inside the fixture, creating a potential fire hazard.
- The fixture is intended for indoor application.
- The double insulation between the LV power supply and the control conductor on the fixture.
- The maximun temperature that can be reached on the external surface of the fitting, in a thermally steady state,is 60 Avoid contact by persons and materials. Allow the
- fixture to cool for at least 5 minutes before handling.
- The light source in this xture shall be replaced by the manufacturer or its service agent or similar qualification. Always disconnect from mains before
- replacing the light.
- Protection against explosion The protection screen, lens or ultraviolet screen on the lamp can be damaged to the degree of failure if visible damage, such as a crack or deep
- mark, should be replaced
- Protection optical radiation Never look directly into the light source. You risk injury to your retina, which may induce blindness.
- Do not look at LEDs with magnifiers, telescopes, binoculars or similar optical instruments that may concentrate the light output.
TECHNICAL INFORMATION
- Power supplies availabl100V~240V~ 50/60Hz
- Power 410W
- LED chip
- TYANSHINE 20W
- White 3000K-6000KLED.
- LED QTY19PCS/W1W2.
- Average life30000h Beam angle
- Zoom function min.7°,max.55°.
- CCT3000K6000K
- CRIRa90
- Optical system High precision combination structure, high permeable glasslight rod +PMMA lens.
- Zoom system Linear electric zoom. Strobe1-30 times/ second electronic strobe and random strobe.
- Dimmer Electronic dimmerprovides four dimming options.
- PanTilt
- X/Y Travel: 540°/210°
- X/Y Resolution: 2.11°/0.82°
- X/Y Speed: 2.5S/1.0S
- Control Mode DMX512, RDM.
- ChannelStandard(13CH)
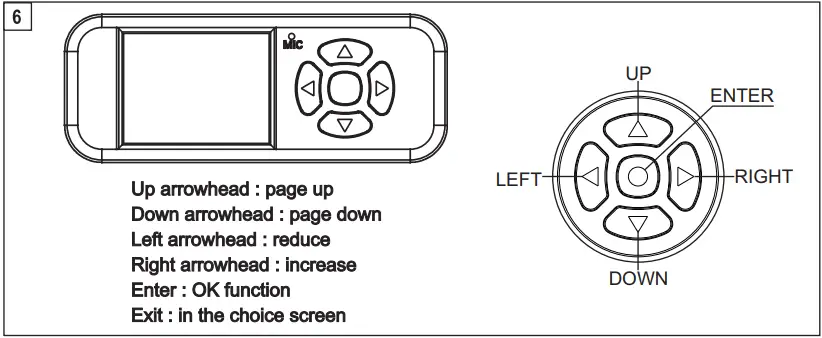
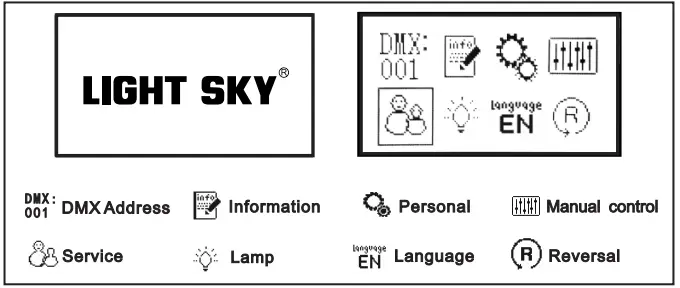
- Display Menu
- The display panel adopts a 2.4-inch LCD12864 LCD screen, which is used in both Chinese and English languages to facilitate quick operation and browse menus.
- Display board can record device’s using time , show device’s temperature, channel data and software version .
- Customizable Settings display menu Settings, through the menu can be edited or called built-in The program. Software upgrade Upload the upgrade file through the DMX interface. IP20 protection – Protected against the entry of solid bodies larger than 12mm.
- No protection against the entry of liquids.
- Safety Devices
- BIPOlar circuit breaker with thermal protection.
- Automatic break in power supply in case of overheating or failed operation of cooling system.
- Cooling Forced ventilation with axial fans.
- Working mode Silent mode;Standard mode; High Brightness mode.
- Outlooking Metal base and anti-fire plastic.
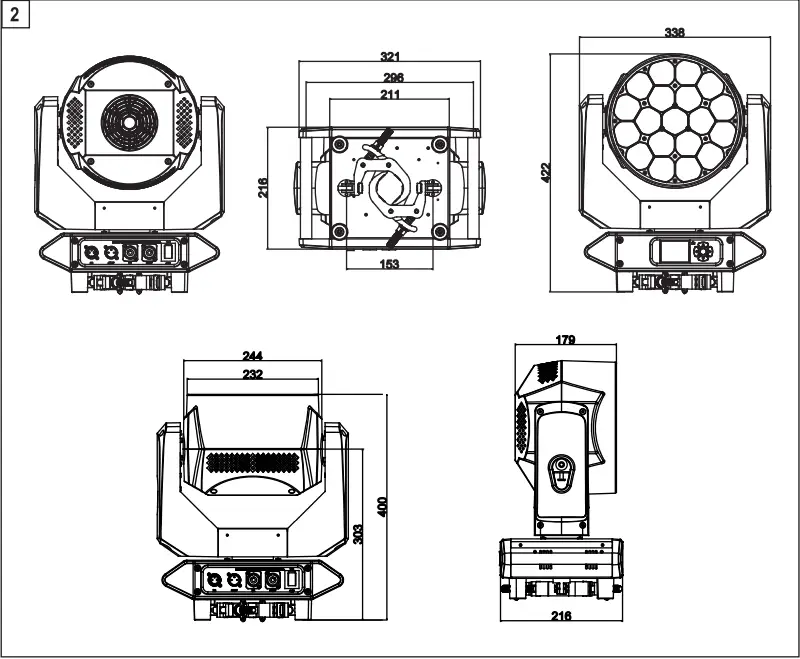
- Light size 338X216X422
- Box Size400X270X495MM N.W.: 10.6kg G.W.: 12.6kg
- Flycase Size(4sets)
- 920X580X615MM
- N.W.: 42.4kg G.W.: 78.8kg
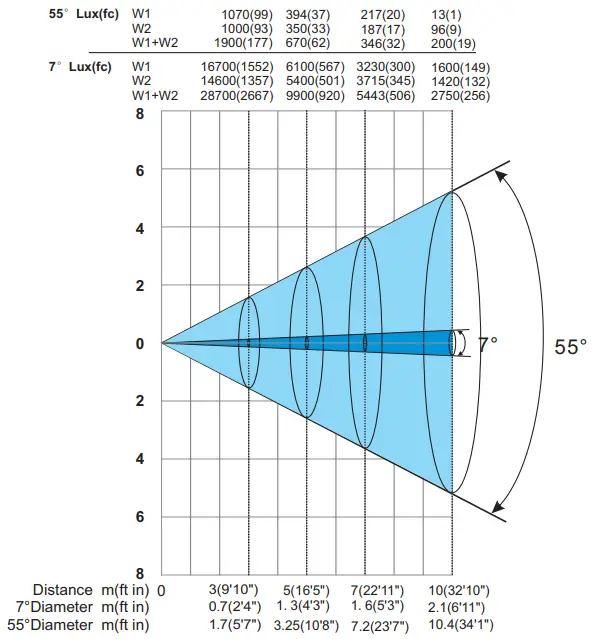
Distance,spot diameter and illumination diagram
ATTACHMENT AND BODY SIZE

INSTALLATION AND CONNECTING

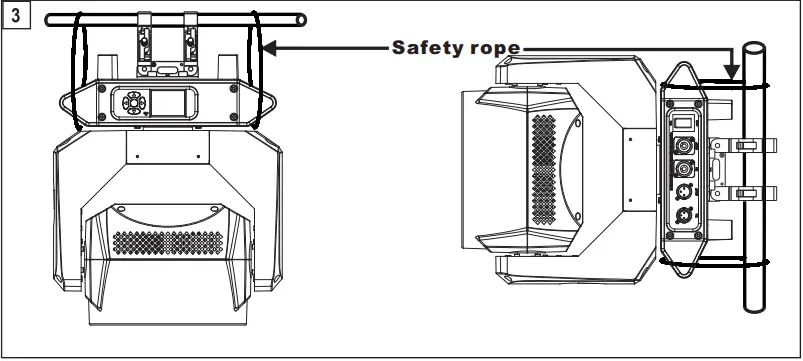
Installing the projector– Fig. 3 Compact,standard clamp system equipped & easy installation The projector can be installed on the floor resting on special rubber feet, on a truss or on the ceiling or wall.
WARNING: with the exception of when the projector is positioned on the floor, the safety rope must be fitted. This must be securely fixed to the support structure of the projector and then connected to the fixing point at the centre of the base. Make sure all parts for fixing the projector are in a good state of repair. Make sure the point of anchorage is stable before positioning the projector. When suspending the fixture, ensure that the supporting structure and all hardware used can hold at least 10 times the weight of all the devices they support.
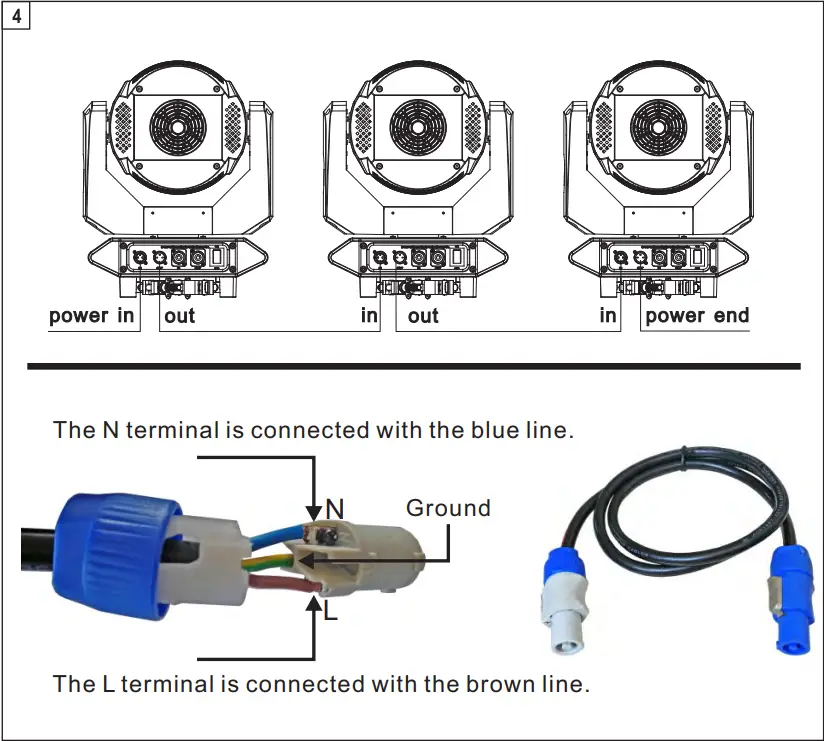
The stage lighting power supply can not be more than 2pcs pre line connection to the eiectricty mains must be carried out by a qualified electrical installer.
After doing the above operation and making sure all the devices had been installed with natural operate, press the power switch to check whether every -thing is working normally.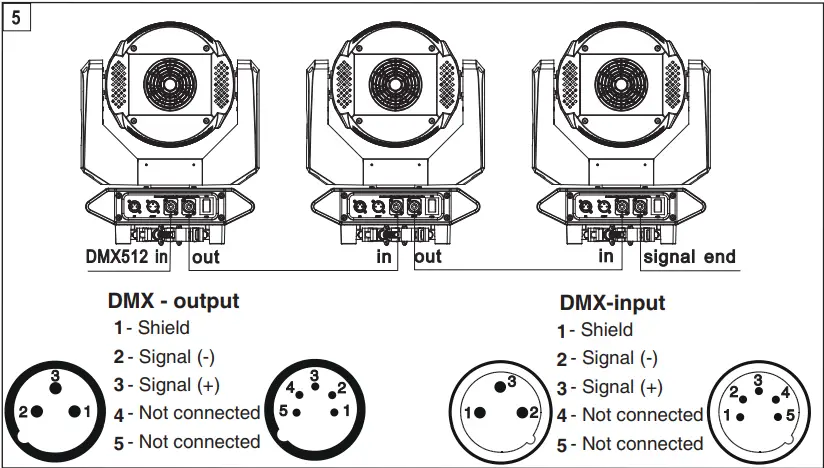
CONTROL PANEL

Color Calibration System
Because LED chip’s brightness and wave length can not be produced exactly same by LED factory, which would cause the color difference in the LED color fixture. To solve the issue , LIGHT SKY adopts a calibration system by calibrating each color’s brightness curve and defining a standard color area . then apply this standard into all the LED fixture to lower the color difference . So, in MENU Optional of Open Calibration OFF/ON in PERSONAL is available. Standard production , the Calibration system in ON. But user can choose OFF as well
| Mainmenu | Ⅰ menu | Ⅱ menu | Ⅲ menu | ⅠV menu | ||||
|
DMX setting |
> | Address | > | 001 – 512 | ||||
| Channel mode | Standard(13) | |||||||
| State | > | Blackout | ||||||
| Hold | ||||||||
| Auto | ||||||||
|
Info |
> | Fixture times | > | Power on time | > | 0 – 99999H | ||
| LED on time | > | 0 – 99999H | ||||||
| All time | > | 0 – 99999H | ||||||
| Fan speed | > | LED fan | > | 0 – XXXXX | ||||
| Power fan | 0 – XXXXX | |||||||
| Fan voltage | > | LED fan | > | 0 – XX.XV | ||||
| Power fan | 0 – XX.XV | |||||||
| Temperatures | > | LED TEMP | > | (-40℃ – 125℃) | ||||
| RDM info | > | 0x3888XXXXXXXX | ||||||
|
DMX live |
> | 1.Pan | > | 0 – 255 | ||||
| 2.Pan fine | > | 0 – 255 | ||||||
| 3.Tilt | > | 0 – 255 | ||||||
| 4.Tilt fine | > | 0 – 255 | ||||||
| 5.P/T Speed | > | 0 – 255 | ||||||
| 6.Function | > | 0 – 255 | ||||||
| 7.Dimmer | > | 0 – 255 | ||||||
| 8.Dimmer fine | > | 0 – 255 | ||||||
| 9.Strobe | > | 0 – 255 | ||||||
| 10.Cold white | > | 0 – 255 | ||||||
| 11.Warm white | > | 0 – 255 | ||||||
| 12.CCT | > | 0 – 255 | ||||||
| 13.Zoom | > | 0 – 255 | ||||||
| Version | > | Display | > | VX.XXX | ||||
| Pan/Tilt | > | VX.XXX | ||||||
| LEDDRV | > | VX.XXX | ||||||
|
Person |
> |
Pan/Tilt |
> | PT swap | > | OFF | ||
| > | ON | |||||||
| Pan invert | > | OFF | ||||||
| > | ON | |||||||
| Tilt invert | > | OFF | ||||||
| > | ON | |||||||
|
Led Hz |
> | 3000Hz | ||||||
| 6000Hz | ||||||||
| 12000Hz | ||||||||
| 24000Hz | ||||||||
|
Dimmer Curve |
> | Linear | ||||||
| Square | ||||||||
| I-Square | ||||||||
| SCurve | ||||||||
| Dimmer Speed | > | Fade | ||||||
| Snap | ||||||||
| Fan mode | > | Silent mode | ||||||
| Standard mode | ||||||||
| Hot mode | ||||||||
|
Display |
> | Language | > | English | ||||
| Chinese | ||||||||
| Backlight time | > | Always | ||||||
| Auto (30S) |
| Main menu | Ⅰ menu | Ⅱ menu | Ⅲ menu | ⅠV menu | ||||
|
Person |
> | Display | > | Intensity | > | 0 – 100 | ||
| Rotation | > | Normal | ||||||
| Rotate | ||||||||
| Master/Slave | > | Master | ||||||
| Slave | ||||||||
|
Manual |
> |
Manual Control |
> | 1.Pan | > | 0 – 255 | ||
| 2.Pan fine | > | 0 – 255 | ||||||
| 3.Tilt | > | 0 – 255 | ||||||
| 4.Tilt fine | > | 0 – 255 | ||||||
| 5.P/T Speed | > | 0 – 255 | ||||||
| 6.Function | > | 0 – 255 | ||||||
| 7.Dimmer | > | 0 – 255 | ||||||
| 8.Dimmer fine | > | 0 – 255 | ||||||
| 9.Strobe | > | 0 – 255 | ||||||
| 10.Cold white | > | 0 – 255 | ||||||
| 11.Warm white | > | 0 – 255 | ||||||
| 12.CCT | > | 0 – 255 | ||||||
| 13.Zoom | > | 0 – 255 | ||||||
| Reset | > | Pan/Tilt reset | ||||||
| Zoom reset | ||||||||
| Total reset | ||||||||
| Test | → | Test all | > | test in process | ||||
| Test pan/tilt | test in process | |||||||
| Test effects | test in process | |||||||
|
Service |
→ |
Fixture state |
> | Memory IC |
> | OK/ Reset/ Error | ||
| Pan Encodeer | OK/ Reset/ Error | |||||||
| Pan Drive IC | OK/ Reset/ Error | |||||||
| Tilt Encoder | OK/ Reset/ Error | |||||||
| Tilt Drive IC | OK/ Reset/ Error | |||||||
| Pan | OK/ Reset/ Error | |||||||
| Tilt | OK/ Reset/ Error | |||||||
| Zoom | OK/ Reset/ Error | |||||||
|
> | Adjust | > | Pan | > | 0 – 255 | |||
| Tilt | > | 0 – 255 | ||||||
| Zoom | > | 0 – 255 | ||||||
| White Balance | > | Cold white | > | 125 – 255 | ||||
| > | Warm white | > | 125 – 255 | |||||
|
Factory |
> | Factory Reset | Passwo rd | YES | ||||
| NO | ||||||||
|
Reset timers |
> | Reset power on timers | Passwo rd | YES | ||||
| NO | ||||||||
| Reset led timers | Passwo rd | YES | ||||||
| NO | ||||||||
| Reset all timers | Passwo rd | YES | ||||||
| NO | ||||||||
|
Developer |
Passwo rd | LOGO | > | LIGHT SKY | ||||
| No LOGO | ||||||||
| Manual OR DMX | > | DMX | ||||||
| Manual | ||||||||
| Manual Fan Vol | > | OFF | ||||||
| ON | ||||||||
| Power correlation | > | OFF | ||||||
| ON | ||||||||
| LED output power | Passwo rd | 50 – 100 | ||||||
CHANNEL FUNCTION
| Channel | DMX | Percentage | Function | Note |
| 1 | 0 – 255 | 0 – 100 | Pan | |
| 2 | 0 – 255 | 0 – 100 | Pan fine | |
| 3 | 0 – 255 | Tilt | ||
| 4 | 0 – 255 | 0 – 100 | Tilt fine | |
| 5 | 0 – 255 | 0 – 100 | P/T Speed | |
|
6 | Function | |||
| 0 – 10 | Reserved | |||
| 11 — 20 | Total reset | |||
| 21 — 30 | Pan/Tilt reset | |||
| 31 — 40 | Zoom reset | |||
| 41 — 50 | Silent mode | |||
| 51 — 60 | Standard mode | |||
| 61 — 70 | Hot mode | |||
| 71 — 80 | Pan invert on | |||
| 81 — 90 | Tilt invert on | |||
| 91 — 100 | P/T invert off | |||
| 101 — 110 | PT swap on | |||
| 111 — 120 | PT swap off | |||
| 121 — 130 | Backlight time Always | |||
| 131 — 140 | Backlight time Auto | |||
| 141 — 150 | Linear | |||
| 151 — 160 | Square | |||
| 161 — 170 | I-Square | |||
| 171 — 180 | Scurve | |||
| 181 — 190 | Led Hz 3000HZ | |||
| 191 — 200 | Led Hz 6000HZ | |||
| 201 — 210 | Led Hz 12000HZ | |||
| 211 — 220 | Led Hz 24000HZ | |||
| 221 — 230 | Dimmer Speed Fade | |||
| 231 — 240 | Dimmer Speed Snap | |||
| 241 — 255 | Reserved | |||
| 7 | 0 – 255 | 0 – 100 | Dimmer | |
| 8 | 0 – 255 | 0 – 100 | Dimmer fine | |
|
9 | Strobe | |||
| 0 – 9 | Reserved | |||
| 10 – 199 | Strobe-effect from slow to fast | |||
| 200 – 249 | Random strobe-effect from slow to fast | |||
| 250 – 255 | Reserved | |||
| 10 | 0 – 255 | 0 – 100 | Cold white | |
| 11 | 0 – 255 | 0 – 100 | Warm white | |
| 12 | 0 – 255 | 0 – 100 | CCT | |
| 13 | 0 – 255 | 0 – 100 | Zoom |
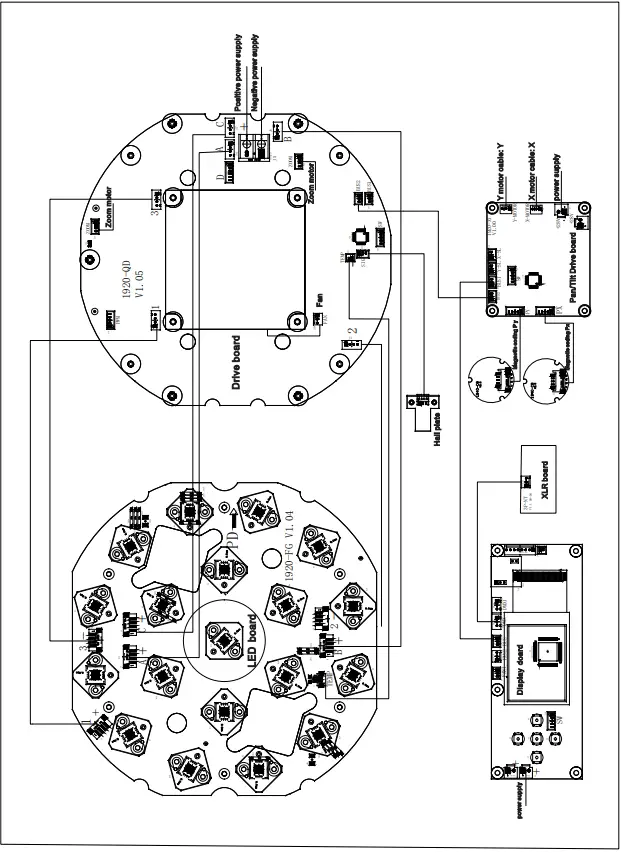
CIRCUIT CONNECTING DIAGRAM
CLEANING AND MAINTENANCES
- In order to ensure the projector could work normally. It should be kept clean always . The lens should also be regularly cleaned to maintain an optimum light output. Do not use any type of solvent on the lens. It will damage the projector.
- Suggestion: The continued usage of the light don’t exceed 4 hours. Or it will shorter the usage of the lamp. Please use the alternative operation to solve this problem. The fixture power ON time is best not over 48 hours, or it would generate lamp protection procedure.
- Please disconnect the power supply when begin to maintenance take down the light. Please let the parts cool down 10 minute at least then begin to install.
- Please inspect the lens or other moving parts timing and keep them clear and static. If find anything damaged or looseness must change a lamp or fix the lamp in order to avoid the accident. Please check the machenical parts is jamming. After cleaning,please add some temperature-durable juice.
- The light use the strong cool system.It iseasy for the dirty to be colletced.Please do clear the hot-sak one time two weeks at least.
- After you use the light,please check the intake place whether there are some wastepaper, please clean it up,or the windmill will break down and causing fire.
CAUTION! Disconnect from mains before starting maintenance operation.
It is recommended some solution for some normal trouble shooting. Any inextricability problems should always be handling by the professional person. Disconnect the power supply before maintenance the light.
LED off / LED
- Please check if install the suitable voltage.
- Please check whether the led will reach the end of their life can explode; please replace a same description led.
- Please check if the power supply is enough.
- Please check whether the DMX 512 controller pass the “turn on” order.
The light couldn’t accept the control order:
- Please check the start code address and the function option are correct.
- Please check whether the communication control cable is on good connection or the cable is too long or interrupt.
- Please check the control system is not valid, check the signal amplifier of chain connected is valid.
- Please check whether the communicate cable is too long or the other equipment is mutually conjugate.
- Please arrange the wire well, shorter the signal cable, put the high voltage cable and low voltage cable separately.
- Add the signal amplify isolator.
- Signal cable is used the excellent screening doublet (Resistance 75 OHM.
- The end of the light end and the end resistance.
The light can’t move:
- Please check if the power supply is suitable for the light voltage data.
- Please check the light if they are deformation, inside parts is broken, become wet etc will lead the loose contact.
- Please check the if the iniside lead wire and the connector is loose.
- Please check the electric parts(such as the transformer,PCB board,contrller) is short-circuit or burn down.
DUTY EXONERATIVE AND cOPYRIGHT PROTECTION
The lamp belongs to consumption products that is not guarantee to keep it in good repair.
- Any products broken that didn’t according to the instruction is not guarantee to keep it in good repair.
- The commentary for all the instruction belongs to the supplier in final.
- No authorize can’t copy.
- The information in this manual may be changed in the future, the company reserve the right to change the data without any advise.


 Instruction Manual")


