
![]()
User Manual
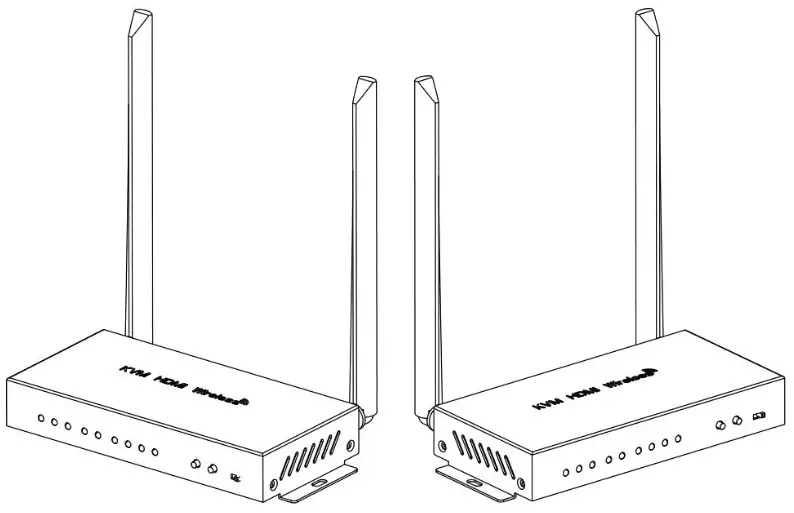
KVM HDMI Wireless Extender
Model No. HDEX0028M1
FEATURES OF THE INTERFACE:
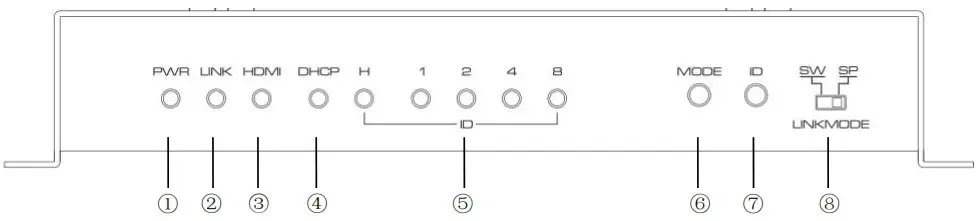
FIG.1 Front panel view of TX
| No. | Description | Introduction |
| 1 | Power indicator | Lighting when power is supplied |
| 2 | Link status indicator | Lighting when wireless module starts normally Flashing when data is transmitting |
| 3 | HDMI status indicator | Lighting when HDMI cable is connected to HOW IN port |
| 4 | DHCP mode indicator | Lighting on to enable DHCP when necessary |
| 5 | ID indicator | ID value displayed. Lighting when link mode is switched to SW When indicator H is lighting off, the indicator 1/2/4/8 show low bit value. When indicator H is lighting on, the indicator 1/214/8 show high bit value. |
| 6 | DHCP mode select button | Short press: DHCP mode turn on/off |
| 7 | ID select button | Short press: Switch ID value Long press( more than 3 seconds): Switch ID values high/low bit. Indicator H lighting when switched to high bit. |
| 8 | Link mode select switch | Select link mode to SW(Switch mode) or SP(Splitter mode). |
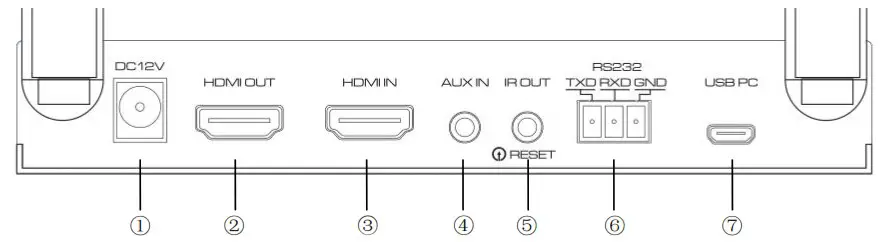
FIG.2 Rear panel view of TX
| No. | Description | Introduction |
| ① | Power jack | Requires 6-12V power supply |
| ② | HDMI output port | Connects to monitor with HDMI port for loopout. |
| ③ | HDMI input port | Connects to your source device (e.g. laptop or computer box) |
| ④ | Analog audio input port | Audio input to replace the audio from HDMI source |
| ⑤ | IR output jack | Infrared transmitter jack & Reset button (Embedded in the jack) |
| ⑥ | RS232 interface | Support RS232 pass-through. Signal level compatible with RS232 standard. |
| ⑦ | Micro USB port | USB slave port (connected to PC) |
 FIG.3 Front panel view of RX
| No. | Description | Introduction |
| ① | Power indicator | Lighting when power is supplied |
| ② | Link status indicator | Lighting when wireless module starts normally Flashing when data is transmitting |
| ③ | HDMI status indicator | Lighting when monitor is connected to HDMI OUT port |
| ④ | Display mode indicator | Lighting off for Graphic Mode with shorter latency. Lighting on for Video mode with less package lost rate. |
| ⑤ | ID indicator | ID value displayed. Lighting when link mode is switched to SW When indicator H is lighting off, the indicator 1/2/4/8 show low bit value. When indicator H is lighting on, the indicator 1/2/4/8 show high bit value. |
| ⑥ | Display mode select button | Click to switch display mode |
| ⑦ | ID select button | Short press: Switch ID value Long press( more than 3 seconds): Switch ID values high/low bit. H indicator lighting when switched to high bit. |
| ⑧ | Link mode select switch | Select link mode to SW(Switch mode) or SP(Splitter mode). |
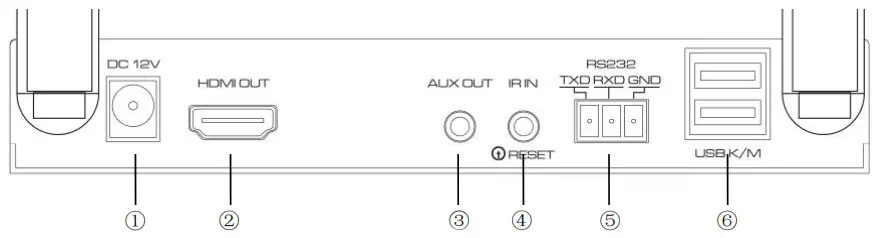
FIG.4 Rear panel view of RX
| No. | Description | Introduction |
| ① | Power jack | Requires 6-12V power supply |
| ② | HDMI output port | Connects to monitor with HDMI port |
| ③ | Analog audio output port | Output Analog Audio Signal as the HDMI Output Port and connected to outside headset or power amplifier. |
| ④ | IR input jack | Infrared receiver jack & Reset button (Embedded in the jack) |
| ⑤ | RS232 interface | Support RS232 pass-through. Signal level compatible with RS232 standard. |
| ⑥ | USB host port | Supports external keyboard and mouse connection for remote control. |
Connection and operation:
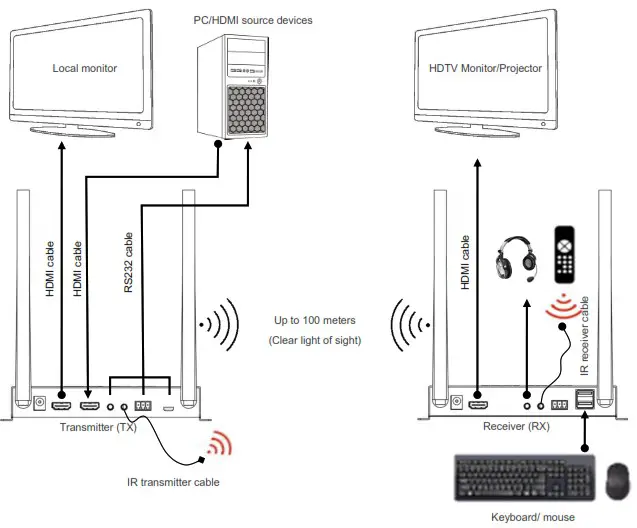
FIG.5 CONNECTION DIAGRAM
Install TX
Step1: Connect HDMI output port of video source (BD player, PC…) to HDMI input port of TX by HDMI cable.
Step 2: If you need a local screen, connect HDMI output port of TX to HDMI input port of TV by HDMI cable.
Step3: Connect the power adapter to TX and wall socket, the TX will power on automatically, the power indicator will turn on.
Step4: In the case of KVM application, you can connect external audio to AUX IN jack and connect RS232 device to RS232 Interface, USB port needs to connect to PC/Android TV box USB port.
Install RX
Step1: Connect HDMI output port of RX to HDMI input port of TV by HDMI cable.
Step2: Connect the power adapter to RX and wall socket, the RX will power on automatically, the power indicator will turn on.
Step3: In the case of KVM application, you can connect headset or power amplifier to AUX OUT jack and connect RS232 device to RS232 Interface. The USB keyboard and mouse are connected to the USB host ports.
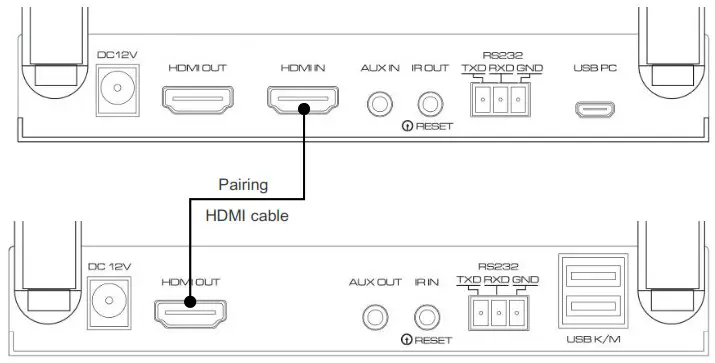
Wireless Pairing
- TX and RX must be paired before normal use.
- Connect HDMI IN port of TX and HDMI OUT port of RX by the HDMI cable to pair. The HDMI status indicator flash when pairing and stop flashing after complete pairing.

- If you want to clear the pairing, please press the reset button of TX&RX for more than 6 seconds. The pairing information is cleared when the button is released. The reset button is embedded in the IR OUT/IN jack, you need a long and thin rod (e.g. toothpicks) inserted into the jack to operate it.
Splitter Mode (1 to 1 / 1 to N)
- Position the toggle switch to SP Mode on both TX and RX.
- In the SP mode, support one TX and one or multiple RX simultaneous connection. All Rx and Tx should be paired before use.
- In the case of 1 to N, it is recommended that the number of Rx should not exceed 4.
- If there’s no signal on the monitor connected to RX, please make sure TX and RX are both switched to SP mode and have been paired together.
Switch Mode (N to 1)
- Position the toggle switch to SW Mode on both TX and RX.
- In the SW mode, support one or multiple TX and one RX connection. All TX and RX should be paired before use.
- TX and RX can only connect after setting the same ID.
- Two TX/RX cannot have the same ID at the same time, otherwise it will prompt an ID conflict, at this point all the ID indicator lights will flash. You must modify the ID of one of the TX/RX before you can continue using it.
ID setting and display
- ID setting is required in SW Link mode, TX and RX can only connect after setting the same ID.
- Click ID button to switch ID value, and long press ID button to switch ID value high/low bit. H indicator lighting when switched to high-bit.
- In the low-bit display state, four LEDs of 1/2/4/8 represent low ID value 1-15. ID value is the total of what is light on. Refer to the following table for details.
ID lights status
1-2-4-8ID lights status
1-2-4-8ID lights status
1-2-4-8ID lights status
1-2-4-8/ ○○○○ 4 ○○●○ 8 ○○○● 12 ○○●● 1 ●○○○ 5 ●○●○ 9 ●○○● 13 ●○●● 2 ○●○○ 6 ○●●○ 10 ○●○● 14 ○●●● 3 ●●○○ 7 ●●●○ 11 ●●○● 15 ●●●● Note: ● means light on and ○ means light off.
- If 15 IDs are not enough for your circumstances, up to 255 IDs are provided. The ID more than 15 is “high bits x 16 + low bits”.In the high-bit display state, it is divided into 16 segments with 16 IDs as a segment. At this point, 1/2/4/8 four LEDs represent the number of segments. Refer to the following table for details.
ID
segmentlights status
H-1-2-4-8ID
segmentlights status
H-1-2-4-8ID
segmentlights status
H-1-2-4-8ID
segmentlights status
H-1-2-4-81-15 ●○○○○ 64-79 ●○○●○ 128-143 ●○○○● 192-207 ●○○●● 16-31 ●●○○○ 80-95 ●●○●○ 144-159 ●●○○● 208-223 ●●○●● 32-47 ●○●○○ 96-111 ●○●●○ 160-175 ●○●○● 224-239 ●○●●● 48-63 ●●●○○ 112-127 ●●●●○ 176-191 ●●●○● 240-255 ●●●●●
How to control the device by using remote control
- Using the infrared transmission function of this product, you can remote control the source devices and other peripherals that can be controlled by infrared (e.g. air conditioner).
- Connect the IR Transmitter cable to the IR OUT jack of TX, and aim the IR probe in front of the IR sensor of the video source. (Please find the correct position of IR sensor of the video source or the IR signal won’t pass through)
- Connect the IR Receiver cable to the IR IN jack of RX, and use the source device remote control aiming at IR receiver of the cable to control the source device, the distance between this IR receiver hole and remote control should be within 5m.
How to control the device by using mouse/keyboard
- Connect the Device Port of TX to PC/ Android TV Box by using a Micro USB-USB Type A Cable.
- Connect the RX USB Host jack with a mouse or keyboard. After the device is identified, there will be an OSD character showing “HID Driver Loading”, and a mouse icon will be displayed at the top of the standby screen.
- Then you can use the mouse or keyboard to control the PC/ game controller in other room.
RS232 communication through
- RS232 port allows both input and output signal transition, which makes it possible to monitor and to remote control from the receiver or from the transmitter.
- RS232 serial port baud rate is recommended to set at 115200bps.
Other Notes
- Proprietary anti-interference technology to ensure stable streaming in a crowded Wi-Fi environment, support up to 6 sets of equipment running at the same time at one space.
- TXRX will automatically select a channel with less interference to connect according to the current wireless interference situation.
- Don’t worry about the data security, this product support AES 128-bit security encryption and WPA2/WPA-PSK/WPA2-PSK authentication protocol to protect data. HDCP supported to protect the content.
- If the environment is not good, the distance could will be much shorter. At this time, please try to adjust the angle of the antenna or adjust the position of the device. Matter that needs attention: Concrete walls, Brick, Wallpaper, Metal, Bulletproof glass will shorten the signal cover range or cause big signal loss. Please try to avoid these obstacles in the transmission path.
- When the devices can’t run normally, please try to restart TX and RX, or reset and repair.
- This product only support 48/44. 1/32KHZ 16/20/24 bit digital audio, please check the source device set to correct audio standard. If the product has no sound or abnormal sound, try to modify the audio output format of the signal source to LPCM/PCM.
SPECIFICATIONS:
| Model No. | HDEX0028M1 |
| Model name | KVM HDMI Wireless Extender |
| Ports | TX: HDMI IN x1, HDMI OUT x1, AUX IN x1, IR OUT x 1, RS232 x1, Micro USB x1, DC JACK x1 RX: HDMI OUT x1, AUX OUT x1, IR IN x 1, RS232 x1, USB2.0 x2, DC JACK x1 |
| HDMI input resolution | 480P/720P/1080P/2160P@60/50/30/25/24 |
| HDMI loop output resolution | Same as input, with no latency |
| HDMI output resolution | 480P/720P/1080P@60,Output 4K@30 when 4K input |
| HDMI Audio format | LPCM (48/44.1/32KHZ 16/20/24bit) |
| Input/output TMDS signal | 0.5~1.5Vp-p(TTL) |
| Input/output DDC signal | 5Vp-p(TTL) |
| Transmission latency | Less than 80ms |
| Wireless standard | 802.11 ac WiFi MIMO technology |
| Wireless Band | 4.900 GHz ~ 5.845 GHz (5GHz ISM Band) |
| Antenna type | External dual 5dBi gain antenna |
| Transmit Output Power | 802.11ac /MCS9: 15 dBm ± 1.5 dB @ EVM ≤ -32dB |
| Transmission distance | ≤100m (in open space) |
| IR Carrier frequency | 20~60KHz |
| Power adapter specification | Input: AC 100~240V / Output: DC 12V/1.5A |
| Max working current | TX≤ 400mA, RX≤ 300mA |
| Working temperature range | 0~ +40℃ |
| Working humidity range | 10 to 85%RH(No Condensation) |
| Storage temperature | -10 to 60℃ |
| Storage humidity | 5 ~95%RH(No Condensation) |
| Size | TX/RX:170.5*74.5*27.5 (mm) |
| Weight | TX:325g,RX:330g |
| Accessories | Transmitter x1, Receiverx1, Manualx1, Power Adaptorx2, Micro USB-USB cable x1, IR Transmitter cable x1, IR Receiver cable x1 |


