air DrumSynth Flagship Virtual Drum VI
Introduction
DrumSynth is a plugin application for creating drum sounds on your computer. For complete system requirements and compatibility information, visit airmusictech.com. For technical support, visit support.airmusictech.com.
Installation
- Download the .exe (Windows) or .pkg (macOS) file and double-click to install the software.
- Open the plugin application. If using with other software, consult its documentation for scanning new plugins and adding plugin instrument tracks.
- Click Sign In to sign into your inMusic Brands Profile using your Internet browser. If you do not have an inMusic Brands Profile yet, you will be prompted to create one.
- Once signed in, click Activate in the plugin window to enter your serial key to unlock the plugin. You can unlock each plugin on up to three devices at a time.
- If you do not have a serial key, you can click Try Unlicensed to explore the plugin with intermittent audio alerts. You can also click 10-Day Trial to initiate a free, fully-featured trial of the plugin for 10 days. If you would like to purchase a serial key, click the link to purchase a license at profile.inmusicbrands.com.
Operation
Setup Section
- Keyboard: Click this icon to enable or disable the virtual keyboard. When enabled, you can click these keys to input notes, or view notes being played on an external MIDI device.
- Tempo: Displays the current plugin tempo. To change the tempo:
- Click and drag the tempo slider to adjust the tempo.
- Double-click the tempo value to enter a specific tempo.
- Settings: Click this icon to open the Settings window, where you can set the following parameters:
- Audio: Set the audio buffer size and sample rate.
- MIDI: Set the MIDI input and output devices.
- General: Set the plugin language and UI scaling.
- Menu: Click this icon to open the menu, where you can find the following options:
- Edit: Select a MIDI note value from the dropdown menu.
- Learn: Learn a MIDI note value from a connected MIDI device. Use the Settings menu described above to make sure your MIDI device is connected under Active MIDI Inputs.
- Reset To Default: Return the note mapping to the default settings.
- Close: Close the Note Mapping window.
- Preset: Click this drop-down menu to view the list of included plugin presets. You can also click the up and down arrows next to this field to move to the previous or next preset.
Mix Controls
Click the drum synth name to select which type is used for each available slot. The available types are Kick, Snare, Clap, HiHat, Ride, Crash, Tom, and Percussion. You can also turn each drum synth on or off and adjust its volume level.
Synth Controls
Click on the drum pictures shown in the Mix section to display the Synth Controls below. You can select the type of drum sound to be used for each available slot and set whether the drum sound plays entirely when triggered or only for how long the note length is set. You can also adjust the one-shot model, mute group, velocity, velocity 2, and target parameter knobs.
Introduction
Thank you for purchasing the AIR DrumSynth plugin instrument. The AIR DrumSynth plugin emulates the sound of classic drum machines and features multiple synthesis types, advanced modeling and carefully crafted, built-in effects to create powerful contemporary drum sounds. This user guide explains the features and functions of the plugin instrument. For more information on using this plugin with other software, please refer to your software’s documentation for adding and using plugin instruments.
System Requirements & Product Support
For complete system requirements and compatibility information, visit airmusictech.com. For technical support, visit support.airmusictech.com.
Installation
- Double-click the .exe (Windows) or .pkg (macOS) file you downloaded. Follow the on-screen instructions to install the software.
- Open the plugin application. If you are using this plugin with other software, consult its documentation for scanning new plugins and adding plugin instrument tracks.
- Click Sign In to sign into your inMusic Brands Profile using your Internet browser. If you do not have an inMusic Brands Profile yet, you will be prompted to create one.
- Once you have signed in, click Activate in the plugin window to enter your serial key to unlock the plugin. You can unlock each plugin on up to three devices at a time.
- If you do not have a serial key, you can click Try Unlicensed to explore the plugin with intermittent audio alerts. You can also click 10-Day Trial to initiate a free, fully-featured trial of the plugin for 10 days. If you would like to purchase a serial key, click the link to purchase a license at profile.inmusicbrands.com.
Operation
Overview
Click a part of the screen below to skip directly to that part of this user guide.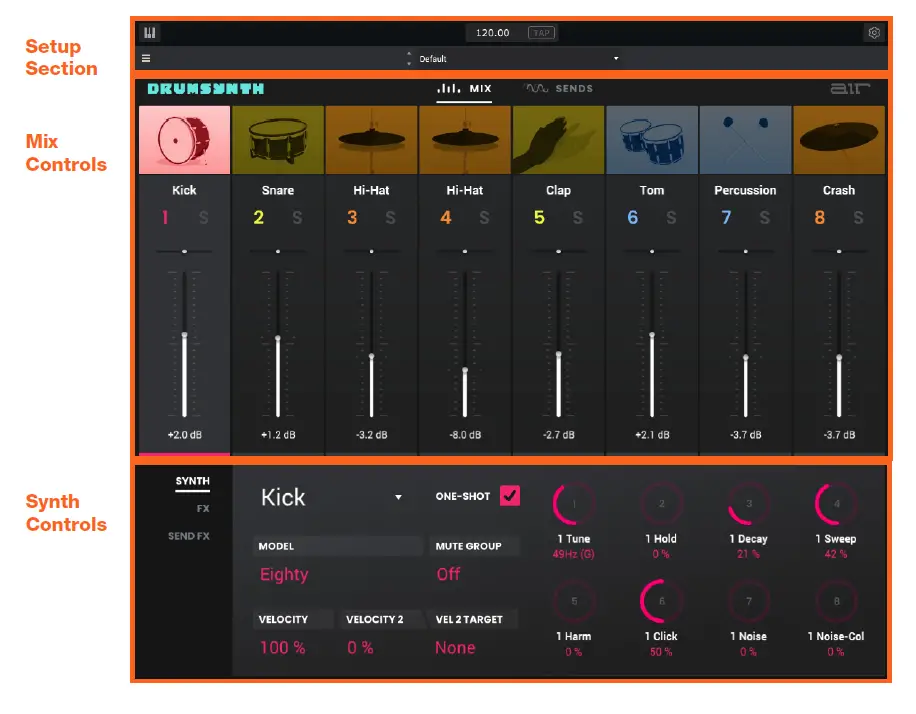
Setup Section

- Keyboard: Click this icon to enable or disable the virtual keyboard. When enabled, you can click these keys to input notes, or view notes being played on an external MIDI device.
- Tempo: Displays the current plugin tempo. To change the tempo:
- Click the number and use your keyboard to input a new value.
- Click and drag the tempo value up or down using your cursor.
- Click the Tap button at regular intervals.
- Settings: Click this icon to open the Settings window, where you can set the following parameters:
- Output: to select an audio hardware driver in your computer system. Click the Test button to play a test tone for checking your audio output settings. (Careful! You should lower the volume on your audio system beforehand.)
- Sample Rate: Click this drop-down menu to select the desired sample rate for your project. This depends on the available sample rates of the type of MPC hardware you are using or of your audio interface (i.e., select 96000 Hz only if your interface allows a 96 kHz sample rate).
- Audio Buffer Size: Click this drop-down menu to set your audio system’s latency. Lower values result in a more immediate playing response but also more CPU consumption. If you are working with larger projects, this may cause audible clicks and pops. Higher values are more CPU-friendly but can produce more delay between pressing a pad and hearing the corresponding sound. The ideal audio buffer size also depends on your computer’s CPU performance. Experiment with this to find the best setting for your system.
- Active MIDI Inputs: Displays available MIDI input devices. To enable a device, check the box next to its name.
- Menu: Click this icon to open the menu, where you can find the following options:
- Scale: Click here to select a value to scale the plugin window to a new size.
- Load Preset: Click here to load a saved preset.
- Save Preset: Click here to save the current preset.
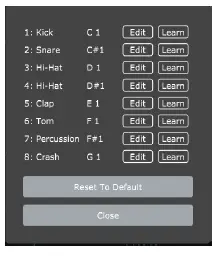
- Note Mapping: Click here to edit the MIDI note mapping for the eight drum sounds.
- Click Edit to select a MIDI note value from the dropdown menu.
- Click Learn to learn a MIDI note value from a connected MIDI device. Use the Settings menu described above to make sure your MIDI device is connected under Active MIDI Inputs.
- Click Reset To Default to return the note mapping to the default settings.
- Click Close to close the Note Mapping window.
- Open User Guide: Click here to open this User Guide.
- About: Click here to view plugin version information.
- Check For Updates: Click here to check for available software updates.
- Preset: Click this drop-down menu to view the list of included plugin presets. You can also click the up and down arrows next to this field to move to the previous or next preset.

Mix Controls
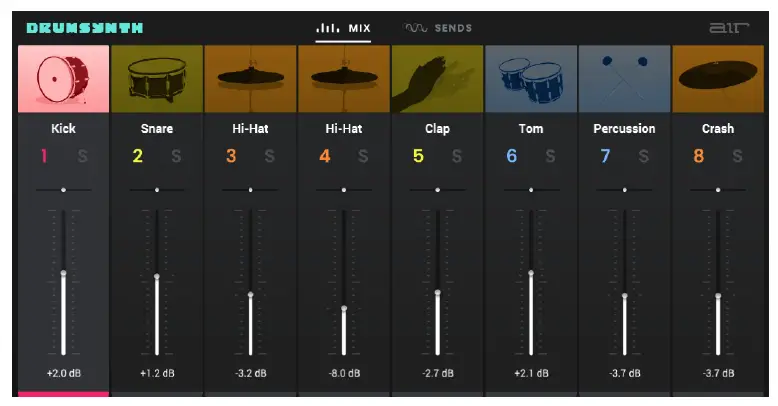
| Parameter | Description | Value Range |
| Type | Click the drum synth name to select which type is used for each available slot. | Kick, Snare, Clap, Hi- Hat, Ride, Crash, Tom, Percussion |
| 1–8 | Click the 1–8 icons to mute or unmute the selected drum. | On, Off |
| S | Click to solo the selected drum. | On, Off |
| Pan | Click and drag the pan slider to adjust the position of the drum sound in the stereo field. | L100 – C – R100 |
| Level | Sets the volume level of each drum synth. | -Inf – 0.0 – +12.0 dB |
Synth Controls
Click on the drum pictures shown in the Mix section to display the Synth Controls below.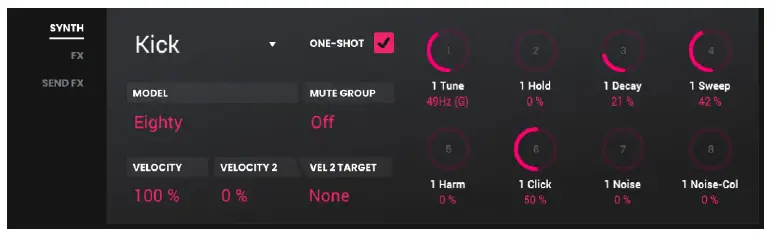
| Parameter | Description | Value Range | |
| Type | Click the drum synth name to select which type is used for each available slot. | Kick, Snare, Clap, Hi-Hat, Ride, Crash, Tom, Percussion | |
| One-Shot | Allows the drum sound to play entirely when triggered or only for how long the note length is set. | Enabled, Disabled | |
| Model | Type of drum sound emulated. | Varies | |
| Mute Group | Assign drums to a mute group so that the last pad played will silence all other pads in that mute group. This is useful for programming realistic hi-hats, especially if only the open or closed hat should be heard. | Off, A, B, C, D | |
| Velocity | Amount of incoming Velocity applied. When set to 0, all notes will sound as if Full Level. | 0–100% | |
| Velocity 2 | Amount of additional Velocity envelope that can be used to control a parameter. | -100 – 0 – +100% | |
| Target | Select the Parameter where the Velocity 2 information is sent. | None, Param 1–8 | |
| Parameter Knobs | Each drum sound has up to eight associated parameters that can be used to further shape the sound. The available parameters vary based on the type of drum sound selected. Use the knobs to adjust the selected parameter. | Varies | |
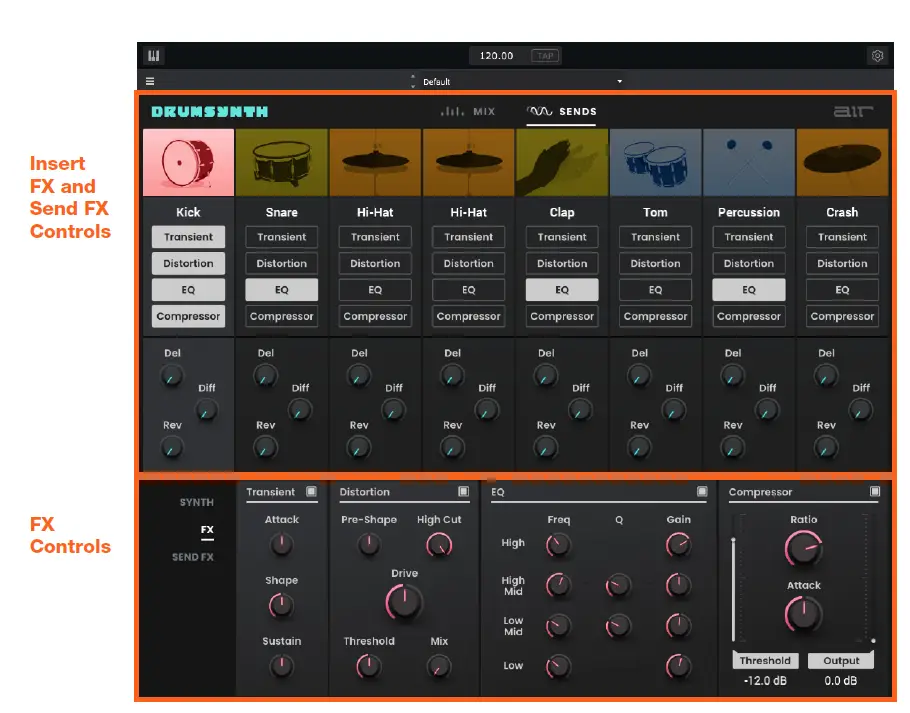
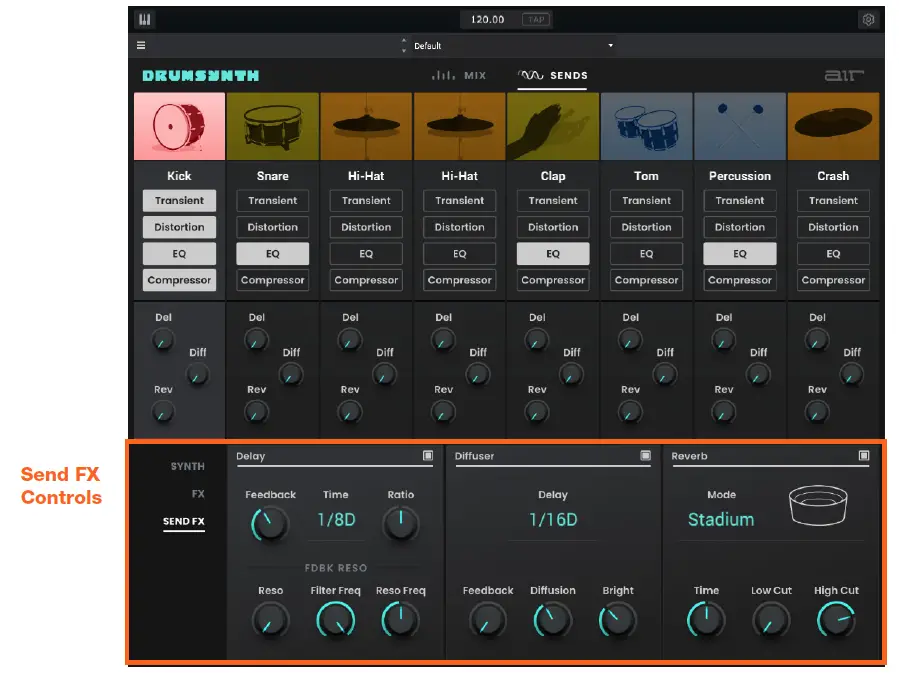
Insert FX and Send FX Controls
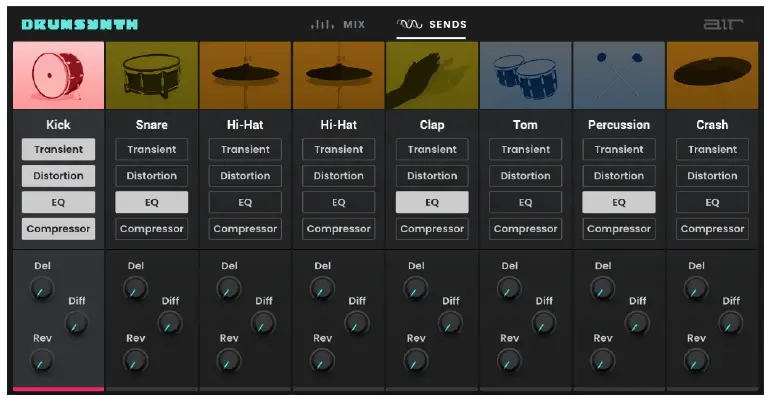
| Parameter | Description | Value Range |
| Inserts | Click the name of the insert slots on each drum to enable or disable the selected insert effect: Transient, Distortion, EQ, or Compressor. See FX Controls for information on each effect. | Off, On |
| Sends | Turn the knobs for each drum to set the send level of the desired Send FX: Del (Delay), Diff (Diffuser), or Rev (Reverb). See Send FX Controls for information on each effect. | -Inf – 0.0 dB |
FX Controls
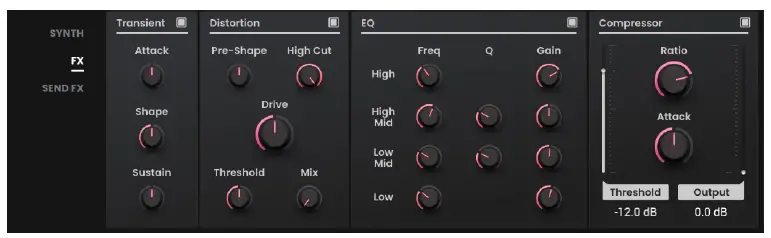
| Transient | Parameter
| Description Click the button in the upper-right corner to enable or disable the transient effect. | Value Range Off, On |
| Attack | Decreases or increases the amount of transient attack applied to the signal. | -100 – 0 – +100% | |
| Shape | Adjusts the shape of the processed transient. | 0–100% | |
| Sustain | Percentage of sustain envelope subtracted from or added to the transient effect. | -100 – 0 – +100% | |
| Distortion | Click the button in the upper-right corner to enable or disable the distortion effect. | Off, On | |
| Pre-Shape | Increases or decreases the high-end tone of the incoming audio signal pre-distortion. | -100 – 0 – +100% | |
| High Cut | Center frequency of the distortion signal high- cut filter. | 1.00–20.0 kHz | |
| Drive | Amount of drive applied. | 0–60 dB | |
| Threshold | Signal level after which the distortion will be applied. | -20.0–0.0 dB FS | |
| Mix | Wet/dry amount of the distortion effect. | 0–100% | |
| EQ | Click the button in the upper-right corner to enable or disable the EQ effect. | Off, On | |
| High Freq | Center frequency for the High EQ band. | 1.20 – 20.0 kHz | |
| High Gain | Amount of gain applied to the High EQ band. | Cut, -12.0 – 0 – +12.0 dB | |
| High Mid Freq | Center frequency for the High Mid EQ band. | 120 Hz – 16.0 kHz | |
| High Mid Q | Width of the High Mid EQ band. | 0.40–10.00 | |
| High Mid Gain | Amount of gain applied to the High Mid EQ band. | -18.0 – 0 – +18.0 dB | |
| Low Mid Freq | Center frequency for the Low Mid EQ band. | 40.0 Hz – 8.00 kHz | |
| Low Mid Q | Width of the Low Mid EQ band. | 0.40–10.00 | |
| Low Mid Gain | Amount of gain applied to the Low Mid EQ band. | -18.0 – 0 – +18.0 dB | |
| Low Freq | Center frequency for the Low EQ band. | 20.0 Hz – 1.00 kHz | |
| Low Gain | Amount of gain applied to the Low EQ band. | Cut, -12.0 – 0 – +12.0 dB |
| Parameter | Description | Value Range | |
| Compressor | Click the button in the upper-right corner to enable or disable the compressor effect. | Off, On | |
| Threshold | Signal level after which the compressor will be applied. | -60.0–0.0 dB | |
| Ratio | Amount of compression applied. | 1.0:1 – 100.0:1 | |
| Attack | Length of time to apply the compression. | 100 us – 300 ms | |
| Output | Amount of additional output gain for the compressed signal. | 0.0–30.0 dB |
Send FX Controls
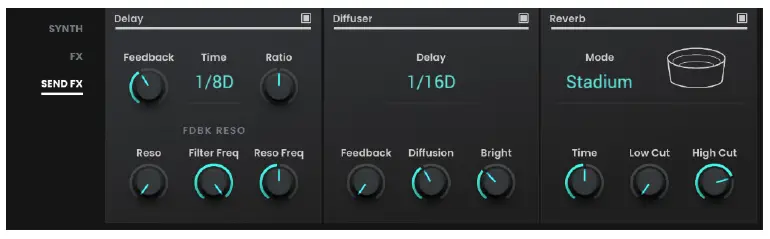
| Parameter | Description | Value Range | |
| Delay | Click the button next to the effect name to enable or disable the delay effect. | Off, On | |
| Feedback | Amount of delay signal fed back into the delay line. | 0–100% | |
| Time | Length of time between the dry signal and the delayed signal. | 1/32 – 8/4 | |
| Ratio | Reduces the delay Time in either the left or right stereo field. This is useful for creating offset, panned delays. | 50:100 – 100:100 – 100:50 | |
| Reso | Amount of resonance of the feedback signal. | 0–100% | |
| Filter Freq | Sets the center frequency of the filtered delay signal. | 1.00–20.0 kHz | |
| Reso Freq | Center frequency for feedback resonance. | 100 Hz – 10.0 kHz | |
| Diffuser | Click the button next to the effect name to enable or disable the diffuser effect. | Off, On | |
| Delay | Delay time between the dry signal and the diffused signal. | 1/64 – 4/4 | |
| Feedback | Amount of diffused signal sent back into the delay line. | 0–100% | |
| Diffusion | Rate of increasing density of reverb reflections. At lower settings, the sound of individual reflections is more present. At higher settings, reflections are more uniform. | 0–100% | |
| Bright | Adjusts the high-end tone of the diffused signal. | 0–100% | |
| Reverb | Click the button next to the effect name to enable or disable the reverb effect. | Off, On | |
| Mode | Type of reverb applied. | Hall, Stadium, Room, Abstract | |
| Time | Length of reverb tail. | 0.4 – +Inf s | |
| Low Cut | Center frequency for the reverb low-pass filter. | 1–1000 Hz | |
| High Cut | Center frequency for the reverb high-pass filter. | 1.00–20.0 kHz |
Trademarks and Licenses
- AIR Music Technology is a trademark of inMusic Brands, Inc., registered in the U.S. and other countries.
- macOS is a trademark of Apple Inc., registered in the U.S. and other countries.
- Windows is a registered trademark of Microsoft Corporation in the United States and other countries.
- All other product or company names are trademarks or registered trademarks of their respective owners.
- airmusictech.com.


