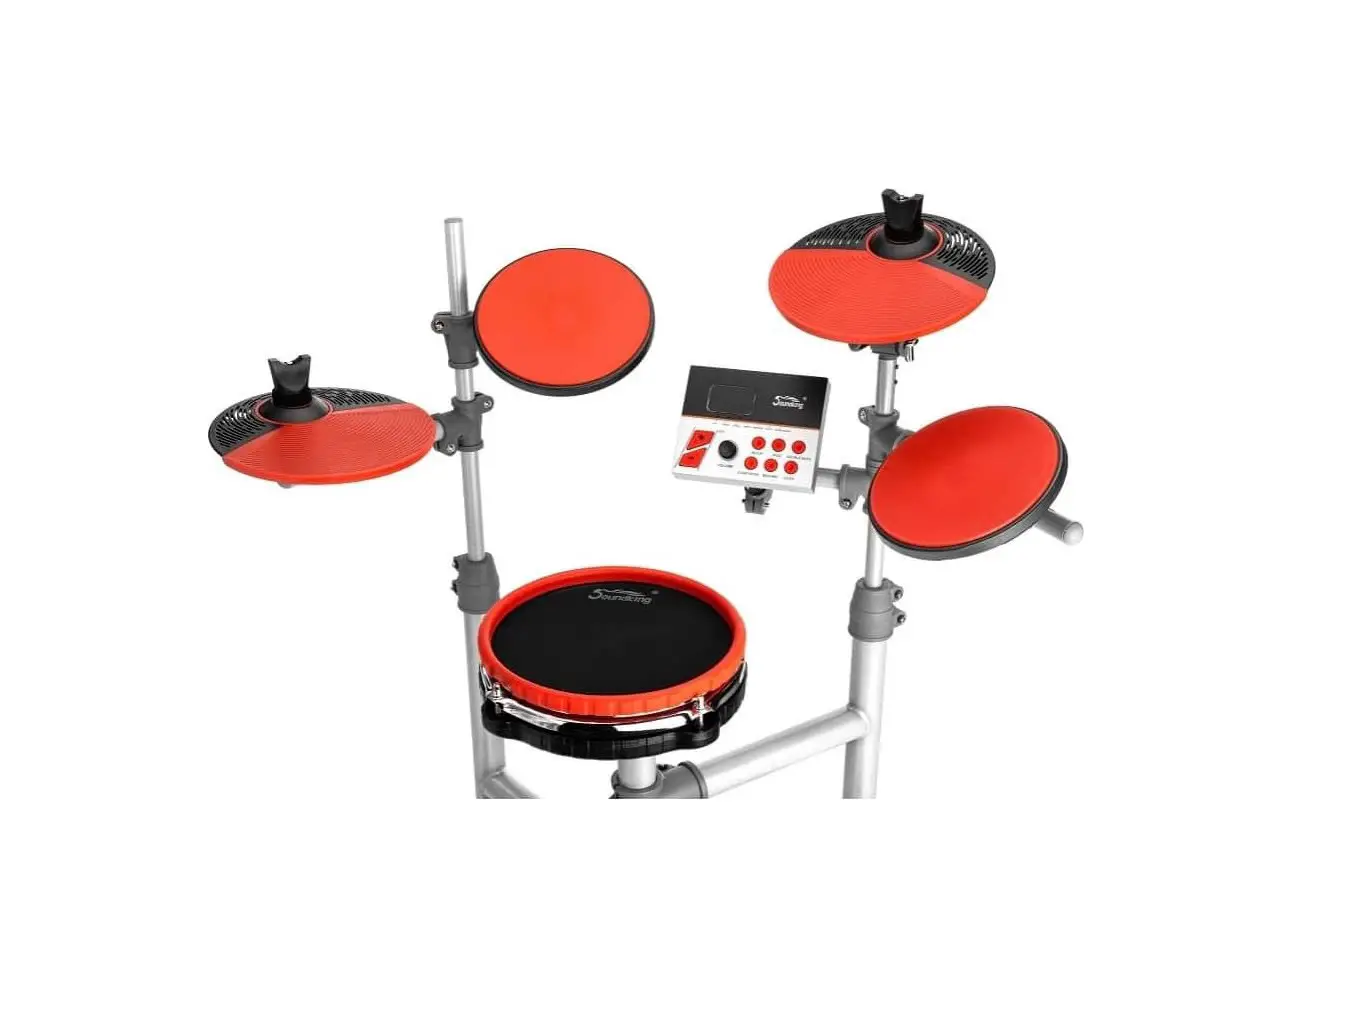
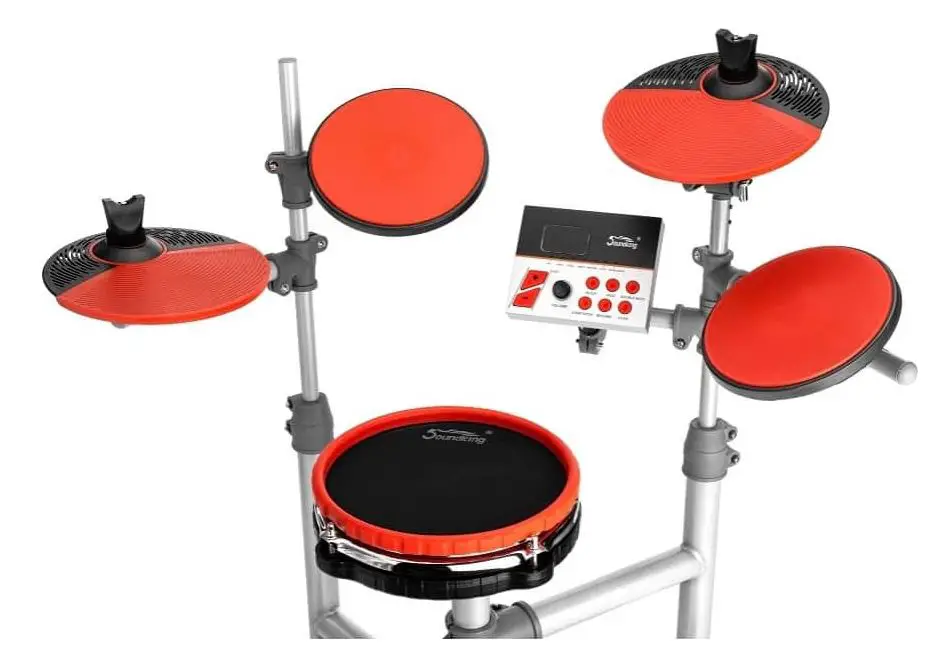
SD30M Electronic Drum Kit
Product Information
The product is a musical instrument that provides a range of different sounds and voices. It includes various percussion and drum sounds such as bass drum, snare drum, hi-hat, cymbals, and other sound effects such as claps, bells, and whistles. The instrument has a total of 105 voices to choose from.
Product Usage
To use the product, connect it to a power source and turn it on. Use the buttons or keys to select the desired sound or voice. The numbered notes correspond to the different voices available. For example, note 27D#1 is the High Q Slap sound, note 28E1 is the Scratch Push sound, and so on.
The instrument also includes different modes and settings that can be adjusted to customize the sound. These settings may include volume, tone, reverb, and other effects. Refer to the user manual for specific instructions on how to adjust these settings.
The product can be used for various purposes such as music production, live performances, or personal enjoyment. Experiment with different sounds and combinations to create unique music compositions.
Congratulations!
Thank you for purchasing this digital drum set. The drum set has been developed to act and play like a drum set but with greater ease. Before you use the instrument, we recommend you to read through this manual.
Taking care of your digital drum set
Location
- Do not expose the unit to the following conditions to avoid deformation, discoloration or more serious damage.
- Direct sunlight.
- High temperature (near a heat source, or in car during the day time).
- Disconnect all cables before moving
Power Supply
- Make sure to use the suitable AC adaptor, and also make sure the AC outlet voltage at your country matches the input voltage specified on the AC adaptor’s label.
- Turn the power switch OFF when the Instrument is not in use.
- An AC adaptor should be unplugged from the AC outlet if the instrument is not to be used for an extended period of time.
- Unplug the AC adaptor during electric storms.
- Avoid plugging the AC adaptor into the same AC outlet as appliance with high power consumption, such as electric heaters or ovens. Also avoid using multi-plug adaptors since these can result in reducing the sound quality, operation errors, and possibly damage.
Turn Power OFF When Making Connections
- To avoid damage to the instrument and other devices to which it is connected, turn the power switches of all related device OFF prior to connecting or disconnecting cables. Handling and Transport
- Never apply excessive force to the controls, connectors or other parts of the instrument.
- Always unplug cables by gripping the plug firmly, but not pulling on the cable.
- Disconnect all cables before moving the instrument.
- Physical shocks caused by dropping, bumping, or placing heavy objects on the instrument can result in scratches and more serious damage.
Cleaning
- Clean the unit with a dry soft cloth.
- A slightly damp cloth may be used to remove stubborn grime and dirt.
- Never use cleaners such as alcohol or thinner.
- Avoid placing vinyl object on top of the unit (vinyl can stick to and discolor the surface). \
Electrical Interference
- This instrument contains digital circuitry and may cause interference if placed too close to radio or television receivers. If this occurs, move the instrument further away from the affected equipment.
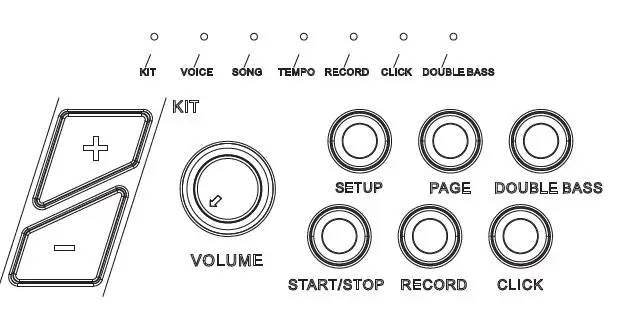
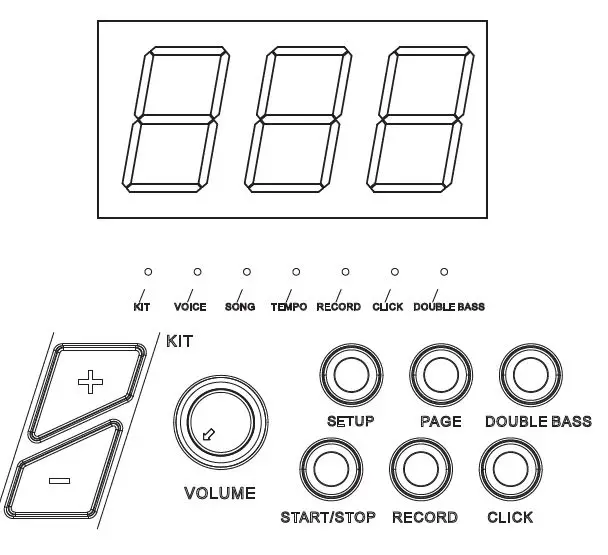
Module function
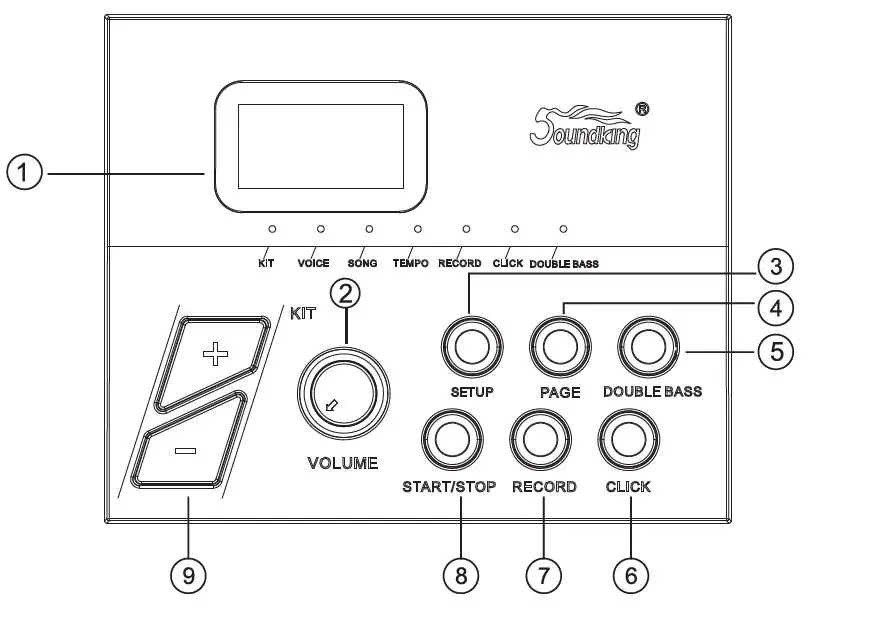
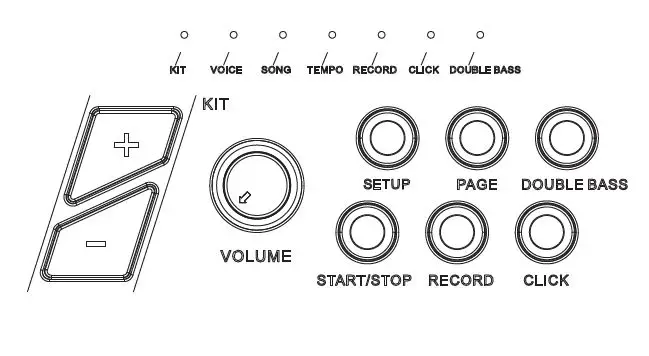
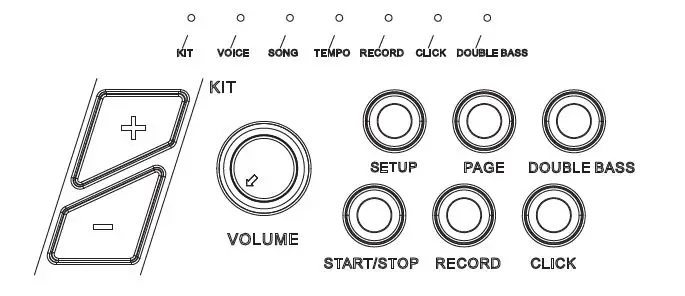
Front panel
- LED display
Displays the menu parameters. - VOLUME
Adjusts the headphone and main output volume. - SETUP
Enters setting menu, to adjust parameters of VOICE/SONG/TEMPO. Press and hold to save user presets. - PAGE
Changes sub menu of VOICE/SONG/TEMPO. - DOUBLE BASS
The hi-hat ctrl pedal becomes a 2nd bass drum. - CLICK
Turns on/off the metronome. - RECORD
Records the drum sound. - START/STOP
Starts/stops demo songs or recording. - [+/-]
Adjusts the parameters, e.g. drum kit, Voice, etc.(Hold the button to change value quickly)
Top panel
- PHONE
Stereo headphone connector. - AUXIN
External stereo input connection, e.g. MP3 or CD player. - OUTPUT
The stereo output connector to connect with audio system or drum amp, mono output. - MIDI OUT
Connects with external MIDI devices(The drum MIDI signal outputs via MIDI OUT to external audio source.) - DC-IN
Power adapter connector. - ON/OFF
Switches the power on and off.

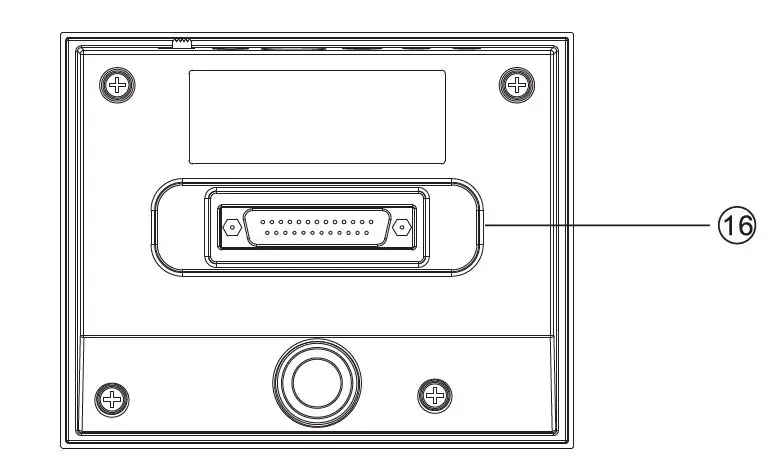
Rear panel
- Trigger in connector
D-SUB pad signal input connector.
Connect with external devices
Connect module OUTPUT socket to audio system or drum amplifier using 1/4″ jack instrument cable.
Note: The volume is controlled by the module volume knob and device volume knob.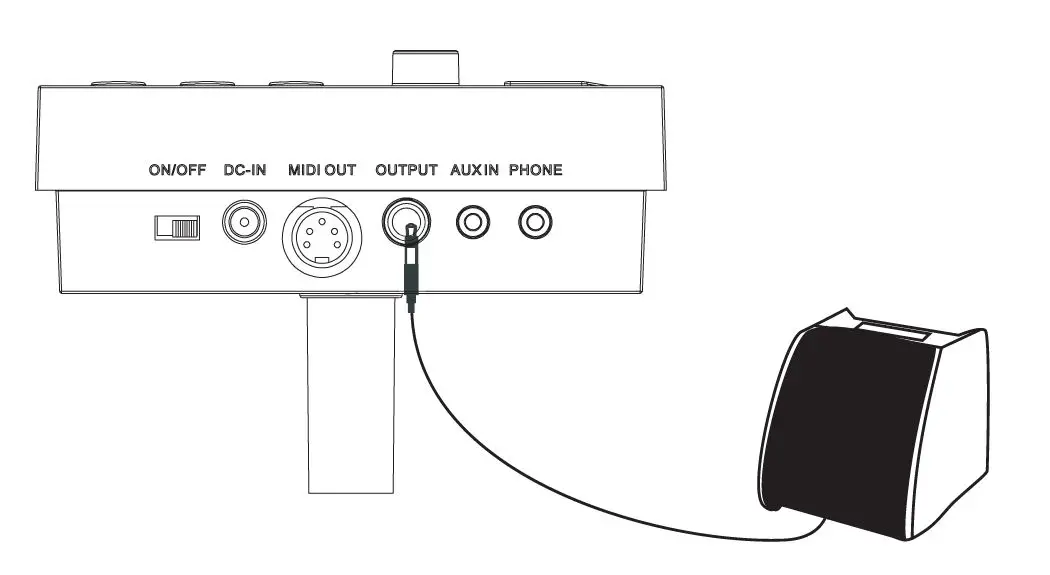
Connect with Headphones
Connect headphones with 1/8″ stereo connector, to the headphone socket on the module. The volume is controlled by the Volume knob on the module.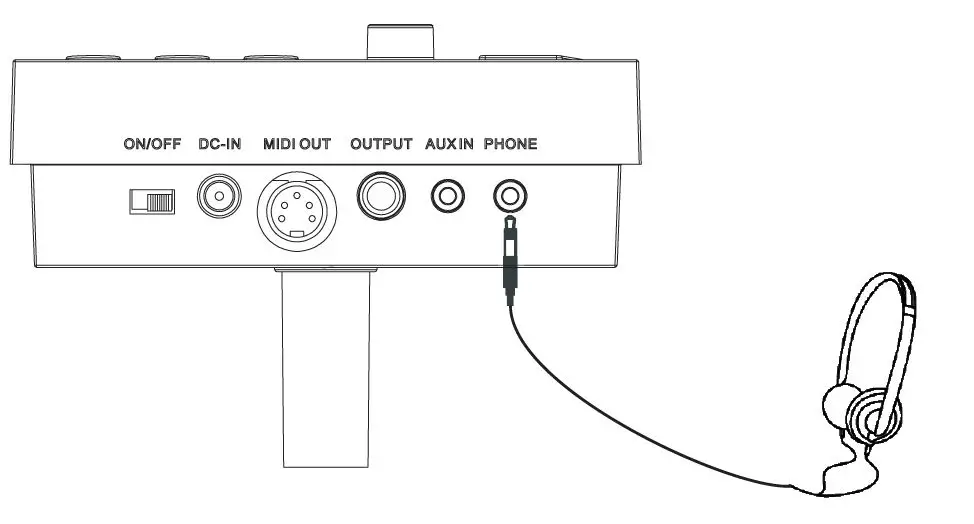
Connect with MP3 or player
connect the output of your MP3 or CD player with the INPUT socket on the module. Volume of input can be adjusted via your MP3 or CD player.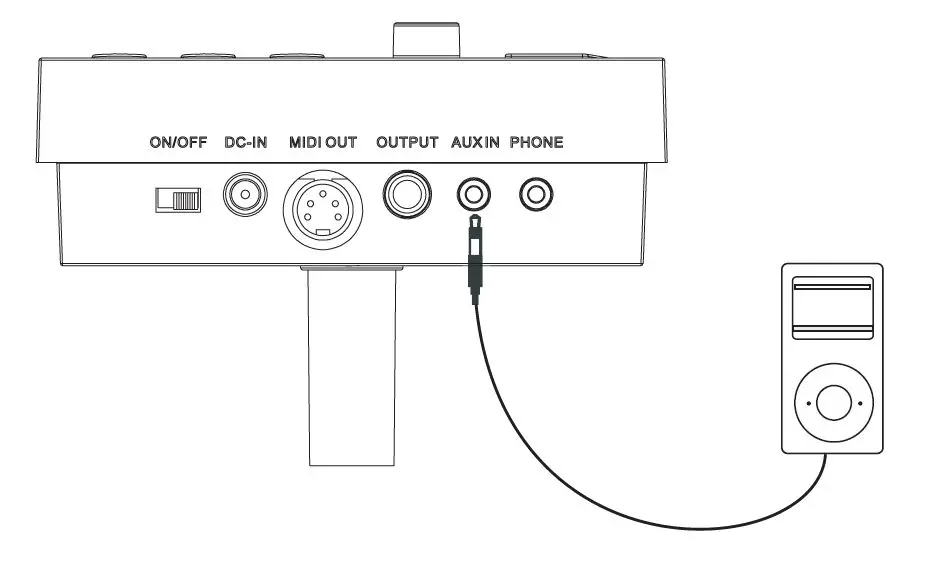
Connect with PC
Connect PC via MIDI port
MIDI OUT: delivers pad signal to PC.
Power supply
- Tum off the module power switch.
- Connect the power supply with DC IN connector.
- Confirm all the pads are correctly connected. Set the module volume to minimum, then tum on the power switch of the module. The display lights up and it enters into the drum kit menu.

Turn off the power switch before connecting with other devices.
Operation
Adjust the master volume
Strike the pads and adjust the volume knob for suitable master volume. Preset drum kit: KIT01—10
- Power on to enter drum kit selection, the KIT LED lights up(the display shows drum kit number saved last time before power-off);
- Press [SET UP] button to enter drum kit setting, the KIT LED lights up; (The corresponding mode LED will also light up in mode switch)

- In drum kit mode, LED shows the current drum kit number, press[+/-] button to switch the drum kit and select any drum kit as current drum kit.


Voice
The module has 108 voices, including the GM voices.
- Select voice you are playing.
- This change will automatically save until the module is switched off.
- To permanently save this setting to a user drum kit please refer to the next section on page 8.

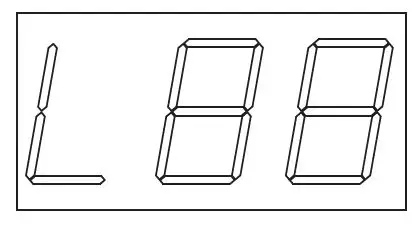
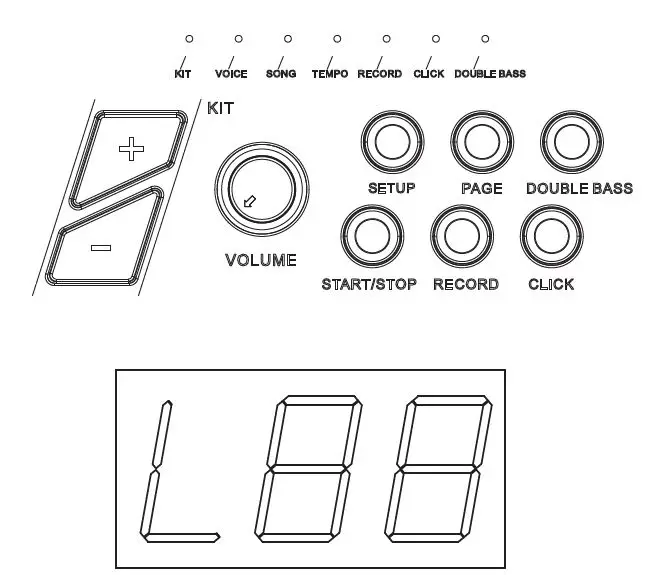
- Adjust voice volume

- In voice mode, press [Page] button to enter the voice volume adjustment (the screen will show [L- -]) Press [+/-] button to adjust the voice volume of the pad you are playing (range 0-32)
- This change will automatically save until the module is switched off. To permanently save this setting to a user drum kit please refer to the next section on page 8.

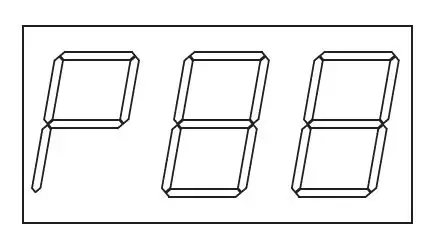
- Adjust voice pan
- In voice mode, press [Page] button again to enter the voice pan adjustment (the screen will show [P – -])
- Press[+/-] button to adjust the voice pan of the pad you are playing (range -8 Left, +8 Right) This change will automatically save until the module is switched off. To permanently save this setting to a user drum kit please refer to the next section on page 8.


Saving adjustments
When you are happy with your adjustments, press and hold the [SETUP] button. The screen will flash U01, you can now select which user preset you would like to save your new drum settings to. Use[+/-] buttons to select U01 or U02 and press the [SETUP] button again to save your adjustments. Your User kit will will now be permanently store on the module. To recall your user kit upon next use, use[+/-] buttons to select U01 or U02. To make further adjustments to your preset kits, follow the steps above.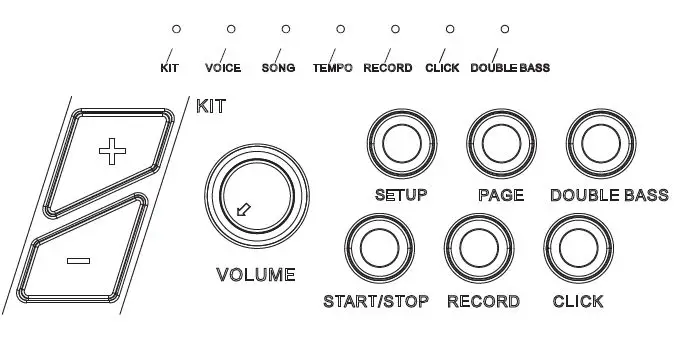
Note: If you do not wish to save your settings after entering into save mode, press any button other than [SETUP] and[+/-] to exit save mode.
Song setting
- Song selecting
- Press [SET UP] button to enter into song menu, the SONG LED lights up.
- Press[+/-] button to switch the song, range 001-010 (non-cycle);

- Song playing
- Press [START/STOP] button to play the selected song. During playing, change the song via[+/-] button. The overall volume is controlled by the module volume knob;
- Before song mode, directly press [START/STOP] button to play the song;
- After playing.songs will stop automatically; during playing, press [START/STOP] once again to stop playing.
- Accompaniment volume
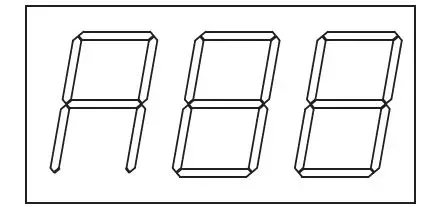
During playing, user can adjust the volume of accompaniment and the drum sound.- In song mode, press [PAGE] button to enter into accompaniment volume setting; Accompaniment: the three LED showsAXX (XX refers to accompaniment volume value);
 Percussion: the three LED shows DXX (XX refers to drum volume value); dBB
- Press[+/-] button to switch the accompaniment/volume (0-32, non-cycle).
- In song mode, press [PAGE] button to enter into accompaniment volume setting; Accompaniment: the three LED showsAXX (XX refers to accompaniment volume value);
- Tempo
- When playing DEMO SONG, press [SET UP] button to enter into Tempo setting, the TEMPO LED lights up;
- Press[+/-] button to change the song tempo.

 Percussion: the three LED shows DXX (XX refers to drum volume value); dBB
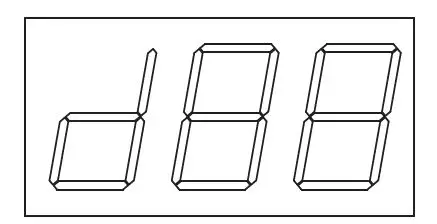
Metronome
This module has 1 click voice.
- Metronome function switch
Press [CLICK] button to open or close metronome function, after [CLICK] is pressed down, CLICK LED will light on, the three LED shows the “beats”, e.g. 4-4, press [+/-] button to switch “beats”.
Note: during playing the songs, the metronome is closed. - Click volume
After [CLICK] is pressed down, press [PAGE] button, it shows “click volume” interface, the three LED shows LXX (XX refers to volume value), press[+/-] button to switch the click volume.
Record and replay
Record quickly
- Press [RECORD] button, and [RECORD] LED lights up and flashes. It shows “REC” .
- Strike the pads to start recording or record only the drum sound of the song being played.
- Press [RECORD] button to stop recording. [RECORD] LED lights off. The song or the user’s performance has been recorded.
Note:
- During recording, the metronome function will not automatically start. If user needs to start the metronome function, user can press [CLICK] button before recording instead of pressing it after recording.
- The metronome sound can not be recorded.
- If the user is not satisfied with the recorded result, press [RECORD] to restart recording.
(Note: this module supports the recording function, but not saving function. The recorded data will cover the former data, and all the data will not be saved after the module is powered off).
Play recording
Press and hold the [RECORD] button, the RECORD LED lights up, press [START/STOP] button to replay the recorded song, press [START/STOP] button again to stop the recorded song.
MIDI setting
This equipment is compatible with various MIDI devices and can be used as trigger device or audio source. It is also compatible with part of GM standard, and can be used with many audio sequencer softwares together.
MIDI connection
MIDI OUT: sends the external MIDI signal when connecting with external MIDI devices.
Connect with external audio source equipment
This equipment can send its various information via channel 10, including: trigger notes, force, hi-hat pedal performance and status, etc.
(Note: the song replaying and metronome information can not be sent)
Use the external audio sequencer to record the performance
- Connect external audio sequencer or PC via MIDI OUT or USB.
- Set the equipment of channel 10 in the audio sequencer or in the sequence software, and then start recording.
- Play the pads.
- Stop the performance and recording, and listen to the performance.
Trouble shooting
- Problem
- Reason
- No sound
- Please confirm the volume knob is not turned off
- Pad has no sound
- confirm the pad connection is correct.
- confirm the pad volume is not set to 0
- Metronome has no sound
- Confirm the metronome volume is not set to 0
- DEMO SONG has no sound
- Confirm the DEMO SONG volume is not set to 0
Audio source specification
- Max polyphony:32
- Drum kits: 10 preset drum kits: KIT01-10
- Voice: 108 voices (DRUMS, PERCUSSION, SFX)
- Audio sequencer: DEMO SONG 10
- Recording: real time recording, but can not be saved.
- Tempo: 30bpm-280bpm
- Display: three LED (red or green)
- Connection: Phone stereo out connector(1/8″), AUX IN stereo connector(1/8″),
- Audio output connector(1/4″ L/mono),
MIDI OUT
- Power supply: DC 12V internal + external
- Dimensions: 135(L)x132.5(W)x99.5(H)
- Weight: 0.35Kg or so (the specification is subject to change without prior notice.)
LIST
DRUM KIT LIST
| NO. | PRESET DRUM KIT |
| 1 | POP1 |
| 2 | POP2 |
| 3 | ROCK |
| 4 | FUNK |
| 5 | LATIN |
| 6 | JAZZ. |
| 7 | DANCE |
| 8 | MARCHING |
| 9 | PERCUSSION1 |
| 10 | PERCUSSION2 |
VOICE LIST
| BASS DRUM | |
| NO. | NAME |
| 1 | KICK1 |
| 2 | KICK2 |
| 3 | KICK3 |
| 4 | KICK4 |
| 5 | KICK5 |
| 6 | JAZZKICK |
| 7 | ELE KICK |
| 8 | MARCHING KICK |
| SNARE | |
| NO. | NAME |
| 9 | SNARE1 |
| 10 | SNARE2 |
| 11 | SNARE3 |
| 12 | SNARE4 |
| 13 | SNARES |
| 14 | BRUSH SNARE |
| 15 | ELESNARE |
| 35 | ELETOML |
| HI-HAT | |
| NO. | NAME |
| 36 | CLOSED HH1 |
| 37 | CLOSED HH2 |
| 38 | CLOSED HH3 |
| 39 | CLOSED HH4 |
| 40 | CLOSED HH5 |
| 41 | CLOSED HH6 |
| 42 | ELE CLOSED HH |
| 43 | OPEN HH1 |
| 44 | OPEN HH2 |
| 45 | OPEN HH3 |
| 46 | OPEN HH4 |
| 47 | OPEN HH5 |
| 48 | OPEN HH6 |
| 49 | ELE OPEN HIHAT |
| 50 | HHP1 |
| 51 | HHP2 |
| 69 | SCRATCH PULL |
| 70 | STICK |
| 71 | SQUARE CLICK |
| 72 | METRONOME CLICK |
| 73 | METRONOME BELL |
| 74 | HAND CLAP |
| 75 | TAMBOURINE |
| 76 | COWBELL |
| 77 | VIBRASLAP |
| 78 | HI BONGO |
| 79 | LOW BONGO |
| 80 | MUTE HI CONGA |
| 81 | OPEN HI CONGA |
| 82 | LOW CONGA |
| 83 | HI TIMBALE |
| 84 | LOWTIMBALE |
| 85 | HIAGOGO |
| 86 | LOWAGOGO |
| 87 | CABASA |
| 16 | MARCHING
SNARE |
| 17 | SIDESTICK |
| TOM | |
| NO. | NAME |
| 18 | TOM1H |
| 19 | TOM1M |
| 20 | TOM1L |
| 21 | TOM2H |
| 22 | TOM2M |
| 23 | TOM2L |
| 24 | TOM3H |
| 25 | TOM3M |
| 26 | TOM3L |
| 27 | TOM4H |
| 28 | TOM4M |
| 29 | TOM4L |
| 30 | BRUSHTOMH |
| 31 | BRUSHTOMM |
| 32 | BRUSH TOML |
| 33 | ELETOMH |
| 34 | ELETOMM |
| 52 | HHP3 |
| 53 | HHP4 |
| 54 | HHP5 |
| CYMBAL | |
| NO. | NAME |
| 55 | CRASH1 |
| 56 | CRASH2 |
| 57 | CRASH3 |
| 58 | SPLASH CYMBAL |
| 59 | MARCHING
CYMBAL |
| 60 | ELE CYMBAL |
| 61 | RIDE1 |
| 62 | RIDE2 |
| 63 | ELE RIDE |
| 64 | RIDE BELL1 |
| 65 | RIDE BELL2 |
| PERCUSSION | |
| NO. | NAME |
| 66 | HIQ |
| 67 | SLAP |
| 68 | SCRATCH PUSH |
| 88 | MARACAS |
| 89 | SHORT HI WHISTLE |
| 90 | LONG LOW WHISTLE |
| 91 | SHORTGUIRO |
| 92 | LONGGUIRO |
| 93 | GLAVES |
| 94 | HI WOOD BLOCK |
| 95 | LOW WOOD BLOCK |
| 96 | MUTECUICA |
| 97 | OPEN CUICA |
| 98 | MUTED TRIANGLE |
| 99 | OPEN TRIANGLE |
| 100 | SHAKER |
| 101 | JINGLE BELL |
| 102 | BELL TREE |
| 103 | CASTANETS |
| 104 | MUTEDSURDO |
| 105 | OPEN SURDO |
| 106 | TIMPANI1 |
| 107 | TIMPANl2 |
| 108 | TIMPANl3 |
GM PERCUSSION LIST
| Note No. | Standard name | Voice No. | Voice Name |
| 27-D#1 | High Q | 66 | High Q |
| 28- E1 | Slap | 67 | SLAP |
| 29-F1 | Scratch Push | 68 | SCRATCH PUSH |
| 30-F#1 | Scratch Pull | 69 | SCRATCH PULL |
| 31-G1 | Sticks | 70 | STICKS |
| 32-G#1 | Square Click | 71 | CLIP |
| 33-A1 | Metronome Click | 72 | METRONOME CLICK |
| 34-A#1 | Metronome Bell | 73 | METRONOME BELL |
| 35-B1 | Acoustic Bass Drum | 3 | ACKICK |
| 36-C2 | Bass Drum 1 | 1 | KICK1 |
| 37-C#2 | Side Stick | 17 | SRSTD |
| 38-D2 | Acoustic Snare | 9 | SNCOMBO3 |
| 39-D#2 | Hand Clap | 74 | CLAP1 |
| 40-E2 | Electric Snare | 15 | ESN7 |
| 41-F2 | Low Floor Tom | 26 | TOMMSTD |
| 42-F#2 | Closed Hi Hat | 36 | CHH3 |
| 43-G2 | High Floor Tom | 20 | TOM8 |
| 44-G#2 | Pedal Hi-Hat | 50 | PHH2 |
| 45-A2 | Low Tom | 19 | TOM1 |
| 46-A#2 | Open Hi-Hat | 43 | OHHSTD |
| 47-B2 | Low-Mid Tom | 28 | TOM7 |
| 48-C3 | Hi-Mid Tom | 18 | TOM6 |
| 49-C#3 | Crash Cymbal 1 | 55 | CRSHSTD1 |
| 50-D3 | High Tom | 27 | TOM3 |
| 51-D#3 | Ride Cymbal 1 | 61 | RIDESTD |
| 52-E3 | Chinese Cymbal | X | CNCYMBAL |
| 53-F3 | Ride Bell | 64 | RBLLSTD |
| 54-F#3 | Tambourine | 75 | TMBRN1 |
| 55-G3 | Splash Cymbal | 58 | SPLSH1 |
| 56-G#3 | Cowbell | 76 | COWBLL1 |
| 57-A3 | Crash Cymbal 2 | 57 | LTCRSH1 |
| 58-A#3 | Vibraslap | 77 | VSLP03 |
| 59-B3 | Ride Cymbal 2 | 62 | RIDE1 |
| 60-C4 | Hi Bongo | 78 | HIBNGO01 |
| 61-C#4 | Low Bongo | 79 | LOBNGO |
| 62-D4 | Mute Hi Conga | 80 | MHCNGA |
| 63-D#4 | Open Hi Conga | 81 | OHCNGA01 |
| 64-E4 | Low Conga | 82 | LOCNGA01 |
| 65-F4 | High Timbale | 83 | HTMBL1 |
| 66-F#4 | Low Timbale | 84 | L0TMBL1 |
| 67-G4 | High Agogo | 85 | HAGOGO1 |
| 68-G#4 | Low Agogo | 86 | LAGOGO1 |
| 69-A4 | Cabasa | 87 | CABASA1 |
| 70-A#4 | Maracas | 88 | MRCAS1 |
| 71-B4 | Short Whistle | 89 | SWHSL1 |
| 72-C5 | Long Whistle | 90 | LWHSL1 |
| 73-C#5 | Short Guiro | 91 | SGUIRO |
| 74-D5 | Long Guiro | 92 | LGUIRO |
| 75-D#5 | Claves | 93 | CLV |
| 76-E5 | Hi Wood Block | 94 | HWBLK |
| 77-F5 | Low Wood Block | 95 | LWBLK |
| 78-F#5 | Mute Cuica | 96 | MCUICA |
| 79-G5 | Open Cuica | 97 | OCUICA |
| 80-G#5 | Mute Triangle | 98 | MTRNGL |
| 81-A5 | Open Triangle | 99 | OPNTRNGL |
| 82-A#5 | Shaker | 100 | SHAKER |
| 83-B5 | Jingle Bell | 101 | JINGLEBELL |
| 84-C6 | Bell Tree | 102 | BELLTREE |
| 85-C#6 | Castanets | 103 | CASTANETS |
| 86-D6 | Mute Surdo | 104 | MUTESURDO |
| 87-D#6 | Open Surdo | 105 | OPNSURDO |
DEMO SONG LIST
| NO. | NAME | METER |
| 1 | FUNK | 4/4 |
| 2 | ROCK1 | 4/4 |
| 3 | ROCK2 | 4/4 |
| 4 | METAL | 4/4 |
| 5 | SLOWROCK | 6/8 |
| 6 | BLUES | 4/4 |
| 7 | COUNTRY | 4/4 |
| 8 | BOSSA | 4/4 |
| 9 | REGGAE | 4/4 |
| 10 | WALTZ | 3/4 |
SDUNDKING AUDIO
www.SOUNDKING.COM
All rights r..vad to SOUNDKIIIG.
No pert of thi• manual may be reproducad, tranalatad or photocopied by any maa,. far any p….-. without th• writta1 panniaion of SOUNDKIIIG. The infonn.tion involved in this manual is .,bject to change without notice.


