![]()
Strex Wildlife Camera
User manual SP48
Thanks for choosing Strex! Read the manual carefully for correct and safe operation of the product. Always follow these instructions for safe usage.
If you have any questions about the product or encounter problems, you can contact us by email: [email protected]
INTRODUCTION
Thanks for choosing Strex! Read the manual carefully for correct and safe operation of the product. Always follow these instructions for usage. If you have any questions about the product or encounter problems, you can contact us by email: [email protected]
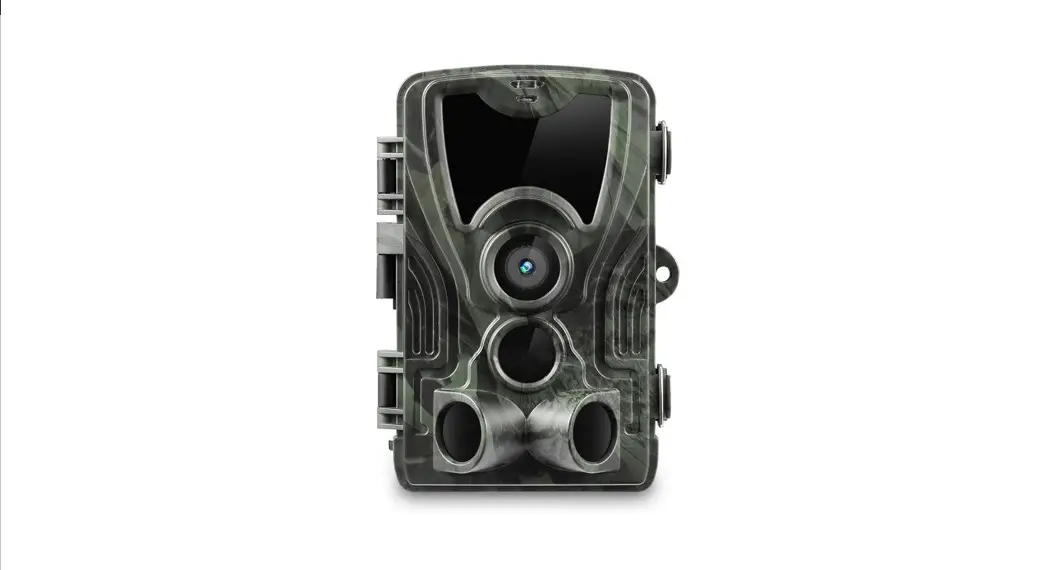
Strex Wildlife Camera
For professionals, hobbyists, hunters and nature lovers Whoever or whatever you want to observe, the reliable Strex Wildlife Camera can bring you closer than ever. During the day or at night, take a look at the vibrant animal world and record the animals, their behavior and other details. This way you know exactly what is really happening when there are no people around.
Getting started
The illustrations in this manual have been created with care. However, some parts of the product may differ from the illustration shown in this manual. In that case, Strex is not obliged to adjust the part or the manual. This manual is intended for the end user of the product. Using the table of contents on the next page you can find the necessary information in the manual.
![]() WARNING
WARNING
Improper use of this product and accessories are dangerous to you and others and can damage, destroy or cause a serious accident. We therefore ask you to read the manual carefully and to read and strictly observe the danger, safety and warning messages.
PRODUCT INTRODUCTION
Some tips before you start
- If a DC power adapter is used to power the camera, please make sure there are NO batteries in the camera in order to prevent overcharging. This will cause permanent damage to the wildlife camera
- Do not dip or submerse the wildlife camera underwater.
- The configuration of the wildlife camera should be done when in “TEST” mode. The “ON” mode is only used when the installation is complete and ready for real world use.
- If you observe a red flash when you take photos, please turn the switch from “TEST” to “ON”
- For best performance do not mix old batteries and new batteries.
- The camera can work in temperatures of up to 70°C but please keep the camera far enough from fire to protect the batteries.
- To change the menu language first enter settings mode (slide mode switch to “TEST”) then click on the menu button and go to language to select the desired language.
- After you turn the switch from “TEST” to “ON”, you will observe a countdown from
10 seconds to 0 seconds then the screen will shut down. This is completely normal. You can walk in front of the camera to check if it takes photos and videos.
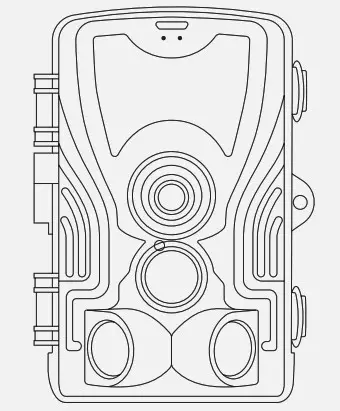
Structure
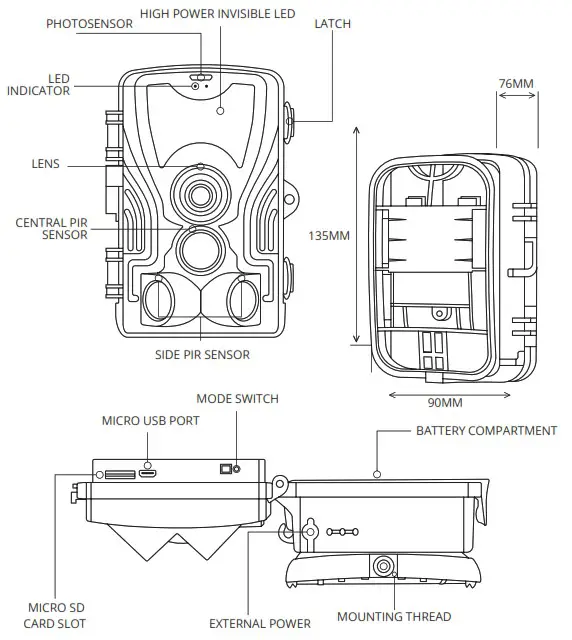
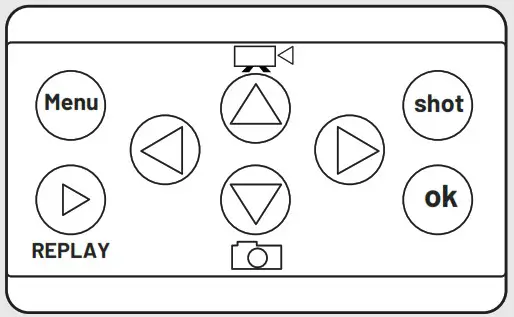
STREX WILDLIFE CAMERA
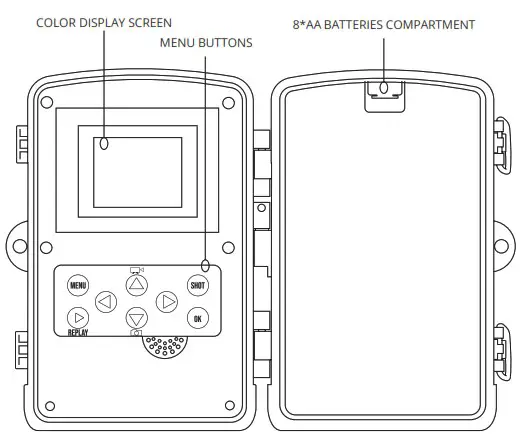
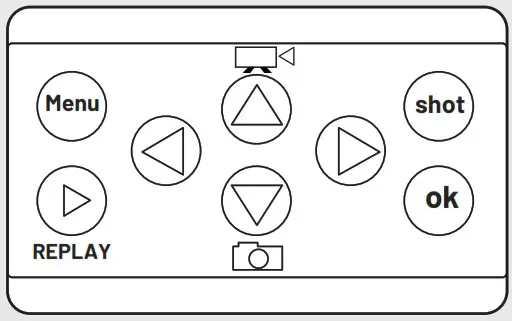
MENU BUTTONS
| MENU | Open the settings menu |
| REPLAY | Start replay mode (show saved photos / videos) |
| SHOT | Manually take a photo or video depending on the configured recording mode. Videos are also stopped by pressing the SHOT button. |
| OK | Confirm / select button |
| Menu go left | |
| Menu go right | |
| Menu go up (or manual video recording mode) | |
| Menu go down (or manual photo recording mode) |
Specifications
| Photo Resolution | 30MP / 24MP / 20MP / 16MP / 12MP |
| Video Resolution | 4K / 2K / 1080P / 720P / 480P (VGA) |
| Detection Angle | Up to 120° |
| Detection Distance | Up to 20 meters |
| IR LED Wavelength | 940nm (Low Glow) |
| IR LED Quantity | 36 pcs |
| Trigger Speed | 0.2 seconds |
| Waterproof Level | IP65 |
| Working Temperature | -20°C to +70°C |
| Memory Card Type | Up to 256GB TF Card (Class 10) |
| Power Supply Type | Battery / External |
| Battery Type | AA battery (4/8pcs) |
| Working Voltage | 6V |
| External Power Supply | DC 6V 1.5A |
| Standby Time | Up to 6 Months |
| Photo Format | JPG |
| Video Format | MP4 / H.264 |
| Screen Size | 2.0” TFT |
| Size | 135x90x77mm |
| Weight | 0.38 KG |
Installation guide
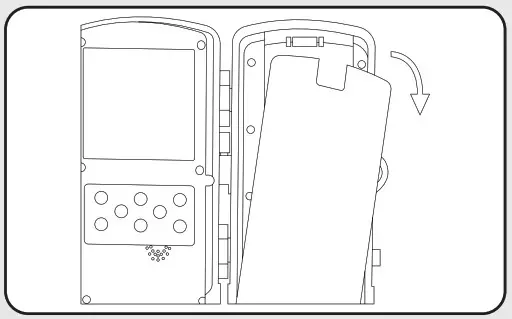 | 1. Battery installation Open the battery cover and insert 8* AA batteries. Make sure the batteries are correctly placed (pos+ / neg-) Do not insert any batteries when using a DC power adapter. This will cause permanent damage to the camera! |
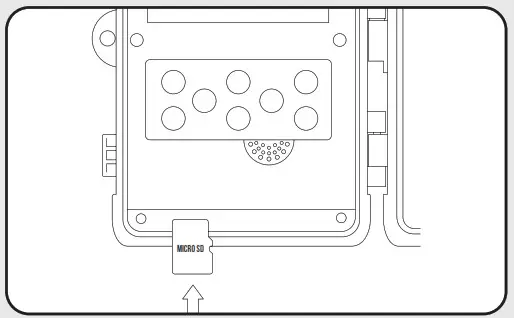 | 2. Memory card installation Insert the micro SD memory card in the designated slot with the contacts (gold plating) facing away. The micro SD card should slide in freely with little resistance. Continue pressing the card inward until you hear a click. The microSD card is now locked in place and ready for use. |
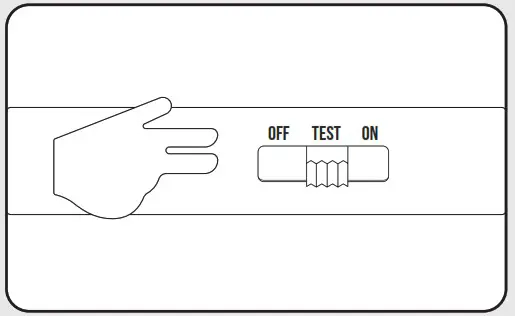 | 3. Enter TEST mode Slide the mode switch to “TEST” to activate the camera and view the setup screen. While in TEST mode you are able to change all settings to the desired settings and also view previous recordings. |
 | 4. Adjust desired settings While in the “TEST” modus click the “MENU” button. While in the menu you can configure all options to your desired settings. See the chapter “Settings” for all available options. |
 | 5. Enter ON mode After you have completed all settings slide the mode switch to “ON” to enter working mode. The screen will countdown 10 seconds and then go black. The camera is now in auto working mode and will start taking photos and videos based on the configured settings immediately. |
Review footage
 | Option 1: On the device Slide the mode switch to “TEST”. Then click on the “REPLAY” button to view all images and videos. Use the menu buttons to navigate through all the footage. |
 | Option 2: microSD card Shut off the camera and take the microSD card out of the camera. You can now insert the microSD card into a suitable device such as TV, PC or Laptop to review all footage. |
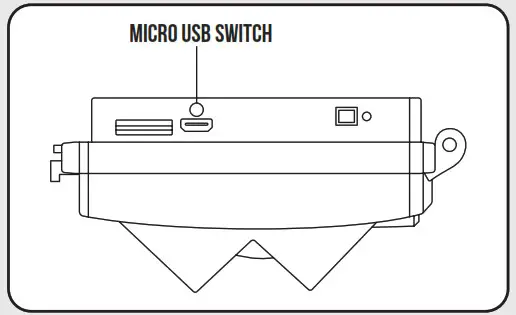 | Option 3 : USB connection Connect the camera to a PC or laptop using the micro USB cable. You can now review all footage on the connected device. |
Settings
| Setting | Description | Options |
| Mode | Choose the operation mode | Camera, Video Camera & Video Time Lapse |
| Resolution | Choose the resolution for the videos | 4K/ 2K/1080P/ 720P / 4.30P (VGA) |
| Video length | Choose the length of the video | 5s / 10s / 30s / 60s / 90s |
| Record audio | Choose to record audio when taking videos | Off / On |
| Image Size | Choose the resolution for the photos | 30MP / 24MP / 20MP /16MP/12MP |
| Interval | Time between 2 detection moments | 1s/10s/ 10m/3m/Sm 10m/ 15m/ 30m |
| Time Lapse | The time interval between each time lapse shot taken | 5m / 30m / 1 h / 2h / 3h / 6h/ 12h/ 24h |
| Sequence | Amount of photos to take on each trigger | single /3/6/9 |
| ISO | Adjust the exposure level | Auto / 100 / 200 /400 |
| Overwrite | Overwrite old recordings when the memory is full | Off / On |
| PIR Sensitivity | Adjust the PIR sensors sensitivity | Low / Medium / High |
| Language | Set a different language | English, Francais, Deutsch, Italiano, Espanol, Portuguese Hrvatski, Dansk, Svenska, Suomi, Polski, Pyccknn, Dutch |
| Frequency | LCD screen refresh rate | 50Hz / 60Hz |
| TV Mode | Set TV mode | NTSC / PAL |
| Camera ID | Choose your own camera ID | 6 numbers / letters |
| Password | Set a password to protect your camera (default password = 1314) | 4 numbers |
| Timer | Choose when the camera should be active | 00:00:00 – 23:59:59 |
| Date/Time | Set the current date and time | DD/MMNY |
| Format | Format the memory card ALL DATA WILL BE DELETED | Cancel / OK |
| Default Setting | Restore all settings to factory default | Cancel / OK |
Troubleshooting
Camera doesn’t capture the desired objects
- Check the PIR sensitivity. For warm environments set the “PIR sensitivity” setting to “LOW” and for cold environments set the “PIR sensitivity” setting to “HIGH”
- Try to install the camera in an area where there are no external heat sources in the camera’s field of view.
- In some cases placing the camera near water will cause false positives / empty shots.
- Try to install the camera on stable and immovable objects such as large trees.
- At night the motion detector may detect movement beyond the illumination range of the LED’s. Try reducing this distance by adjusting the “PIR sensitivity” setting.
- Rising sun or sunset can cause the sensor to trigger. Try reorienting the camera.
- If a person or animal moves very quickly, it may move out of the camera’s field of view before the photo/video is taken. Try moving the camera further back to get a larger field of view.
- Placing the camera behind glass will impact the PIR sensor.
Camera stops taking photos/videos
- Make sure that the memory card has enough storage space. If the memory card is full the camera will stop taking photos/videos.
- Check the batteries to make sure there is enough power left. If the battery’s power level is too low the camera will stop functioning.
- Make sure that the camera’s mode switch is on “ON” and not on “OFF” or “TEST”. The “TEST” mode should only be used for changing the configuration or viewing photos/videos.
- Sometimes memory cards will get corrupted. Try formatting the memory card or using another memory card.
Night vision doesn’t meet my expectations
- The camera requires 8*AA batteries in order to use night vision. Using just 4*AA batteries will only support operation during daytime.
- Make sure the batteries have enough power. If the batteries are below 30% power level night vision will not work.
- High-quality 1.5V NiMH or lithium rechargable batteries offer better performance than regular alkaline batteries.
- To ensure accuracy and quality of night vision photos/videos mount the camera in a dark enviroment without any obvious external light sources.
- Placing the camera between certain surroundings such as trees, walls, bushes, and ground within the IR LED’s range will result in better performance compared to placement in an open field. If the camera is placed in an open field the IR LED’s will have nothing to reflect the light back on to.
Manual information
All rights reserved. No part of this publication may be reproduced, distributed, or transmitted in any form or by any means, including photocopying, recording, or other electronic or mechanical methods, without the prior written permission of the publisher, except in the case of brief quotations embodied in critical reviews and certain other noncommercial uses permitted by copyright law. For permission requests at the address below.

SBD Trading B.V. (Strex Europe)
Noorwegenstraat 6-A4
7418BC Deventer
The Netherlands
[email protected] ● www.strex.nl
© Strex 2021


