![]()
T10 4K GPS Car Camera
PACKAGE CONTENTS
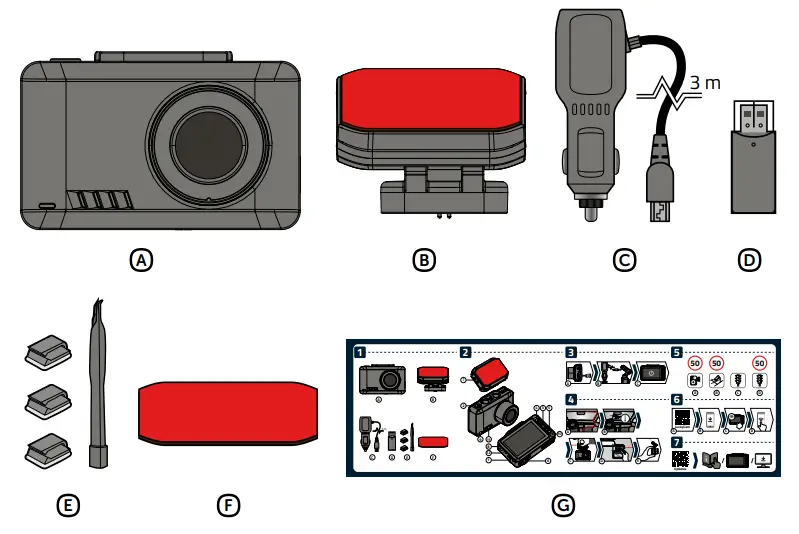
A. LAMAX T10 dashcam
B. Magnetic 3M mount with GPS
C. Cigarette lighter adapter with extra USB port
D. MicroSD card reader for transferring files to PC
E. 3M cable clips (3x) + cable tool
F. Replacement 3M adhesive pad for mount
F. User manual
CAMERA INTRODUCTION / CONTROLS
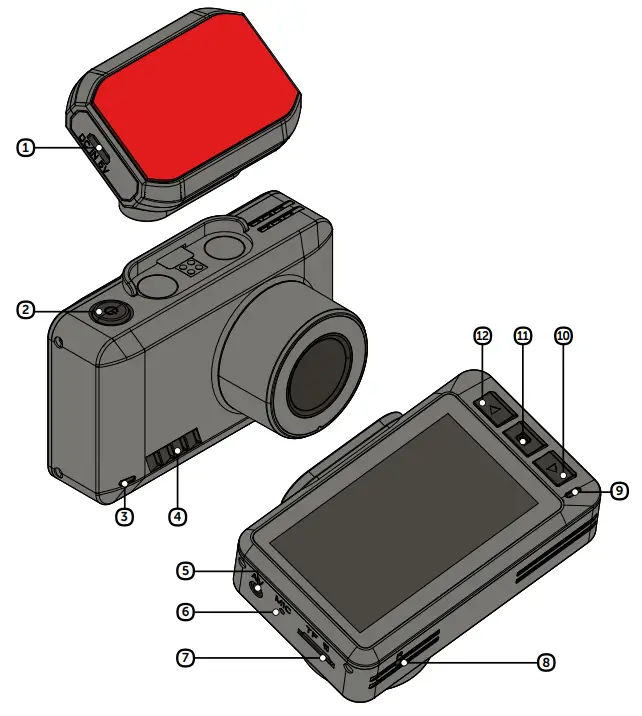
- Micro USB port for power supply
- POWER / OK button
- Camera power LED (lit blue = camera on)
- Speaker
- AV port to connect rear camera (optional)
- Microphone
- Memory card slot
- RESET button
- Recording LED (flashing blue = recording, lit red = not recording)
- DOWN button
- MENU button
- UP button
AT ALL TIMES
| POWER / OK button | Hold | Camera On/Off |
| MENU button | Press | Open menu |
| MENU button | Hold | Switch between video / photo / gallery mode |
| UP button | Hold | Turn WiFi On/Off |
| RESET | Press with paperclip | Restart camera |
VIDEO MODE
| POWER / OK button | Press | Start/Stop recording |
| MENU button | Press | Protect recording from being overwritten |
| Press | Toggle between front/rear camera display | |
| Hold | WiFi On/Off | |
| Press | Mute/Unmute audio recording | |
| Hold | Parking mode On/Off |
PHOTO MODE
| POWER / OK button | Press | Shutter |
| UP button | Hold | Zoom in |
| DOWN button | Hold | Zoom out |
GALLERY MODE
| POWER / OK button | Press | Start/Pause playback |
| UP button | Press | Browse files Change playback speed |
| DOWN button | Press | Browse files Change playback speed |
MENU
| POWER / OK button | Press | Confirm |
| MENU button | Press | Switch between menu mode / camera menu Close menu |
| UP button | Press | Navigate the menu |
| DOWN button | Press | Navigate the menu |
BASIC SETTINGS AND FUNCTIONS
| Video mode | G-sensor sensitivity | ||
| Photo mode | G-sensor off | ||
| Gallery mode | Memory card detected | ||
| Recording | Memory card missing | ||
| Protected file | Dashcam plugged into power | ||
| Parking mode activated | Battery status | ||
| WDR on | GPS not available | ||
| Set loop length | GPS is connecting | ||
| Microphone on | GPS connected | ||
| Microphone off | WiFi on | ||
| White balance setting | WiFi turning on |
SETTING UP FOR THE FIRST TIME
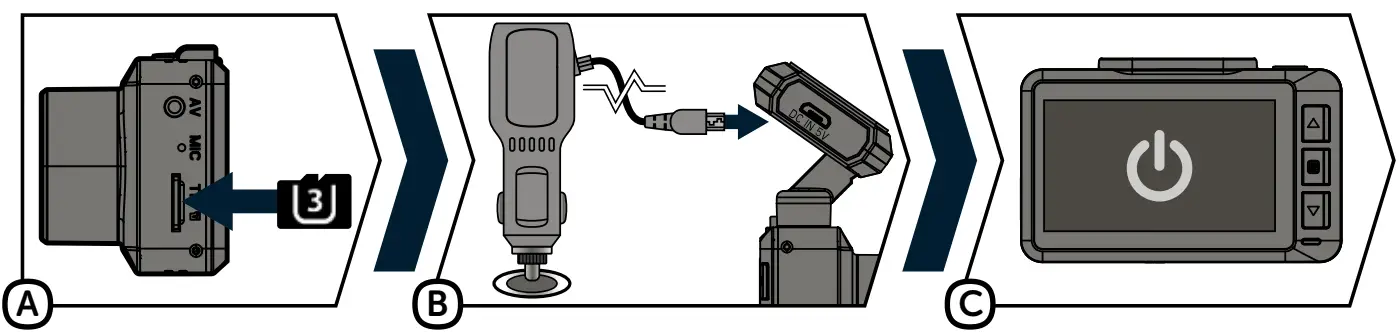
A Insert the microSD card into the camera as shown (card pins towards the display).
› Use SD cards from reputable manufacturers of Class U3 and higher with a capacity of up to 128 GB.
› Remove the card only when the camera is off.
› The first time you use the card, format it directly in the camera and repeat the formatting at least once a month to ensure proper camera operation.
B Plug the adapter into the cigarette lighter and with a USB cable, connect it to the camera mount.
› The camera is designed for use only when connected to a power supply.
C The dashcam turns on automatically and starts recording.
› For some vehicles, it is necessary to start the ignition first.
PLACEMENT ON THE WINDSCREEN
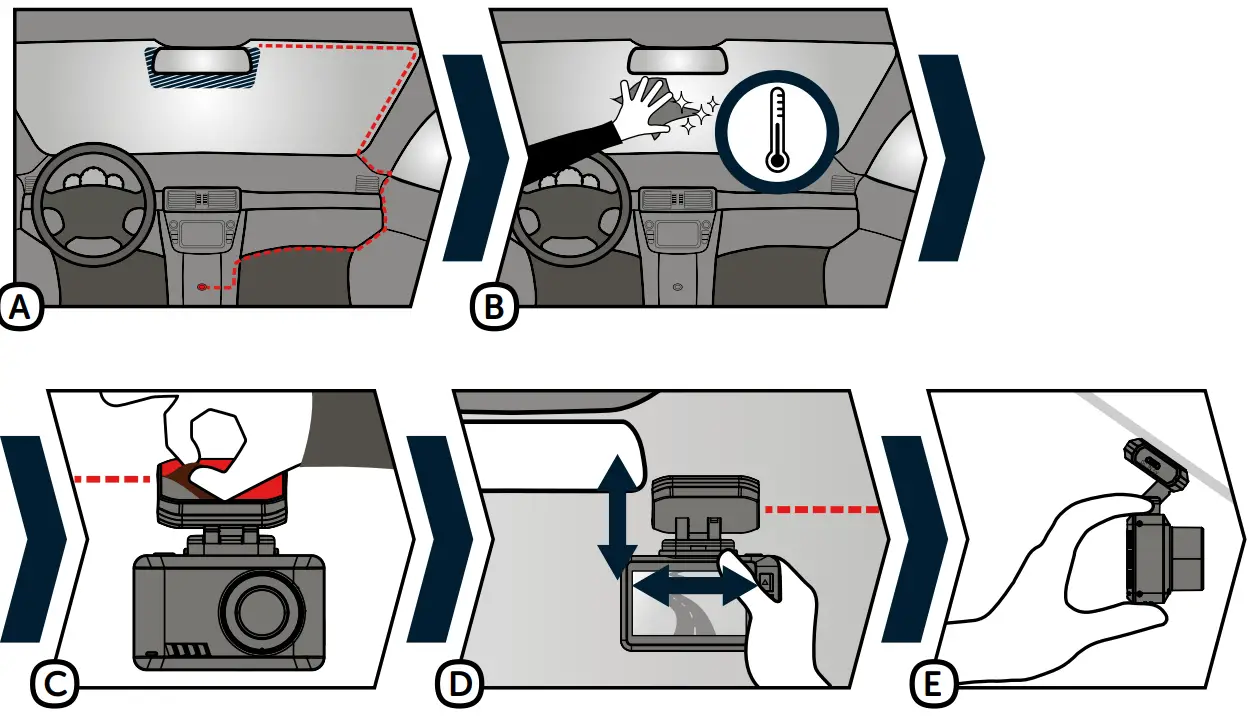
A The ideal place to attach the dashcam is the space between the windscreen and the rearview mirror so that it does not obstruct the driver’s view.
B Make sure the glass at the point of attachment is clean and dry.
› Ideal temperature for adhesion is 20°C – 40°C.
C Remove the film from the 3M adhesive pad on the camera mount.
D Before attaching to the glass, adjust the camera whilst switched on to make sure it has a good view.
E Press the 3M adhesive pad onto the glass and hold for a while.
VIDEO SETTINGS
| Speed Camera Alert | Allows the reporting of stationary speed cameras from the uploaded database. |
| Parking mode | If an impact is detected by the G-sensor, the camera automatically turns on and starts recording. After 30 seconds the recording will be saved, protected and the camera will turn off again. When parking mode is activated, the display is turned off so as not to attract attention. The sensitivity setting of the G-sensor is the same as when recording conventionally. Use the parking mode function with the power supply disconnected! |
| Audio recording | Allows you to mute or unmute the microphone when recording video. This can be done quickly by pressing the DOWN button. |
| Loop length | Sets the length of each individual recording. The camera records a 1-5 minute video in a loop. If the memory card becomes full, the dashcam will start overwriting the oldest recordings. The individual videos follow each other smoothly. |
| Resolution | Higher resolutions ensure better recording, but also larger file sizes. Higher FPS ensures smoother video. |
| G-senzor | Thanks to the G-sensor, the camera can detect an impact, for example in a traffic accident. As soon as the camera detects an impact, it immediately protects the shot currently being recorded against being overwritten. |
| WDR | Thanks to the WDR function, the dashcam captures the image better in a wide contrast ratio. This means the camera better handles situations where parts of the image are more or less illuminated. A typical example may be the contrast between light and shade or a road at night with the headlights of oncoming cars. |
| Exposure | Adjusts the camera exposure to optimize video brightness. |
| Date Stamp | Sets whether to display date on the video. |
| GPS Stamp | Sets whether to display GPS coordinates on the video. |
| Speed Stamp | Sets whether to display speed on the video. |
| Speed Units | Sets the speed unit in the camera. |
GENERAL SETTINGS
| WiFi | WiFi is used to connect the camera to the mobile application. In the app, you can edit some of the settings of your dashcam, control front and rear camera recording, and download videos to your smartphone. |
| Screensaver | Sets the screen to turn off automatically when you are not operating the camera. The time intervals are 1–5 minutes, or the screensaver can be switched off completely. |
| Auto Power Off | Allows you to set the dashcam to turn off automatically when idle after 1, 3, or 5 minutes. |
| System Sounds | Allows you to switch ON or OFF the key sound and the welcome tone. |
| Language | Sets the preferred language of the camera operating system. |
| Time / Date | Allows you to manually set the current date and time. The dashcam synchronizes the time and date automatically as soon as the GPS module in the camera holder is connected to the GPS signal. |
| Timezone | In this setting you can change the time zone. |
| Daylight Saving Time | When this function is turned on, the time automatically adjusts when daylight savings time begins or ends. |
| Format SD-Card | This feature deletes all photos and videos on the camera. Attention, this even includes protected files! We recommend formatting at least once a month. |
| Default Settings | Allows you to reset the camera settings to factory settings. |
| FW Version | Learn about the currently installed firmware version. |
PHOTO SETTINGS
| Resolution | Higher resolutions ensure better recording but larger file sizes. |
| Quality | Higher quality settings ensure better recording but larger file sizes. |
| Exposure | Adjusts the camera exposure to optimize photo brightness. |
| Date Stamp | Allows you to set the date to appear on the photo. |
GALLERY OPTIONS
| Delete | Allows you to delete one or all unprotected recordings in the camera. |
| Protect | Allows you to lock (protect) or unlock entries. |
| Slide Show | Automatic viewing of files at a set interval. |
SPEED CAMERA ALERT
› GPS status is indicated by an icon ![]() in the lower left corner of the camera display.
in the lower left corner of the camera display.
› When the GPS is connected to the satellites, the icon turns green![]() .
.
› The GPS module records speed, GPS coordinates and warns of fixed speed cameras and red light cameras.
› The database contains more than 40,000 fixed speed cameras throughout Europe.
ICON DESCRIPTION
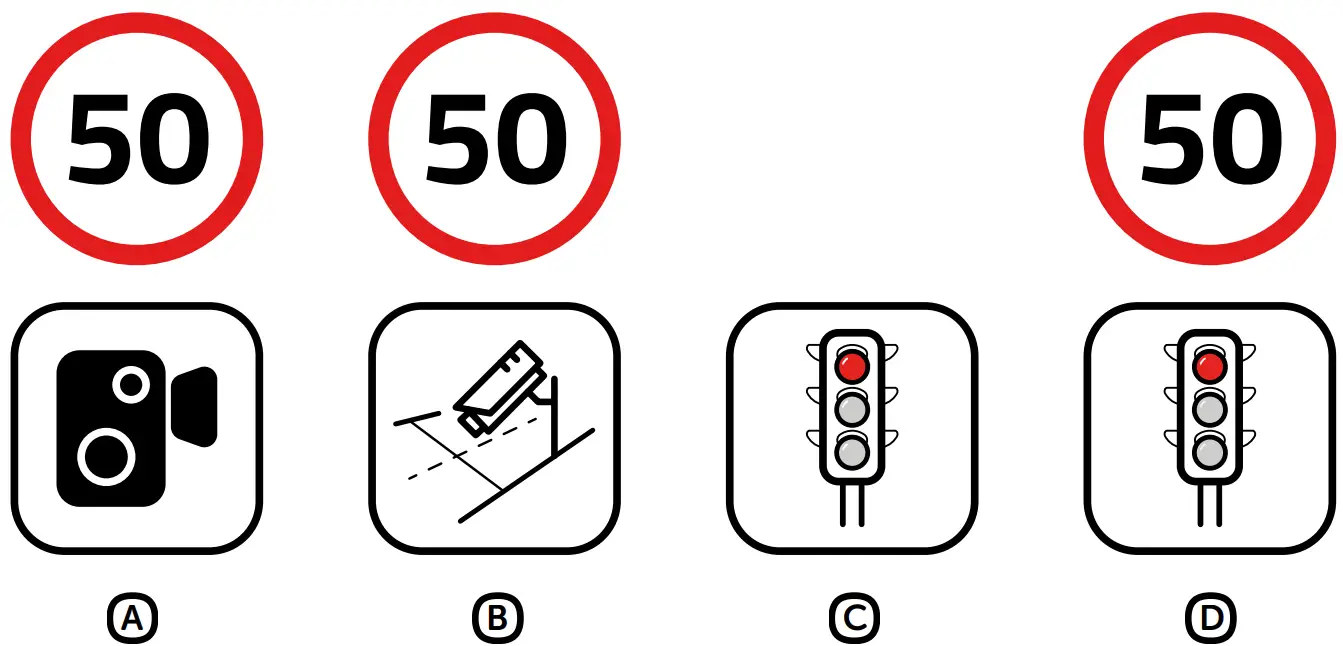
A Speed camera
B Average speed camera
C Red light camera
D Red light speed camera
AUDIBLE NOTIFICATIONS
› Approaching speed camera – beep
› At the speed camera / beginning of average speed measurement – ascending tone
› End of average speed measurement – descending tone
WIFI APPLICATION
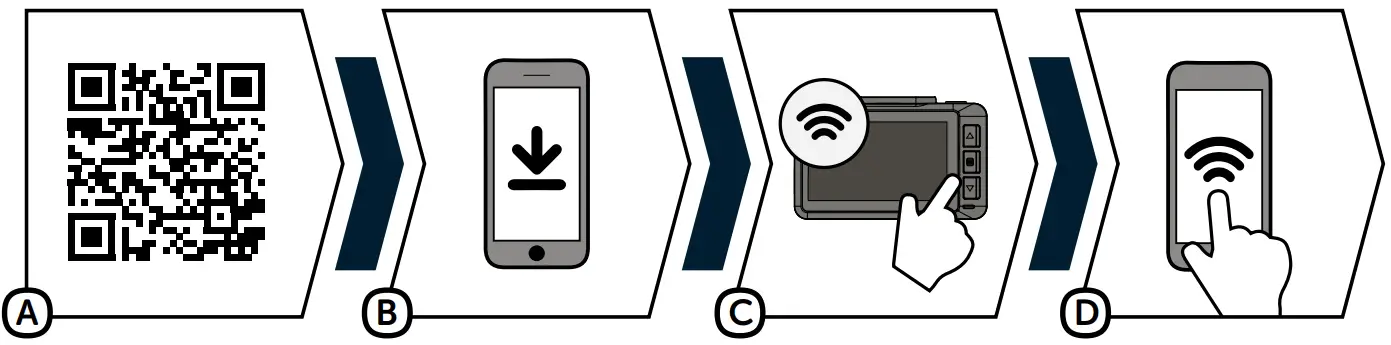
A Scan the QR code or use the link: https://www.lamax-electronics.com/t10/app
B Install the application on your smartphone or tablet.
C Turn on WiFi in the camera settings menu – the display will show the network name (SSID) and WiFi password (PWA2).
D On your phone or tablet, connect to the WiFi network with the name of the camera, enter the password (the factory default is 12345678), start the application and connect to the camera.
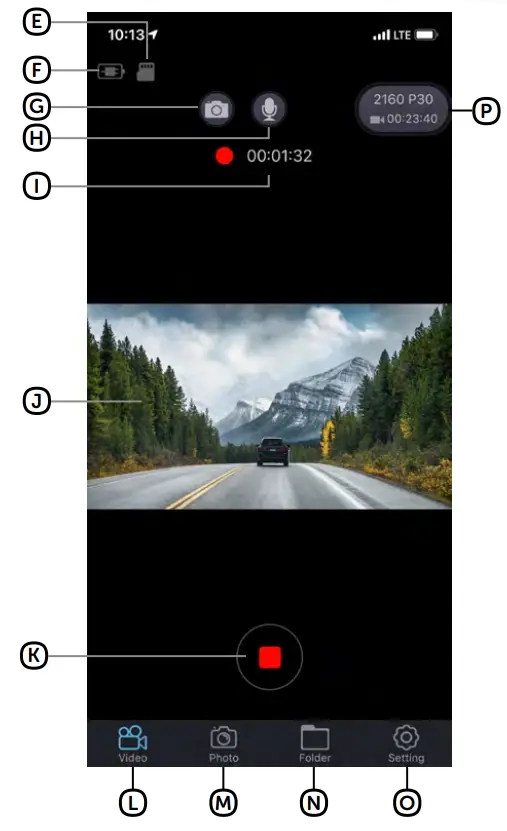
APP CONTROLS
E Memory card status
F Battery status
G Audio recording on / off
H Take photo
I Recording time
J Live video preview
K Recording on / off
L VIDEO mode
M PHOTO mode
N Files in camera
O Enter camera settings
P Resolution settings + remaining time until SD card is full
INSTALLING THE REAR CAMERA (OPTIONAL)
- The ideal location for the rear camera is the upper center part of the rear window.
- Make sure that the glass is clean and dry at the attachment point.
- Remove the film from 3M adhesive pad on the camera holder.
- Before attaching it to the glass, point the camera to capture best view.
- Press the 3M adhesive pad onto the glass and hold it for a while.
- Connect the rear camera to the switched off front camera with the connecting cable.
The cable can be easily hidden in the interior under the roof upholstery. Guide it sideways to the passenger side and gradually push the cable under the upholstery using the tool.
UPDATING FIRMWARE
The latest camera firmware can be found in the „Downloads“ section of the product website: https://www.lamax-electronics.com/t10
UPDATE PROCEDURE
- Prepare a microSD by formatting it on a PC / Mac.
- Download and open the .zip file containing the “.bin” files. Do not change the files’ names.
- Copy the “.bin” files to the formatted microSD card.
- Insert the microSD card into the switched-off camera. Plug the dashcam into the power supply and making sure the dashcam is powered throughout the update process. The update should begin automatically on start-up.
- Wait for the update to complete. Then format the memory card in the camera itself.
CONNECT WITH US

Find complete instructions and current firmware and speed camera databases at: https://www.lamax-electronics.com/t10

Do not forget to register your product on our website: https://www.lamax-electronics.com/productupdate
We will let you know as soon as we update the firmware or speed camera database!
By registering, you also get access to the latest news and discount promotions!
PARAMETERS
| Front camera video resolution: | 4K (3840×2160) @ 30FPS (interpolated) 2.5K (2560×1440) @ 30FPS (max. resolution when rear camera is connected) FullHD (1920×1080) @ 60FPS FullHD (1920×1080) @ 30FPS |
| Field of view: | 170° |
| Screen size: | 2,45“ IPS |
| Memory: | MicroSDHC/SDXC up to 128 GB |
| Video format: | MOV, H.265/H.264 compression |
| Photo format: | JPG |
| Photo resolution: | Up to 16 Mpx |
| Connectivity: | WiFi, MicroUSB |
| Power supply: | Built-in battery |
| Holder: | Magnetic 3M adhesive pad |
| Menu languages: | English, German, Czech, Slovak, Polish, Hungarian |
| Dimensions: | 47×74×39 mm |
| Features: | GPS with the speed camera alerts (can be switched off), Wi-Fi with app, parking mode, WDR, turn video watermarks on/off (time and date, speed and coordinates), file protection (on impact/button), auto start recording, G-sensor with sensitivity adjustment, loop recording, exposure settings, screensaver, key sounds that can be switched off, photo mode |
REAR CAMERA SPECIFICATIONS (OPTIONAL)
| Rear camera resolution: | FullHD (1920×1080) @ 30FPS |
| Connecting cable length: | 6 meters |
Note, when the rear camera is connected, the maximum resolution of the front camera is 2.5K (2560×1440) @ 30FPS.
Specifications may change due to replacement of any part of the device or software updates.
MANUFACTURER:
elem6 s.r.o., Braškovská 308/158, 161 00 Prague 6
https://www.lamax-electronics.com
Subject to printing errors and changes to the manual.![]()


