![]()
USER MANUAL
JOURNEY
CONGRATULATIONS ON THE PURCHASE OF YOUR NEW LIGHT BICYCLE CARBON FRAMESET!
This user guide includes everything you need to know about building your Journey gravel/adventure bike. Rider stories on the frameset are much welcomed, and we offer a $50 reward for each story. Feel free to contact us ([email protected]) if you have any questions or would like to write a story.
 1. SAFETY INSTRUCTIONS
Improper installation, usage, and service can cause damage to your frameset and components and pose a hazardous condition for the rider. To ensure proper installation and a safe riding experience, please read and follow these instructions. If in doubt, please consult a professional bike mechanic, get in touch with us at [email protected] or leave a comment on any product page of our website.
A. Do not attempt to assemble or maintain the bike without the special tools and knowledge required.
B. Make sure the components you use are compatible with the frameset and suitable for your riding style.
C. Torque cage/rack/seatstay bridge/derailleur plate bolts on the frameset to 5-6Nm.
D. Apply frame wrap to protect against abrasion and rock strikes.
E. Do not overheat your frameset. Be mindful of how close your composite frame gets to the exhaust on your vehicle, especially during transport. The high temperature can damage the composite structure and void your warranty.
F. After a big impact or crash, there may be some unnoticeable cracks, delaminations, or dents. Please inspect the bicycle and all of the parts to make sure there is no damage.
G. Always ride with a safe distance between you and other objects, especially in wet or low light conditions.
H. Do not contaminate the disc rotors or brake pads with lubricant. This can cause poor performance or even make the brakes/bike unusable and unsafe to ride.
I. We suggest applying a thin layer of lubricant onto all the bolts used in bike assembly unless otherwise suggested by the manufacturer of the part.
2. GENERAL INFORMATION
2.1 Bike Diagram
Please use the illustration below to identify the parts referenced in this manual.
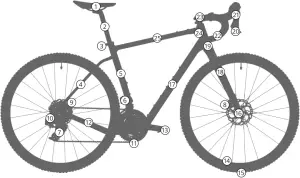
(1) Saddle (15) Tire
(2) Seat Post (16) Hub
(3) Seat Clamp (17) Down Tube
(4) Seat Stays (18) Fork
(5) Seat Tube (19) Head Tube
(6) Front Derailleur (20) Shifter
(7) Rear Derailleur (21) Brake Lever
(8) Front Disc Brake (22) Handlebar
(9) Rear Disc Brake (23) Stem
(10) Cassette (24) Headset
(11) Chainring (25) Top Tube
(12) Chainstays
(13) Crank Arm
(14) Rim
2.2 Geometry Chart
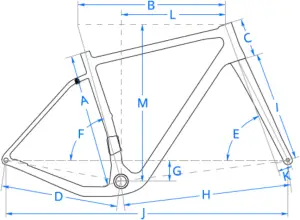
Dimensions = mm/inch
| XS | S | M | L | |
| A: Seat Tube | 450 / 17.7 | 480 / 18.9 | 510 / 20.1 | 540 / 21.3 |
| B: Effective Top Tube | 521 / 20.5 | 542 / 21.3 | 559 / 22.0 | 574 / 22.6 |
| C: Head Tube Length | 110 / 4.3 | 137 / 5.4 | 165 / 6.5 | 195 / 7.7 |
| D: Chainstay Length | 415 / 16.3 | 420 / 16.5 | 425 / 16.7 | 430 / 16.9 |
| E: Head Tube Angle | 70.0° | 70.8° | 70.8° | 70.8° |
| F: Seat Tube Angle | 73.5° | 73.5° | 73.5° | 73.5° |
| G: BB Drop | 77.5 / 3.05 | 75.0 / 3.0 | 75.0 / 3.0 | 72.5 / 2.9 |
| H: Front Center | 594 / 23.4 | 604 / 23.8 | 622 / 24.5 | 639 / 25.2 |
| I: Fork Length | 400 / 15.7 | 400 / 15.7 | 400 / 15.7 | 400 / 15.7 |
| J: Wheelbase | 997 / 39.3 | 1013 / 39.9 | 1036 / 40.8 | 1059 / 41.7 |
| K: Rake | 56 / 2.2 | 51 / 2.0 | 51 / 2.0 | 51 / 2.0 |
| L: Reach | 362 / 14.3 | 375 / 14.8 | 384 / 15.1 | 392 / 15.4 |
| M: Stack | 537 / 21.1 | 563 / 22.2 | 590 / 23.2 | 616 / 24.3 |
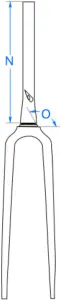
| N: Steerer Tube | 300 / 11.8 | 300 / 11.8 | 300 / 11.8 | 300 / 11.8 |
| O: Integrated Crown Race | 126° | 126° | 126° | 126° |
3. BIKE BUILDING
3.1 Seatpost/Clamp
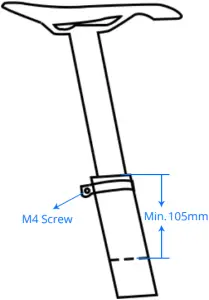
The diameter of the seat post is 31.6mm which requires a 34.9mm clamp.
The carbon seat post we offer is 350mm long. The minimum depth of the seat post that MUST be inserted is 105mm. The minimum insertion point is marked on the shaft. The maximum insert depth of the seat post varies with the frame size.
| Frame Size | XS (450) | S (480) | M (510) | L (540) |
| Maximum Insert (mm) | 212 | 242 | 272 | 302 |
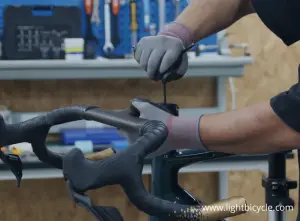
Installation Tip: Apply a thin layer of carbon assembly paste onto the seat post and inside the seat tube to prevent the parts from moving. Apply a small amount of grease to the seat clamp bolt to prevent it from seizing.
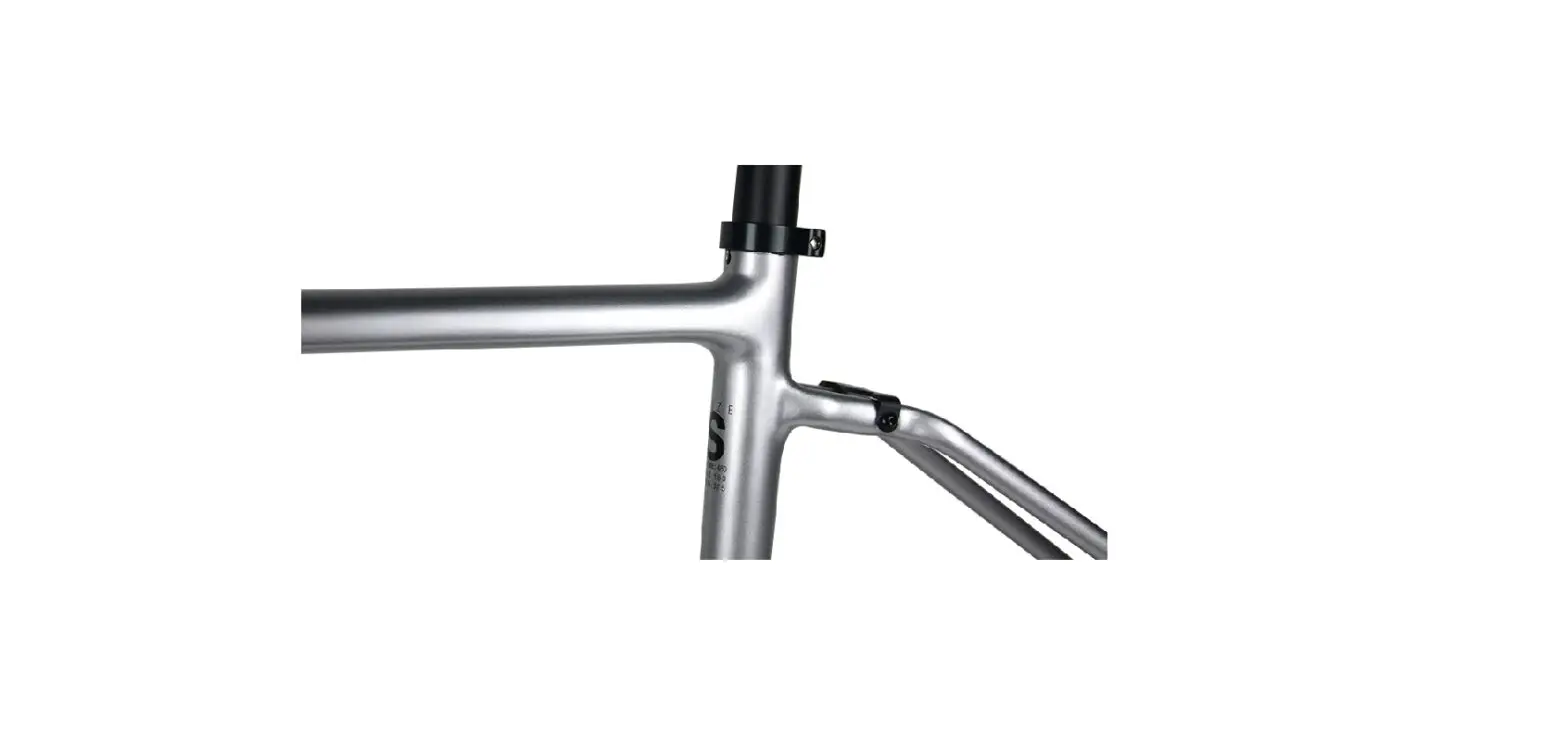
3.2 Headset
Headset Bearings
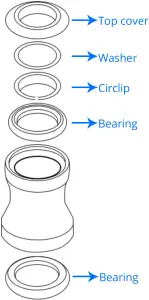
The Journey features a tapered (1 1/8”-1 ½”) and integrated headtube with molded headset cups. The fork steerer (tapered) has an integrated crown race. The bearing assembly we offer includes upper/lower bearings, a circlip, 0.3mm thin washers, and a top dust cover.
Installation Tips: Apply a thin layer of grease onto each of the bearings and the top dust cover. You may need one or two of the 0.3mm thin washer(s) to bring up the top cover so that it does not contact the frame.
Compression Plug
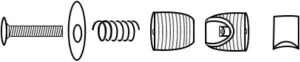
To allow for the front-end cables to be internally routed, the carbon fork features a special D-shape steerer tube. We include a D-shape compression plug and a small anti-compression part (to fit the gap in front of the steerer tube) in the accessories for assembly.
Installation Tips: Apply a thin layer of grease to the threads of the compression bolt. DO NOT apply any lubricant or grease onto the expanding sleeves. Tighten the compression bolt properly to make the sleeves expand so that the expansion plug gets pressed gently into the steerer.
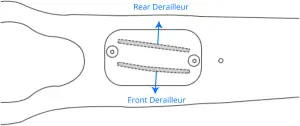
3.3 BB Standard & FD Mounting
Bottom Bracket
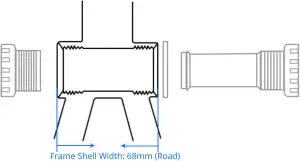
The Journey gravel frame is compatible with the traditional BSA threaded bottom bracket (68mm) for easy maintenance.
Installation Tips: Mount the bottom bracket after you have routed the cables. Apply a thin layer of grease on the frame’s bottom bracket threads and the threads of each cup.
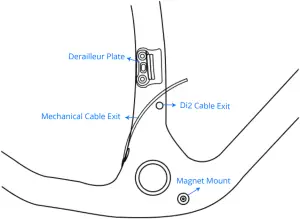
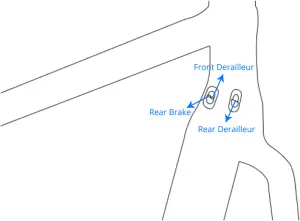
Front Derailleur
The frame is compatible with one-by and two-by drivetrains. The maximum chainring size for a 1x setup is 42T (round), while that for a 2X system is 36/48T.
Installation Tips: For one-by setups, you can replace the provided derailleur plate with a blank plate or a chain guide. To the lower right side of the bottom bracket shell is a mount for a power meter magnet.
3.4 Axle Standard
The Journey uses bolt thru axles front and rear for added stiffness. The front axle is 12 x 100mm, and the rear is 12 x 142mm.
Installation Tips: Apply a thin layer of grease onto the axles so that they will not seize. Torque the axles to 10Nm when installing your wheels.


3.5 Disc Brake

The gravel frameset is constructed with a flat mount disc brake platform. 140mm rotors can be used without adapters. You’ll need 140-160 flat-mount brake adapters when using 160mm rotors. The maximum rotor size is 160mm.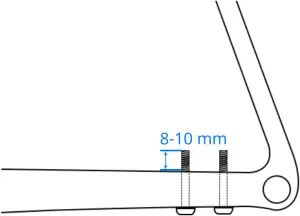
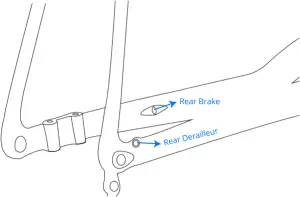
The chainstay thickness on the Journey frame is 30mm. Our bike mechanic prefers to use caliper mounting bolts of 38mm-40mm length, ensuring 8-10mm of thread engagement to secure the rear brake to the frame. Please refer to the brake manufacturer’s recommended bolt thread engagement for their ideal measurement.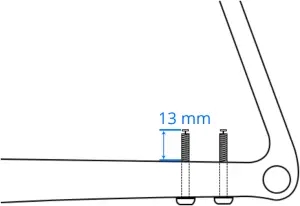
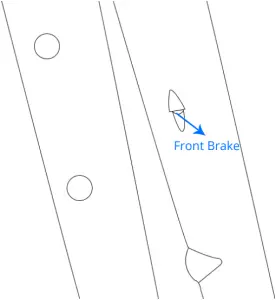
Installation Tips: Insert the rear brake hose/cable into the rear exit port on the chainstay until it exits the upper downtube port. You may need a guide cable to help route the housing through the fork. Insert the front brake cable/housing into the lower hole near the caliper mount.
3.6 Cable Routing
The Journey features an internal cable routing and is compatible with the most common shifting systems.
Mechanical Cable Routing Road Map
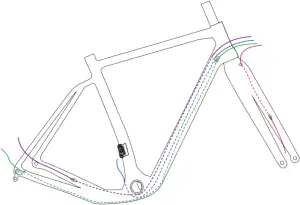
![]() Front Shifter Cable
Front Shifter Cable![]() Front Brake Cable
Front Brake Cable![]() Rear Shifter Cable
Rear Shifter Cable![]() Rear Brake Cable
Rear Brake Cable![]() Cable Inside Frame
Cable Inside Frame
Di2 Cable Routing Road Map (Fully Internal)
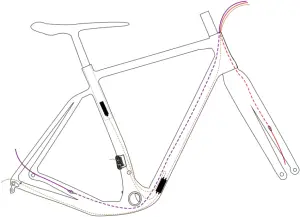
![]() Front Brake Cable
Front Brake Cable![]() Rear Brake Cable
Rear Brake Cable![]() Shifter Cables
Shifter Cables![]() Cable Inside Frame
Cable Inside Frame
4. WARRANTY
Light Bicycle warranties the gravel frames, forks, and seat posts from manufacturer’s defects in materials and workmanship for a period of 3 years from the date of purchase of the product. The warranty is limited to the original owner of the product and is non-transferable. Within the warranty period, if your frameset is damaged in a crash, we offer a 10% crash replacement discount.
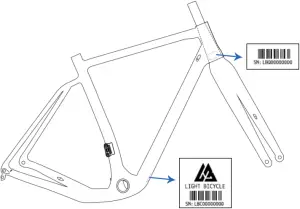
How to make a Warranty claim:
- Put your bike upside down and locate the serial number label of the frame underneath the downtube near the BB cover. The label of the fork is on the steerer tube. Clean it off and take a picture.
- Take detailed pictures or a video of the issue in question.
- Email us ([email protected]) with the serial number of your product, description of the issue, proof of purchase, and the photos/videos.
This page intentinally left blank.

Scan the code to visit our website.
CONTACT US
Global Warehouse
Email: [email protected]
Phone: +86-18030305013, +86-0592-6254228
Skype: light_bicycle
North American Warehouse
Email: [email protected]
Phone: +1 (253) 216-2535


